UNIVERSITY OF CALIFORNIA
SANTA CRUZ
THE EMBEDDED WINDOW TOOLKIT
Porting Java’s AWT to an Embedded System
A thesis submitted in partial satisfaction
of the requirements for the degree of
MASTER OF SCIENCE
in
COMPUTER SCIENCE
By
William Holt
March 1999
The Thesis of William Holt is
approved:
______________________________________
Professor Charles McDowell
______________________________________
Professor Ira Pohl
______________________________________
Professor Glen Langdon
____________________________________
Dean Of Graduate Studies
i
TABLE OF CONTENTS
1 Introduction...........................................................................1
2 Overview of the AWT ...........................................................5
2.1 How the AWT Peers Work ..........................................7
2.2 The AWT Toolkit Class ...............................................8
2.3 Walk through ...............................................................9
3 Overview of Existing Embedded Java Solutions...................12
3.1 Java Card ...................................................................12
3.2 Embedded Java ..........................................................13
3.3 Personal Java..............................................................13
3.4 Solutions from Companies other than Sun ..................14
4 EWT - the Embedded Window Toolkit................................15
4.1 User Interfaces on Embedded Systems........................15
4.2 Requirements for EWT...............................................16
4.3 Three Options for EWT..............................................17
4.3.1 Non AWT Solution...........................................18
4.3.2 AWT Solution without Peers.............................18
4.3.3 AWT Solution using peers?...............................19
4.4 A Button is not a Key.................................................19
4.5 The EWT Peers..........................................................21
4.6 An EWT Port to Win95/NT .......................................22
5 UCSC Embedded Systems Development Platform ...............23
5.1 NS486 Development Board........................................23
5.2 The Java Nanokernel System Software.......................24
5.3 Overview of LCD Hardware.......................................24
5.4 Hardware Modifications.............................................26
6 Measuring the size of the AWT............................................27
6.1 Measurement Experiment...........................................27
6.2 Relative comparison Results.......................................30
7 Conclusions.........................................................................33
8 Appendixes..........................................................................36
8.1 Bill Of Materials.........................................................36
8.2 Schematic...................................................................37
8.3 Mock Application Source Code..................................38
9 References...........................................................................43
ii
TABLE OF FIGURES
Figure 1. AWT Peer Model.............................................................................................8
Figure 2. Toolkit Class Calls Peer Constructor................................................................9
Figure 3. AWT Walkthrough Example..........................................................................10
Figure 4. Proposed Embedded User Interface ...............................................................17
Figure 5. Main Menu of Example Application...............................................................29
Figure 6. Java Byte Code for AWT versus EWT...........................................................33
Figure 7. Size Comparison Including Native Code ........................................................34
1
1 Introduction
The Java language has features that make it preferable to C/C++ for many
application domains. It is therefore desirable to use this language for many types of
applications, including the development of certain small embedded systems. One aspect of
Java that makes it desirable is the inclusion of a portable windowing library called the
Abstract Window Toolkit (AWT). The AWT was designed to facilitate the construction
of graphical user interfaces on various windowing platforms.
Many common embedded systems have a limited amount of memory in
comparison to a desktop computer. Very often the embedded system has a rather low
resolution liquid crystal display (LCD). The complete AWT is not practical for these
systems as it has many more features than required, resulting in an unnecessarily large
memory footprint. The AWT is intended for systems with a pointer, like a mouse, and
multiple, overlapping windows. Many simple embedded systems have no need of these
features. Recently, Sun Microsystems has introduced Personal Java, which includes a
subset of the AWT. Personal Java reduces both the memory footprint and the complexity
of the AWT, but still has many more features then are needed for a simple embedded
system. The main question addressed by this thesis is how small, in terms of both code
and required memory, can a usable subset of the AWT be made?
Java is a superior language because it draws together many concepts previously
found desirable in other, older languages. For example, it uses the simple clean syntax of
the C language for ordinary statements. The syntax of C is widely known, and is famous
2
for being so concise and powerful. The Java syntax for invoking an object’s methods is
also borrowed from C++. One advantage to this similarity is reducing the time required
for learning the Java language for someone familiar with C++.
Java has support for multi-threading contained in the standard library. It also has
the keyword synchronized to tell the compiler that a procedure cannot be started while
another synchronized procedure of the same object is executing. Multithreading is a
very useful feature for building embedded systems. Very often, it is necessary to have
more than one process executing simultaneously, for example, it would be desirable to
scan the keyboard while measuring some sensors and updating the display. Using Java,
each of these tasks can be written as a separate thread and the task switching handled by
the language. Multithreading is available using C/C++ or assembly language, however it is
an attribute of the operating system and the programming interface varies on different
platforms. With Java, since the multithreading is built into the language and standard
libraries, the programming interface is consistent on all platforms.
Another important advantage of Java is it’s automatic memory management. The
“garbage collection” type of memory management was pioneered in the LISP language. It
is a big advantage to the programmer since it removes the potential errors associated with
having to de-allocate memory. There are two forms of this problem, the memory leak and
the dangling pointer. In a memory leak, the programmer allocates memory, however the
programmer never deallocates memory. This can cause the memory requirements of a
program to grow until it exceeds the capacity of the system at which point the program
will fail. The dangling pointer is the opposite problem. Memory is deallocated before all
3
references to that memory are removed. This memory may be reallocated for a second
use, which makes the data referred to by the first pointer invalid.
In the context of an embedded system, garbage collection is somewhat of a
limitation since many garbage collection schemes require the system to shut down
temporarily while the garbage collector runs. This means that real-time systems could not
be built using Java. However, this is not a limitation of the language but its
implementation. New garbage collection schemes using hardware assisted techniques
appear to make real-time Java systems possible [NIL94]. The choice of using a garbage
collection system is a trade off between the need to have an embedded system that can
have reliable software easily created for it versus writing the entire system in assembly
language or C. Using a low-level language like assembly would create a smaller, faster
application but at a greater cost in terms of development effort. For many complex
applications the advantages of automatic memory allocation outweigh the disadvantages.
Java also has built-in exception handling. While exceptions have been added to
C++, their use is optional. Unfortunately, this means that many programmers will not use
them. In Java, the use of exceptions is mandatory. A programmer cannot use a function
that might throw an exception unless they provide a mechanism for handling that
exception or explicitly declare the exception will be passed up the call chain. In an
embedded system, this is a useful requirement, since it is widely believed this technique
increases the reliability of the software. Unhandled exceptions will generally cause an
embedded system to crash.
4
The networking capability of Java is a useful feature when building an embedded
system that is connected to a network. While this is technically not a feature of the
language, rather a feature of its libraries, it is important that the networking interfaces are
well developed and defined. While networking interfaces are clearly defined for many
operating systems, including them in Java makes the interface platform independent, which
is a definite advantage to the programmer who needs only learn the interface once.
The Java virtual machine uses run-time linking, something that is also a feature of
LISP. This feature allows an application to execute code that was not available at the time
the application started execution. This has many applications in an embedded system.
One example is the UCSC JavaCam servlet [MCD98]. This system uses run time linking
to allow code to be loaded into an embedded system across a network. The code that is
loaded over the network into the embedded system is known as a servlet. The JavaCam
servlet is required to use a predefined interface to communicate locally with the embedded
system in order to control the camera settings and capture images. It is free however, to
communicate back over the network with the client system that supplied the servlet in any
format that the client wishes. This run time linking is an advantage over C/C++, since
C/C++ is linked prior to execution either at compile time or at the time the application is
loaded into memory.
One of the most important features of Java is its portability. Since Java runs on a
virtual machine, the binary code is identical across various platforms. It might seem that
portability would be useless in an embedded system since the software for an embedded
system is typically run from a read only memory. There are, however, a couple of
5
advantages to having the object code portable. The main advantage is involved in
providing updates to the operating software. Many embedded systems use some type of
“flash” memory for storing the program code. While many embedded systems do not
provide any means of updating this code (e.g. microwave ovens, telephones) many other
more complex ones do have the ability to update. If Java is used, it is possible that the
same update package could work on embedded systems using different hardware. This
could be an advantage when the hardware platform is changed during the product lifetime.
Only one version of the Java object files would need to be maintained and distributed for
all hardware platforms.
A second advantage of Java’s portability is during the development process of the
embedded system. The identical object files that are to be used in the embedded system
may be run in a simulation environment on any platform that supports the Java virtual
machine. This yields two advantages. During the design process, rapid prototypes of the
product can be developed and shared across a network without distributing any source
code. This allows an untrusted user to interact with the design using their favorite
computer platform. The second advantage is that as the product is being coded, the object
files that will be used in the final hardware can be tested without requiring the tester to
have any actual system hardware.
2 Overview of the AWT
In order to write a useful application, it is necessary to have a user interface. Java
includes a basic toolkit called the AWT for building platform independent graphical user
6
interfaces (GUI’s). The goal of the AWT design was to provide a set of classes that
represent the most commonly used window objects and provide versions of them for all
common windowing environments. Sun Microsystems’ version of the AWT currently
supports Windows, Macintosh, and X-Windows. The AWT supports a pointing device,
overlapping windows, variable width fonts, and multiple depth color graphics.
There are many ways to implement a platform independent windowing library.
The technique that the AWT designers used was to make a set of wrapper classes that
interface to the native windowing system of the computer system. This means the native
window manager “look and feel” is retained, since the AWT window objects are actually
native window objects.
There are multiple layers in the AWT classes. First there is a group of window
objects that are identical across all the platforms. These classes are all derived from the
Component class and represent objects and/or controls that can be displayed. These
component objects have a one to one mapping to wrapper classes. The wrapper classes
are called peers and are different for each platform. Finally, a toolkit class, also unique for
each platform, has the job of connecting the platform independent component classes to
the platform dependent peer classes. The next section describes the working of the AWT
peer system in greater detail.
While the toolkit and the peer classes must be implemented differently on the
various hardware platforms (much in the same way that the virtual machine is different),
this is transparent to the Java programmer. The Java programmer requests a window with
7
a button on it, and this is produced by the system independent of what computer platform
is being used.
The AWT was defined as a lowest common denominator of the many popular
window systems. Only window objects that existed on all platforms were included.
Therefore, it contains a subset of the features available on the different platforms.
However, compared to the very simple requirements of many embedded systems, it is still
too complex.
2.1 How the AWT Peers Work
Java’s AWT uses a system of peers. A peer is a wrapper for a native windowing
system object. A peer acts as a stand-in for a native window object. For example, when
you create a Button, you also create a ButtonPeer. The ButtonPeer calls the native
window system and requests that a button be displayed on the screen.
A one to one correspondence exists between the peers and the native window
objects. For every AWT component, a peer is automatically created. It is interesting to
note that the peer is not created at the same time as the AWT component, but rather when
the addNotify method of the AWT component is called. The addNotify method can be
called explicitly, but more often it is called implicitly when the AWT object is displayed.

8
Figure 1. AWT Peer Model
The programmer using the AWT never actually needs to know about peers. They
work using the AWT components. When the program begins to run, the AWT
components used by the programmer are constructed. This, in turn, causes the platform
specific peers to be constructed. Most of the components’ procedures simply call the peer
object, and the peer object in turn calls the native window system. While this layering no
doubt pays a price in efficiency, it provides a benefit in making the AWT easier to port to
new platforms.
2.2 The AWT Toolkit Class
The platform dependant code in the AWT is isolated effectively from the AWT
classes that make up the programmer API. The platform dependant code consists of two
Peer
Object
Native
Window
Object
Peer
Object
Native
Window
Object
Peer
Object
Native
Window
Object
Java
Application
Native Window
System
Event
Queue
PLATFORM DEPENDANT CODEPLATFORM INDEPENDANT CODE
AWT
Component
AWT
Component
AWT
Component

9
areas, the Toolkit class and the peer classes. The toolkit class is an abstract class that is
extended by each different implementation of the AWT. In my project, this class was also
made runnable and contains the event handler as a separate thread. In the Win95/NT
version of the toolkit, two additional classes, EventQueue and EventDispatch are used.
The bulk of the Toolkit class contains methods of the following form:
protected ButtonPeer createButton(Button target)
{
return new EwtButtonPeer( target );
}
Figure 2. Toolkit Class Calls Peer Constructor
This code is called by the constructor of Button. Its job is to make a native
implementation of the desired component, a Button in this instance. Note that the actual
AWT button is passed in as a parameter, and the toolkit specific peer is returned. This
allows double linking of the objects - the Button keeps a reference to the native peer, and
the native peer keeps a reference to the AWT button component it “works” for.
2.3 Walk through
One way to explain how the AWT works is to walk through a very simple
application and examine what objects are created and what methods are called. The test
program is shown below in Figure 3. The sample program makes a frame and places a
button in it. The walk through analysis of this program will be limited to the most
important AWT method calls. A complete trace of the method entry and exits, using the
trace method option of the JVM (-tm) resulted in a file containing over forty thousand

10
lines of method calls and returns. The approach used here has the goal of explaining the
relationship between the platform independent AWT classes and the platform dependent
peer classes.
import java.awt.*;
public class trivial
{
static Frame f;
static Button b;
public static void main( String argv[] )
{
b = new Button( "Button" );
b.setBounds( 5, 25, 100, 35 );
f = new Frame();
f.setLayout( null );
f.add( b );
f.setSize( 110, 65);
f.show();
}
}
Figure 3. AWT Walkthrough Example
The following list explains some of the methods that are called during the
execution of the above code.
1. Constructor for Button: The first line in the main method calls the constructor for
button. This in turn calls the constructor for Component, since Button is extended
from Component.
2. b.setBounds(): The call to set the bounds of the Button is handled in the part of
the Button object inherited from Component.
11
3. Constructor for Frame: Making a new Frame calls the constructors for Frame,
Window, Container, and Component in that order.
4. f.setLayout(): Setting the layout manager to null is handled in the Container
part of the Frame.
5. f.add(): The call to add the button to the frame is handled in the Container part
of the Frame.
6. f.setSize(): The setSize call is handled in the Component part of the Frame.
Note that up to this point no platform dependent code has been invoked. All the
methods are part of the AWT code that is common to all platforms. Now, when the
program requests that the frame be displayed, by calling it’s show() method, the platform
dependent code begins.
7. f.show(): The show call is handled in the Window part of the Frame. This method
checks to see if the parent’s peer is null – if it is null, which is true in this example,
the addNotify method of the parent, Frame.addNotify() is called.
8. Frame.addNotify(): This method makes a peer. The name of the toolkit class is
obtained from the System.Properties, and that platform dependent toolkit’s
createFrame() method is called with this passed as a parameter.
9. WToolkit.createFrame(): The createFrame method returns a new platform
dependent frame peer. Toolkit has a static initializer as well as a constructor. The
static initializer loads the WINAWT.DLL library. In the constructor, three additional
12
threads are started. These threads are called AWT_Windows, AWT_EventQueue, and
ScreenUpdater.
10. Constructor for WFramePeer: The WFramePeer extends WWindowPeer, which
extends WPanelPeer, which extends WCanvasPeer, which extends
WComponentPeer. For this reason, the constructors of all these objects are called
in sequence. Inside these methods, calls to the native windowing code allow the
peer objects to communicate with the native window objects.
3 Overview of Existing Embedded Java Solutions
Sun Microsystems has several flavors of Java intended for systems smaller than a
personal computer. However, it appears that none of these match the characteristics of
the EWT. Either the systems have no support for the AWT or they support much more of
it than the EWT does. A brief discussion of each of these platforms appears below.
3.1 Java Card
The smallest Java systems are built to the JavaCard specification. These systems
are intended for “SmartCard” technology. SmartCards are typically single chip devices,
intended to be placed on a plastic card the size of a credit card. The typical target
applications are storing and retrieving information, although some applications have been
written that will execute on the smart card, notably cryptographic applications.
The Java Card API contains four packages that are specifically tailored to the
requirements of a smart card. Minimum hardware requirements are specified at 16
Kbytes ROM and 512 bytes of RAM.
13
The Java Card specification does not include any of the AWT classes. Many of the
core Java classes and packages are also omitted. For example, the specification does not
allow garbage collection, dynamic class loading, threads, or floating-point numbers.
3.2 Embedded Java
The next step up from the JavaCard specification is the Embedded Java application
environment. Embedded Java targets industrial controllers, automotive, printers, and low-
end telephones.
Minimum hardware requirements are specified at 512K ROM and 512K RAM.
This size seems to most closely fit with the NS486 development board. The development
board is sold with 1 Mbyte DRAM and 256 Kbytes of flash EPROM. Note that the
UCSC project increased the size of the ROM to 1 Mbyte and also typically stores the Java
bytecode on a PCMCIA card, at least for development work.
The Embedded Java specification does not require any of the AWT classes. It
does allow for subsets of the AWT to be included. This is essentially what the EWT is, a
version of the Embedded Java specification. At the time that work on EWT was begun,
the Embedded Java specification was not released.
3.3 Personal Java
One step below the complete Java system, Personal Java is designed for set-top
boxes, real-time operating systems, telephones with graphic displays, Internet television
systems, and car navigation systems.
The minimum hardware requirements are specified at 2 Mbytes of ROM, and 1
Mbyte of RAM.
14
The Personal Java specification includes a subset of the AWT classes, known as
the Personal AWT. The Personal AWT is a subset of the AWT, much like the EWT. The
Personal AWT modifies the Component, Dialog, Frame, PopupMenu, and Window classes.
In addition, the following classes are made optional: CheckboxMenuItem,
FileDialog, Menu, MenuBar, MenuShortcut, MenuShortcut, and Scrollbar.
Even with these modifications, the Personal AWT is still more complicated then
would be required for many embedded system user interfaces.
3.4 Solutions from Companies other than Sun
One alternative to the AWT is being offered by NewMonics. It is called Minimal
Window Toolkit or MWT[NEW96]. While MWT claims to be minimal, the EWT is much
smaller, although also much less functional. In addition, MWT is dependent on the use of
the Metagraphics graphics libraries. On NewMonics web site the size of the MWT
including the native libraries is given as 458 Kbytes. They also compare their software to
the AWT on Win95/NT platform. In order to do this they estimate the native method
footprint by adding the sizes of awt.dll, user32.dll, gdi32.dll, and the corresponding
VGA driver dll file. The size of the native methods is placed at 690 Kbytes.
I tried to examine the sizes of these files on my system and found the awt.dll file
in the jdk1.0.2/bin directory. The size of this file was 152 Kbytes. In the jdk1.1.6
directory I could not find an awt.dll file. Probably, this file has been replaced by a file
named msawt.dll. In the later version of the AWT, the file size has predictably
increased to 224 Kbytes.
15
4 EWT - the Embedded Window Toolkit
The EWT, or embedded window toolkit, is a set of Java classes and native code
that implements a subset of the AWT. It is written to run on the NS486 development
system using a low-resolution black and white LCD display. Programs written for the
EWT will also run on any Java platform that supports the AWT with a minor modification
to the program. The required modification concerns the selection of font type. In EWT
there are only two statically defined fixed size fonts. AWT has a complex lookup method
to attempt to match fonts on various platforms. The EWT is designed as a research tool
to test how much memory is required to have a toolkit which acts, at least for a couple of
classes, exactly like the AWT.
The design of the EWT was motivated by the desire to add a hardware user
interface to an application running on the UCSC Java Nanokernel [MON97]. While the
NS486 contains special hardware to support an LCD panel, there is no software support
for graphics or text.
4.1 User Interfaces on Embedded Systems
Embedded systems come in all sizes and levels of complexity. Microprocessors
today are embedded in everything from a wristwatch to a jetliner. One common thread
between embedded systems is the need to communicate to a human. A popular way an
embedded system communicates with a user is through a visual interface. A wide set of
visual user interfaces for embedded systems make use of an LCD. The LCD is common
because they are relatively inexpensive, require little power, and can be small in physical
size. In complex embedded systems, the resolution of the display approaches that of a
16
typical computer system display. In the majority of embedded systems the display
resolution is much less.
While Java would be an excellent solution for programming in many of these
smaller embedded systems, it is clear that fully implementing the AWT wouldn’t be at all
practical or useful. However, implementing a subset of the AWT would allow portability
of the object code, a useful advantage already discussed above.
The question then arises: just how small can a useful subset of the AWT be made,
and what differences are there between an AWT designed for small embedded systems
versus the complete AWT supplied for a personal computer?
4.2 Requirements for EWT
The design of EWT was based on building a user interface for a greenhouse
environmental controller. This was envisioned as a device that would allow control of
some equipment such as heaters, fans, and misters while monitoring, temperature,
humidity, and light levels.
While network connection and control of this device would be a big advantage, it
was desired to be able to operate the device without a network connection. Therefore, a
user interface was required that was local to the embedded system. The example
mechanical interface imagined and then coded in a simulation as a test for this project
consisted of eight devices. There are four keys under the display, and a rotary scroll knob
with two keys below it. The two keys are labeled “ENTER” and “EXIT”. The four keys
below the display are used to navigate through a series of menus using labels that change
above the keys. The rotary scroll knob is used to change a numeric value, or select from a

17
list. From the standpoint of a user concerned with entering numeric values (as in
temperature set points in an environmental control) this is a practical and simple to use
interface.
Figure 4. Proposed Embedded User Interface
The current implementation of EWT supports only one Frame at a time. There is
no support for overlapping windows. Given the resolution of the LCD, and the desire for
minimum complexity, this seems like a reasonable choice. Probably the most basic AWT
component is “Label”, which simply displays text at a given location. In order to respond
to user input, a “Button” was also implemented. With these two simple components a
small application can be constructed. The choice of implementing these two components
was made because the goal was to implement a subset of AWT as small as possible that
still would allow creation of a useful application.
4.3 Three Options for EWT
There are several ways to implement a user interface on the NS486 as a Java
library. One choice was to ignore the AWT and design a specialized library optimized for
320x240
LCD
ENTER
EXIT
F1 F3 F4F2
18
the LCD. Another choice is to follow the model of the AWT, but ignore the peer system.
The alternative that was chosen was to treat EWT as a partial port of the AWT peers to
the NS486 platform.
4.3.1 Non-AWT Solution
The choice to ignore the AWT would have created a set of Java objects that were
optimized for the LCD requirements and available keys. In an embedded system like a
copier or greenhouse environmental control system, the menu and user input design can be
very specialized. The components of the AWT are intended for a full “QWERTY”
keyboard, mouse, and multi-window high-resolution display. Design of the interface from
the ground up would result in a more natural choice of software objects to represent the
interface objects. A disadvantage of this approach is that the interface objects must be
created from scratch. Also, the application code will not run on other Java platforms
without additional work porting the custom interface objects.
4.3.2 AWT Solution without Peers
If the peer model was not used, the basic components of AWT would have been
directly implemented as platform dependent objects. The goal of platform independence
could still be realized, since the Java application code has no knowledge of the peer
objects, therefore the same code that works on a Windows platform could work on the
EWT.
Following the AWT system without using the peer model has the disadvantage that
there is no way to guarantee compatibility without extensive testing. Additionally, using
19
the AWT peer system means the existing AWT non-peer code, which is publicly
distributed by Sun, could be used without modification.
4.3.3 AWT Solution using peers?
The source code of the AWT components is publicly distributed and is identical
across different platforms. Using the peer concept, it was possible to reuse the existing
Java AWT component code, unmodified. The extra layer of the peer classes enforces
platform independence, which makes using the peers desirable even at the cost of a larger
memory footprint. The peer classes enforce platform independence because the
components that an application interacts with represent identical code on all platforms.
There is, unfortunately, no guarantee that the peer classes provide the same underlying
behavior on all platforms.
Designing the EWT to be a subset of AWT has additional advantages. The
application code can run on the embedded system or directly on a PC that supports Java.
It can be run on any Embedded Java that supports the AWT. If the EWT had been
written to reflect the input controls available on the embedded system, then the EWT code
would also need to be available on the PC system.
4.4 A Button is not a Key
An interesting problem arose when implementing the example application using the
EWT. The user interface contains four buttons that act as labels for four actual
mechanical keys located under the display. This is intended to function as a menu system.
The labels of the keys change depending on the location in the menu structure.
20
The EWT is designed to work from keypad input. There is no support for a
pointing device such as a mouse. This leads to some problems in compatibility with the
AWT. Most of the AWT components are designed to be operated with a mouse. The
easy way to operate a button using the AWT is simply to click on it with a mouse. The
only other way to operate the button is to change the focus to the button, possibly by
using the tab key, and then press the enter key. There is no way to map a single keystroke
to a button press without adding additional code in the application. The newest beta
release of the AWT, in version 1.2, supports menu shortcut keys. Unfortunately, the
shortcut keys apply to pull down menus and not buttons.
The example application implements this type of button in a very roundabout way.
In fact, we experimented with two different approaches to this problem. The numeric keys
1 through 4 are used to simulate four keys that would be placed under the LCD in both
solutions.
The initial approach was to have a key press generate a mouse event at a specific
location on the window. Each of the number keys would be assigned a specific location,
at which to trigger the mouse event. The thought was that the active button at that
particular location of the display would then be triggered. Unfortunately, these mouse
events do not trickle down from the container to the contained component. In other
words, a MouseEvent on a component gets passed up to the container (in our case, a
Frame) that holds the button, but a MouseEvent on a container does not get passed down
to the components held in the container. In order to make this work we were forced to
add a lot of code to the keyboard event handler. When the system saw a number key
21
between 1 and 4 pressed, it would search all visible components in order to determine
which button occupied the location that was associated with the keyboard event. The
search was made by calling the contains() method of each visible component in the
container to see if the coordinate associated with the number key was inside the
component. This technique works because the only components found at the button
locations are buttons. If other components might occupy these locations, a further test for
the type Button would be required. Finally, an ActionEvent corresponding to the button
object that we have singled out is created and then dispatched to the event queue.
A second solution was to keep a table that associates the four keys with the
different buttons. When a menu is removed and another one made active, this table must
be updated to reflect the new buttons that are now associated with the keys. The
advantage is that when a key is pressed, the ActionEvent for the correct button is
immediately available from the table, with no search or validation required.
A solution similar to one of the above is necessary in order to be compatible with
the existing AWT. If we did not attempt to implement the AWT Button, we would be
free to come up with our own, very specialized structure that would describe the user
interface more directly. For example, the four button menus might motivate a hierarchical
menu structure, similar to the AWT Menu structure, except the number of MenuItems
would be fixed, and the means of activation would be simple KeyEvents.
4.5 The EWT Peers
The current implementation of the EWT provides the following peer classes:
EwtButtonPeer
22
EwtComponentPeer
EwtContainerPeer
EwtFramePeer
EwtLabelPeer
EwtWindowPeer
An interesting difference between a typical implementation of the AWT and the
EWT is that in the case of the EWT, there is no underlying window system. Instead of
simply passing calls down to the native window system, as is the case in a typical AWT
port, the peers of the EWT actually do the work of drawing text and lines necessary to
build the simple components supported by the EWT.
The lack of native window code may be less efficient, since the native window
code is usually written at a low level and fine tuned for efficiency, but it demonstrates that
most of the platform dependent code required for porting the AWT may be written in
Java.
4.6 An EWT Port to Win95/NT
In addition to implementing the EWT on the target system, simulation code was
developed for Win95/NT. This allowed testing the EWT code without having to program
it into the NS486 board, a time consuming process. The simulation consisted of replacing
the native method calls to the Java Nanokernel with calls to a Windows DLL that
simulated the behavior of the native methods. A useful by product of this, was that the size
of Java code that made up the EWT could be directly compared to the standard AWT
provided for Win95/NT. The required native methods are described in detail in section
6.1 below.
23
5 UCSC Embedded Systems Development Platform
The EWT was developed as a component of the Embedded Systems Lab
development platform. The development platform consists of hardware and software.
The hardware includes a National Semiconductor development board, a host PC with a
serial port connection, and an LCD and LCD adapter board. The software consists of the
Java Nanokernel, a Java compiler, a C compiler, linker and debugger, and various custom
built utilities.
5.1 NS486 Development Board
The National NS486 development board is a complete self-contained embedded
system with many attributes. It has a 25 MHz NS486 CPU chip. The required clocks and
reset circuitry for the CPU are included. There is a 256 Kbyte flash memory, which was
upgraded by UCSC to 1 Mbyte. The system boot code is contained in this chip. A
DRAM socket is included for main system memory, in which UCSC has installed a 4
Mbyte DRAM module. A PCMCIA socket is also provided on the development board.
UCSC has installed a battery backed memory card in this location, and a simple file system
is included in the Java Nanokernel that allows classes to be loaded from the memory on
this card.
Further attributes of the NS486 evaluation board are two serial ports, a bi-
directional parallel port, and a real time clock.
Finally, there is a PC/104 expansion interface. This interface is extremely popular
in the embedded systems market. It is functionally identical to the ISA buss, the buss at
the heart of the original IBM PC. The only difference is the connector type. Instead of
using the gold finger card edge connector, PC/104 uses the more reliable (and smaller)
24
0.025-inch square pin and socket system. UCSC has installed a commercially available
Ethernet card in the PC/104 socket on the evaluation board.
5.2 The Java Nanokernel System Software
The software environment that the EWT was implemented on was developed by
several UCSC graduate students. The Java Nanokernel is a very small “soft” real-time
operating system, specifically designed to support the Java virtual machine. The source
code for JN consists of only about 2000 lines of C code. There is much more that is
included in the Nanokernel system. This includes a TCP/IP stack modified from the
publicly available KA9Q. A simple file system is also included. The file system is a single
directory system, although since the forward slash character is allowed in the file name, it
is able to mimic the directory structures required for the Java package structure. Further
parts of the system are a fairly complete suite of tests that are executed from a simple
menu system using a VT100 terminal. Finally, the system has a command line interpreter
which is used to start execution of a Java class file and a modified Java virtual machine.
5.3 Overview of LCD Hardware
Liquid Crystal Displays work by applying an alternating voltage across a special
fluid. When the fluid is placed in this electric field, the liquid acts as a light polarizer. By
placing a polarizing filter between the viewer and the liquid, the amount of light
transmitted to the viewer can be controlled by controlling the applied voltage.
There are two basic types of LCD’s which are typically used in embedded systems.
These are known as character and graphic LCD’s. The character LCD’s are generally
custom made for the application and have individual segments which are fabricated in the
25
shape of a number segment or a special symbol, such as a low battery symbol. Graphic
LCD’s are simply arrays of rectangular pixels in which software is used to generate
characters and symbols.
Graphic LCD’s also come in two different classes. Some use a specialized
controller that has it’s own memory. When a pixel is written once to the controller, the
controller stores it in its memory and the pixel remains on the display until it is
overwritten. In this type of display, the controller continually refreshes the LCD from its
local memory. The other type of LCD system does not require separate memory. This
system is analogous to a raster scan video monitor. In this system, data for the entire
display must be continuously written to the LCD, at a rate rapid enough so the display
doesn’t flicker. While this system creates much more overhead on the processor, it is
superior when rapid changes to the displayed image are needed, since the image is
generally contained in high-speed system memory. The NS486 contains a special LCD
controller designed to generate this type of scan line data output from system memory.
The NS486 uses the on chip DMA controller to transfer data from a frame buffer
allocated in DRAM to the LCD controller. The frame buffer is an array of bytes statically
allocated in the operating system code. The array is organized as follows: first there is a
section of 32 bytes called a Gray-scale Look Up Table (GLUT). The GLUT provides
factors that map the 4 gray scale levels to different modulation values. The GLUT values
remained unchanged from the National demonstration code. The next 19200 bytes
contains the pixel data. The pixel data is two bits per pixel and as usual, is organized as a
scan line. The dimensions of the display determine the size of the array. The display is
26
320 by 240 and there are 4 pixels per byte. The built in LCD controller includes a timing
generator and a FIFO which synchronizes with the DMA controller which sends the
contents of the frame buffer in a burst that is repeated approximately 70 times a second.
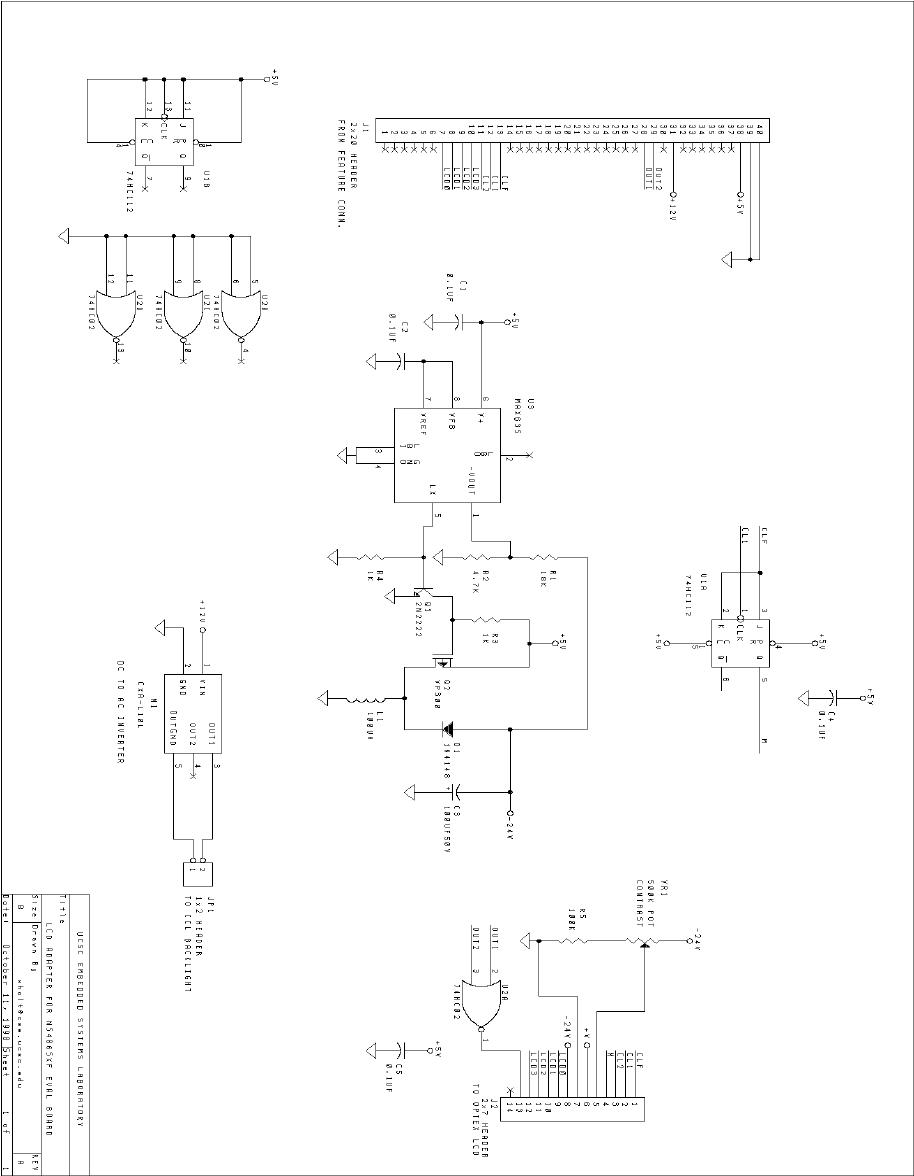
5.4 Hardware Modifications
In order to connect the LCD to the NS486 development board a special interface
circuit board was required. The NS486 provides 4 LCD data lines and 3 LCD clocks.
The clocks include a frame signal, used to signal the start of a frame, a data latch, and a
data shift clock. The data lines output four different scan lines simultaneously.
Unfortunately, there are other required signals that are not supplied directly by the
NS486 chip. There is a display off signal which is generated using a NOR gate. Also an
interlacing signal is required – this signal may be generated by using a flip-flop to divide
the frame clock by two.
Additional power supplies are also required. The LCD has a florescent backlight.
This backlight requires a high AC voltage, approximately 170VAC. A DC to AC inverter
supplies this voltage. The LCD also requires a –25VDC bias voltage. This voltage is
generated by a small switching power supply, fabricated on the circuit board. Finally, a
potentiometer is required to adjust the contrast voltage.
The required circuitry was built on a small wire wrap prototype board and
mounted in a case along with the display. A bill of materials and a schematic of the circuit
board is found in the appendix. The design of the circuit was based on a paper by Michael
Draeger[DRA97].
27
6 Measuring the size of the AWT
Measuring the size of the AWT is not difficult, the problem comes when
comparing this size to the EWT. The AWT uses the native window system to do much of
the work. In contrast to this, the EWT runs on a platform that has no native window
system. The EWT has a very minimal amount of native methods, less than 100 lines of C
source code. This interface, as discussed below in section 6.1, includes only five methods.
In contrast, the size of the Windows graphics library is enormous. An estimate of the size
of the Windows native code can be made by adding the size of some of the required
Windows DLL files, however, this is only a very rough estimate. It is likely that the actual
memory footprint is much larger than the estimate created by examining the DLL sizes,
since this does not include any of the fonts, which are held in many separate files.
6.1 Measurement Experiment
A very small port of the AWT was made for the NS486 system. A 320 by 240
pixel display was connected as described in the documentation for the development board.
The Java Nanokernel was modified to provide some basic support for the LCD. This
required addition of the following functions:
USHORT LCD_Start( void ) – The LCD_Start function initializes the LCD
controller hardware and the DMA hardware. A DMA request is generated by the LCD
controller approximately every 14 milliseconds. This request causes data to be transferred
from the frame buffer in system memory to the LCD controller. A FIFO in the controller
allows data to leave the controller at a constant rate, even though the DMA transfer may
be somewhat sporadic.
28
USHORT LCD_Stop( void ) – The LCD_Stop function disables the DMA transfer
and shuts down the LCD controller..
void LCD_drawImage( LCD_IMAGE im, int x, int y ) – The
LCD_drawImage function takes an image structure and an x and y coordinate. Then it
copies the image data to the frame buffer located in main memory. The copy places the
top left corner of the image at the x and y location of the frame buffer. The
LCD_drawImage clips any portions of the image that extend beyond the coordinates of the
frame buffer.
void LCD_drawLine( int x1, int y1, int x2, int y2 ) – The
LCD_drawLine function draws a line between any two points in the frame buffer. If the
line extends beyond the coordinates of the frame buffer it is clipped.
char GetChar( void ) – This function is used to read a key press from the serial
port of the NS486. It is blocking, i.e. it does not return until a key press is received. This
function is not technically part of the EWT, but was required because the capability of
reading a single character from stdin in the JavaNanokernel system relies on changing the
mode of the input stream from cooked to raw. For portability reasons to the WinNT
platform, a function existing in the JavaNanokernel, uart_rcv_c() was used. This
fuction is equivalent to the WinNT getch() which retrieves a single character from the
keyboard.
Note that the LCD_IMAGE data type is an array of char containing a raster format
image along with two ints that give the x and y dimensions. The LCD_drawImage

29
function simply copies this array to the appropriate part of the frame buffer, overwriting
whatever is present in the buffer at that location.
The functions discussed above were implemented in C, as is the Java Nanokernel
system. Java wrapper functions called drawLine, drawImage, and makeWindow were
written to make these functions accesible from Java. The makeWindow function simply
uses the LCD_Start function. In addition, two fonts were created. These fonts were
implemented as static arrays of images. A drawString method was written that would
sequentially call drawImage to display a string.
A simple ButtonPeer was implemented that used the drawString and drawLine
to draw a button on the display. Finally a mock application was written. The application
is a mock up of what might be required to implement a greenhouse environmental
controller. There is a menu of four buttons across the bottom of the LCD, and they allow
the display of three different measurement parameters, as well as the selection of a
different set of menu buttons.
Figure 5. Main Menu of Example Application

30
6.2 Relative comparison Results
The size of the Java classes which were required to execute the above was
measured using the “–v” switch on the Java virtual machine. When the virtual machine is
started with this switch, it sends to standard error the name of each class as it is loaded.
Two lists were made, one using the EWT version on WinNT and a second one using the
normal AWT on WinNT. Both of these lists were made with version 1.1.6 of the virtual
machine and class files. The lists were then filtered to remove any classes that were not
either part of the java/awt package, part of the sun/awt package, or part of the
ucsc/ewt package. By removing the classes not associated with the AWT or EWT,
differences between the size of the toolkits should be more dramatic. The lists were the
sorted alphabetically, and arranged in a spreadsheet such that identical classes were placed
on the same row. The size of each class was then entered and totals obtained for both.
AWT EWT
.\ghewt.class 5064 .\ghewt.class 5064
Java/awt/AWTError.class 315 Java/awt/AWTError.class 315
java/awt/AWTEvent.class 4614 Java/awt/AWTEvent.class 4614
java/awt/AWTEventMulticaster.class 7286 Java/awt/AWTEventMulticaster.class 7286
java/awt/BorderLayout.class 5166 Java/awt/BorderLayout.class 5166
java/awt/Button.class 3409 Java/awt/Button.class 3409
java/awt/Color.class 4924
java/awt/Component$NativeInLightFixer.clas
s
2593 Java/awt/Component$NativeInLightFixer.clas
s
2593
java/awt/Component.class 25832 Java/awt/Component.class 25832
java/awt/Container.class 14389 Java/awt/Container.class 14389
java/awt/Cursor.class 1459 Java/awt/Cursor.class 1459
java/awt/event/ActionListener.class 286 Java/awt/event/ActionListener.class 286
java/awt/event/AdjustmentListener.class 305 Java/awt/event/AdjustmentListener.class 305
java/awt/event/ComponentEvent.class 1555 Java/awt/event/ComponentEvent.class 1555
java/awt/event/ComponentListener.class 372 Java/awt/event/ComponentListener.class 372
java/awt/event/ContainerEvent.class 1386 Java/awt/event/ContainerEvent.class 1386

31
java/awt/event/ContainerListener.class 321 Java/awt/event/ContainerListener.class 321
java/awt/event/FocusListener.class 299 Java/awt/event/FocusListener.class 299
java/awt/event/InputEvent.class 1213 Java/awt/event/InputEvent.class 1213
java/awt/event/ItemListener.class 281 Java/awt/event/ItemListener.class 281
Java/awt/event/KeyEvent.class 9332
java/awt/event/KeyListener.class 313 Java/awt/event/KeyListener.class 313
java/awt/event/MouseEvent.class 2071
java/awt/event/MouseListener.class 372 Java/awt/event/MouseListener.class 372
java/awt/event/MouseMotionListener.class 313 Java/awt/event/MouseMotionListener.class 313
java/awt/event/PaintEvent.class 1284
java/awt/event/TextListener.class 281 Java/awt/event/TextListener.class 281
java/awt/event/WindowEvent.class 1201
java/awt/event/WindowListener.class 438 Java/awt/event/WindowListener.class 438
java/awt/EventDispatchThread.class 1625
java/awt/EventQueue.class 2704 Java/awt/EventQueue.class 2704
java/awt/EventQueueItem.class 493
java/awt/FocusManager.class 2475 Java/awt/FocusManager.class 2475
java/awt/Font.class 3809 Java/awt/Font.class 3809
java/awt/Frame.class 5651 Java/awt/Frame.class 5651
Java/awt/Graphics.class 3685
Java/awt/Image.class 1382
java/awt/image/ImageObserver.class 493 Java/awt/image/ImageObserver.class 493
java/awt/Insets.class 1391
java/awt/Label.class 1634 Java/awt/Label.class 1634
java/awt/LayoutManager.class 473 Java/awt/LayoutManager.class 473
java/awt/LayoutManager2.class 504 Java/awt/LayoutManager2.class 504
java/awt/LightweightDispatcher.class 3951 Java/awt/LightweightDispatcher.class 3951
java/awt/Menu.class 5275 Java/awt/Menu.class 5275
java/awt/MenuComponent.class 3034 Java/awt/MenuComponent.class 3034
java/awt/MenuContainer.class 333 Java/awt/MenuContainer.class 333
java/awt/MenuItem.class 5453 Java/awt/MenuItem.class 5453
java/awt/peer/ActiveEvent.class 213
java/awt/peer/ButtonPeer.class 3409 Java/awt/peer/ButtonPeer.class 3409
java/awt/peer/CanvasPeer.class 221
java/awt/peer/ComponentPeer.class 1364 Java/awt/peer/ComponentPeer.class 1364
java/awt/peer/ContainerPeer.class 338 Java/awt/peer/ContainerPeer.class 338
java/awt/peer/FontPeer.class 182
java/awt/peer/FramePeer.class 379 Java/awt/peer/FramePeer.class 379
java/awt/peer/LabelPeer.class 291 Java/awt/peer/LabelPeer.class 291
java/awt/peer/LightweightPeer.class 2654 Java/awt/peer/LightweightPeer.class 2654
java/awt/peer/PanelPeer.class 219

32
java/awt/peer/WindowPeer.class 262 Java/awt/peer/WindowPeer.class 262
java/awt/PopupMenu.class 2020 Java/awt/PopupMenu.class 2020
java/awt/Rectangle.class 4242 Java/awt/Rectangle.class 4242
java/awt/Shape.class 216 Java/awt/Shape.class 216
java/awt/Toolkit.class 5336 Java/awt/Toolkit.class 5336
java/awt/Window.class 7815 Java/awt/Window.class 7815
sun/awt/CharToByteSymbol.class 2197
sun/awt/DrawingSurface.class 253
sun/awt/EmbeddedFrame.class 1184
sun/awt/FontDescriptor.class 640
sun/awt/im/InputContext.class 2012
sun/awt/im/InputMethodContext.class 278
sun/awt/PlatformFont.class 6430
sun/awt/SunToolkit.class 3809
sun/awt/UpdateClient.class 231
sun/awt/windows/CharToByteWingDings.cla
ss
1628
sun/awt/windows/WButtonPeer.class 1535 .\ucsc\ewt\EwtButtonPeer.class 1655
sun/awt/windows/WCanvasPeer.class 1345
.\ucsc\ewt\EwtContainerPeer.class 1238
sun/awt/windows/WColor.class 604
sun/awt/windows/WComponentPeer.class 7271 .\ucsc\ewt\EwtComponentPeer.class 3767
sun/awt/windows/WDefaultFontCharset.clas
s
499
sun/awt/windows/WFontPeer.class 2017 .\ucsc\ewt\EwtFont.class 986
sun/awt/windows/WFramePeer.class 2145 .\ucsc\ewt\EwtFramePeer.class 1215
.\ucsc\ewt\EwtImage.class 1622
sun/awt/windows/WLabelPeer.class 1535 .\ucsc\ewt\EwtLabelPeer.class 1521
sun/awt/windows/WObjectPeer.class 553
sun/awt/windows/WPanelPeer.class 1284
sun/awt/windows/WToolkit.class 9399 .\ucsc\ewt\WillsAWT.class 8343
sun/awt/windows/WWindowPeer.class 2662 .\ucsc\ewt\EwtWindowPeer.class 626
.\ucsc\ewt\NativeGraphics.class 780
.\ucsc\ewt\LCDGraphics.class 4065
.\ucsc\ewt\EwtFont$Digits.class 7407
.\ucsc\ewt\EwtFont$SansSerif.class 9459
TOTAL FOR AWT 205312 TOTAL FOR EWT 199060
EWT IS WHAT PERCENT OF
AWT?
97.0%
33
Figure 6. Java Byte Code for AWT versus EWT
7 Conclusions
The result that the class sizes of the two systems were almost identical was not
surprising. The very simple EWT required almost the same amount of object code as the
vastly more complex AWT. The reason that they are so similar in size is because only
parts of the AWT that were needed were including in the list. The list shows only classes
that are loaded by the run time system. In Java, a class that is declared but not used is not
loaded. Since the application has identical requirements, whether using AWT or EWT, the
required classes have a similar size.
The differences in size appear in the platform dependent code. The sun/awt classes
are somewhat larger that their simpler ucsc/ewt classes. The EWT fonts are implemented
as images and therefore require support for images.
One result that seems surprising is that many classes are loaded which have no
purpose. The EWT has no Menu, no LayoutManager and yet these classes are loaded. It
should be possible to remove these classes and thereby reduce the memory footprint of the
EWT by modifying the non peer classes.
Another reason for the large size of the EWT is the inclusion of fonts. As
previously discussed, the EWT stored fonts as Java Images. This is not at all efficient.
The Image classes were required by the EWT implementation, while they were not
required for the AWT. The size of the font classes is also very inefficient. For example,

34
the EwtFont$SansSerif.class required 9459 bytes. The data contained within was 55
images that were 8 by 10 pixels. A C language array could pack this into 550 bytes. Part
of the reason for the increased size is that the images were stored in an array of 128
images, which requires a pointer table.
Despite the similarity between the sizes of the class files, we are not achieving a
fair comparison. As discussed above, the EWT requires almost no native graphics
support, much different from the AWT. If we add in the native methods used by both
systems, it is apparent the EWT is much smaller.
AWT EWT
msawt.dll
224256
Jn_lcd.o
8036
user32.dll
44544
gdi32.dll
131072
Vga.drv
52064
Java Classes 205312 199060
Total AWT 657248 Total EWT 207096
EWT % of AWT 31.5%
Figure 7. Size Comparison Including Native Code
The size of the EWT seems much more reasonable when the native code is
included. This size fits well within the Embedded Java requirements of 512K ROM. Thus
it has been shown that an AWT compatible subset, tailored to the needs of a small
embedded system, can be built without the need for the embedded system to have a native
windowing system.
35
36
8 Appendixes
8.1 Bill Of Materials
LCD ADAPTER FOR NS486SXF EVAL BOARD Revised: October 11, 1998
[email protected] Revision: A
Bill Of Materials October 11, 1998 12:06:23 Page 1
Item Quantity Reference Part Digi-Key
_______________________________________________________________________
1 4 C1,C2,C4,C5 0.1UF P4924-ND
2 1 C3 100UF50V P1353-ND
3 1 D1 1N4148 1N4148-ND
4 1 JP1 1x2 HEADER
5 1 J1 2x20 HEADER
6 1 J2 2x7 HEADER
7 1 L1 100UH M5820-ND
8 1 M1 CXA-L10L 73-1007-ND
9 1 Q1 2N2222 ZTX-651-ND
10 1 Q2 VP300 ZVP2106A-ND
11 1 R1 18K 18KQBK-ND
12 1 R2 4.7K 4.7KQBK-ND
13 2 R3,R4 1K 1.0KQBK-ND
14 1 R5 100K 100KQBK-ND
15 1 U1 74HC112 MM74HC112N-ND
16 1 U2 74HC02 MM74HC02N-ND
17 1 U3 MAX635 MAX635CPA-ND
18 1 VR1 500K POT 3310C-1-504-ND
37
8.2 Schematic
38
8.3 Mock Application Source Code
import ucsc.ewt.*;
import java.awt.*;
import java.awt.event.*;
import java.util.*;
public class ghewt extends Frame
implements ActionListener, KeyListener
{
//these rectangles outline the menu buttons, the reading value,
// and units display
static Rectangle f1= new Rectangle( 4, 216, 72, 20 );
static Rectangle f2= new Rectangle( 84, 216, 72, 20 );
static Rectangle f3= new Rectangle( 164, 216, 72, 20 );
static Rectangle f4= new Rectangle( 244, 216, 72, 20 );
static Rectangle d = new Rectangle( 20, 60, 200, 100 );
static Rectangle u = new Rectangle( 220, 100, 100, 30 );
//menu A
static Button temp, humid, light, chart;
//menu B
static Button hour, day, week, back;
static Label tempValue, humidValue, lightValue;
static Label tempUnits, humidUnits, lightUnits;
static ghewt lcd;
//keeps track of which menu is active
static Button menu_key[ ]= new Button[4];
public ghewt()
{
super( "An LCD SIMULATION" );
// the next section is to force the toolkit to EWT
// only necessary to use the Win95/98/NT version of EWT
Properties theProps;
theProps = System.getProperties();
//comment out this line to use normal AWT
// theProps.put( "awt.toolkit", "ucsc.ewt.WillsAWT" );
System.setProperties( theProps );
System.out.println( theProps );
}
public static void main( String argv[] )
{
lcd = new ghewt();
//Comment out one of the following two lines
Font digits = new Font( "Helvetica", Font.PLAIN, 72 );
// Font digits = EwtFont.EwtDigits;
lcd.setLayout( null );
// build the menus
39
temp = new Button( " TEMP " );
temp.setBounds( f1 );
humid = new Button( "HUMID" );
humid.setBounds( f2 );
light = new Button( "LIGHT" );
light.setBounds( f3 );
chart = new Button( "CHART" );
chart.setBounds( f4 );
hour = new Button( " HOUR " );
hour.setBounds( f1 );
day = new Button( " DAY " );
day.setBounds( f2 );
week = new Button( " WEEK " );
week.setBounds( f3 );
back = new Button( " BACK " );
back.setBounds( f4 );
// so the action events we make on the buttons
// get passed back up to the frame
temp.addActionListener( lcd );
humid.addActionListener( lcd );
light.addActionListener( lcd );
chart.addActionListener( lcd );
hour.addActionListener( lcd );
day.addActionListener( lcd );
week.addActionListener( lcd );
back.addActionListener( lcd );
// this next section is only important for AWT
temp.addKeyListener( lcd );
humid.addKeyListener( lcd );
light.addKeyListener( lcd );
chart.addKeyListener( lcd );
hour.addKeyListener( lcd );
day.addKeyListener( lcd );
week.addKeyListener( lcd );
back.addKeyListener( lcd );
// only need this for EWT
lcd.addKeyListener( lcd );
// make some fake data to display
tempValue= new Label( " 74.4" );
tempValue.setFont( digits );
tempValue.setBounds( d );
humidValue= new Label( " 62.9" );
humidValue.setFont( digits );
humidValue.setBounds( d );
lightValue= new Label( "574.4" );
lightValue.setFont( digits );
lightValue.setBounds( d );
tempUnits= new Label( "DEGREES F" );
tempUnits.setBounds( u );
humidUnits= new Label( " PERCENT " );
humidUnits.setBounds( u );
lightUnits= new Label( " LUMENS " );
40
lightUnits.setBounds( u );
// add them to the display
lcd.add( temp );
lcd.add( humid );
lcd.add( light );
lcd.add( chart );
lcd.add( hour );
lcd.add( day );
lcd.add( week );
lcd.add( back );
lcd.add( tempValue );
lcd.add( humidValue );
lcd.add( lightValue );
lcd.add( tempUnits );
lcd.add( humidUnits );
lcd.add( lightUnits );
// make the menu active
menu_key[0] = temp;
menu_key[1] = humid;
menu_key[2] = light;
menu_key[3] = chart;
// make everything but the active invisible
hour.setVisible( false );
day.setVisible( false );
week.setVisible( false );
back.setVisible( false );
humidValue.setVisible( false );
lightValue.setVisible( false );
humidUnits.setVisible( false );
lightUnits.setVisible( false );
lcd.setSize( 320, 240 );
lcd.show();
}
public void actionPerformed( ActionEvent e )
{
if ( e.getSource().equals( temp ) )
{
tempValue.setVisible( true );
humidValue.setVisible( false );
lightValue.setVisible( false );
tempUnits.setVisible( true );
humidUnits.setVisible( false );
lightUnits.setVisible( false );
lcd.repaint();
}
else
if ( e.getSource().equals( humid ) )
{
tempValue.setVisible( false );
humidValue.setVisible( true );
lightValue.setVisible( false );
tempUnits.setVisible( false );
41
humidUnits.setVisible( true );
lightUnits.setVisible( false );
lcd.repaint();
}
else
if ( e.getSource().equals( light ) )
{
tempValue.setVisible( false );
humidValue.setVisible( false );
lightValue.setVisible( true );
tempUnits.setVisible( false );
humidUnits.setVisible( false );
lightUnits.setVisible( true );
lcd.repaint();
}
else
if ( e.getSource().equals( chart ) )
{
temp.setVisible( false );
humid.setVisible( false );
light.setVisible( false );
chart.setVisible( false );
tempValue.setVisible( false );
humidValue.setVisible( false );
lightValue.setVisible( false );
tempUnits.setVisible( false );
humidUnits.setVisible( false );
lightUnits.setVisible( false );
hour.setVisible( true );
day.setVisible( true );
week.setVisible( true );
back.setVisible( true );
menu_key[0]= hour;
menu_key[1]= day;
menu_key[2]= week;
menu_key[3]= back;
lcd.repaint();
}
else
if ( e.getSource().equals( back ) )
{
hour.setVisible( false );
day.setVisible( false );
week.setVisible( false );
back.setVisible( false );
temp.setVisible( true );
humid.setVisible( true );
light.setVisible( true );
chart.setVisible( true );
tempValue.setVisible( true );
tempUnits.setVisible( true );
menu_key[0] = temp;
menu_key[1] = humid;
42
menu_key[2] = light;
menu_key[3] = chart;
lcd.repaint();
}
}
public void keyTyped( KeyEvent e )
{
Component temp;
int x= -10 , y= -10;
switch( e.getKeyChar() )
{
case '1':
temp= menu_key[0];
break;
case '2':
temp= menu_key[1];
break;
case '3':
temp= menu_key[2];
break;
case '4':
temp= menu_key[3];
break;
default:
temp= null;
}
if ( null != temp )
{
temp.dispatchEvent(
new ActionEvent( temp,
ActionEvent.ACTION_PERFORMED, null ));
}
}
public void keyPressed( KeyEvent e )
{
}
public void keyReleased( KeyEvent e )
{
}
}

43
9 References
NIL94 Nilsen, K: Cost Effective Hardware-Assisted Real-Time Garbage Collection. In
ACM SIGPLAN Workshop on Language, Compiler and Tool Support for Real-
Time Systems. 1994. Orlando, Florida: ACM
MCD98 McDowell, B. R. Montague, M. R. Allen, E. A. Baldwin, M. E. Montoreano,
JavaCam: Trimming Java Down to Size, IEEE Internet Computing, May/June
1998, pp53-59, v2, n3.
NEW96 NewMonics’ Web Page: MWT, Minimal Windowing Toolkit,
http://www.newmonics.com/webroot/perc.info/data.sheets/mwt.html
MON97 Montague, B. JN: OS for an Embedded Java Network Computer, IEEE Micro,
v17,n3, May-June 1997, pp54-60.
http://www.cse.ucsc.edu/research/embedded/pubs/tr96-29/html/tr96-29.html
DRA97 M. Draeger, Using an LCD with the NS486SXF Evaluation Board, NS486
Application Note,
http://www.national.com/appinfo/ns486/apps/reference/lcd_app.pdf
