
UNIT:5
Toast, Menu, Dialog, List and
Adapters
1

SYLLABUS
5.1 Menu :Basics, Custom v/s System Menus,
Create and Use Handset menu Button
(Hardware)
5.2 Dialog : Creating and Altering Dialogs
5.3 Toast : List & Adapters
5.4 Basic operation of SQLite Database
5.5 Android Application Priorities
2

5.1 MENU
Options Menu
The primary collection of menu items for an
activity, which appears when the user touches
the MENU button.
Context Menu
A floating list of menu items that appears when
the user touches and holds a view that's
registered to provide a context menu.
Submenu
A floating list of menu items that appears when
the user touches a menu item that contains a
nested menu.
3

OPTION MENU
We can create an Option Menu with following :
Create a menu xml
Register the menu in Activity
Write code to Handle the Clicks on menu items
4

1: CREATE XML FOR MENU
<?xml version="1.0" encoding="utf-8"?>
<menu
xmlns:android="http://schemas.android.com/apk/res/android" >
<item android:id="@+id/ChangeColor"
android:icon="@drawable/setting"
android:title="Settings" />
<item android:id="@+id/phoneInformation"
android:icon="@drawable/phone"
android:title="My Phone Information" />
<item android:id="@+id/callInfo"
android:icon="@drawable/callinfo"
android:title="In and Out Call Info" />
<item android:id="@+id/email"
android:icon="@drawable/mail"
android:title="Mail to Developer" />
</menu>
5

2: REGISTER IN ACTIVITY
Override onCreateOptionMenu method and inflate the
.xml (here options.xml) inside method
@Override
public boolean onCreateOptionsMenu(Menu menu)
{
MenuInflater inflater = getMenuInflater();
inflater.inflate(R.menu.options, menu);
return true;
}
6

3: HANDLE CLICK EVENTS
public boolean onOptionsItemSelected(MenuItem item)
{
// Handle item selection
switch (item.getItemId())
{
case R.id.ChangeColor:
// write code to execute when clicked on this option
return true;
case R.id.phoneInformation:
// write code to execute when clicked on this option
return true;
case R.id.callInfo:
// write code to execute when clicked on this option
return true;
case R.id.email:
// write code to execute when clicked on this option
return true;
default:
return super.onOptionsItemSelected(item);
}
}
7

ANDROID CONTEXT MENU
1: REGISTERING THE VIEW(HERE LIST
VIEW) FOR CONTEXT MENU.
We have to register the ListView for ContextMenu in
onCreate method
public class MainActivity extends Activity
{
ListView listView1;
String contacts[]={"Aarav",“Roshni",“Ujjaval",“Hiral",“Raj"};
8

2: IMPLEMENT THE ONCREATECONTEXTMENU()
When the registered view receives a long-click
event, the system calls your
onCreateContextMenu() method.
@Override
public void onCreateContextMenu(ContextMenu menu, Vi
ew v, ContextMenuInfo menuInfo)
{
super.onCreateContextMenu(menu, v, menuInfo);
menu.setHeaderTitle("Select The Action");
menu.add(0, v.getId(), 0, "Call");
//groupId, itemId, order, title
menu.add(0, v.getId(), 0, "SMS");
}
9

@Override
protected void onCreate(Bundle savedInstanceState)
{
super.onCreate(savedInstanceState);
setContentView(R.layout.activity_main);
listView1=(ListView)findViewById(R.id.listView1);
ArrayAdapter<String> adapter=new ArrayAdapter<String>(this,andro
id.R.layout.simple_list_item_1,contacts);
listView1.setAdapter(adapter);
// Register the ListView for Context menu
registerForContextMenu(listView1);
}
10

3: IMPLEMENT ONCONTEXTITEMSELECTED
METHOD
When the user selects a menu item, the system calls
this method so you can perform the appropriate
action.
@Override
public boolean onContextItemSelected(MenuItem item)
{
if(item.getTitle()=="Call")
{
Toast.makeText(getApplicationContext(),"calling code",Toa
st.LENGTH_LONG).show();
}
11

else if(item.getTitle()=="SMS")
{
Toast.makeText(getApplicationContext(),"sending sms cod
e",Toast.LENGTH_LONG).show();
}
Else
{
return false;
}
return true;
}
12

5.2 CREATE ALERT DIALOG:
An AlertDialog is an extension of the Dialog
class. It is capable of constructing most dialog
user interfaces and is the suggested dialog type.
You should use it for dialogs that use any of the
following features:
A title
A text message
One, two, or three buttons
A list of selectable items (with optional
checkboxes or radio buttons)
13

So, in main.xml create a Button
<Button android:id="@+id/Button01"
android:layout_width="wrap_content"
android:layout_height="wrap_content"
android:text="Show Alert Dialog">
</Button>
14

In Class File:
Btn=(Button)findViewById(R.id.Button01);
btn.setOnClickListener(new View.OnClickListener(){
@Override
public void onClick(View v) {
Builder builder_obj = new
AlertDialog.Builder(AlertDExample.this);
// builder_obj.setTitle("My Alert Dialog Box");
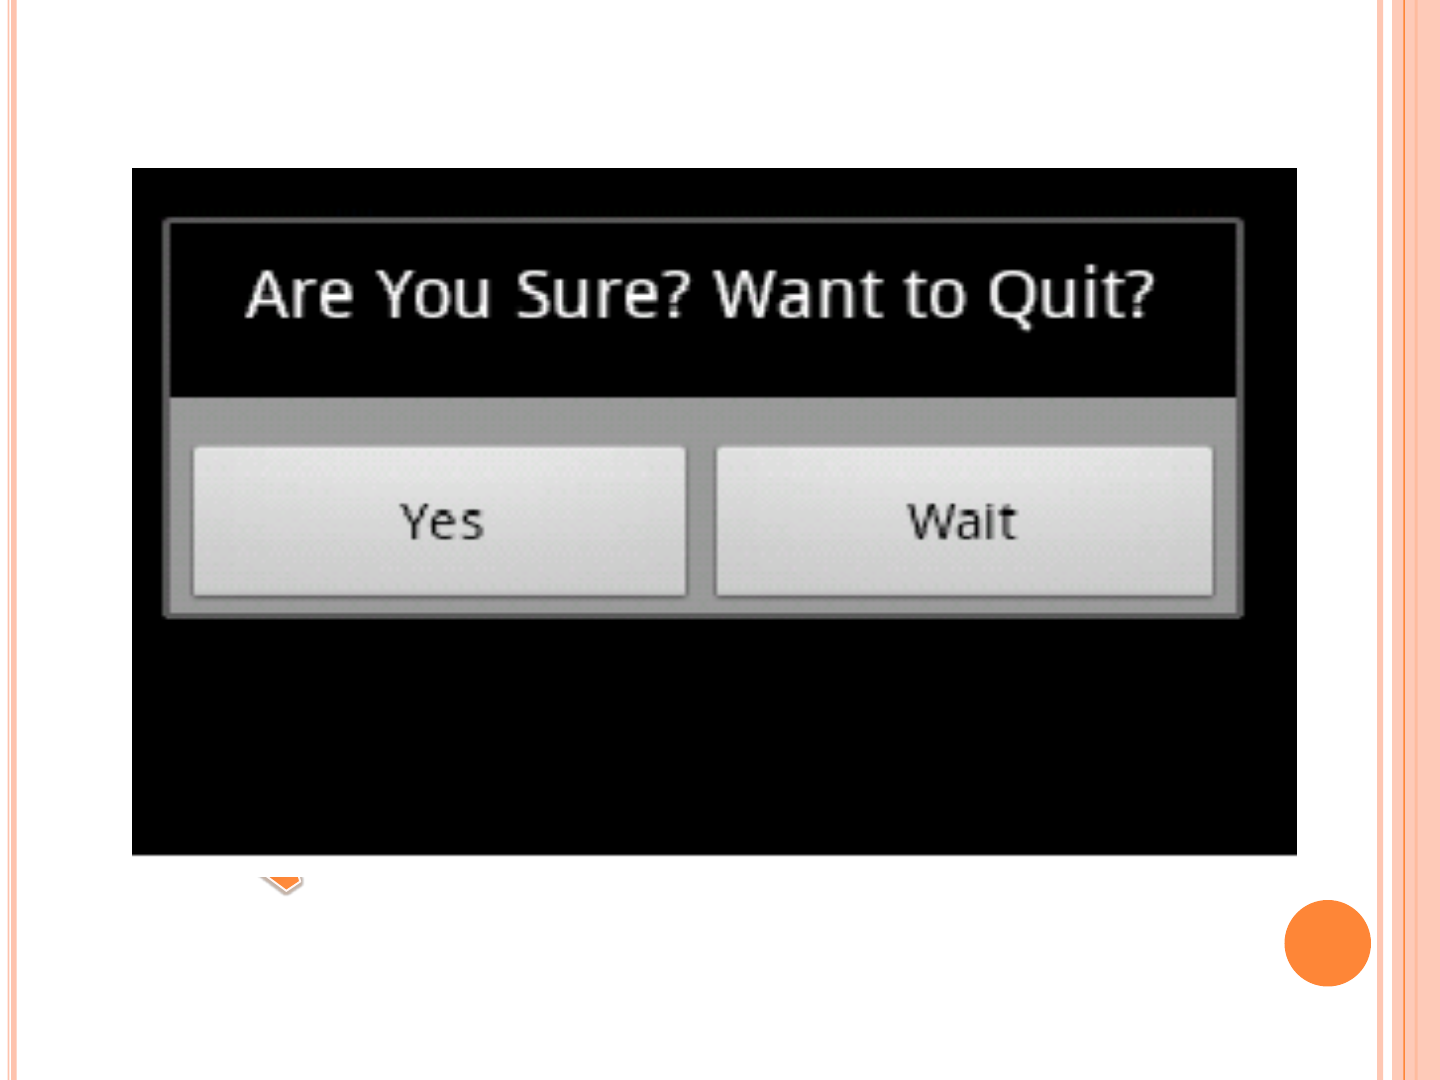
builder_obj.setMessage("Are You Sure? Want to Quit? ");
builder_obj.setCancelable(true);
builder_obj.setPositiveButton("Yes", new
DialogInterface.OnClickListener() {
public void onClick(DialogInterface dialog, int which)
{
finish();
}
});
15

builder_obj.setNegativeButton("Wait", new
DialogInterface.OnClickListener() {
public void onClick(DialogInterface dialog, int which)
{
Toast.makeText(getApplicationContext(),"Ok!!!Activity
will continue",Toast.LENGTH_LONG).show();
}
});
AlertDialog dialog_obj = builder.create();
dialog_obj.show();
}
});
16
17

5.3 ANDROID TOAST, LIST AND ADAPTER
Android Toast:
Andorid Toast can be used to display information
for the short period of time. A toast contains
message to be displayed quickly and disappears
after sometime.
The android.widget.Toast class is the subclass of
java.lang.Object class.
You can also create custom toast as well for
example toast displaying image. You can visit
next page to see the code for custom toast.
18

Android Toast Example
Toast.makeText(getApplicationContext(),"Ur
Message",Toast.LENGTH_SHORT).show();
Another code:
Toast toast=Toast.makeText(getApplicationCont
ext(),"Ur Message",Toast.LENGTH_SHORT);
toast.show();
Here, getApplicationContext() method returns
the instance of Context.
19

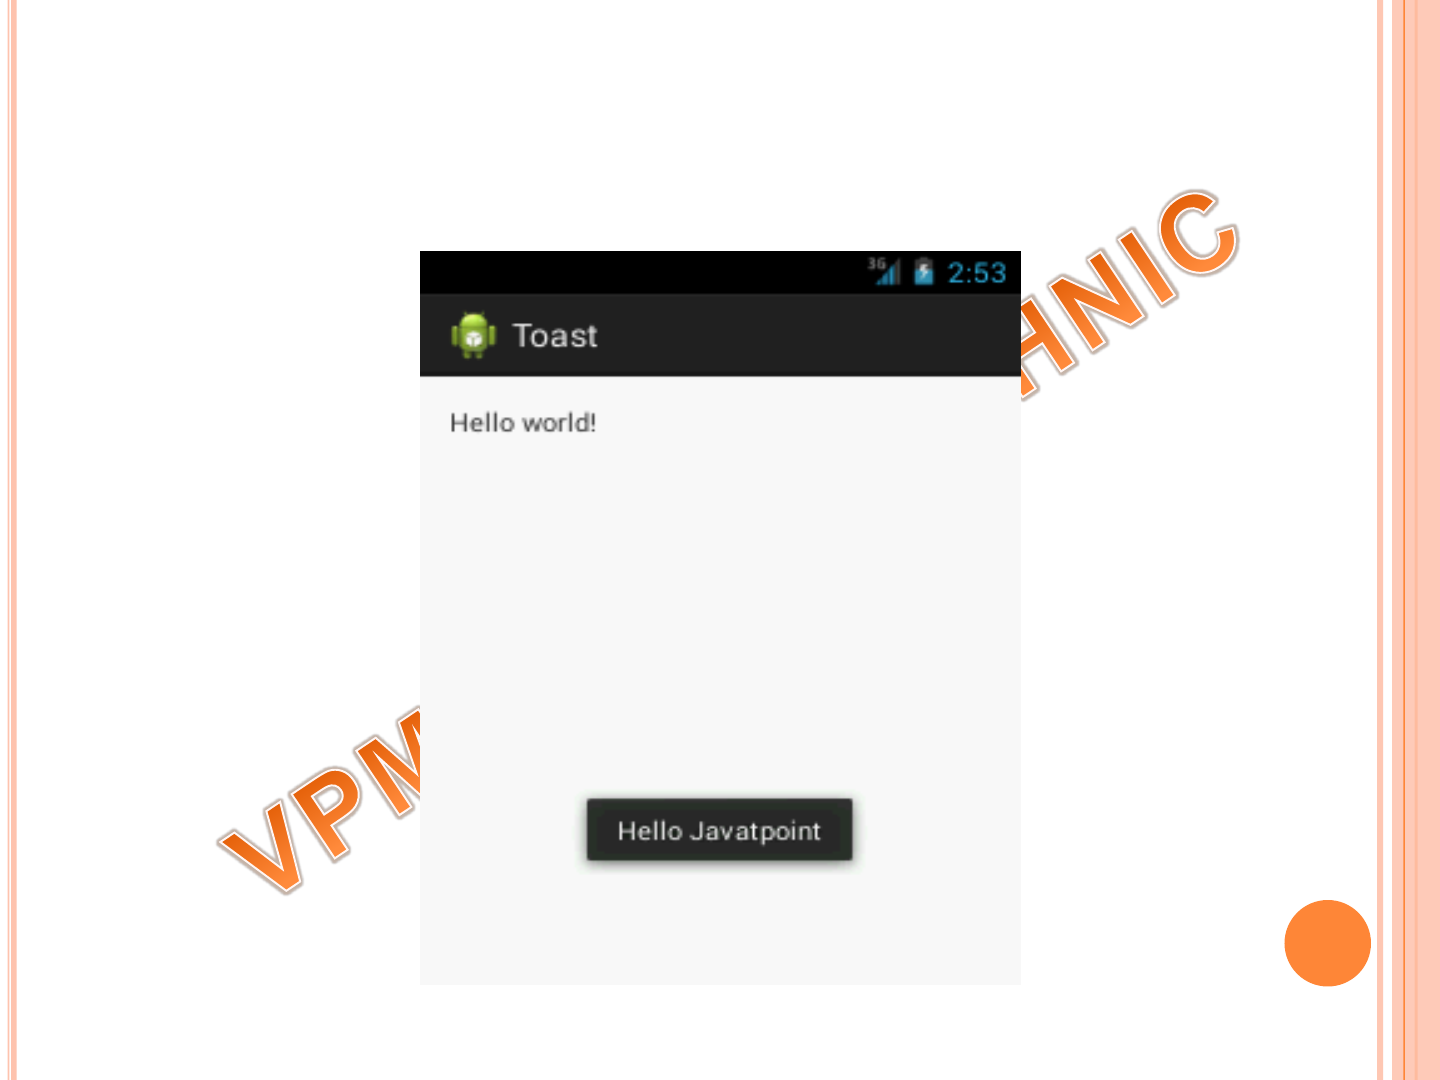
EXAMPLE
//Displaying Toast with Hello Javatpoint message
Toast.makeText(getApplicationContext(),"Hello Jav
atpoint",Toast.LENGTH_SHORT).show();
}
@Override
public boolean onCreateOptionsMenu(Menu menu)
{
getMenuInflater().inflate(R.menu.activity_main, m
enu);
return true;
}
}
20
21

ANDROID CUSTOM TOAST
Creating Layout for Custom Toast:
<LinearLayout xmlns:android="http://schemas.android.com/apk/res/android"
android:id="@+id/custom_toast_layout"
android:orientation="horizontal"
android:layout_width="fill_parent"
android:layout_height="fill_parent"
android:padding="8dp"
android:background="#DAAA"
>
<ImageView android:src="@drawable/myimage"
android:layout_width="wrap_content"
android:layout_height="wrap_content"
android:layout_marginRight="8dp"
/>
<TextView android:id="@+id/textToShow"
android:layout_width="wrap_content"
android:layout_height="wrap_content"
android:textColor="#FFF"
/>
</LinearLayout>
22

Showing The Toast
LayoutInflater inflater = getLayoutInflater();
// Inflate the Layout
View layout = inflater.inflate(R.layout.my_custom_toast,
(ViewGroup)
findViewById(R.id.custom_toast_layout));
TextView text = (TextView)
layout.findViewById(R.id.textToShow);
// Set the Text to show in TextView
text.setText("My Custom Toast in Center of Screen");
Toast toast = new Toast(getApplicationContext());
toast.setGravity(Gravity.CENTER_VERTICAL, 0, 0);
toast.setDuration(Toast.LENGTH_LONG);
toast.setView(layout);
toast.show();
23

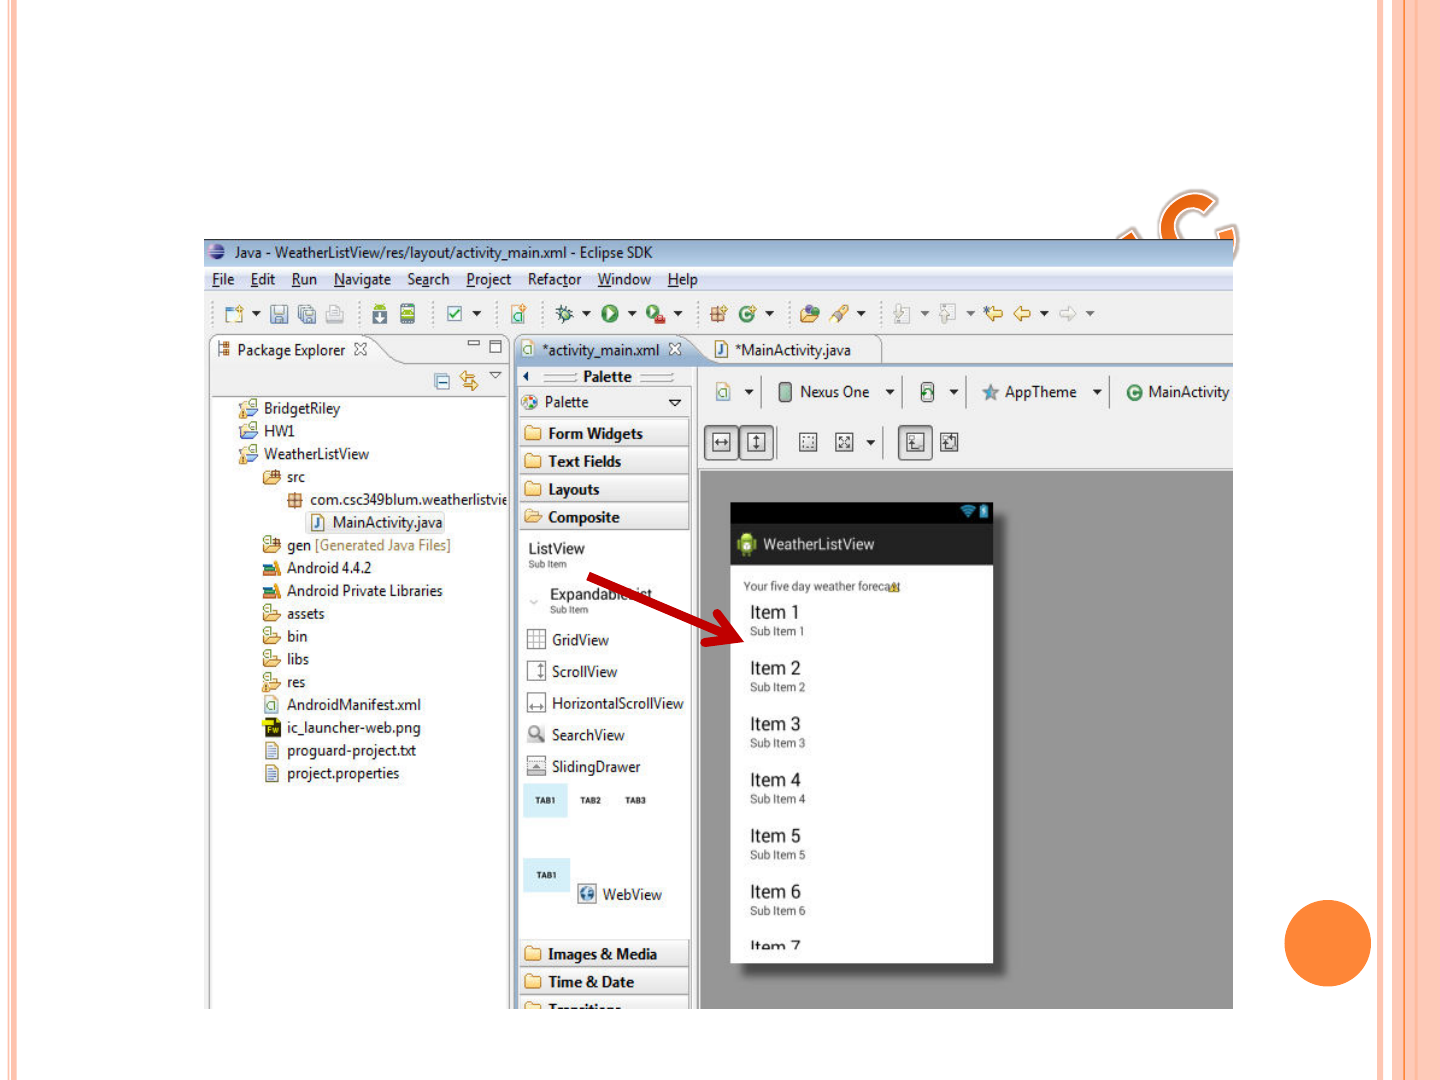
ANDROID LISTVIEW
25

RIGHT CLICK ON RES/LAYOUT CHOOSE
NEW/OTHER (OR XML IF IT IS THERE)
26

CHOOSE ANDROID/ANDROID XML FILE
(NOT JUST XML FILE) AND CLICK NEXT
27
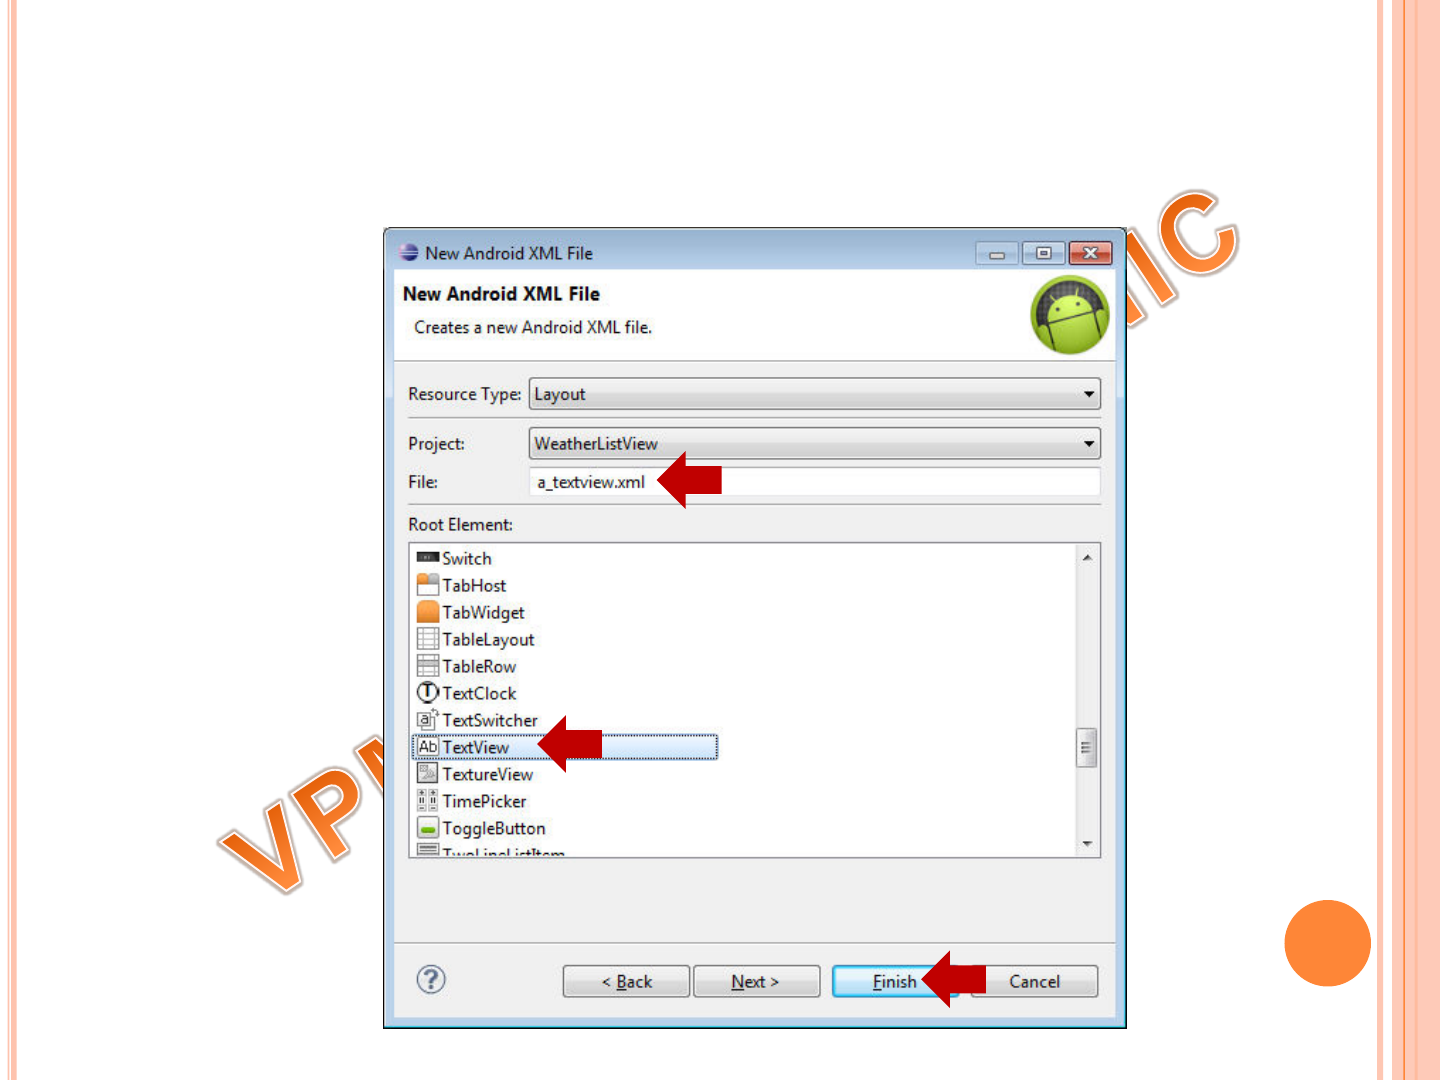
GIVE THE FILE A NAME – REMEMBER THE FILE NAME
CONVENTION SMALL LETTERS NUMBERS UNDERSCORES
AND PERIODS. CHOOSE A ROOT ELEMENT. CLICK FINISH.
28

RESULTING XML IN GRAPHICAL LAYOUT
VIEW AND XML VIEW
29

CODE FOR STRING ARRAY,
ARRAYADAPTER, AND LISTVIEW
30

RESULT SO FAR IN EMULATOR. NOTE THAT
THE LIST ITEMS ARE CLICKABLE
31

CODE FOR THE ONITEMCLICKLISTENER
32

RESULT
33

5.4 BASIC OPERATIONS OF SQLITEDATABASE
The following code shows how to create an
SQLite database and a table in the
database.
db=openOrCreateDatabase("StudentDB",
Context.MODE_PRIVATE, null);
db.execSQL("CREATE TABLE IF NOT EXISTS
student(rollno VARCHAR,name
VARCHAR,marks VARCHAR);");
34

INSERT
The following code uses the db.execSQL() function
to INSERT a student record in the student table
db.execSQL("INSERT INTO student
VALUES('"+editRollno.getText()+"','"+editName.getText()
+"','"+editMarks.getText()+"');");
The above code generates an INSERT statement by
appending the contents of the editable fields into a string
and executes the INSERT statement.
35

DELETE
In the same way, the DELETE command can be
executed as follows:
db.execSQL("DELETE FROM student WHERE
rollno='"+editRollno.getText()+"'");
The above code deletes the record of the student
whose roll number is entered in the editable field.
36

UPDATE
The UPDATE command can be executed as
follows:
db.execSQL("UPDATE student SET
name='"+editName.getText()+"',marks='"+editMarks.get
Text()+"' WHERE rollno='"+editRollno.getText()+"'");
The above code updates the record of the student whose
roll number is entered in the editable field.
37

VIEW
To VIEW a student record, we execute a query
using the rawQuery() method of
the SQLiteDatabase class as follows:
Cursor c=db.rawQuery("SELECT * FROM student
WHERE rollno='"+editRollno.getText()+"'", null);
if(c.moveToFirst())// Check if record is there or not
{ editName.setText(c.getString(1)); //Display
Name editMarks.setText(c.getString(2));
//Display Marks
}
38

5.5 ANDROID APPLICATION PRIORITIES
39

1. ACTIVE PROCESSES
Active (foreground) processes have application
components the user is interacting with.
These are the processes Android tries to keep
responsive by reclaiming resources from other
applications.
There are generally very few of these processes,
and they will be killed only as a last resort.
40

Active processes include the following:
Activities in an active state — that is, those in
the foreground responding to user events.
Broadcast Receivers executing onReceive event
handlers
Services executing onStart, onCreate,
or onDestroy event handlers
Running Services that have been flagged to run
in the foreground
41

2. VISIBLE PROCESSES
Visible but inactive processes are those hosting
“visible” Activities.
Visible Activities are visible, but they aren’t in
the foreground or responding to user events.
This happens when an Activity is only partially
obscured (by a non-full-screen or transparent
Activity).
There are generally very few visible processes,
and they’ll be killed only under extreme
circumstances to allow active processes to
continue.
42

3. STARTED SERVICE PROCESSES
Processes hosting Services that have been
started.
Because these Services don’t interact directly
with the user, they receive a slightly lower
priority than visible Activities or foreground
Services.
Applications with running Services are still
considered foreground processes and won’t be
killed unless resources are needed for active or
visible processes.
When the system terminates a running Service it
will attempt to restart them when resources
become available.
43

4. BACKGROUND PROCESSES
Processes hosting Activities that aren’t visible
and that don’t have any running Services.
There will generally be a large number of
background processes that Android will kill using
a last-seen-first-killed pattern in order to
obtain resources for foreground processes.
44

5. EMPTY PROCESSES
To improve overall system performance, Android
will often retain an application in memory after it
has reached the end of its lifetime.
Android maintains this cache to improve the
start-up time of applications when they’re
relaunched.
These processes are routinely killed, as required.
45

IMPORTANT QUESTIONS.
1. Write a short note on Toast .
2. What is menu ? Explain types of menu.
3. Write a short note on option menu.
4. Explain context menu in detail.
5. Write short on Alert Dialog box.
6. What is sqlite database ? and how to create sqlite
database.
7. Explain basic operation of sqlite database.
8. Define cursor in sqlite database.
46
