
Creating Intelligent Templates™
Technical Document
English
USING DYNAMIC DESIGN TECHNIQUES TO PRINT
MULTIPLE OUTPUTS BY USING A SINGLE DOCUMENT
SUPPORTS:BARTENDER
®
2019 AND LATER VERSIONS

Contents
Overview 3
Dynamic Design Techniques 3
Conditional Printing 4
About Conditional Printing 4
Using conditional printing 4
Conditionally Printing Objects 5
Example 5
Conditionally Printing Layers 5
How layers work in BarTender 6
Example 6
Conditionally Printing Templates 8
Example 1:Conditionally printing templates 9
Example 2:Using template selectors 10
Using Visual Basic Script 11
Document-Level Events 11
Changing Object Properties by Using VBScript 12
Example 1 12
Example 2 12
Example 3 12
Example 4 13
Support for Data-Sourced VBScript 13
Automatically Sizing Objects 14
Using Auto Fit for Text Objects 14
Example 14
Using Auto Fit for Barcode Objects 15
Example 16
Automatically Sizing Picture Objects 16
Example 16
Using Suppression 18
Example 18
Appendix A:Task Reference 19
Related Documentation 20

Overview
As the popularity of complex and variable designs increases, so does the need for dynamic design
techniques. Companies can use BarTender to create Intelligent Templates™ to produce a wide
variety of flexible label designs without having to create and maintain hundreds of separate
documents, so that you can vary the image, color, object position and text on each item that you
print.
For example, one Intelligent Template generated all of the following membership cards by using a
variety of dynamic design techniques. This technical document describes these techniques in detail.
Dynamic Design Techniques
Use one or more of the following techniques to create a dynamic design:
l Use conditional printing to set conditionsthat specify when objects, layers or entire
templates are printed.
l Run custom Visual Basic script (VBScript) in response to certain document-level events. By
using VBScript, you can alter any object's appearance by changing its color, font, position, size
or border.
l Use automatic sizing for text, barcode and picture objects to make the objects fit a
designated space on your template.
l Use suppression to automatically hide text on your template based on conditions that you
specify.
Creating Intelligent Templates™ 3

Conditional Printing
Use conditional printing to specify exactly when different objects, layers or templates in your
document are printed. For example, you can configure a graphic to be printed under one condition
but not under any others. Or, you can choose to print a template based on a value in your database.
You can conditionalize printing for as much or as little of your design as you want.
About Conditional Printing
Conditional printing is based on conditional operators. For example, your conditions for printing might
be based on whether the conditionalized item contains or does not contain certain text, numeric
values, or images, or on whether the conditionalized item is less than, greater than, or equals a
particular value.
You can apply conditional printing to objects, layers or templates, depending on how much of your
design you want to change at print time.
Using conditional printing
To use conditional printing, use the When to Print dialog in BarTender to specify a conditional
statement that is based on a database field or a named data source value to determine when
the object, template or layer is printed.
Creating Intelligent Templates™ 4

For more information, refer to the following topics in the BarTender help system:
l Conditional Printing
l Building Conditional Expressions
l When to Print Dialog
Conditionally Printing Objects
When your design calls for only one object to change for multiple items, consider setting up
conditional printing for that one object. When you do this, you can print (or not print) one object
based on conditions that you specify. This technique is useful when you need different objects to
appear in variations of the same template.
Any of the following objects can be conditionally printed:
l Barcodes
l Encoder objects
l Text objects
l Line objects
l Shape objects
l Layout grid objects
l Table objects
l Pictures
Example
In this example, the document is connected to a database that includes a list of conference
attendees and their status. The When to Print dialog was used to configure the bottom text
object to be conditionally printed based on whether the attendee has a status of "VIP." Notice
that the position, formatting and visibility of all other objects on the name tag remain the same,
regardless of whether the status is printed.
Conditionally Printing Layers
When you have a complex design in which multiple objects are the same among all designs but other
objects change, consider using conditional layers. A layer is an object or group of objects that
occupies a single plane. Layers are stacked on top of one another.
Creating Intelligent Templates™ 5

How layers work in BarTender
In BarTender, each layer can contain one or more objects. When you need to dynamically print
multiple objects on your template at different times, you can put the objects on different layers
and then conditionalize the layers to be printed when certain conditions are met. You use the
When to Print dialog for each layer to specify when that layer is printed, just as you do when you
conditionalize an object.
Example
In this example, the following base layer includes all of the objects that remain the same on all of
your designs.
Each subsequent layer includes the objects that differ on each of your designs. Each layer can
include one or more objects, as shown.
Creating Intelligent Templates™ 6

After you conditionalize each of the subsequent layers by using the When to Print dialog, the
layers are printed on top of the base layer based on the conditions that you set. The final print
output for this example is as follows.
Creating Intelligent Templates™ 7

For more information about layers, refer to the following topics in the BarTender help system:
l Using Layers
l Layer Properties Dialog
l Arranging Layers on a Template
Conditionally Printing Templates
When one piece of information can alter the entire layout of the document that you want to print,
consider creating two or more different templates for the same document. You can configure
templates to be printed by using either conditional printing or template selectors.
Consider the following example. Your company has two offices, one in Seattle and the other in New
York. All of the employees are listed in the same database, and you need to print business cards for
all of the employees. The office in Seattle uses one design for their business cards, and the office in
New York uses a different design. Each design is saved as a separate template within the same
BarTender document.
The following examples describe how to configure conditional printing for this scenario by using both
conditional printing and template selectors.
Creating Intelligent Templates™ 8

Example 1:Conditionally printing templates
By using conditional printing, you can specify multiple conditional expressions for each template,
and you have a lot of flexibility for specifying print conditions.
For example, suppose that your database has a "City" field that includes multiple different
spellings for the same city (New York, NewYorkCity, NYC). To address the discrepancies in
terminology, you can define multiple conditional statements so that you can print items for all the
variations of "New York" in the database.
To do this, specify your conditional statements in the When to Print dialog to instruct BarTender
to print the document when it encounters "New York", "NYC", or "New York City" in the "City"field
of the database, as shown.
Repeat this procedure for the Seattle template to instruct BarTender to conditionally print the
template when the "City" field contains the values "Seattle" or "SEA".
As a result, if the value that BarTender reads from the database is "New York", "NYC", or "New
York City", the New York template is printed, and if the database value is “Seattle or "SEA",” the
Seattle template is printed.
For more information, refer to the following BarTender help topics:
l Page Setup Dialog
l When to Print Dialog
Creating Intelligent Templates™ 9
Example 2:Using template selectors
Template selectors provide a simple way to choose among templates
when you know all the values that could appear in your data source.
When you use a template selector, it determines which template to
print based on the content of the data source. Note that the data
source must match the name of the template for the template to be
printed.
For example, suppose that the only values for the "City"field in the
database are "Seattle" and "New York" and that the names of your
templates match these values.
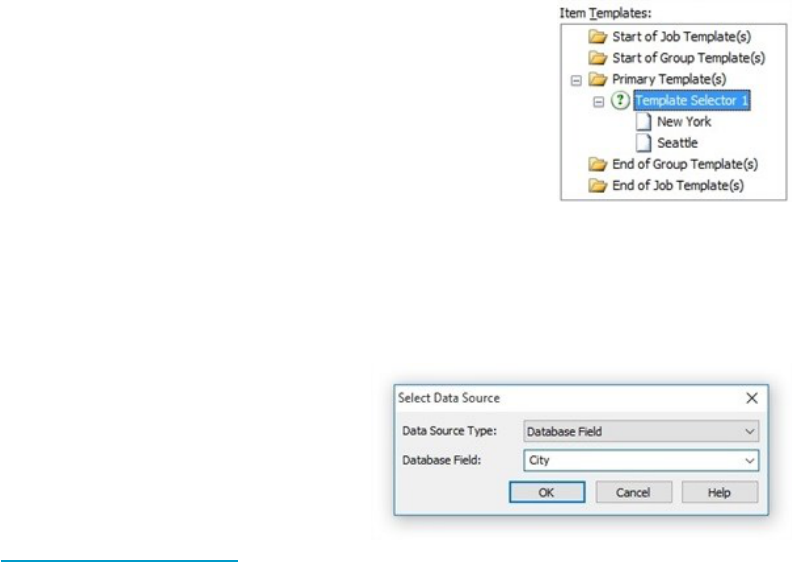
On the Templates tab of the Page Setup dialog, add a new template selector. Drag both the
Seattle and New York templates to the template selector. Then, select the value that you want
to use to match the template name. In this example, select the "City" database field.
As a result, if the value that BarTender reads from
the database is “Seattle,” the Seattle template is
printed, and if the database value is "New York,"
the New York template is printed.
For more information about template selectors,
refer to the Using Template Selectors topic in the
BarTender help system.
Creating Intelligent Templates™ 10

Using Visual Basic Script
Visual Basic Script (VBScript) is a very flexible language that you can use to programmatically modify
objects at different times throughout the document design and print process.
You can use VBScript to change object properties such as size, location and color, in combination
with any other variables that you can script. For example, you can change an object's color based on
the time of day or change an object's size based on the color of another object. VBScript is perhaps
the most dynamic template design tool of all, because when you have the appropriate programming
skills, you can accomplish almost anything that you want in your BarTender document.
Although Visual Basic scripts can be complex enough to be
considered "programs," sometimes a single line of VBScript can prove
very useful. However, scripting is typically a technique for power users
that is not ideal for beginners. In any case, we recommend that you
determine whether BarTender offers a solution to your challenge
before you try using a script-based solution. For more information,
refer to the Visual Basic Scripting book in the BarTender help system.
For a complete listing of object properties that you can dynamically change by using VBScript, refer to
the Template Objects topic in the BarTender help system.
Document-Level Events
You can use VBScript to modify objects in
a BarTender document only by using
document-level event scripts, such as
opening or closing a document, starting a
print job, reading a database record, and
so on. To write scripts for these events,
use the BarTender Document Options
dialog to enable document-level script
events. Once this feature is enabled, you
can write scripts for the events by using
the Visual Basic Script Editor.
For more information about the available
document-level events that you can use
for Visual Basic scripting and how to open
and use the Visual Basic Script Editor,
refer to the following topics in the BarTender hep system:
l Document-Level Events
l Visual Basic Script Editor
Creating Intelligent Templates™ 11

Changing Object Properties by Using VBScript
The following examples describe how to change object properties by using VBScript.
Example 1
A common use case is to change an object’s color in response to the data that is coming from a
database.
In this example, you want to make an object's text color gold, silver or bronze, depending on
membership level. To do this, enter script that resembles the following in the Editor pane of the
Visual Basic Script Editor.
Set Notice = Objects("Text 1")
If (Field("MembershipType") = "Gold") Then
Notice.TextColor = btColor.Gold
Else
If (Field("MembershipType") = "Silver") Then
Notice.TextColor = btColor.Silver
Else
If (Field("MembershipType") = "Bronze") Then
Notice.TextColor = btColor.DarkGoldenrod
Else
Notice.TextColor = btColor.Black
End If
End If
End If
Example 2
If your database includes a column that contains the name of a color, you can use VBScript to
set the color of an object by reading the color from the database. To do this, enter script that
resembles the following in the Editor pane of the Script Editor.
ReferenceField("ConditionColor")
Objects("Box 1").FillColor = Eval(Field("ConditionColor"))
When you do this, the "ConditionColor" field in your database can contain values such as
"BtColor.Red" or "BtColor.FromRGB(255,0,0)".
Example 3
You can use VBScript to change the properties of linked objects and embedded objects or to
switch among the objects. The following sample code uses VBScript to switch between two
linked image objects based on conditional values.
ReferenceField("Image")
Set ImageObject = Objects("Picture 1")
If Field("Image") = "Black" Then
ImageObject.PicturePath = "C:\vbscriptimagepath\images\BarTender_Black.png"
Else
ImageObject.PicturePath = "C:\vbscriptimagepath\images\BarTender_RGB.png"
End If
Creating Intelligent Templates™ 12
Example 4
You can hide or show objects based on the data that is read from a database or named data
source. To do this, you can use an object’s PrintVisibility property, or you can move the object on
or off the design area by using its X and Y properties.
For example, if you want a line object to appear only if a "Location" database fieldhas the value
"Seattle,"enter script that resembles the following in the Editor pane of the Script Editor.
Set Notice = Objects("Line 1")
If (Field("Location") = ("Seattle")) Then
PrintVisibility = True
Else
PrintVisibility = False
End If
Support for Data-Sourced VBScript
You can feed VBScript into BarTender from external sources, such as a database or a program that
is controlling BarTender. For example, you might configure a field in a database to contain VBScript
code. Then, when BarTender reads the data record that contains that field, VBScript code in
BarTender can use the Visual Basic “Execute” statement or the “Eval” function to run the imported
VBScript.
This is an advanced technique that should be used only by users who
have extensive VBScript experience or who have the help of a
BarTender reseller or other consultant.
Creating Intelligent Templates™ 13

Automatically Sizing Objects
BarTender can automatically adjust the size of objects on your template based on the data that is
contained in the object. You can configure the sizing settings by using the Object Properties page for
a text, barcode, or picture object, as follows:
l For text objects and the human readable text portion of barcode objects, you can use the Auto
Fit property page to change the font size, scale and spacing of the text to make it fit the
available space on the template.
l For barcode objects, you can use the Auto Fit feature to automatically fit the barcode symbol
to a width that you specify.
l For picture objects, you can use the settings on the Picture Properties page to make sure that
the pictures automatically fit a specified space on the template.
Using Auto Fit for Text Objects
The Auto Fit feature configures the size of the text to fit into the text object that you have specified on
the template. The text object itself stays the same size; only the text inside the object is adjusted.
To use this feature, click Auto Fit in the navigation pane on the Text Properties dialog for the text
object, and then click to select the Automatically fit text to specified dimensions check box. After
you do this, you can specify the dimensions, alignment, minimum and maximum font point sizes, font
scale width, and character and line spacing .
Example
Suppose that you are creating mailing labels and that certain fields contain more address
information than others. For example, some customer names and company names are longer
Creating Intelligent Templates™ 14

than others and exceed the label dimensions. By using Auto Fit for these text objects, you ensure
that they always fit on your label.
When you apply Auto Fit to the text objects that correspond to the "Customer Name" and
"Company Name" fields of your label, the text size adjusts to fit the available space, as shown.
Using Auto Fit for Barcode Objects
You can use the Auto Fit feature for both the barcode symbol and the accompanying human
readable text, so that regardless of the length of the data source, the objects that contain your
barcode symbol and human readable text maintain a consistent size. You configure the Auto Fit
settings separately for the symbol and the text.
When you use Auto Fit to configure the human readable text, the text automatically fits into
dimensions that you specify. To do this, click Auto Fit in the navigation pane on the Barcode
Properties dialog, and then click to select the Automatically fit text to specified dimensions check
box. After you do this, you can specify the dimensions, alignment, minimum and maximum font point
sizes, font scale width, and character and line spacing .
When you use Auto Fit to configure the barcode symbol, BarTender adjusts the X dimension to
maintain the symbol size that you want. To do this, click Symbology and Size in the navigation pane
on the Barcode Properties dialog, click next to the X Dimension field, and then click to select the
Automatically fit barcode to specified width check box. After you do this, you can specify the symbol
width and maximum and minimum X dimension widths that you want.
The barcode width that you specify is the maximum width that the
barcode uses. Therefore, depending on the data source value, the
symbol that is printed might be smaller than what you specify.
Because Auto Fit can affect the density (and consequently, the
readability) of data, we recommend that you test your scanner’s
ability to read barcodes at both your minimum and maximum
settings.
Creating Intelligent Templates™ 15
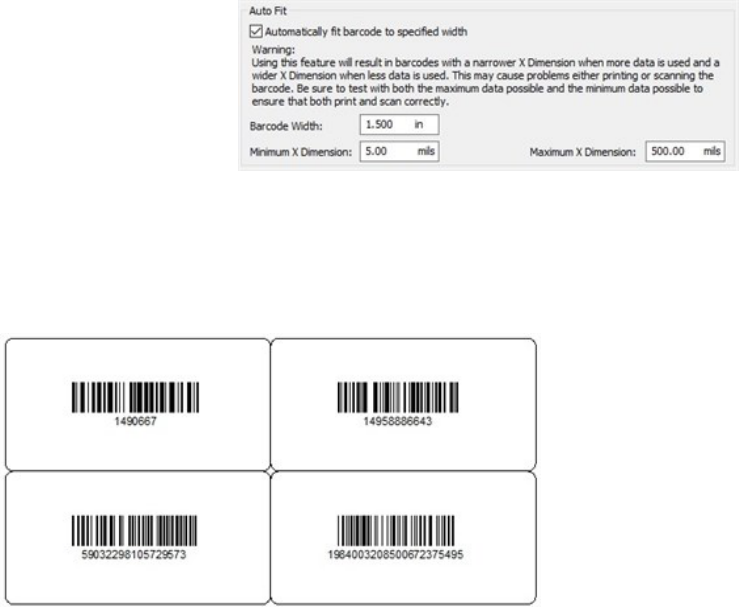
Example
Suppose that you are printing labels and
that each label has a specified area
where one of four barcodes appear. The
barcodes contain varying amounts of
information and human readable text,
but you need all of them to fit within the
specified area on the template.
Depending on the barcode type and the values of the connected data source, your results when
you use Auto Fit might resemble the following sample labels. Notice that the X dimension of the
barcode symbol becomes smaller as the data source (indicated by the human readable text)
increases in length so that the symbol maintains its width.
Automatically Sizing Picture Objects
You can configure picture objects to automatically fit a specific area on the template. To do this, use
the picture object's Picture Properties dialog.
Example
Suppose that you want to create labels to mark sale items and that you want the picture of the
current sale item to appear in a particular place on the template. You have multiple pictures that
can appear on the label, and not all of the pictures are the same size. You need all the pictures
that appear on the template to be printed at the same size.
To do this, click Size in the navigation pane of the Picture Properties dialog, and then configure
the sizing settings that you want. Then, click to select the Lock Size check box. When you do this,
any picture that you use for that object appears at the size that you selected.
Creating Intelligent Templates™ 16

Creating Intelligent Templates™ 17

Using Suppression
You can use the suppression feature in BarTender to conditionally print data sources. Suppression
differs from the conditional printing methods that were described previously in that data sources are
suppressed, or hidden, when a condition is met.
Suppression is commonly used for a wrapped text object that contains separate data sources for
each line in the object, but in which a data source might not contain data. When the data source
does not contain data, you might want to configure BarTender to automatically suppress the data
source so that it doesn't appear on the label as a blank space.
Example
Suppose that you have a wrapped text object that uses multiple data
sources for an address label. The data sources are linked to database
fields that are called CustomerName, CompanyName, Address1,
Address2, City, State, and Country. To create line breaks between the
address lines, an Embedded Data data source that contains only a
carriage return is added after each Database Field data source.
For some records in the database, there is no data in the
"Address2"database field. You want to eliminate the blank space that
appears on the label if the "Address2"data source is empty.
To do this, on the Transform tab on the Data Sources property page,
apply the Suppress when previous data source is empty suppression
rule to the carriage return data source that follows the "Address2" data source. By suppressing
the carriage return when there is no data for the "Address2" data source, you eliminate the
blank space.
As a result, your address labels are printed without a blank space when the "Address2" field is
empty.
For more information about suppression, refer to the Suppression Dialog topic in the BarTender help
system.
For more information about how to read data from databases, refer to the Reading Data from
Databases topic in the BarTender help system.
Creating Intelligent Templates™ 18

Appendix A:Task Reference
The following table describes common dynamic design tasks and the methods that we recommend
that you use.
Task Recommended Methods
Show or hide a single object based on the data that is read Conditional printing for objects
Show or hide multiple objects based on the data that is read Conditional printing for layers
Change the color of an object based on the data that is read
Conditional printing for layers
VBScript
Change the font size of a text object based on the data that is read Auto Fit for text
Hide the contents of a selected data source under certain conditions Suppression
Change the size of a barcode object based on the data that is read Auto Fit for barcodes
Change the position of an object based on the size or other properties
of another object
VBScript
Change part of a template design based on the data that is read Conditional printing for layers
Change the entire template based on the data that is read
Conditional printing for templates
Template selectors
Creating Intelligent Templates™ 19

Related Documentation
Technical Documents
l Color Coding Your Items
To view and download technical documents, visit:
https://www.seagullscientific.com/resources/white-papers/
User Guides
l Getting Started with BarTender
https://support.seagullscientific.com/hc/categories/200267887
BarTender Help System
l Building Conditional Expressions
l Conditional Printing
l Using Layers
l Suppression Dialog
l Using Template Selectors
l Visual Basic Scripting
l Reading Data From Databases
Other Resources
Please visit the BarTender website at https://www.seagullscientific.com.
To learn more about conditional printing, please visit the BarTender Support Center website at
https://support.seagullscientific.com.
l "Introduction to conditional printing" (WEB)
https://support.seagullscientific.com/hc/en-us/articles/205643327-Introduction-to-conditional-printing
© 2020 Seagull Scientific, Inc. BarTender, Intelligent Templates, Drivers by Seagull, the BarTender
logo, and the Drivers by Seagull logo are trademarks or registered trademarks of Seagull Scientific,
Inc. All other trademarks are the property of their respective owners.
Version 2020-10-30 Copyright © 2020 Seagull Scientific, Inc.
