RECORDING AND CAPTIONING
YOUR VIDEO PRESENTATION
In addition to your poster, you will prepare a brief (2-3 minute) video presenting your project. Guidance on
preparing the content of that video is available in the Preparing Your Video Presentation handout. Here, our focus
is on the steps to follow in order to record, caption, and share your video.
RECORDING YOUR VIDEO
The format of your video content can guide your selection of recording platform:
• If recording only yourself speaking, we recommend using Google Meet.
• If recording a combination of visual content and yourself speaking, we recommend using Google Meet.
• If recording only visual content, we recommend using PowerPoint.
USING GOOGLE MEET TO RECORD YOUR VIDEO
UConn students with a university Gmail account can use Google Meet to record a video.
1. Go to https://meet.google.com/_meet. Make sure you are signed in to your university Gmail account by
clicking the “Sign in” button at the top right.
2. Click “New Meeting” and then “Start an instant meeting.”
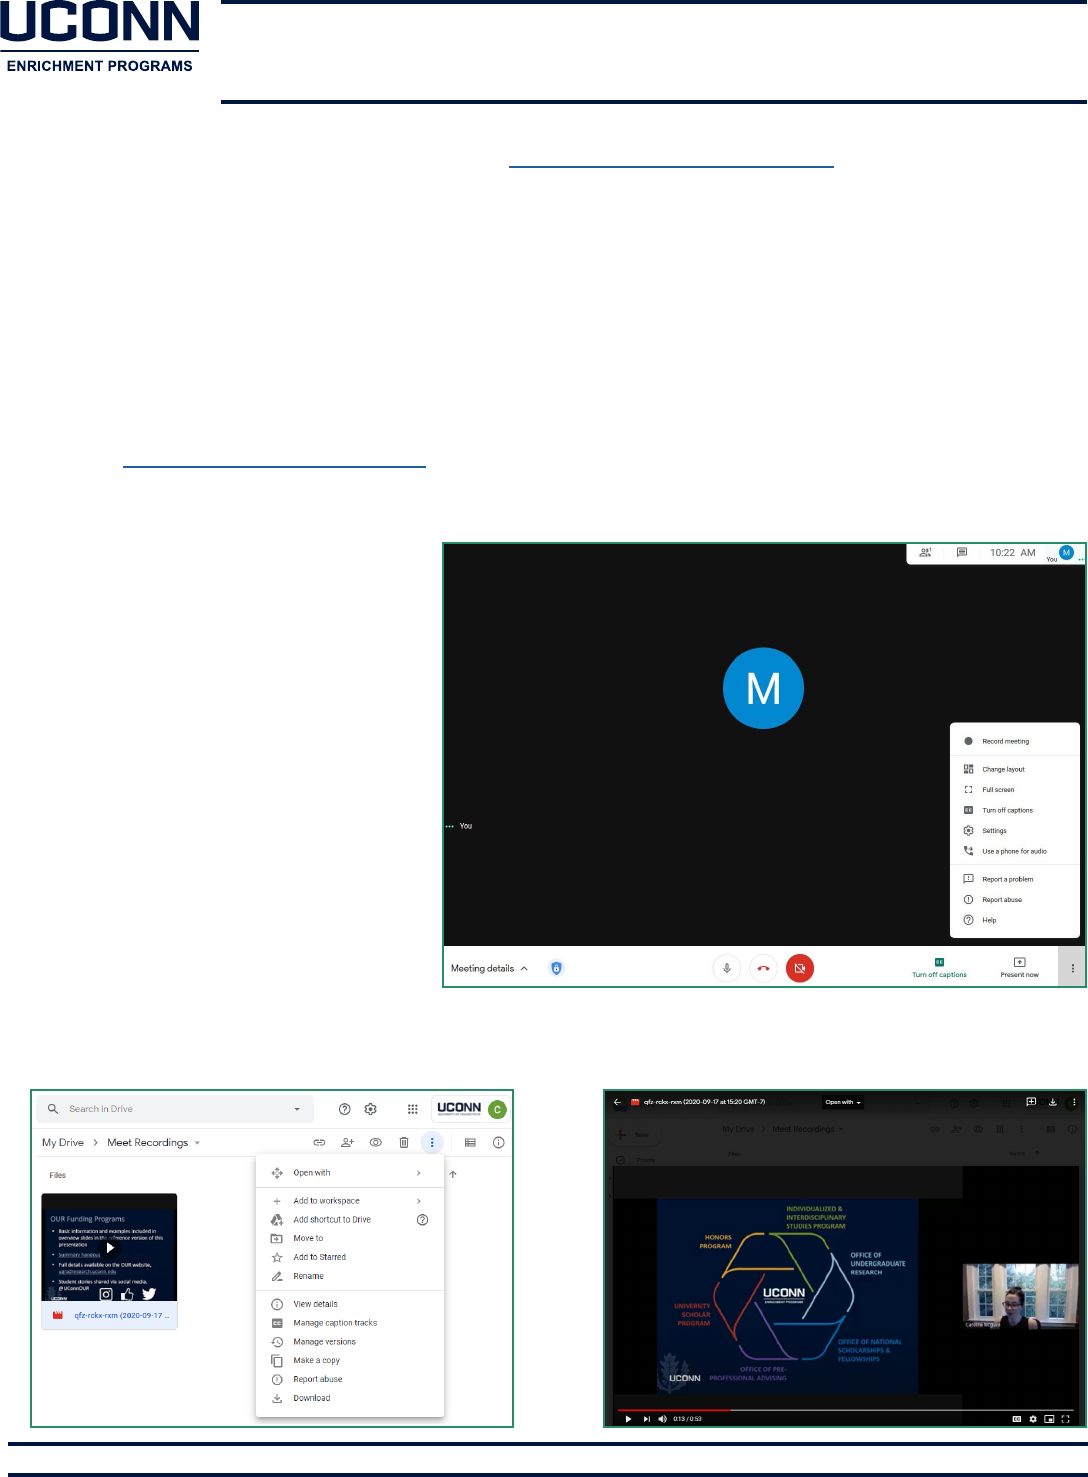
3. Once in the meeting, select the 3 dots
at the bottom right of the screen.
Select “Record meeting” to initiate the
recording. If you want to share slides
or other visual content, click “Present
now” in the bottom menu and select
the content you want to share before
you begin recording.
4. To stop recording, click the 3 dots
at the bottom right and select “Stop
recording.”
5. Videos will be saved to your Google
Drive within a few minutes of ending
the meeting. Once the video is in your
Google Drive, you can rename your
video by clicking on the three dots in
the upper right corner and selecting
“Rename.”
This can be done on your Drive homepage by selecting the file (at left) or by opening the file itself (at right).
6. Click “Download” to save the file on your computer as a .mp4 video.
OFFICE OF
UNDERGRADUATE RESEARCH
Oce of Undergraduate Research - ugradresearch.uconn.edu - our@uconn.edu

USING POWERPOINT TO RECORD YOUR VIDEO
Prepare your PowerPoint slides. We recommend limiting your slides to no more than 3-5 slides for a 2-3 minute
video. Focus on highlights of your project and consider selecting visual elements and/or excerpts from your poster.
When your slides are complete and you are ready to record your video, follow the steps below.
1. Click on the “Slide Show” tab and then “Record Slide Show.”
2. When ready, click “Start Recording.” To stop recording, either click the “Stop” or “Pause” button in the upper
left corner or press ESC on your keyboard.
3. Save your file as a .mp4.
• On a PC: Go to the “File” tab, click
“Save As,” and name your file (we
recommend using Last_First_
Frontiers2023). In the “Save as
type” field, select “MPEG-4 Video”
and click “Save.”
• On a Mac: Go to the “File” tab,
click “Export,” and name your
file (we recommend using
Last_First_Frontiers2023). In
the “File Format” field, select
“MP4” and click “Export.”
Note: PowerPoint 2016 for Mac
does not support saving in a
video format. Download an
updated version of PowerPoint
(free for students) here.
Oce of Undergraduate Research - ugradresearch.uconn.edu - our@uconn.edu

CAPTIONING YOUR VIDEO
You will upload your Google Meet or PowerPoint video to YouTube in order to add captions and get a shareable
link to use in Portfolium.
UPLOADING YOUR VIDEO TO YOUTUBE
1. Sign into YouTube using your Google account (UConn account).
2. Click on the “Create” (camera) icon in the upper right corner and
select “Upload video.” See screenshot at right.
3. Follow the instructions for selecting a file, entering a title, and
selecting a video thumbnail.
4. In the Visibility settings, we recommend selecting “Unlisted.” This
will allow you to generate a link that can be shared on Portfolium.
Selecting “Private” will restrict the ability of Frontiers audience
members to view your video. Selecting “Public” allows anyone on
YouTube to view your video.
ADDING CAPTIONS TO YOUR VIDEO
YouTube automatically generates captions for videos uploaded to the site; YouTube uses the term subtitles. The
auto-generated captions are not very accurate. You are encouraged to review and edit captions to ensure that
your video is accessible.
Please note that the auto-generated captions will not appear immediately after uploading. You can either wait for
them to become available or generate your own; see step 3 for instructions on how to do so.
1. To review and edit subtitles, go to your Channel dashboard and click “Subtitles” in the menu on the left.
Oce of Undergraduate Research - ugradresearch.uconn.edu - our@uconn.edu

2. Select your video.
3. In the Subtitles column, you should see “Published - Automatic” listed. If you do not see this, the auto-
generated subtitles are not yet available. Wait until they are in order to proceed. Alternately, if you want to
generate your own subtitles rather than waiting for them to be auto-generated, click the “Add” button.
4. Once the auto-generated subtitles are available, click the 3 dots next to “Published - Automatic,” then click
“Edit on Classic Studio” to review and edit the captions.
5. Click “Edit” in the upper right corner to edit text, if needed.
Oce of Undergraduate Research - ugradresearch.uconn.edu - our@uconn.edu

6. Make all necessary corrections to the subtitles. Click “Save changes” in the upper right corner when done.
SHARING YOUR VIDEO
1. Go to your Channel dashboard and click “Videos” in the menu on the left. Click the “Details” (pencil) icon to
the right of your video thumbnail.
2. The video link will be on the right side of the page. Copy the link and paste it into Portfolium. For detailed
instructions, consult the Using Portfolium to Share Your Frontiers Project handout.
Oce of Undergraduate Research - ugradresearch.uconn.edu - our@uconn.edu
