

Document release date:January 2024
Send Us Feedback
Let us know how we can improve your experience with the ALM
External Authentication Configuration Guide.
Legal Notices
© Copyright 2024 Open Text.
The only warranties for products and services of Open Text and its affiliates and licensors
(“Open Text”) are as may be set forth in the express warranty statements accompanying such
products and services. Nothing herein should be construed as constituting an additional
warranty. Open Text shall not be liable for technical or editorial errors or omissions contained
herein. The information contained herein is subject to change without notice.
Disclaimer
Certain versions of software accessible here may contain branding from Hewlett-Packard
Company (now HP Inc.) and Hewlett Packard Enterprise Company. This software was
acquired on September 1, 2017 by Micro Focus and is now offered by OpenText, a separately
owned and operated company. Any reference to the HP and Hewlett Packard Enterprise/HPE
marks is historical in nature, and the HP and Hewlett Packard Enterprise/HPE marks are the
property of their respective owners.
ALM External Authentication Configuration Guide
ALM (12.53 and later) Page 2 of 51

Contents
External Authentication Overview 5
Smart Card Authentication Overview 5
Single Sign-OnOverview 6
External Authentication Roadmap 7
Prerequisites 8
Configure Proxy Authentication 10
Configure Web Server as Reverse Proxy 11
Configuring IISas a reverse proxy 11
Configuring Apache as a reverse proxy 14
Web Server Configuration 17
Configure Web Server for SSLOffloading 17
For Apache 18
For IIS 18
Configure Web Server for SSL Termination on ALM Server 19
For Apache 19
For IIS 19
Smart Card Configuration 20
Access ALM 21
Prepare Certificates 22
Configure Apache as a Secure Reverse Proxy 23
Configure Apache to Require a Client Certificate 25
Configure the Apache SSL Proxy Server to Work with Smart Card 26
Configure IIS as a Secure Reverse Proxy 27
Configure IIS to Require a Client Certificate 28
Single Sign-On Configuration 29
Verification Checklist 31
ALM Configuration 32
Configure Site Administration 32
Verify External Authentication 35
Configure Smart Card Authentication for APIs 36
Configure SSO for APIs 37
ALM External Authentication Configuration Guide
ALM (12.53 and later) Page 3 of 51

External Authentication Overview
ALM supports external authentication, where a reverse proxy positioned in front of
ALM is configured to support external authentication. Once the user is
authenticated by the reverse proxy, the authenticated user details are passed to
ALM, which completes the authentication and authorization process.
For example, a user who passes the reverse proxy authentication but does not
exist in ALM will be denied access to ALM. A user who passes the reverse proxy
authentication but does not have permissions to enter specific parts of ALM, will be
denied access to those parts of ALM, such as Site Administration or Lab
Management.Otherwise, the login process will complete and the user will enter
ALM.
This guide contains information about external authentication systems, such as
Smart Card Authentication and Single Sign-on, and how to configure these
systems to work with ALM.
Smart Card Authentication Overview
Smart cards are physical devices used to identify users in secure systems. These
cards can be used to store certificates that verify the user's identity and allow
access to secure environments. Currently, ALM supports one type of smart card
authentication, CAC(Common Access Card).
ALM can be configured to use these certificates in place of the standard model of
each user manually entering a user name and password. You can define a method
of extracting the user name from the certificate stored on each card or use the
system defaults.
When ALM is configured to work with smart cards, users can only log in using a
smart card. The option of logging in by manually typing in your user name and
password is locked for all users.
ALM (12.53 and later) Page 5 of 51

The following figure illustrates the smart card authentication topology (the Web
server is either Apache or IIS):
Single Sign-OnOverview
Single sign-on (SSO) is a session/user authentication process that permits a user
to enter one name and password to access multiple applications. The process
authenticates the user for all the applications to which the user has been given
rights. This eliminates further prompts when the user switches applications during
a particular session. Currently, ALM supports one type of SSO authentication,
SiteMinder.
Note: For OpenText tools such as UFT, ALM supports only SiteMinder basic
authentication.
ALM External Authentication Configuration Guide
External Authentication Overview
ALM (12.53 and later) Page 6 of 51

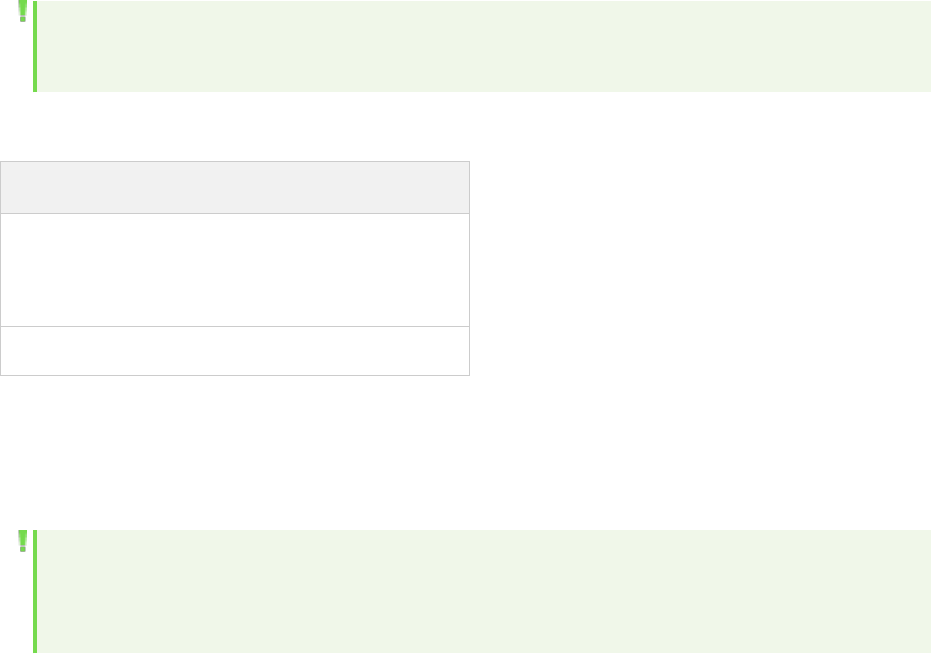
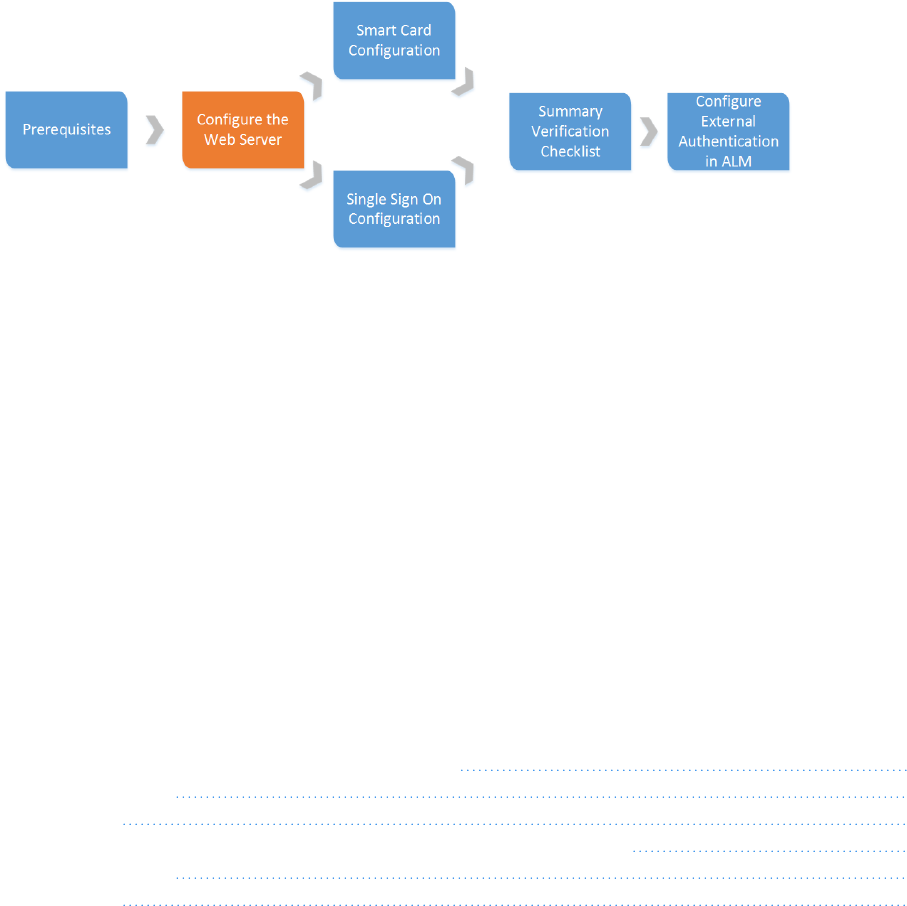
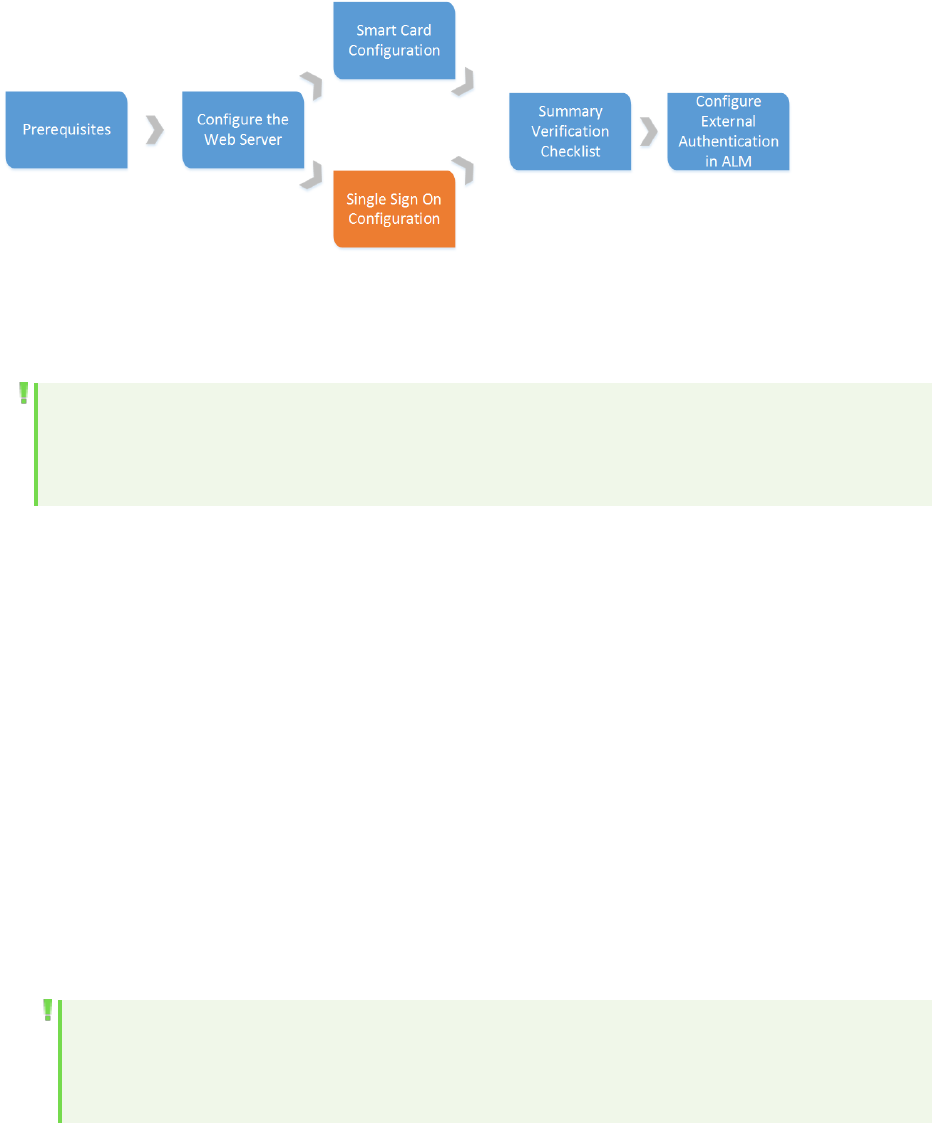
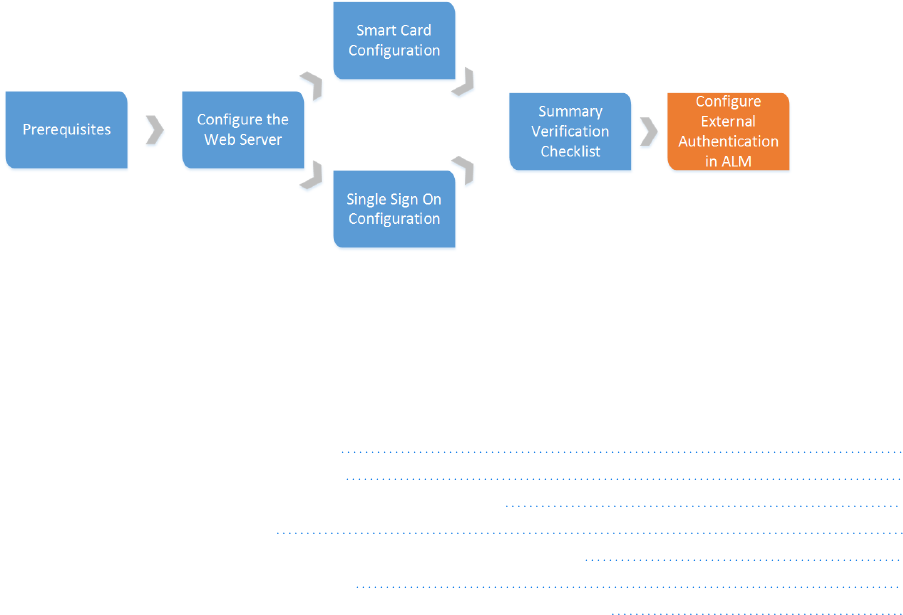
External Authentication Roadmap
The external authentication roadmap includes the following phases:
Phase Description
Prerequisites Gather the information you need to configure external
authentication for use with ALM.
For details, see "Prerequisites" on the next page.
Configure the Web
Server
Configure the web server, either Apache or IIS, for full
SSLor SSLoffloading.
For details, see "Web Server Configuration" on page17.
Smart Card
Configuration
Configure the web server for smart card authentication.
For details, see "Smart Card Configuration" on page20.
Single Sign-On
Configuration
Configure the web server for single sign-on
authentication.
For details, see " Single Sign-On Configuration" on
page29 .
Verification
Checklist
Verify that all of the necessary steps have been
successfully implemented to use external authentication
with ALM.
For details, see "Verification Checklist" on page31.
Configure External
Authentication in
ALM
Configure ALMto work with external authentication.
For details, see "ALM Configuration" on page32.
ALM External Authentication Configuration Guide
External Authentication Roadmap
ALM (12.53 and later) Page 7 of 51

Prerequisites
1. Ensure that the ALMserver is installed and running.
2. Ensure that the web server, either Apache or IIS, is installed and running.
Note: It is recommended to install the web server and the ALMserver on
separate machines.
3. Configure the web server as a reverse proxy server. For details, see "Configure
Web Server as Reverse Proxy" on page11.
4. Disable IPv6 stack on the ALM server host using the operating system's
network tool. This will improve communication performance between the IPv6
client and the ALM server. (Jetty 5.x does not support IPv6.)
5. Determine how the users will log in to ALM using external authentication (for
example, using an email address), and ensure that this information is present in
the user details in Site Administration. At the end of this process, the site
administrator must be able to log in to ALM using external authentication. Only
then can other users log in to ALMusing external authentication.
6. If you are using LDAP, import the LDAPusers.
Recommended ALMconfiguration:
For the list of supported system environments, refer to the
Readme
.
Note: The supported environment information in the
Readme
is accurate for
the current ALM release, but there may be subsequent updates. For the most
up-to-date supported environments, see
ALM External Authentication Configuration Guide
Prerequisites
ALM (12.53 and later) Page 8 of 51
http://admhelp.microfocus.com/alm/specs/alm-qc-system-
requirements.htm.
Web Server system requirements:
Operating System Web Server
Windows
l
IIS 7.5
l
Apache 2.2 or
later
Linux
Apache 2.4 or later
Make sure you have the following information about the host on which you are
configuring smart card authentication or SSO: Server host name, server operating
system type, and web server type (IIS or Apache).
Note: We recommend configuring the firewall so the only servers allowed to
log in to the Jetty port are the reverse proxy's machine (IIS or Apache) or the
LoadRunner Enterprise server machine.
Segmented networks configuration:
ALM is certified in the following topology:
ALM External Authentication Configuration Guide
Prerequisites
ALM (12.53 and later) Page 9 of 51
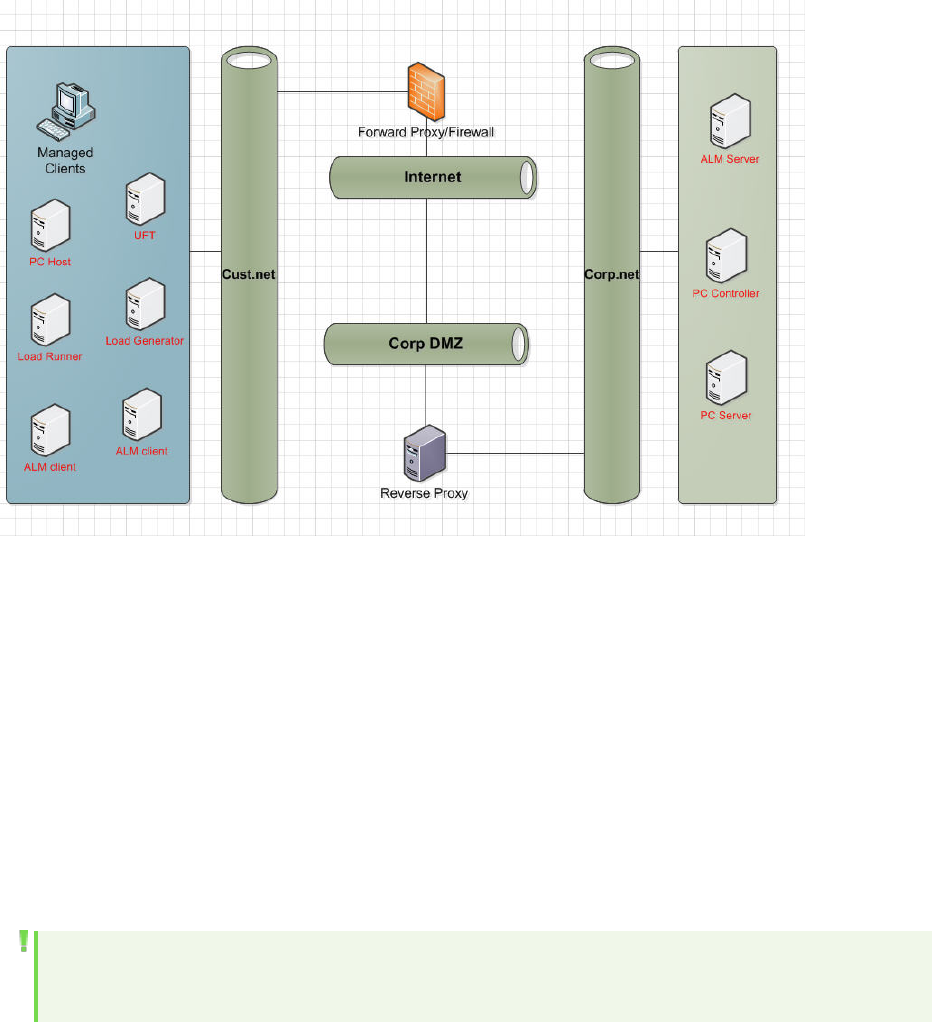
When ALM clients are located in a different network segment from the ALM server
and require a forward proxy to access outside the segment, the ALM server is
behind the reverse proxy or load balancer, and both proxies require Basic or NTLM
authentication, following are the requirements for the proxies:
l
The forward proxy and the reverse proxy must return different error codes.
l
The forward proxy must support the 407 error code and the reverse proxy must
support the 401 error code.
l
The forward proxy must pass the authentication headers forward.
Note: You may experience problems if your topology does not meet these
requirements.
Configure Proxy Authentication
ALM was certified with the following forms of authentication:
l
Forward proxy: NTLM and Basic. If forward proxy requires authentication, you
must pre-configure proxy authentication credentials in the Webgate
ALM External Authentication Configuration Guide
Prerequisites
ALM (12.53 and later) Page 10 of 51

Customization tool (or API) to prevent ongoing authentication requests.
l
Reverse proxy: Client authentication (in a Smart Card environment) and Basic
authentication.
You can use the Webgate Customization tool to configure the proxy and identify
the authentication credentials it requires, as well as any required front end web
server credentials. Go to Help > ALM Tools > Webgate Customization to access
the tool. On the Proxy Settings tab, select the type of proxy server and enter Proxy
Username, Proxy Password, and Domain.
Configure Web Server as Reverse Proxy
To enhance the security of your ALM deployment, it is recommended to place the
ALM server behind a secure reverse proxy, either an Apache or IIS web server.
Such configuration is also required to support external authentication.
Configuring IISas a reverse proxy
To integrate ALM with a web server, you configure the web server to redirect
requests to the ALM Application Server. You configure the web server to work in
proxy HTTP mode.
To configure IISto work as a reverse proxy:
Note: The following instructions apply to IIS 7.0 and later.
1. Using Server Manager, install the IIS server using default settings. You do not
need to enable any other extensions.
2. Install the URL rewrite package from
http://www.iis.net/downloads/microsoft/url-rewrite.
3. Install Application Request Routing (ARR) for IIS from
http://www.iis.net/downloads/microsoft/application-request-routing.
ALM External Authentication Configuration Guide
Prerequisites
ALM (12.53 and later) Page 11 of 51

Note: You may need to disable Internet Explorer ESC and run Internet
Explorer as an administrator.
If you have no direct access to the internet from your server, you can
obtain the ARR 3.0 standalone version that contains everything you
need, including the URL rewrite package, from
http://www.microsoft.com/en-us/download/details.aspx?id=40813.
Download ARR 3.0 to your client, copy it to the server, and install it on the
server.
4. Make sure the IIS Web server is stopped.
5. Open IIS Manager and ensure you have an element named Server Farms under
the relevant IIS server node.
Note:
l
If there is no Server Farms element and you are using a Windows 2012
server, uninstall Microsoft Web Farm Framework and download the
latest version from
http://download.microsoft.com/download/5/7/0/57065640-4665-
4980-a2f1-4d5940b577b0/webfarm_v1.1_amd64_en_us.msi.
l
If you fail to install a Web Farm for IIS 10, see this KB article.
6. Right click Server Farms and click Create Server Farm.
7. Enter a name for the farm and click Next.
8. Click Advanced settings and change the ports to match your ALM Jetty ports.
The default ALM Jetty ports are 8080 for http and 8443 for https.
9. Under Server address, type the name or IP address of the ALM server you
want to add to the farm.
10. Click Add to add the server.
Note: Repeat steps 9 - 10 to add more ALM servers to use IIS as a load
balancer in an ALM cluster.
11. Click Finish.
ALM External Authentication Configuration Guide
Prerequisites
ALM (12.53 and later) Page 12 of 51

12. Click Yes in the Rewrite Rules dialog box that opens. This adds a URL rewrite
rule that causes IIS to forward all incoming requests to the ALM Server.
13. Select the new Server farm element created.
14. Double-click Proxy.
15. Set Time-out (seconds) to 35.
16. Set Response buffer threshold to 0.
17. Click Apply.
Note: This change is applied only to the Application Request Routing
proxy.
18. Enable the proxy.
a. Select the main tree node (the server name), click Application Request
Routing Cache, and then click Server Proxy Settings in the Proxy section.
b. Enable Enable proxy.
c. Verify that HTTP version is valued with Pass Through.
d. Verify that Reverse rewrite host in response headers is enabled.
e. Click Apply.
19. Restart the IIS Web server.
You can now connect to your ALM site using the following URL: http://<IIS
server name>/qcbin.
20. If you are using IIS with multiple servers farms:
a. Add another server farm for the other server group.
b. Modify the URL Rewrite rule for the ALMserver farm:
i. Select the main tree node (the server name) and click URLRewrite.
ii. Edit the Inbound Rule.
iii. Change Using from Wildcards to Regular Expressions.
iv. Change Pattern to (^qcbin(.*)).
v. Click Apply.
c. Modify the URL Rewrite rule for the other server farm:
ALM External Authentication Configuration Guide
Prerequisites
ALM (12.53 and later) Page 13 of 51

i. Select the main tree node (the server name) and click URLRewrite.
ii. Edit the Inbound Rule.
iii. Change Using from Wildcards to Regular Expressions.
iv. Change Pattern to reflect the other server group .
v. Click Apply.
d. Restart the IIS Web server.
Configuring Apache as a reverse proxy
To configure Apache to work as a reverse proxy:
Note: It is recommended that you use Apache HTTP Server version 2.22.4.
1. Make sure the Apache Web server is stopped.
2. Navigate to the <Apache Home directory>\conf directory.
3. Create a backup copy of the httpd.conf file.
4. Open the httpd.conf file.
5. Uncomment or add the following load module commands:
LoadModule proxy_module modules/mod_proxy.so
LoadModule proxy_http_module modules/mod_proxy_http.so
LoadModule rewrite_module modules/mod_rewrite.so
LoadModule headers_module modules/mod_headers.so
6. Add the following section to the end of the file:
# Turn off support for true Proxy behavior as we are acting as
# a reverse proxy
ProxyRequests Off
# Turn off VIA header as we know where the requests are proxied
ProxyVia Off
# Set the permissions for the proxy
ALM External Authentication Configuration Guide
Prerequisites
ALM (12.53 and later) Page 14 of 51

<Proxy *>
AddDefaultCharset off
Order deny,allow
Allow from all
</Proxy>
# Turn on Proxy status reporting at /status
# This should be better protected than: Allow from all
ProxyStatus On
<Location /status>
SetHandler server-status
Order Deny,Allow
Allow from all
</Location>
# Configuring mod_proxy_http
# To connect to servlet container with HTTP protocol, the
ProxyPass
# directive can be
# used to send requests received on a particular URL to a Jetty
instance.
ProxyPreserveHost off
ProxyPass /qcbin http://<ALM server name>:8080/qcbin
ProxyPassReverse /qcbin http://<ALM server name>:8080/qcbin
# For LoadRunner Enterprise deployments, add the following:
ProxyPass /loadtest http://<LoadRunner Enterprise server
name>/loadtest
ProxyPass /LoadTest http://<LoadRunner Enterprise server
name>/LoadTest
ProxyPass /Loadtest http://<LoadRunner Enterprise server
name>/Loadtest
ProxyPassReverse /loadtest http://<LoadRunner Enterprise server
name>/loadtest
ProxyPassReverse /LoadTest http://<LoadRunner Enterprise server
name>/LoadTest
ProxyPassReverse /Loadtest http://<LoadRunner Enterprise server
name>/Loadtest
# Rewrite rule trailing slash must be used in the VirtualHost
section
RewriteEngine On
#Add trailing slash if was not present in the original request
ALM External Authentication Configuration Guide
Prerequisites
ALM (12.53 and later) Page 15 of 51

RewriteRule ^/qcbin$/qcbin/ [R]
7. Save the changes to the file.
8. Run httpd -t from the Apache bin folder to check the syntax of the file.
9. Restart the Apache Web server.
You can now connect to your ALM site using the following URL: http://<ALM
virtual server name>[:<apache port number>]/qcbin.
ALM External Authentication Configuration Guide
Prerequisites
ALM (12.53 and later) Page 16 of 51
Web Server Configuration
It is strongly recommended (and required for smart card authentication) to secure
the front-end web server. There are two options:
l
Full SSL: Configure SSLon both the front-end web server and Jetty.
l
SSLOffloading:Configure SSLonly on the front-end web server.
For instructions on how to configure the web server in SSL, see "Configure Apache
as a Secure Reverse Proxy" on page23 or "Configure IIS as a Secure Reverse
Proxy" on page27.
This chapter describes additional steps for SSLoffloading or SSLtermination on
ALMserver.
This chapter includes
• Configure Web Server for SSLOffloading
17
• For Apache
18
• For IIS
18
• Configure Web Server for SSL Termination on ALM Server
19
• For Apache
19
• For IIS
19
Configure Web Server for SSLOffloading
Perform the following steps to configure the web server for SSLoffloading. With
SSLoffloading, the encrypted communication channel terminates on the reverse
proxy or load balancer and continues to the ALM server unencrypted:
ALM External Authentication Configuration Guide
Web Server Configuration
ALM (12.53 and later) Page 17 of 51

For Apache
SSLOffloading means that Apache is configured to connect to ALM over http and
not https. In this case, perform the following configuration:
1. Navigate to the <Apache Home directory>\conf directory.
2. Create a backup copy of the httpd.conf file.
3. Open the httpd.conf file.
4. Add the following section if encrypted communication terminates on the
Apache server:
###############################################################
# add the following line if SSL is terminated/offloaded on
Apache server
###############################################################
RequestHeader set X-Forwarded-Proto https
5. Save the httpd.conf file.
6. Restart Apache so it will read the configuration.
For IIS
SSLOffloading means that IISis configured to connect to ALM over http and not
https. In this case, perform the following configuration:
1. Edit the qcbin inbound rule and add the following server variable:
Set name="HTTP_X_FORWARDED_PROTO" value="https".
2. In Action Properties, change the protocol from https to http.
3. Restart IIS so it will read the configuration.
ALM External Authentication Configuration Guide
Web Server Configuration
ALM (12.53 and later) Page 18 of 51
Configure Web Server for SSL Termination
on ALM Server
Perform the following steps to configure the reverse proxy web server for SSL
termination on the ALM server. With this option, the encrypted communication
channel continues to the ALM server:
For Apache
1. Comment out the RequestHeader set X-Forwarded-Proto https line in the
httpd.conf file.
2. In the httpd-ssl.conf file, set SSLCACertificateFile to point to the file that
contains the Root Authority certificate of the Certificate Authority that issued
the ALM server certificate. It must be in Base64 format. If there are any
intermediate authorities in addition to the root authority, all these certificates
can be concatenated into one file.
3. Replace http with https in ProxyPass and ProxyPassReverse.
4. Restart Apache.
For IIS
1. Ensure that the IIS server trusts the Root Authority certificate of the Certificate
Authority that issued the ALM server certificate.
2. Open the URL Rewrite Rule for qcbin:
l
Remove the HTTP_X_FORWARDED_PROTO server variable.
l
Change the protocol from http to https.
ALM External Authentication Configuration Guide
Web Server Configuration
ALM (12.53 and later) Page 19 of 51

Smart Card Configuration
When smart card authentication is enabled on ALM, users are required to provide a
certificate when connecting. Once the user’s certificate is validated, the user is
authenticated by the ALM server. Before enabling smart card authentication,
ensure the following steps are completed:
l
The web server works over the HTTPS protocol. For details, see "Configure
Apache as a Secure Reverse Proxy" on page23.
l
The web server is configured as a reverse proxy that requires a client certificate.
For details, see "Configure Apache to Require a Client Certificate " on page25.
l
The web server is configured to pass certificate details to ALM. For details, see
"Configure the Apache SSL Proxy Server to Work with Smart Card" on page26.
Note: For IIS, the above steps are described in "Configure IIS as a Secure
Reverse Proxy" on page27 and "Configure IIS to Require a Client Certificate"
on page28.
Note: For non-interactive user communication, such as testing tools running
on clients, you have obtained standard client certificates from your
Certificate Authority (CA). Ensure that your ALM front-end web server trusts
this CA. These certificates must be issued to a valid ALM user.
Note: For additional details on configuring smart card authentication in ALM,
see this KB article.
This chapter includes
ALM External Authentication Configuration Guide
Smart Card Configuration
ALM (12.53 and later) Page 20 of 51

• Access ALM
21
• Prepare Certificates
22
• Configure Apache as a Secure Reverse Proxy
23
• Configure Apache to Require a Client Certificate
25
• Configure the Apache SSL Proxy Server to Work with Smart Card
26
• Configure IIS as a Secure Reverse Proxy
27
• Configure IIS to Require a Client Certificate
28
Access ALM
You must determine how users are gong to log in to ALM.
Review your smart card certificate to identify which part of the Subject field is
going to be used by ALM to identify users during login.
l
If the user ID is an email address (E=name@domain), you can simply enable
External Authentication in ALM.
l
If user ID is in the common name (CN = <user id>), the name must also be
present in the Description field of the ALM user.
In this case, it is recommended to load this information using LDAP. For details
on LDAP, see the ALM help.
Configure LDAP settings in ALM and import user data, including the description,
from the LDAP server.
Ensure that you see the user IDin the description column. If the user IDis not in
the description column, ask your LDAP administrator for the name of the
attribute containing this information and map the Description field to this
attribute in LDAP settings (look under Data retrieving settings).
You can manually copy the user ID from the Subject field of the certificate to the
User Description field in ALM, making sure not to include "CN=".
If your user ID is in another format inside the Subject field, you need to specify the
pattern to search for. Following are the default patterns that ALM uses to search
for email and common name:
l
To match by email field:
*[eE][^=]*=([^,]*@[^,]*).*
l
To match by description field:
*?[cC][nN] *= *([^/,]*).*
You can also write your own pattern.
ALM External Authentication Configuration Guide
Smart Card Configuration
ALM (12.53 and later) Page 21 of 51

Prepare Certificates
1. Obtain standard certificate(s) from your Certificate Authority (CA). Make sure
that your ALM front-end server trusts this CA. Request the following from your
certificate authority:
l
The certificate authority certificate. For Apache, the certificate must be in
Base-64 format. For example, name the file TrustedCA.pem.
l
The server certificate issued to the reverse proxy server, either in an FQDN
form or using a wildcard.
l
The software client certificate (for non-interactive users, when a smart card
is not used).
2. Place the server certificate files in your web server configuration directory. For
IIS, you can work with PFX or PKCS12 certificates. For Apache, you need to
split the PFX certificate into two PEM files, the public certificate (for example,
WebServerPublicCert.pem) and the private key (for example,
WebServerPrivateCert.pem).
Note: If you receive certificates in different formats, you can use openssl
to convert them. To install openssl, go to
http://www.openssl.org/related/binaries.html.
l
To convert from CER, use openssl x509 -in /<webserver-
directory>/conf/cert.cer -outform pem -out cert.pem.
l
To convert from PFX, do the following:
o
Export the public key by using openssl pkcs12 -in /<webserver-
directory>/conf/cert.pfx -clcerts -nokeys -out certPublic.pem.
o
Export the private key by using openssl pkcs12 -in /<webserver-
directory>/conf/cert.pfx -nocerts -nodes -out certPrivate.pem.
3. Create an ALM user and make sure there is a physical smart card with a
certificate containing the user credentials. The user login value must be
embedded in an attribute in the certificate. When you run the Smart Card
Authentication Configuration Wizard you select the specific attribute.
ALM External Authentication Configuration Guide
Smart Card Configuration
ALM (12.53 and later) Page 22 of 51

4. If you are using a CRL server for the certificate revocation list check, and the
CRLserver resides outside of the ALM server network segment, ALM may
require a proxy to access the CRLserver. You must modify the <ALM
installation folder>\wrapper\wrapper.conf file. Add the following:
# *** IMPORTANT ***
# If you enable any of the options below, you MUST change <n> to
the next available
# consecutive number (based on the number of additional properties
in the current file).
# Otherwise, Java will not parse this properties file correctly!
wrapper.java.additional.<n>=-Dhttp.proxySet=true
wrapper.java.additional.<n+1>=-Dhttp.proxyHost=<the proxy host>
wrapper.java.additional.<n+2>=-Dhttp.proxyPort=<the proxy port>
wrapper.java.additional.<n+3>=-Dhttp.proxyUser=<the proxy user
name>
wrapper.java.additional.<n+4>=-Dhttp.proxyPassword=<the proxy
password>
5. Install the client certificate for the non-interactive user.
Configure Apache as a Secure Reverse
Proxy
To configure Apache to work as a secure reverse proxy:
1. Open the httpd.conf file.
2. Uncomment ssl_module:
LoadModule ssl_module modules/mod_ssl.so
3. Uncomment the httpd-ssl.conf file:
ALM External Authentication Configuration Guide
Smart Card Configuration
ALM (12.53 and later) Page 23 of 51

# Secure (SSL/TLS) connections
Include conf/extra/httpd-ssl.conf
4. Close the httpd.conf file and open the httpd-ssl.conf file. By default it is in
/<apache-directory>/conf/extra.
5. In the httpd-ssl.conf file, activate the SSL port 443:
Listen 443
6. Add the SSLProtocol parameter:
SSLProtocol -SSLv2 -SSLv3 +TLSv1
7. Change the cache settings:
LoadModule socache_shmcb_module modules/mod_socache_shmcb.so
SSLSessionCache "shmcb:<apacheAbsoluteFolder>/logs/ssl_scache
(512000)"
8. Modify the VirtualHost and ServerName parameters:
<VirtualHost <fully qualified server name>:443>
ServerName <fully qualified server name>:443
9. Add the SSL certificates to the VirtualHost section:
# Server Certificate
SSLCertificateFile " /<apache-
directory>/conf/WebServerPublicCert.pem"
# Server Private Key:
SSLCertificateKeyFile " /<apache-
directory>/conf/WebServerPrivateCert.pem"
10. Restart Apache so it will read the new configuration.
Run <apache-directory>/bin/apachectl -k restart
11. Verify that Apache works as a secure proxy server.
Go to https://webserver/qcbin. Make sure the ALM home page is displayed.
ALM External Authentication Configuration Guide
Smart Card Configuration
ALM (12.53 and later) Page 24 of 51

Note: The web server name must be in FQDN (fully qualified domain
name) format when using a secure connection.
12. After verifying that Apache works as a secure proxy server, close the non-
secure port.
a. Open the httpd.conf file.
b. Comment out the Listen parameter:
#Listen 80
Configure Apache to Require a Client
Certificate
To configure Apache to require a client certificate:
1. Open the httpd-ssl.conf file.
2. Find the related VirtualHost and modify as follows:
a. Add the certificate authority that Apache will trust for client certificates
# CA that Apache will trust for client certificates
SSLCACertificateFile " /<apache-directory>/conf/TrustedCA.pem"
b. Set the SSLVerifyClient parameter:
SSLVerifyClient require
SSLVerifyDepth 10
c. If you have a certificate revocation file, add the following line:
SSLCARevocationFile <full name of the revocation file>
SSLCARevocationCheck chain
d. If OCSP is needed, set the SSLOCSPEnable parameter:
SSLOCSPEnable on
ALM External Authentication Configuration Guide
Smart Card Configuration
ALM (12.53 and later) Page 25 of 51

3. Restart Apache so it will read the new configuration.
Run <apache-directory>/bin/apachectl -k restart
4. Verify that Apache accepts your client certificate.
Go to https://webserver/qcbin. Make sure the ALM home page opens after
you provide your client certificate.
Note: If you have several client certificates that can be used, the browser
should show the choice dialog box.
Configure the Apache SSL Proxy Server to
Work with Smart Card
To configure the Apache SSL proxy server to work with Smart Card:
1. Open the httpd.conf file
2. Uncheck headers_module:
LoadModule headers_module modules/mod_headers.so
3. Open the httpd-ssl.conf file.
4. Find the related VirtualHost and modify as follows:
a. Uncomment SSLOptions to extract the certificate:
SSLOptions +ExportCertData
b. Set the header that ALM will use to authenticate (the default value is CERT):
RequestHeader set CERT "%{SSL_CLIENT_CERT}s"
5. Restart Apache so it will read the new configuration.
Run <apache-directory>/bin/apachectl -k restart
6. Verify that Apache accepts your smart card certificate.
Go to https://<webserver>:<securePort>/qcbin. Make sure the ALM home
page opens after you provide your smart card certificate.
ALM External Authentication Configuration Guide
Smart Card Configuration
ALM (12.53 and later) Page 26 of 51
Note: The web server name must be in FQDN (fully qualified domain
name) format when using a secure connection.
Configure IIS as a Secure Reverse Proxy
First, you configure IIS as a secure reverse proxy, and then you configure IISto
work with a client certificate.
To configure IIS to work as a secure reverse proxy:
Note: For detailed instructions, refer to the IISdocumentation.
1. Ensure that you configured IISto work as a reverse proxy.
2. Install the server certificate in IIS.
Note: The server certificate must have a password protected private
key.
In IIS Manager:
l
Import your server certificate:
Select Server > Certificates > Import.
l
Add a listener on a secure port:
Select Default Website.
Edit Bindings.
Click Add.
Select https and select your certificate.
3. In SSL Settings for your website, configure IISto require an SSL connection.
4. Verify that you can access the ALM server through the IISvirtual IPusing the
https protocol.
ALM External Authentication Configuration Guide
Smart Card Configuration
ALM (12.53 and later) Page 27 of 51

Configure IIS to Require a Client Certificate
After you configure IIS as a secure reverse proxy, you configure IISto work with a
client certificate.
To configure IIS to work with a client certificate:
1. In SSL Settings for your website,configure IISto require a client certificate.
2. In IISManager, select your server farm, click Proxy, and enable Reverse
rewrite host in response headers.Also, review the value in Forward encoded
client certificate in the following header. This is the name of the header that
ALM will use to authenticate. The ALMdefault value is CERT. You can set the
value to CERT, or leave the value as is.
Note: If the value is not CERT, you must set the EXTERNAL_AUTH_
CERT_HEADER_NAME site parameter to match the value in Forward
encoded client certificate in the following header.
3. Restart IIS so it will read the configuration.
4. Verify that IISaccepts your smart card certificate.
Go to https://<webserver>:<securePort>/qcbin. Make sure the ALM home
page opens after you provide your smart card certificate.
Note: The web server name must be in FQDN (fully qualified domain
name) format when using a secure connection.
ALM External Authentication Configuration Guide
Smart Card Configuration
ALM (12.53 and later) Page 28 of 51
Single Sign-On Configuration
Implement a Single Sign-On (SSO) solution to use external authentication
providers such as Siteminder.
Note: By default, Siteminder’s Web agent configuration provides restrictions
for characters in URL and URL query parts. To support REST over SiteMinder,
these options must be modified.
This allows the ALM user to authenticate once through the external authentication
point without any need to provide credentials again until the end of the user
session.
The typical SSO server controls the user's access to various organizational
resources, protecting confidential personal and business information from
unauthorized users.
For details, see your SSO vendor's documentation.
Configure your SSO server to secure the following ALM resources:
l
/qcbin/*
l
/loadtest/* (for LoadRunner Enterprise)
Note: Ensure that your authentication scheme supports non-browser
clients. Otherwise, OTA integrations and add-ins will not work in an
SSOenvironment.
ALM External Authentication Configuration Guide
Single Sign-On Configuration
ALM (12.53 and later) Page 29 of 51

Before configuring external authentication in ALM, ensure that the SSO log in
process works. Ensure that you can pass SSOauthentication before the ALM home
page opens. If SSO is not working, work with your SSO administrator.
Note:
l
It is recommended to use SSLwith SSO. If SSL is not enabled, the SSO
cookie is vulnerable to being intercepted.
l
The SSO cookie must be HTTP-only.When it is set as a regular cookie, it is
vulnerable to XSS attacks.
If the same LDAP settings were defined in ALMand in SSO, you can authenticate
through both the SSO and ALM login screens using the same credentials. If not,
verify that the LDAP settings in ALM match those used by SSO.
ALM requires the SSO vendor to pass the authenticated user name as a header on
the HTTP request. Configure the header name and pattern in Site Administration.
For details, refer to "Configure Site Administration" on page32.
Note: There are no special processing considerations when configuring
Apache or IISfor SSO. If you are using an older version of SiteMinder (prior to
version 12.5), you must use Apache as the web server.
ALM External Authentication Configuration Guide
Single Sign-On Configuration
ALM (12.53 and later) Page 30 of 51

Verification Checklist
Perform the following verifications:
l
Verify that the web server works as a reverse proxy.
l
Verify that the site administration user can pass through the reverse proxy
authentication, either Smart Card or SSO.
l
Verify that the same site administration user exists in ALM and can log in to ALM.
Keep a separate session open and do not log out until the external authentication
process has been successfully completed.
ALM External Authentication Configuration Guide
Verification Checklist
ALM (12.53 and later) Page 31 of 51
ALM Configuration
This chapter describes how to configure ALM for external authentication
environments.
This chapter includes
• Configure Site Administration
32
• Verify External Authentication
35
• Configure Smart Card Authentication for APIs
36
• Configure SSO for APIs
37
• Special Configurations for Smart Card Authentication
38
• Special Configurations for SSO
38
• Configure External Authentication for Remote Machines
40
Configure Site Administration
1. Log in to Site Administration using the site administrator user.
2. Enable external authentication.
a. Click the Site Users tab, click the User Settings button, and select
Authentication Settings.
b. Under Authentication type, select External Authentication and click
Advanced Settings.
ALM External Authentication Configuration Guide
ALM Configuration
ALM (12.53 and later) Page 32 of 51

c. Select the Principal Type of authentication and enter the Pattern. The
default pattern is
*[eE][^=]*=([^,]*@[^,]*).*
, which is the pattern for the email
address.
Note: For smart card authentication, enter the Pattern you are using,
or leave the Pattern empty if you are using the default pattern. For
SSOauthentication, enter (.*) as the Pattern.
For details, refer to the
Enabling External Authentication for Users
section in the
ALM help.
3. Set the site parameters as needed. For information on setting site parameters,
refer to the ALM help. For a list of external authentication site parameters, see
"External Authentication Site Parameters" on page47.
Note: Before setting the site parameters , click Refresh to see which site
parameters were set when you enabled external authentication.
The following site parameters are required for external authentication:
l
Valuing EXTERNAL_AUTH_MODE with Y invokes external authentication.
Note: This parameter can be set in the Authentication Settings screen.
l
Value EXTERNAL_AUTH_HEADER_NAME for SSOauthentication with the
name of the header in the HTTP request that contains the string from which
ALM extracts the user search key for the external authentication. The default
value is SM_USER.
l
Value EXTERNAL_AUTH_CERT_HEADER_NAME for smart card
authentication with the name of the header in the HTTP request that
contains the string from which ALM extracts the user search key for the
external authentication. The default value is CERT.
l
EXTERNAL_AUTH_USER_FIELD_PATTERN contains a regular expression
pattern. ALM replaces the string that matches the regular expression pattern
with the value that matches the pattern defined between the first pair of
braces.
ALM External Authentication Configuration Guide
ALM Configuration
ALM (12.53 and later) Page 33 of 51

Note: This parameter can be set in the External Authentication
Advanced Settings screen.
l
EXTERNAL_AUTH_USER_FIELD_TYPE determines how to search for the
valid ALMuser with the extracted user search key. If this parameter is valued
with email, ALM searches for a user email that matches the user search key.
If this parameter is valued with name, ALM searches the user description
field for a match to the user search key. If this parameter is valued with
email+name, ALM searches for a user email that matches the user search
key. If no match is found, ALMthen searches the user description field for a
match to the user search key.
Following are the default patterns that ALM uses to search for email and
common name:
o
To match by email field:
*[eE][^=]*=([^,]*@[^,]*).*
o
To match by description field:
*?[cC][nN] *= *([^/,]*).*
You can also write your own pattern.
Note: This parameter can be set in the External Authentication
Advanced Settings screen.
The following site parameters are optional, depending on the specific external
authentication mode:
l
The client certificate validity should be verified by the authentication proxy.
However, some proxies do not perform some required verifications, so ALM
performs the verification. Valuing EXTERNAL_AUTH_CERTIFICATE_
POLICY_CHECK with Y invokes the ALMverification. If the certificate
contains policy information, the verification is performed. If the certificate
does not contain policy information and EXTERNAL_AUTH_IS_POLICY_
REQUIRED is valued with Y, ALM does not allow the user to log in. If the value
is N, ALM ignores the verification.
l
When ALM performs the verification, it checks whether the client certificate
has at least one policy defined in EXTERNAL_AUTH_CERTIFICATE_VALID_
ALM External Authentication Configuration Guide
ALM Configuration
ALM (12.53 and later) Page 34 of 51
POLICY. If this parameter is not valued , ALM does not allow the user to log
in.
l
Value EXTERNAL_AUTH_CERTIFICATE_CRL_CHECK with Y to check
whether the client certificate is in the certificate revocation list (CRL). If the
client certificate does not contain information about the CRL distribution
point, ALM does not perform this check even if it is enabled. If the client
certificate is in the CRL or if ALMcannot access the CRL distribution point,
ALMdoes not allow the user to log in.
l
Value EXTERNAL_AUTH_CERTIFICATE_LOCAL_CRL_CHECK with Y to
check whether the client certificate is in a local CRL. The folder that contains
the CRLis defined in EXTERNAL_AUTH_CERTIFICATE_CRL_FOLDER. If this
parameter is not set, ALM does not perform this check even if it is enabled.
The CRL files have .crl or .pem extensions.
l
Value EXTERNAL_AUTH_CERTIFICATE_OCSP_CHECK with Y to check the
client certificate status using an online certificate status protocol (OCSP).
This check is not performed if EXTERNAL_AUTH_CERTIFICATES_FILE is not
valued. If the client certificate contains OSCP URLs, ALM perform this
verification. If the client certificate does not contain OSCP URLs and
EXTERNAL_AUTH_CERTIFICATE_OCSP_REQUIRED is Y, ALMdoes not
allow the user to log in. If this parameter is N and the client certificate does
not contain OSCP URLs, ALMignores this check. If ALM fails to access the
OCSP URL, the user is not allowed to log in.
l
Value ALLOW_HTTP_METHOD_OVERRIDE with Y if the SiteMinder server
rejects Post or Delete HTTP requests.
Verify External Authentication
1. Verify that the external authentication mode is active and working.
l
Do not log out of Site Administration.
l
From another client machine, try to log in to Site Administration using
external authentication.
ALM External Authentication Configuration Guide
ALM Configuration
ALM (12.53 and later) Page 35 of 51

o
Go to ALM using the web server address (https://<webserver>/qcbin/).
o
Click Site Administration. Site Administration should open without
displaying the username and password screen.
Note: If you cannot log in, see "Troubleshooting" on page44.
2. Verify that the external authentication mode is working for other users, such as
project administrators.
Configure Smart Card Authentication for
APIs
To use APIs with smart card authentication, the following changes must be made.
l
OTAAPI:
When the user attempts to log in, a window appears and the user selects the
proper certificate to establish an SSL connection. If the application is not
supposed to work in interactive mode or if the user frequently logs in, the user
can specify a default certificate.
To specify the default certificate, in ALM go to Help >ALMTools >Webgate
Customization. On the Web Server Settings tab, select the appropriate
WebClient certificate mode, and select your default certificate.
The WebClient certificate modes are explained as follows:
l
Not specify mode – This mode is for backward compatibility with applications
developed before external authentication was available. If the certificate is not
applied, it works like the Interactive mode.
l
Interactive mode – This mode is for interactive use, where a screen appears if
the certificate is not provided or cannot be applied to the connection. To
enable this mode, use ITDConnection9:: SetExecutionMode().
l
Non-interactive mode – This mode is for non-interactive use, where an error
code is returned if the certificate is not provided or cannot be applied to the
connection. To enable this mode, use ITDConnection9:: SetExecutionMode().
ALM External Authentication Configuration Guide
ALM Configuration
ALM (12.53 and later) Page 36 of 51

l
RESTAPI:
Note: The REST API is a technical preview.
l
Web browser extension (REST clients) – The web browser establishes the SSL
connection. When attempting to connect, a certificate selection window
appears. After the certificate is applied, REST API continues as usual.
l
Non browser REST Clients – The REST client establishes the SSL connection,
after which REST API continues as usual.
Configure SSO for APIs
To use APIs with SSO authentication, the following changes must be made.
l
OTAAPI:
When the user attempts to log in, a window appears and the user enters the
proper credentials to pass SSO authentication. If the application is not supposed
to work in interactive mode or if the user frequently logs in, the user can specify
default credentials.
To specify the default credentials, in ALM go to Help >ALMTools >Webgate
Customization. On the Web Server Settings tab, enter Web Server Username
and Web Server Password, and select Add basic authentication header.
l
RESTAPI:
Note: The REST API is a technical preview.
l
Web browser extension (REST clients) – The web browser authenticates via
the connection itself, so when attempting to connect, the browser requests
the SSO credentials. After the SSO credentials are applied, REST API
continues as usual.
l
Non browser REST Clients – The REST client passes the SSO authentication,
after which REST API continues as usual.
ALM External Authentication Configuration Guide
ALM Configuration
ALM (12.53 and later) Page 37 of 51

Note: SiteMinder does not allow sending URLs that include the [']
character (single quote). To send such URLs, either replace the single
quote with double quotes or change the SiteMinder settings to allow the
single quote character.
Special Configurations for Smart Card
Authentication
To use the following ALM components and features with smart card
authentication, the following changes must be made.
l
ALM Client MSIGenerator:
ALM Client MSI Generator does not fully support external authentication. To use
MSIGenerator with external authentication, perform the following:
l
Install ALM Client MSI Generator on the ALMserver.
l
Value the ALM server address field in MSI Generator with the URL of the ALM
server on which ALM Client MSI Generator is installed.
l
Specify the URL of the server that end users access in the Additional Servers
section of the Generate Client MSI for ALM Server page.
l
Smart Repository
Smart Repository FTP access is not available from remote clients when external
authentication is enabled. To access Smart Repository, the user must connect to
it from any client (including localhost) after the web proxy, with ALM credentials.
Note: Only ALM credentials are used. If LDAP integration was enabled with
external authentication, ensure that the user's ALM credentials are valued.
Special Configurations for SSO
To use the following ALM components and features with SSO, the following
changes must be made:
ALM External Authentication Configuration Guide
ALM Configuration
ALM (12.53 and later) Page 38 of 51

l
All QCCH(QC Connectivity Helper) integrations:
You can only integrate with components and features, such as UFT, Load
Runner, and Business ViewsExcel reports, over QCCP, using the basic
authentication mode.
Note: We recommend using the
Basic authentication over SSL
option.
l
ALM Client MSIGenerator:
ALM Client MSI Generator does not fully support external authentication. To use
MSIGenerator with external authentication, perform the following:
l
Install ALM Client MSI Generator on the ALMserver.
l
Value the ALM server address field in MSI Generator with the URL of the ALM
server on which ALM Client MSI Generator is installed.
l
Specify the URL of the server that end users access in the Additional Servers
section of the Generate Client MSI for ALM Server page.
l
Micsrosoft Word add-in:
a. In the Web Server Settings tab of the Webgate Customization tool, enable
Add basic authentication header and select Do not add when a cookie is
present.
b. When exporting data to ALM from Word:
i. In the ALM Export Wizard - Step 1 of 5 dialog box, enter the ALM URL,
enable Force Basic Authentication as needed, and click Next.
Note: Force Basic Authentication is optional, and should only be
enabled if you get an invalid server response message.
ii. Enter your credentials and click OK.
Note: If your credentials are defined in the Webgate Customization
tool, the ALM Export Wizard - Step 3 of 5 dialog box opens without
requiring any login details.
iii. Continue with the ALM Export Wizard.
ALM External Authentication Configuration Guide
ALM Configuration
ALM (12.53 and later) Page 39 of 51

Note: After making any changes in the Webgate Customization tool, you
must restart Word for the changes to take effect.
l
Smart Repository
Smart Repository FTP access is not available from remote clients when external
authentication is enabled. To access Smart Repository, the user must connect to
it from any client (including localhost) after the web proxy, with ALM credentials.
Note: Only ALM credentials are used. If LDAP integration was enabled with
external authentication, ensure that the user's ALM credentials are valued.
Configure External Authentication for
Remote Machines
To run tests on remote machines, configure the remote machine to interact with
the ALMserver using any batch certificate.
For smart card authentication:
1. Install the batch certificate on the remote machine.
2. On the Import Certificate Wizard, uncheck Enable strong private key
protection.
3. Run the Webgate Customization tool. In ALM, go to Help > ALM Tools >
Webgate Customization.
4. Under Webclient Certificates, select Use client certificate - Non-interactive
mode, and select the batch certificate.
5. If the proxy server requires authentication, it must be configured on the remote
machine. For details, see "Configure Proxy Authentication" on page10.
6. Run the test from the ALM server. The remote machine connects to the ALM
server using the batch certificate.
For SSOauthentication:
ALM External Authentication Configuration Guide
ALM Configuration
ALM (12.53 and later) Page 40 of 51
1. Run the Webgate Customization tool. In ALM, go to Help > ALM Tools >
Webgate Customization.
2. On the Web Server Settings tab enter Web Server Username and Web Server
Password, and select Add basic authentication header.
3. If the proxy server requires authentication, it must be configured on the remote
machine. For details, see "Configure Proxy Authentication" on page10.
4. Run the test from the ALM server. The remote machine connects to the ALM
server using the basic authentication credentials.
ALM External Authentication Configuration Guide
ALM Configuration
ALM (12.53 and later) Page 41 of 51
Limitations
The following ALM components and features are not supported with Smart
Card external authentication:
l
ALI
l
Analysis items sharing
l
Enterprise Collaboration for ALM
l
ALM Explorer
l
ALM Lab Service
l
ALMSynchronizer
l
Enterprise Integration Module for SAP Solution Manager
l
Service Test Management
l
Lab Server-Side Execution
l
MicroSoft Excel add-in
l
LoadRunner Enterprise host over cloud
l
Service Virtualization
l
Sprinter (Not supported in releases prior to Sprinter 12.52)
l
TaskTop
l
Workflow - you cannot connect as another user via workflow
The following ALM components and features are not supported with SSO
external authentication:
l
ALI
l
Analysis items sharing
l
Enterprise Collaboration for ALM
l
ALM Lab Service
l
Enterprise Integration Module for SAP Solution Manager
l
Service Test Management
l
Lab Server-Side Execution
ALM External Authentication Configuration Guide
Limitations
ALM (12.53 and later) Page 42 of 51
l
MicroSoft Excel add-in
l
LoadRunner Enterprise host over cloud
l
Service Virtualization
l
Synchronizer
l
TaskTop
l
Test Types:
l
Custom Test
l
Sprinter (Not supported in releases prior to Sprinter 12.52)
l
System Test
ALM External Authentication Configuration Guide
Limitations
ALM (12.53 and later) Page 43 of 51

Troubleshooting
Following are troubleshooting suggestions for issues relating to external
authentication:
Problem:
SSO header and data are unknown.
Resolution:
l
Turn off External Authentication.
l
Add the DUMP_REQUEST_HEADERS site parameter with a value of Y and set the
debug level for the site administration logs to Debug.
l
Enable External Authentication.
l
Try to log in to ALM Site Administration.
l
Check the Site Administration logs to see what data the Authentication server
sent. Search for your user ID and identify the header that contains it. This header
must be used in the External Authentication wizard.
Note: To help find the entry in the Site Administration logs, filter the ERR
entries and search for the exact time stamp associated with the error. You
will see more info under the DBG entry.
l
Apply the correct header and pattern.
l
Once the problem is solved, turn off debug and set DUMP_REQUEST_HEADERS
to N.
Problem:
Authentication to Site Administration failed due to an incorrect configuration.
Possible Cause:
l
User with SSO data was not added to the Site Administrators list.
l
Incorrect or missed SSO data in the user’s properties.
l
The pattern or header is incorrect.
ALM External Authentication Configuration Guide
Troubleshooting
ALM (12.53 and later) Page 44 of 51
Resolution:
l
Execute the following SQL query :
UPDATE PARAMS SET PARAM_VALUE='N' WHERE PARAM_NAME='EXTERNAL_AUTH_
MODE'
l
Restart ALM service.
l
Log in to Site Administration and verify the configuration.
Information about the Site Administration schema and database can be found at
siteadmin.xml, located in <ALM_INSTALLATION_
FOLDER>\application\20qcbin.war\WEB-INF.
Problem:
Failed to log in to the CAC environment with HTTP error 502.
Possible Cause:
SSL is terminating on the ALM server, but the IIS URL Rewrite Rule contains an
indicator for SSL offloading.
Resolution:
If the ALM server requires SSL, remove the HTTP_X_FORWARDED_PROTO server
variable from the URL Rewrite Rule for qcbin.
Problem:
LoadRunner Enterprise configuration fails with an Action not authorized message.
Possible Cause:
l
The ALM internal URLis incorrect.
l
The LoadRunner Enterprise server internal URLis incorrect.
Resolution:
Ensure that the ALM internal URLand the LoadRunner Enterprise server internal
URLare correct.
ALM External Authentication Configuration Guide
Troubleshooting
ALM (12.53 and later) Page 45 of 51
Problem:
When you must apply a client certificate to a connection, for example when
running VAPI-XPtests, the Select Certificate dialog box is not seen.
Possible Cause:
The Select Certificate dialog box is open, but is sometimes hidden.
Resolution:
Manually switch to the Select Certificate dialog box.
Problem:
When working with Smart Card authentication, the authentication screen appears
when ALMmakes an independent connection. For example, when the ALM
Welcome page or the ALM Help opens, the authentication screen also appears.
Resolution:
Enter the required authentication information each time the authentication screen
appears.
Problem:
When working with Smart Card authentication, the authentication screen appears
when you open a new ALMsession in a separate tab.
Resolution:
Enter the required authentication information in the new tab. You can avoid this
issue by configuring the TabProcGrowth registry parameter.
Problem:
When saving an ALM session with Smart Card authentication using IIS, an error
message appears and the session cannot be saved.
Resolution:
In IIS, increase the value of the uploadReadAheadSize parameter. The default
value is 58 KB.
ALM External Authentication Configuration Guide
Troubleshooting
ALM (12.53 and later) Page 46 of 51

External Authentication Site
Parameters
Following are the external authentication site parameters:
Parameter Description
ALLOW_HTTP_
METHOD_
OVERRIDE
This parameter controls whether to allow REST API requests
with X-HTTP-Method-Override header.
If this parameter is set to Y, REST API requests with X-
HTTP-Method-Override header are allowed.
If this parameter is set to N or is not defined, REST API
requests with X-HTTP-Method-Override header are not
allowed.
The default is N.
ALLOW_WEBUI_
HTTP_METHOD_
OVERRIDE
This parameter controls whether to allow HTTP method
override.
If this parameter is set to Y, HTTP method can be
overridden.
If this parameter is set to N or is not defined, HTTP method
override is not allowed.
The default is N.
EXTERNAL_
AUTH_MODE
Determines if external authentication is invoked (Y).
Default:N
This parameter can be set in the Authentication Settings
screen.
Note: Configure other parameters before switching
ALM to external authentication mode, otherwise you
can lose ALM connectivity.
ALM External Authentication Configuration Guide
External Authentication Site Parameters
ALM (12.53 and later) Page 47 of 51

Parameter Description
EXTERNAL_
AUTH_HEADER_
NAME
The name of the header in the HTTP request that contains
the string from which ALM extracts the user search key for
the external authentication.
This parameter is used for SSOauthentication.
Default:SM_USER
Note: This parameter and EXTERNAL_AUTH_CERT_
HEADER_NAME cannot both be set.
EXTERNAL_
AUTH_CERT_
HEADER_NAME
The name of the header in the HTTP request that contains
the PEM encoded public client certificate from which ALM
extracts the user search key for the external authentication.
ALM extracts the user search key from the subject field of
the certificate.
This parameter is used for smart card authentication.
Default:CERT
Note: This parameter and EXTERNAL_AUTH_HEADER_
NAME cannot both be set.
EXTERNAL_
AUTH_TYPE
Set this parameter to
CAC
for smart card authentication.
EXTERNAL_
AUTH_USER_
FIELD_TYPE
Determines how the user is identified in the external
authentication data (email, name, or email+name).
Default:email+name
This parameter can be set in the External Authentication
Advanced Settings screen.
ALM External Authentication Configuration Guide
External Authentication Site Parameters
ALM (12.53 and later) Page 48 of 51

Parameter Description
EXTERNAL_
AUTH_USER_
FIELD_PATTERN
Determines how to extract authentication data from the
HTTP header specified by the EXTERNAL_AUTH_HEADER_
NAME or the EXTERNAL_AUTH_CERT_HEADER_NAME
parameter.
Default:
l
When user matches by email field: *[eE][^=]*=([^,]*@
[^,]*).*
l
When user matches by description field: *?[cC][nN] *= *
([^/,]*).*
This parameter can be set in the External Authentication
Advanced Settings screen.
EXTERN_AUTH_
VALIDATE_
USER_IN_LDAP
Determines whether ALM contacts the LDAP server (if it
exists) to ensure that this user is active.
Default: N
EXTERNAL_
AUTH_
CERTIFICATES_
FILE
The name of the file that holds all the CA and Intermediate
certificates trusted by ALM. The file must contain PEM
format concatenated certificates.
EXTERNAL_
AUTH_
CERTIFICATE_
CRL_CHECK
Determines whether to enable or disable the online
certificate revocation list (CRL) check.
Default:Y
Note: For smart card authentication, if the online
certification revocation list (CRLDP) is required, set
this parameter to Y.
EXTERNAL_
AUTH_
CERTIFICATE_
LOCAL_CRL_
CHECK
Determines whether to enable or disable the local CRL
check.
Default:Y
ALM External Authentication Configuration Guide
External Authentication Site Parameters
ALM (12.53 and later) Page 49 of 51

Parameter Description
EXTERNAL_
AUTH_MATCH_
DELTACRL_BY_
ISSUER
Determines ALM behavior when the folder in EXTERNAL_
AUTH_CERTIFICATE_CRL_FOLDER contains delta CRL files
without base CRL files.
If this parameter is valued with Y, login is disabled for users
if the delta CRL file is issued by same issuer.
If this parameter is valued with N, then login is disabled even
if there is one delta CRL file in the folder.
Default:Y
EXTERNAL_
AUTH_
CERTIFICATE_
CRL_FOLDER
The full path to the folder containing the CRLfiles.
Note: For smart card authentication, if delta CRL
validation is needed, value this parameter with the
location of the folder on the server that contains the
CRL files. This parameter does not replace the
parameter in the Apache configuration file. Both
Apache and the ALM server check the CRL files.
EXTERNAL_
AUTH_
CERTIFICATE_
DATE_CHECK
Determines whether to enable or disable the certificate date
check.
Default:Y
EXTERNAL_
AUTH_
CERTIFICATE_
POLICY_CHECK
Determines whether to enable or disable the certificate
policy check.
Default:Y
EXTERNAL_
AUTH_
CERTIFICATE_
VALID_POLICY
The list of valid certificate policy IDs.
Note: For smart card authentication, if certificate
policy validation is needed, value this parameter.
ALM External Authentication Configuration Guide
External Authentication Site Parameters
ALM (12.53 and later) Page 50 of 51

Parameter Description
EXTERNAL_
AUTH_IS_
POLICY_
REQUIRED
Determines if each client certificate is required to have a
policy.
Default:Y
Note: If the value is Y, each client certificate must
have a valid policy which matches the EXTERNAL_
AUTH_CERTIFICATE_VALID_POLICY parameter. If the
value is N, the client certificate does not need to have
a policy. However, whenever a policy is defined in the
certificate, it must always match the EXTERNAL_
AUTH_CERTIFICATE_VALID_POLICY.
EXTERNAL_
AUTH_
HARDWARE_
CARD_IS_
REQUIRED
Determines whether each client certificate is required to
have a hardware extended key (relevant for Interactive and
Not Specified client execution modes).
Default:Y
EXTERNAL_
AUTH_
EXTENDED_
HARDWARE_
KEYS
The valid hardware extended keys, separated by commas.
Default:1.3.6.1.4.1.311.20.2.2
EXTERNAL_
AUTH_
EXECUTION_
MODE_HEADER_
NAME
The name of the header in the HTTP request that holds the
execution mode of the client (NOT_SPECIFIED,
INTERACTIVE, NON_INTERACTIVE).
Default:NOT_SPECIFIED
EXTERNAL_
AUTH_
CERTIFICATE_
OCSP_CHECK
Determines whether to enable or disable the online
certificate status protocol (OCSP) check.
Default:N
EXTERNAL_
AUTH_
CERTIFICATE_
OCSP_REQUIRED
Determines whether each client certificate is required to
have an OCSP link.
Default: Y
ALM External Authentication Configuration Guide
External Authentication Site Parameters
ALM (12.53 and later) Page 51 of 51
