
FORMULA VEE
USER MANUAL

2
FORMULA VEE // USER MANUAL
Introduction » 5
Tech Specs » 4
A Message From iRacing » 3
Getting Started » 5
Tires » 10
Dash Pages » 7
Loading An iRacing Setup » 6
Chassis » 11
Dash Configuration » 7
Shift Lights » 8
Front » 11
Left/Right Rear » 14
Left/Right Front » 12
Rear » 15
ADVANCED SETUP OPTIONS
GENERAL INFORMATION
Table of Contents
CLICK TO VIEW A SECTION

Dear iRacing User,
Congratulations on your purchase of the Formula vee! From all of us at iRacing, we appreciate your support
and your commitment to our product. We aim to deliver the ultimate sim racing experience, and we hope
that you’ll find plenty of excitement with us behind the wheel of your new car!
One of the most legendary junior open-wheel racing formulas is part of iRacing! The Formula Vee is based
on the stock parts a pre-1963 Volkswagen Beetle, combining them with a tubeframe chassis and fiberglass
or carbon fiber open-wheel body. Part of the SCCA Runoffs since 1964, the cars have also proven highly
popular around the world, with iconic names from Niki Lauda to Keke Rosberg starting their careers in
these venerable machines.
The following guide explains how to get the most out of your new car, from how to adjust its settings off of
the track to what you’ll see inside of the cockpit while driving. We hope that you’ll find it useful in getting
up to speed.
Thanks again for your purchase, and we’ll see you on the track!

4
FORMULA VEE // USER MANUAL
POWER
UNIT
CHASSIS
FORMULA VEE | TECH SPECS
H-BEAM FRONT AND SWING AXLE
REAR SUSPENSION.
AIR-COOLED FLAT-4
LENGTH
3426 mm
134.88 in
DISPLACEMENT
1.4 Liters
85.4 cid
WIDTH
1097 mm
43.2 in
TORQUE
76 lb-ft
103 Nm
WHEELBASE
2090 mm
82.3 in
POWER
69 bhp
51 kW
DRY WEIGHT
396 kg
873 lbs
RPM LIMIT
7400
WET WEIGHT
WITH DRIVER
481 kg
1060 lbs

5
FORMULA VEE // USER MANUAL
Introduction
The information found in this guide is intended to provide a deeper understanding of the
chassis setup adjustments available in the garage, so that you may use the garage to tune
the chassis setup to your preference.
Before diving into chassis adjustments, though, it is best to become familiar with the car and track. To that end, we have provided
baseline setups for each track commonly raced by these cars. To access the baseline setups, simply open the Garage, click
iRacing Setups, and select the appropriate setup for your track of choice. If you are driving a track for which a dedicated baseline
setup is not included, you may select a setup for a similar track to use as your baseline. After you have selected an appropriate
setup, get on track and focus on making smooth and consistent laps, identifying the proper racing line and experiencing tire wear
and handling trends over a number of laps.
Once you are confident that you are nearing your driving potential with the included baseline setups, read on to begin tuning the
car to your handling preferences.
GETTING STARTED
Before jumping into the car, you are encouraged to map a H-pattern shifter and a manual foot clutch (if available). The Formula Vee
uses a traditional direct selection transmission with four forward gears plus reverse.
The ratios used for this gearbox are not that of a typical modern racecar and as such, first gear is exclusively used for pulling
the car away from stationary while second is rarely used except for very slow speed corners such as tight hairpins. The majority
of your time will be spent using third and fourth gears and it is best to treat these as ‘low’ and ‘high’ respectively. As the ratio
spacing is so large, downshifting to second for most corners will result in locking of the rear axle and a spin, excessive shifting
is not optimal in this car. Upshifting is recommended at the illumination of the third red shift lights on the dashboard. This is at
approximately 6400 rpm.
Finally, it is recommended to map a control for Brake Bias adjustment. While this is not mandatory to drive the car, this will allow
you to alter the brake bias to suit as you drive instead of returning to the garage.
FORMULA VEE // INTRODUCTION

6
FORMULA VEE // USER MANUAL
LOADING AN iRACING SETUP
Upon loading into a session, the car will automatically load the iRacing Baseline setup [baseline.sto]. If you would prefer one of
iRacing’s pre-built setups that suit various conditions, you may load it by clicking Garage > iRacing Setups > and then selecting the
setup to suit your needs.
If you would like to customize the setup, simply make the changes in the garage that you would like to update and click apply.
If you would like to save your setup for future use click “Save As” on the right to name and save the changes.
To access all of your personally saved setups, click “My Setups” on the right side of the garage.
If you would like to share a setup with another driver or everyone in a session, you can select “Share” on the right side of the
garage to do so.
If a driver is trying to share a setup with you, you will find it under “Shared Setups” on the right side of the garage as well.
FORMULA VEE // INTRODUCTION

7
FORMULA VEE // USER MANUAL
FORMULA VEE // DASH PAGES
Dash Configuration
Far Left Low oil pressure warning (illuminates orange when oil pressure is low)
Second from left Engine oil pressure (psi only)
Far Right Gearbox neutral indicator (illuminates green when in neutral)
Digital Dash top Graphical depiction of engine rpm
Digital Dash center Left Engine oil temperature (Celsius or Fahrenheit)
Digital Dash center Currently selected gear
Digital Dash center right Current road speed (km/h or mph)
Digital Dash lower left Current session lap
Digital Dash lower right Last lap time

8
FORMULA VEE // USER MANUAL
SHIFT LIGHTS
1 Red 6000 rpm
2 Red 6200 rpm
3 Red 6400 rpm
4 Red 6600 rpm
5 Red 6800 rpm
FORMULA VEE // DASH PAGES

9
FORMULA VEE // USER MANUAL
Advanced Setup Options
This section is aimed toward more advanced users who want to
dive deeper into the different aspects of the vehicle’s setup. Making
adjustments to the following parameters is not required and can lead to
significant changes in the way a vehicle handles. It is recommended that
any adjustments are made in an incremental fashion and only singular
variables are adjusted before testing changes.
FORMULA VEE // ADVANCED SETUP OPTIONS
10
FORMULA VEE // USER MANUAL
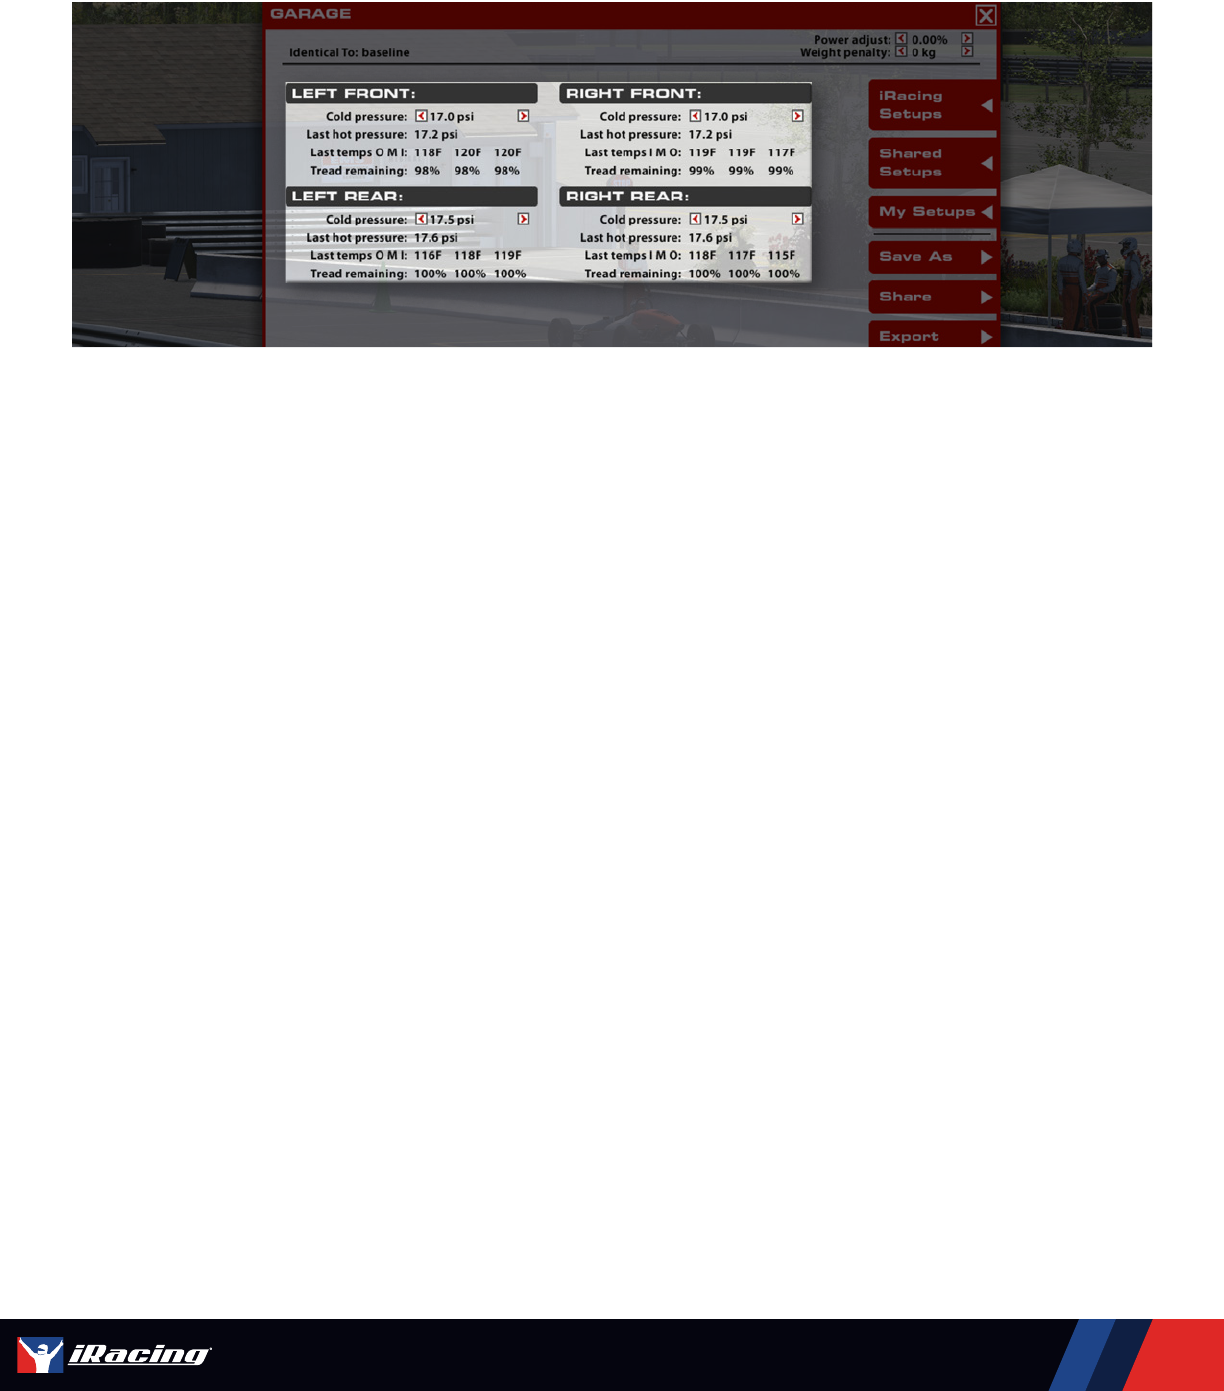
Tires
COLD AIR PRESSURE
Air pressure in the tire when the car is loaded into the world. Higher pressures will reduce rolling drag and heat buildup, but will
decrease grip. Lower pressures will increase rolling drag and heat buildup, but will increase grip. Higher speeds and loads require
higher pressures, while lower speeds and loads will see better performance from lower pressures. Cold pressures should be set
to track characteristics for optimum performance. Generally speaking, it is advisable to start at lower pressures and work your
way upwards as required.
HOT AIR PRESSURE
Air pressure in the tire after the car has returned to the pits. The difference between cold and hot pressures can be used to
identify how the car is progressing through a run in terms of balance, with heavier-loaded tires seeing a larger difference between
cold and hot pressures. Ideally, tires that are worked in a similar way should build pressure at the same rate to prevent a change
in handling balance over the life of the tire, so cold pressures should be adjusted to ensure that similar tires are at similar
pressures once up to operating temperature. Hot pressures should be analyzed once the tires have stabilized after a period
of laps. As the number of laps per run will vary depending upon track length a good starting point is approximately 50% of a
full fuel run.
TIRE TEMPERATURES
Tire carcass temperatures, measured via Pyrometer, once the car has returned to the pits. Wheel Loads and the amount of work
a tire is doing on-track are reflected in the tire’s temperature, and these values can be used to analyze the car’s handling balance.
Center temperatures are useful for directly comparing the work done by each tire, while the Inner and Outer temperatures are
useful for analyzing the wheel alignment (predominantly camber) while on track. These values are measured in three zones across
the tread of the tire. Inside, Middle and Outer.
TREAD REMAINING
The amount of tread remaining on the tire once the car has returned to the pits. Tire wear is very helpful in identifying any possible
issues with alignment, such as one side of the tire wearing excessively, and can be used in conjunction with tire temperatures to
analyze the car’s handling balance. These values are measured in the same zones as those of temperature.
FORMULA VEE // TIRES & AERO
11
FORMULA VEE // USER MANUAL
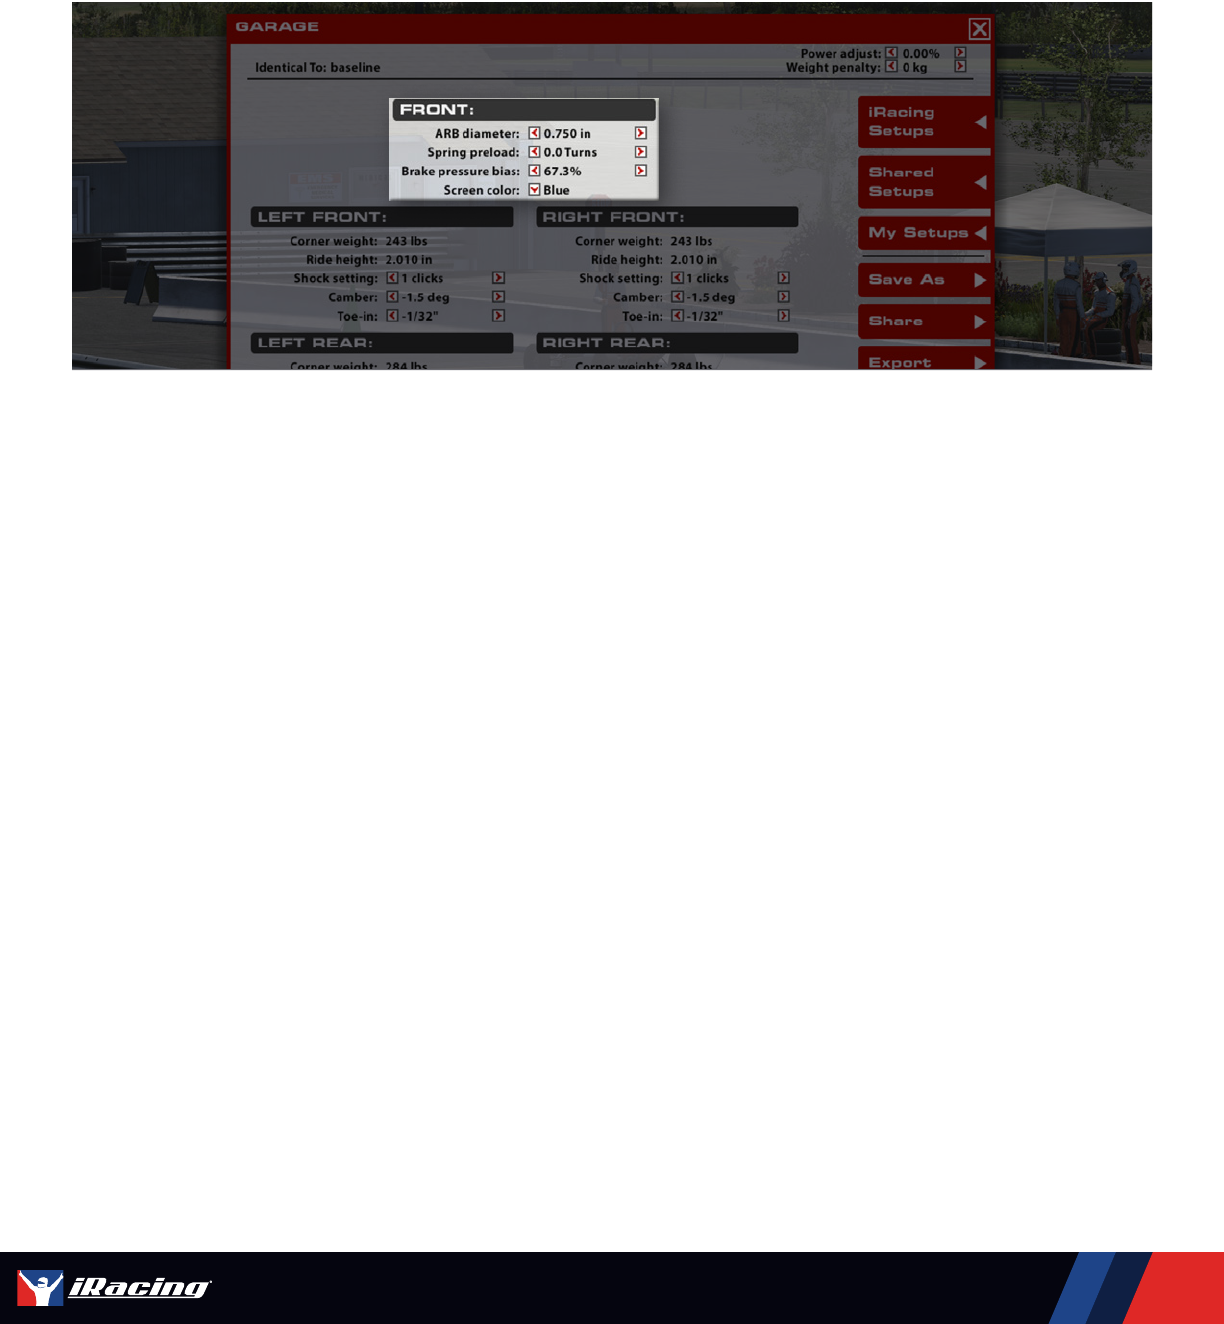
Chassis
FRONT
ARB DIAMETER
The ARB (Anti-Roll Bar) size influences the stiffness of the front suspension in roll, such as when navigating a corner. Increasing the
ARB size will increase the roll stiffness of the front suspension, resulting in less body roll but increasing mechanical understeer.
This can also, in some cases, lead to a more responsive steering feel from the driver. Conversely, reducing the ARB size will soften
the suspension in roll, increasing body roll but decreasing mechanical understeer. This can result in a less-responsive feel from the
steering, but grip across the front axle will increase. 4 ARB diameters are available ranging from 9.53 mm / ⅜” inch (softest)
to 19.05 mm / ¾” inch (stiffest). Of particular note is that there is no Rear ARB in the Formula Vee, nor does the rear spring
contribute to the roll stiffness of the car, this means that the Front ARB and Front Spring combined rates dictate the total roll
stiffness of the car. As such, in the real car it is common to use a stiff (sometimes the stiffest available) Front ARB.
SPRING PRELOAD
Used to adjust the ride height at this end of the car by changing the installed preload of the spring, increasing the number of turns
will lower the front ride height of the car while reducing the number of turns will raise the front ride height of the car.
BRAKE PRESSURE BIAS
Brake Bias is the percentage of braking force that is being sent to the front brakes. Values above 50% result in greater pressure
in the front brake line relative to the rear brake line which will shift the brake balance forwards increasing the tendency to lock up
the front tires but potentially increasing overall stability in braking zones. This should be tuned for both driver preference and track
conditions to get the optimum braking performance for a given situation.
SCREEN COLOR
A choice of 7 different colors are available for the digital dash background: Gray, Cyan, Blue, Green, Yellow, Red and Purple. This
option is adjustable from within the car as well as the garage.
FORMULA VEE // CHASSIS

12
FORMULA VEE // USER MANUAL
LEFT/RIGHT FRONT
CORNER WEIGHT
The weight underneath each tire under static conditions in the garage. Correct weight arrangement around the car is crucial
for optimizing a car for a given track and conditions. For the Formula Vee this cannot be easily influenced as individual corner
pushrods are non-adjustable. However, when running asymmetrical setups some difference in corner weights may
still be observed.
RIDE HEIGHT
Distance from ground to a reference point on the chassis, in this case the lower leading edge of the chassis (not the nose).
Adjusting ride heights is key for optimum performance as they directly impact the mechanical grip. Increasing front ride height
will allow for more weight transfer across the front axle while cornering, this will lead to an increase in understeer in most
cases while lowering the front ride height will decrease weight transfer across the front axle, increase oversteer and provide an
increase in overall performance through a reduction in CG height. As ride height decreases the spring rate should be increased
to compensate and prevent bottoming, typically, the lowest practical ride height without excessive track contact will result in the
best performance with smooth flat tracks allowing for lower ride heights than rough and undulating ones. Minimum legal front ride
height is 25.4 mm (1.0” inch).
SHOCK SETTING
Changes the overall damping of this linear shock in both compression and rebound; higher numbers indicate more damping with 0
being minimum damping and 5 being maximum damping. Higher settings will result in faster loading of the outside tire in transient
maneuvers which can make the car feel more responsive to the driver and increase braking stability, however, at rough tracks
excessive damping can lead to a loss in overall grip as the tire is subject to greater load variation.
CAMBER
Camber is the vertical angle of the wheel relative to the center of the chassis. Negative camber is when the top of the wheel is
closer to the chassis centerline than the bottom of the wheel, positive camber is when the top of the tire is farther out than the
bottom. Due to suspension geometry and corner loads, negative camber is desired on all four wheels. Higher negative camber
values will increase the cornering force generated by the tire, but will reduce the amount of longitudinal grip the tire will have
under braking. Excessive camber values can produce very high cornering forces but will also significantly reduce tire life, so it is
important to find a balance between life and performance. Increasing front camber values will typically result in increased front
axle grip during mid to high speed cornering but will result in a loss of braking performance and necessitate a rearward shift in
brake bias to compensate.
FORMULA VEE // CHASSIS

13
FORMULA VEE // USER MANUAL
TOE-IN
Toe is the angle of the wheel, looking from vertical, relative to the chassis centerline. Toe-in is when the front of the wheels are
closer to the centerline while Toe-out is when the front of the wheels are farther from the centerline than the rear of the tires.
On the front end, Toe will alter how quickly the tires respond to steering inputs and influence how stable the car is in a straight line.
Toe-out settings (negative garage value) will increase turn-in response and make the car less stable in a straight line, while Toe-in
(positive garage value) will increase straight-line stability while making initial steering response more sluggish.
FORMULA VEE // CHASSIS

14
FORMULA VEE // USER MANUAL
LEFT/RIGHT REAR
CAMBER
Due to the swing axle rear suspension design of the Formula Vee, rear camber cannot easily be changed however, this design
results in significant amounts of camber change with vertical suspension travel and is therefore tracked within the garage to aid
in this understanding. While it cannot be directly adjusted it can be influenced through other parameters in the rear suspension
such as pushrod offset (to limit maximum droop travel), spring perch offset (to set the static ride height) and spring rate
(increases or decreases the amount of travel due to load). As at the front of the car, it is desirable to have negative camber at
the rear for increased lateral grip during cornering while values closer to zero will increase longitudinal grip during braking and
acceleration. Of particular importance is ensuring that the camber does not become positive during braking events, this will lead
to a loss of both lateral and longitudinal capability and exacerbate lift-off oversteer events.
TOE-IN
At the rear of the car it is typical to run toe-in. Increases in toe-in will result in improved straight line stability and a reduction in
response during direction changes. Large values of toe-in should be avoided if possible as this will increase rolling drag and reduce
straight line speeds. Generally, it is advised to keep the left and right toe values equal to prevent crabbing or asymmetric handling
behavior; however, heavily asymmetric tracks such as Lime Rock Park may see a benefit in performance from running asymmetric
configurations of rear toe and other setup parameters.
FORMULA VEE // CHASSIS

15
FORMULA VEE // USER MANUAL
REAR
REAR RIDE HEIGHT
Distance from ground to a reference point on the rear of the chassis, in this case the lower trailing edge of the chassis. Increasing
rear ride height will allow for more weight transfer across the rear axle when cornering (more oversteer). Conversely, reducing
ride height will reduce the weight transfer across the rear axle (more understeer). Rear ride height is a critical tuning component
for mechanical balance and camber considerations, it may be necessary to trade-off some ride height control for improved rear
camber control. Minimum legal ride height is 114 mm (4.5” inches), maximum legal ride height is 152 mm (6.0” inches).
PUSHROD OFFSET
Primarily used to adjust the droop (extension) travel of the rear suspension but can be used to adjust the rear ride height. This
must be used in conjunction with the spring perch offset to achieve the desired goal. Reducing the pushrod length while reducing
the spring perch offset to keep a constant ride height results in a reduction in droop travel; this results in increased camber
control (reduced tendency to become positive) during braking events and potentially reduced lift-off oversteer. However,
excessive droop limitation can lead to the inside rear wheel lifting off the track which is undesirable as this will result in a loss of
forward drive due to the use of an open differential.
SPRING PERCH OFFSET
Used to adjust the rear ride height at this end of the car by changing the installed position of the spring, increasing the spring
perch offset will lower the rear ride height of the car while increasing the spring perch offset will raise the rear ride height of the
car. As noted above, it is utilized in conjunction with pushrod offset to alter maximum droop travel of the rear suspension.
FORMULA VEE // CHASSIS

16
FORMULA VEE // USER MANUAL
SPRING RATE
The installation of the rear spring in the Formula Vee is similar to that of a heave spring in a high downforce prototype or open
wheel car, this means that the spring is only effective at controlling pitch/heave moments and does not contribute to the roll
stiffness of the rear suspension. As such, a stiffer rear spring will result in a smaller variance in ride height between high and
low load cases and will provide improved platform and camber control at the expense of overall mechanical grip. This can be
particularly prominent when exiting slow speed corners with aggressive throttle application. A stiffer spring will tend to react
poorly during these instances especially so on rough tracks which will result in significant traction loss. Spring stiffness should
be matched to the needs of the racetrack and set such that the handling balance is consistent between high and low speed
cornering. As an example case, a car which suffers from high speed understeer but low speed oversteer could benefit from an
increase in rear spring stiffness. This will allow for a lower static rear height which will reduce rear weight transfer during slow
speed cornering while maintaining or even increasing the rear ride height in high speed cornering to reduce understeer. 6 options
for spring rate are available ranging from 13 N/mm (75 lbs/in) to 35 N/mm (200 lbs/in) in 4.4 N/mm (25 lbs/in) steps.
Spring perch offset must be adjusted to return the car to the prior static ride height after any spring rate change.
SHOCK SETTING
Changes the overall damping of this linear shock in both compression and rebound; higher numbers indicate more damping with
0 being minimum damping and 5 being maximum damping. Higher settings will result in faster loading of the rear tires during
acceleration events and can increase rear traction on smooth tracks. However, at rough tracks excessive damping can lead to a
loss in overall grip as the tire is subject to greater load variation. As with the spring, the shock has no impact during roll events.
FUEL LEVEL
The amount of fuel in the fuel tank. Tank capacity is 20 L (5.3 g). Adjustable in 1 L (0.26 g) increments.
FORMULA VEE // CHASSIS
