
PORSCHE 963 GTP
USER MANUAL

2
PORSCHE 963 GTP // USER MANUAL
Introduction » 6
Tech Specs » 5
A Message From iRacing » 4
Getting Started » 6
Tires/Aero » 15
Dash Pages » 8
Loading An iRacing Setup » 7
Tire Information » 15
Aero Settings » 16
Lockup Traction Control Lights » 11
Pit Limiter » 12
Shift Lights » 13
Aero Calculator » 16
Front » 18
Chassis » 18
Front Corners » 20
Rear Corners » 22
Rear » 23
Dampers » 25
ADVANCED SETUP OPTIONS
GENERAL INFORMATION
Table of Contents
CLICK TO VIEW A SECTION


Dear iRacing User,
After a five-year hiatus from top-level prototype racing, Porsche returned to the discipline in 2023 with the
all-new 963 for the IMSA WeatherTech SportsCar Championship’s GTP class. Partnering with Multimatic
to construct the chassis, the 963 made its racing debut at the 2023 24 Hours of Daytona with Porsche
Penske Motorsport, and more teams have begun to adopt the car around the world as the season has
continued. Penske’s Mathieu Jaminet and Nick Tandy gave the car its first win at Long Beach in its third
start of the IMSA season.
Powered by Porsche’s 4.6 liter, twin-turbocharged V8, the 9RD engine that powers the 963 makes
over 670 horsepower. As with other GTP cars, the car weighs 1,030 kg and features a spec
50kW hybrid system.
The following guide explains how to get the most out of your new car, from how to adjust its settings off of
the track to what you’ll see inside of the cockpit while driving. We hope that you’ll find it useful in getting
up to speed.
Thanks again for your purchase, and we’ll see you on the track!

5
PORSCHE 963 GTP // USER MANUAL
POWER
UNIT
CHASSIS
PORSCHE 963 GTP | TECH SPECS
DOUBLE-WISHBONE FRONT,
MULTILINK REAR SUSPENSION.
WATER-COOLED SIX-CYLINDER
BOXER ENGINE
LENGTH
5100 mm
200.8 in
DISPLACEMENT
4.6 Liters
280.3 cid
WIDTH
2000 mm
80.7 in
TORQUE
497 lb-ft
671 Nm
WHEELBASE
3148 mm
41.7 in
POWER
671 bhp
500 kW
DRY WEIGHT
1030 kg
2271 lbs
RPM LIMIT
8158
WET WEIGHT
WITH DRIVER
1187 kg
2616 lbs

6
PORSCHE 963 GTP // USER MANUAL
Introduction
The information found in this guide is intended to provide a deeper understanding of the
chassis setup adjustments available in the garage, so that you may use the garage to tune
the chassis setup to your preference.
Before diving into chassis adjustments, though, it is best to become familiar with the car and track. To that end, we have provided
baseline setups for each track commonly raced by these cars. To access the baseline setups, simply open the Garage, click
iRacing Setups, and select the appropriate setup for your track of choice. If you are driving a track for which a dedicated baseline
setup is not included, you may select a setup for a similar track to use as your baseline. After you have selected an appropriate
setup, get on track and focus on making smooth and consistent laps, identifying the proper racing line and experiencing tire wear
and handling trends over a number of laps.
Once you are confident that you are nearing your driving potential with the included baseline setups, read on to begin tuning the
car to your handling preferences.
GETTING STARTED
Before starting the car, it is recommended to map controls for Brake Bias, Traction Control and ABS adjustments. While this is
not mandatory to drive the car, this will allow you to make quick changes to the driver aid systems to suit your driving style while
out on the track.
Once you load into the car, getting started is as easy as selecting the “upshift” button to put it into gear, and hitting the
accelerator pedal. This car uses a sequential transmission and does not require a clutch input to shift up or down. However, the
car’s downshift protection will not allow you to downshift if it feels you are traveling too fast for the gear selected and would incur
engine damage. In these situations the downshift command will simply be ignored. Upshifting is recommended when all of the shift
lights on the steering wheel have changed to blue.
PORSCHE 963 GTP // INTRODUCTION

7
PORSCHE 963 GTP // USER MANUAL
LOADING AN iRACING SETUP
Upon loading into a session, the car will automatically load the iRacing Baseline setup [baseline.sto]. If you would prefer one of
iRacing’s pre-built setups that suit various conditions, you may load it by clicking Garage > iRacing Setups > and then selecting the
setup to suit your needs.
If you would like to customize the setup, simply make the changes in the garage that you would like to update and click apply. If you
would like to save your setup for future use click “Save As” on the right to name and save the changes.
To access all of your personally saved setups, click “My Setups” on the right side of the garage.
If you would like to share a setup with another driver or everyone in a session, you can select “Share” on the right side of the
garage to do so.
If a driver is trying to share a setup with you, you will find it under “Shared Setups” on the right side of the garage as well.
PORSCHE 963 GTP // INTRODUCTION

8
PORSCHE 963 GTP // USER MANUAL
PORSCHE 963 GTP // DASH PAGES
Dash Configuration
The Porsche 963’s main display is integrated into the steering wheel, displaying all
information on a single page to the driver.
FUEL TARGET BAR
The far left of the display has a graphical representation of fuel usage compared to the current fuel Target. If the previously
completed lap used less fuel than the target, this bar will show in green. If the previously completed lap used more fuel than the
target, the bar will be red. The distance from the center represents how much fuel was used or saved, with the top and bottom
representing 1 Liter over the target and 1 Liter under the target, respectively.
Left Half
ERS The currently selected Energy Recovery System mode is in the upper left green box.
Each number is tied to a mode: 1 = No Deploy, 2 = Qual, 3 = Attack, 4 = Balanced, 5 = Build
TCLO Setting for the Traction Control’s Slip parameter
Lap Current lap number
AR-F Front Anti Roll Bar setting
Bias Brake Bias setting
Mig Brake Bias Migration setting
Tar ge t The Brake Bias Target, or offset setting
The following settings are within the FUEL box in the lower left:
Tar ge t The amount of fuel expected to be used per lap. This is set in the garage.
Delta
The amount of fuel that was used relative to the Target value. Negative is fuel saved, positive is
excess fuel used.
9
PORSCHE 963 GTP // USER MANUAL
PORSCHE 963 GTP // DASH PAGES
Left Half (Continued)
Fuel Amount of fuel in the fuel tank. Units dependent on the units selected for the garage
Gear Indicator Currently selected gear
Tire Information
The tire information box will display live tire pressure and temperature information. Pressures are
shown in the center in Pounds-per-square-inch or Kilopascals, temperatures are shown in the outer
corners in °F or °C
Center
Speed
The vehicle’s speed is shown in the top of the display at the center with units dependent on the
garage selection
Gear Currently selected gear is shown in the center of the display
ERS Mode Below the gear display is the active ERS deploy mode
The following settings are within the FUEL box in the lower left:
Tire Temperature Surface temps for each tire are shown in the outer corners of the tire info box
Tire Pressures Tire pressures (units based on garage) are shown in the center
Right Half
State of Charge Bar
A bar on the far right displays the current ERS Battery State of Charge (SoC). Color-coded sections
are used to quickly show a full SoC (red), a low SoC (green), and a yellow section for a mid-level SoC
AR-R Rear Anti Roll Bar setting
Tyre Inoperable
TCLA Setting for the Traction Control’s Gain parameter
Strat Inoperable
Pred The predicted lap time, updated live
Split Split time, relative to the best time of the session, is shown underneath the predicted lap time
Brake Temps The current brake temperatures (units determined by garage) are shown in the lower right
DASH CONFIGURATION (CONTINUED)

10
PORSCHE 963 GTP // USER MANUAL
PORSCHE 963 GTP // DASH PAGES
LOW FUEL WARNING
At low fuel levels the right side of the display will show this large red overlay with a low fuel message as well as a value showing the
amount of fuel remaining. This can be cleared by pressing and holding the button assigned to Low Fuel Accept for two seconds.

11
PORSCHE 963 GTP // USER MANUAL
PORSCHE 963 GTP // DASH PAGES
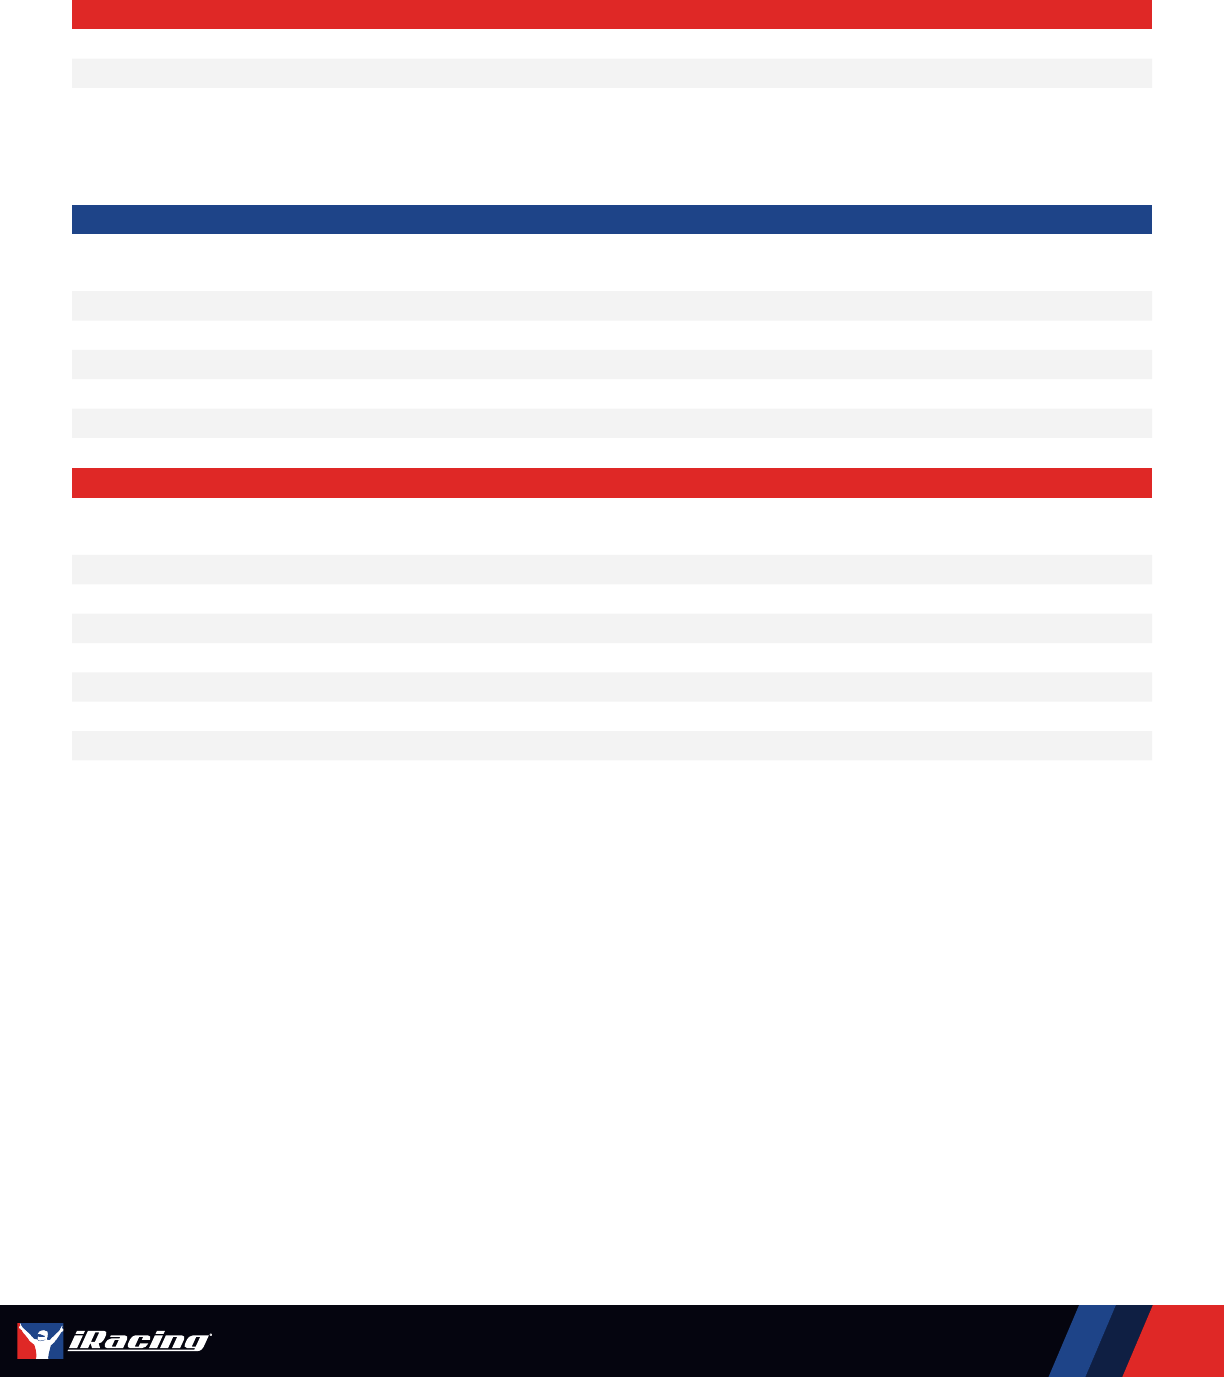
LOCKUP/TRACTION CONTROL LIGHTS
TRACTION CONTROL ACTIVATION
If the Traction Control system activates to reduce wheelspin both LED clusters will flash in blue
BRAKE LOCKUP
If a wheel begins locking under braking the lights will illuminate to indicate which wheel is locking up. The cluster on the left
represents the left side tires with the purple lights for the LF and the amber lights for the LR. The right cluster represents the
right-side wheels in the same way. The severity of the lockup is represented by how many lights are illuminated, with 1 light being a
mild lockup and 4 lights representing a near-full lockup.

12
PORSCHE 963 GTP // USER MANUAL
PORSCHE 963 GTP // DASH PAGES
PIT LIMITER
When the pit limiter is activated the main display will have a red or green overlay over the
top half of the screen displaying the current gear and the current vehicle speed. The display
and the side LED clusters will appear different depending on where the car is in relation to pit
road and the current speed.
APPROACHING PITS
If the limiter is activated before the entry to pit road and the speed is above the pit road
speed limit for the track the display banner and the side clusters will appear red. The side
clusters will illuminate more lights the farther the current vehicle speed is above the pit road
speed, with a full set of lights indicating the vehicle’s speed is very high. As speed decreases
and approaches pit road speed lights will begin to turn off, from the bottom to the top, until
pit road speed is reached.
CORRECT SPEED
Once the correct pit road speed is achieved, the side clusters will illuminate fully in green and the display banner will change from
red to green.
13
PORSCHE 963 GTP // USER MANUAL
PORSCHE 963 GTP // DASH PAGES
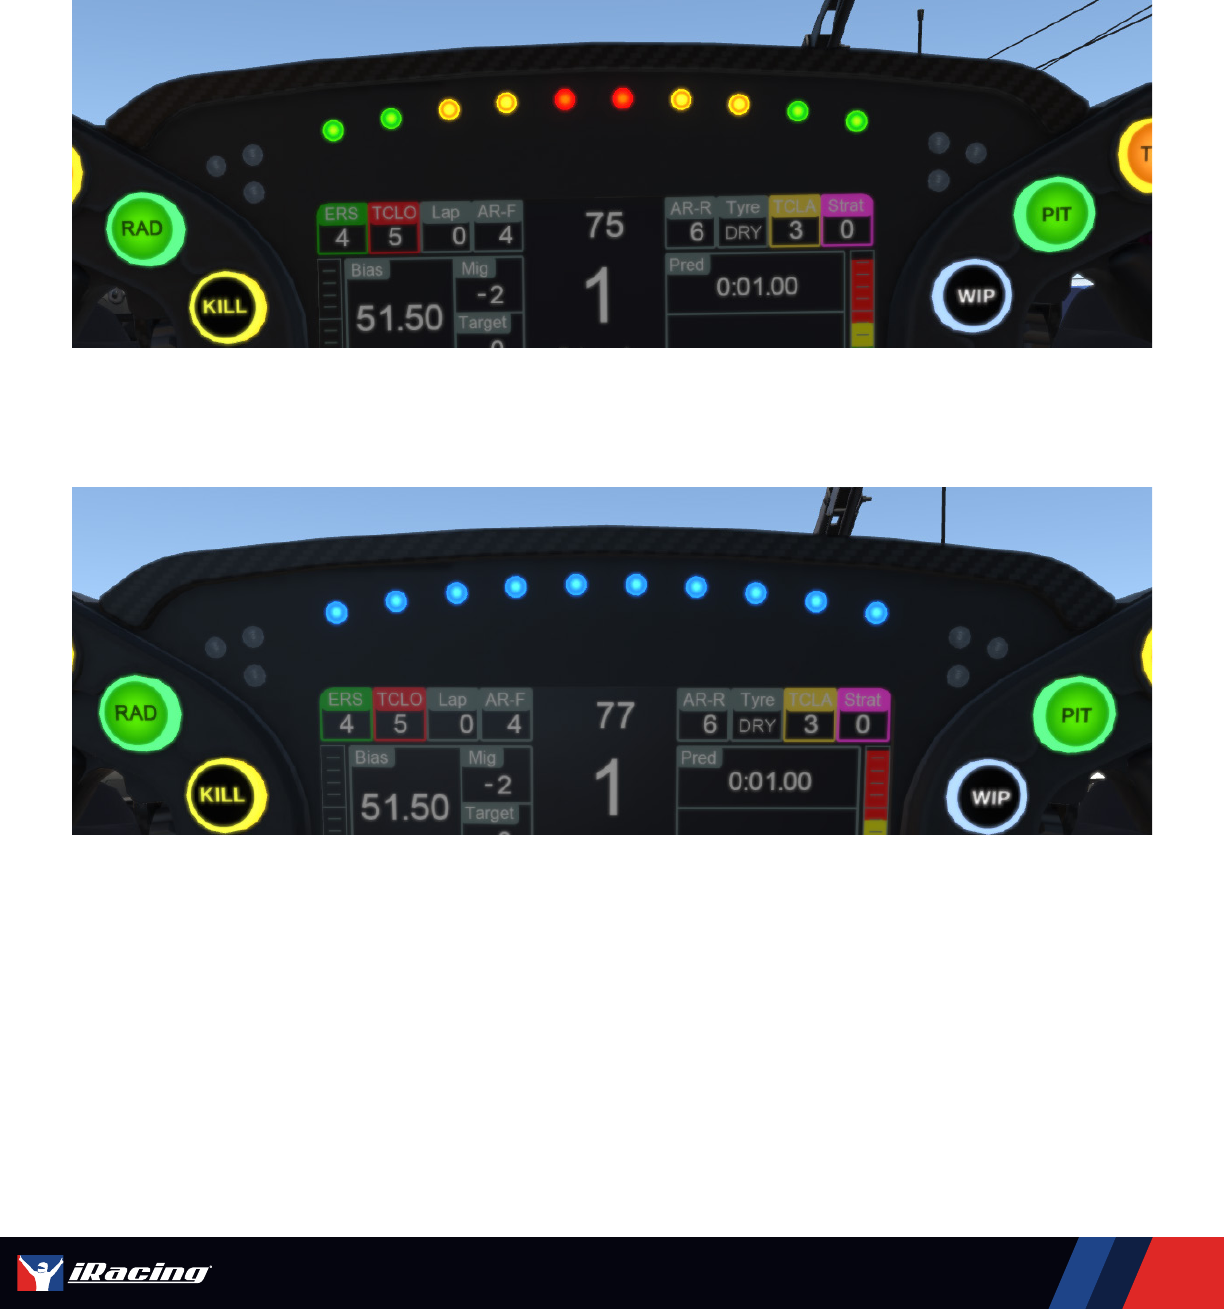
SHIFT LIGHTS
The LEDs above the steering wheel’s display are used to provide an indication to the driver of
when to shift to the next gear.
As RPM increases, the LEDs will illuminate from the outside to the inside from green to red.
More lights will illuminate as the optimum shift point is approaching.
When the optimum shift point is reached, all the shift lights will flash in blue.

14
PORSCHE 963 GTP // USER MANUAL
Advanced Setup Options
This section is aimed toward more advanced users who want to
dive deeper into the different aspects of the vehicle’s setup. Making
adjustments to the following parameters is not required and can lead to
significant changes in the way a vehicle handles. It is recommended that
any adjustments are made in an incremental fashion and only singular
variables are adjusted before testing changes.
PORSCHE 963 GTP // ADVANCED SETUP OPTIONS

15
PORSCHE 963 GTP // USER MANUAL
Tires/Aero
TIRE INFORMATION
STARTING PRESSURE
The air pressure in the tires when the car is loaded into the world. Lower pressures will provide more grip but will produce more
rolling drag and build temperature faster. Higher pressures will feel slightly more responsive and produce less rolling drag, but will
result in less grip. Generally, higher pressures are preferred at tracks where speeds are higher while lower pressures work better
at slower tracks where mechanical grip is important.
LAST HOT PRESSURE
When the car returns to the garage after an on-track stint, the tire pressure will be displayed as Hot Pressure. The difference
between cold and hot pressure is a good way to see how tires are being loaded and worked while on track. Tires seeing more
work will build more pressure, and paying attention to which tires are building more pressure and adjusting cold pressure to
compensate can be crucial for optimizing tire performance.
LAST TEMPS
The tire carcass temperatures (measured within the tread) are displayed after the car returns from the track. These
temperatures are an effective way to determine how much work or load a given tire is experiencing while on track. Differences
between the inner and outer temperatures can be used to tune individual wheel alignment and the center temperatures can be
compared to the outer temperatures to help tune tire pressure.
TREAD REMAINING
The amount of tread on the tire, displayed as a percentage of a new tire, is shown below the tire temperatures. These values are
good for determining how far a set of tires can go before needing to be replaced, but don’t necessarily indicate an under- or over-
worked tire in the same way temperatures will.
PORSCHE 963 GTP // TIRES/AERO

16
PORSCHE 963 GTP // USER MANUAL
AERO SETTINGS
REAR WING ANGLE
The rear wing’s angle of attack can be set with the Rear Wing Angle option. Increasing the angle will increase the amount of
downforce produced and move the aero balance rearward but will increase the amount of drag the wing produces. Reducing the
angle will reduce overall downforce and shift aero balance forward, but will reduce drag and allow for a higher top speed.
AERO CALCULATOR
The Aero Calculator is a tool used to display the car’s approximate aerodynamic values in a
given configuration. Changes to the car’s aerodynamic settings will be reflected in the Aero
Calculator, giving an idea of how the car will behave aerodynamically while on the race track.
This calculator can also be used to determine what changes need to be made to the car to
alleviate aerodynamically-induced handling issues.
FRONT/REAR RH AT SPEED
The Ride Height (RH) at Speed is used to give the Aero Calculator heights to reference for aerodynamic calculations. When using
the aero calculator, determine the car’s Front and Rear Ride height via telemetry at any point on track and input that value into the
“Front RH at Speed” setting.
DOWNFORCE BALANCE
Displayed in percent of Front downforce, this value shows how much of the car’s total downforce is over the front axle. A higher
percentage value indicates more front downforce, increasing oversteer in mid- to high-speed corners and a lower percentage
value indicates more rear downforce, increasing understeer in mid- to high-speed corners.
PORSCHE 963 GTP // TIRES/AERO

17
PORSCHE 963 GTP // USER MANUAL
L/D
The “L/D” value is the ratio of Lift (downforce) to Drag. This quantifies how efficiently the car’s bodywork is producing downforce in
terms of how much drag is being produced as a result. A higher L/D value means more downforce is being produced for each unit
of drag, meaning the bodywork is being more efficient. Having a higher L/D value without sacrificing overall downforce will result in
a faster, more efficient car. Optimum values for L/D can vary based on the aerodynamic configuration and track type.
BRAKE BIAS MIGRATION
This sets how far forward or rearward the brake bias will shift with brake pedal travel. Positive values will migrate the bias forward
and increase the maximum brake bias by 1% per click, negative values will migrate it rearward and reduce the minimum brake
bias by 1%. This is adjustable in-car via the F8 black box.
PORSCHE 963 GTP // TIRES/AERO

18
PORSCHE 963 GTP // USER MANUAL
Chassis
FRONT
HEAVE SPRING
The Heave Spring is a suspension element that handles loads when the chassis moves in a purely vertical direction and does not
experience loads generated from chassis roll. The front Heave Spring will influence the chassis’ handling balance during braking
and over bumps, but is primarily intended to control increasing aerodynamic loads with higher speeds. Stiffer Heave Spring rates
will stiffen the suspension in vertical travel and result in a more consistent aerodynamic platform but can reduce mechanical
grip over rough surfaces. Softer Heave Springs will increase mechanical grip but could allow too much movement to keep the
aerodynamic behavior consistent.
HEAVE PERCH OFFSET
The Heave Perch Offset is used to adjust preload on the Heave Spring. This is one of two methods to adjust ride height through
the front Heave element, with lower values preloading the spring more and raising front ride heights. Conversely, higher values will
unload the spring and lower front ride heights.
HEAVE SPRING DEFLECTION
The Heave Spring Deflection is how much the Heave Spring has compressed from its free (unloaded) length. This is not directly
adjustable, but is altered as a result of other front suspension adjustments, especially the Heave Perch Offset setting. Higher
deflection indicates the spring is under higher preload, lower deflection indicates a more relaxed spring.
HEAVE SLIDER DEFLECTION
The Heave Slider is a mechanism that keeps the Heave Spring assembly moving in a linear fashion without producing the forces
that a damper would produce. The Slider Deflection is how far this slider mechanism is mounted on has compressed from
fully extended. This has no influence on the chassis handling, but is a way to see how much travel is available before the
slider bottoms out.
PORSCHE 963 GTP // CHASSIS

19
PORSCHE 963 GTP // USER MANUAL
ROLL SPRING
The Roll Spring is a device in the front suspension that counteracts roll movement but not vertical loading, similar to an Anti-Roll
Bar. Changing the Roll Spring rate will alter the front suspension’s stiffness in roll, with higher values increasing roll stiffness and
lower values reducing roll stiffness. Higher roll stiffness will counteract chassis roll when cornering which can produce a more
consistent aerodynamic platform, especially at high speeds, but can reduce mechanical grip across the front axle in slower
corners. Lowering roll stiffness will increase mechanical grip at the front axle and reduce understeer in slow corners but can allow
too much body roll in high-speed corners, hurting aero performance.
ROLL PERCH OFFSET
The Roll Perch Offset is used to adjust preload on the Roll Spring. This adjustment is used to remove preload from the Roll Spring
following changes elsewhere on the chassis. Due to tech limits this cannot be used to alter ride heights and is mainly used to alter
the Roll Spring Deflection value.
ROLL SPRING DEFLECTION
The Roll Spring Deflection is how much the Roll Spring has compressed from its free (unloaded) length. This is not directly
adjustable, but is altered as a result of other front suspension adjustments, especially the Roll Perch Offset setting. In order to
pass tech limits in the garage this value must be near-zero.
ROLL DAMPER DEFLECTION
This displays how much the Roll Damper is compressed from its fully-extended length while under static loads in the garage.
ARB SETTING
The ARB (Anti-Roll Bar) setting changes whether the ARB is connected or disconnected from the front suspension. Connecting
the ARB will increase front roll stiffness, which can reduce mechanical grip and induce understeer, but it will allow for the
ARB Adjustment (below) to be utilized by the driver. Disconnecting the ARB will increase grip across the front axle and reduce
understeer, but will also disable the ARB Adjustment option for the driver.
ARB ADJUSTMENT
The configuration of the Anti-Roll Bar arms, or “blades”, can be changed to alter the overall stiffness of the ARB assembly. Higher
values transfer more force through the arms to the ARB itself, increasing roll stiffness in the front suspension and inducing
understeer. Conversely, lower values reduce the roll stiffness of the front suspension and reduce understeer or even promote
oversteer in extreme cases. The front ARB Adjustment is available as an in-car adjustment via the F8 black box as
the “FARB Setting”.
TOE-IN
Toe is the angle of the wheel, when viewed from above, relative to the centerline of the chassis. Toe-in is when the front of the
wheel is closer to the centerline than the rear of the wheel, and Toe-out is the opposite. On the front end, adding toe-out will
increase slip in the inside tire while adding toe-in will reduce the amount of slip. This can be used to increase straight-line stability
and turn-in responsiveness with toe-out. Toe-in at the front will reduce turn-in responsiveness but will reduce temperature buildup
in the front tires.
PUSHROD LENGTH OFFSET
This adjusts the length of both front suspension pushrods together, shown as an offset from a baseline length figure. This is a
great way to adjust front ride height without altering the preload on the Heave Spring.
PORSCHE 963 GTP // CHASSIS
20
PORSCHE 963 GTP // USER MANUAL
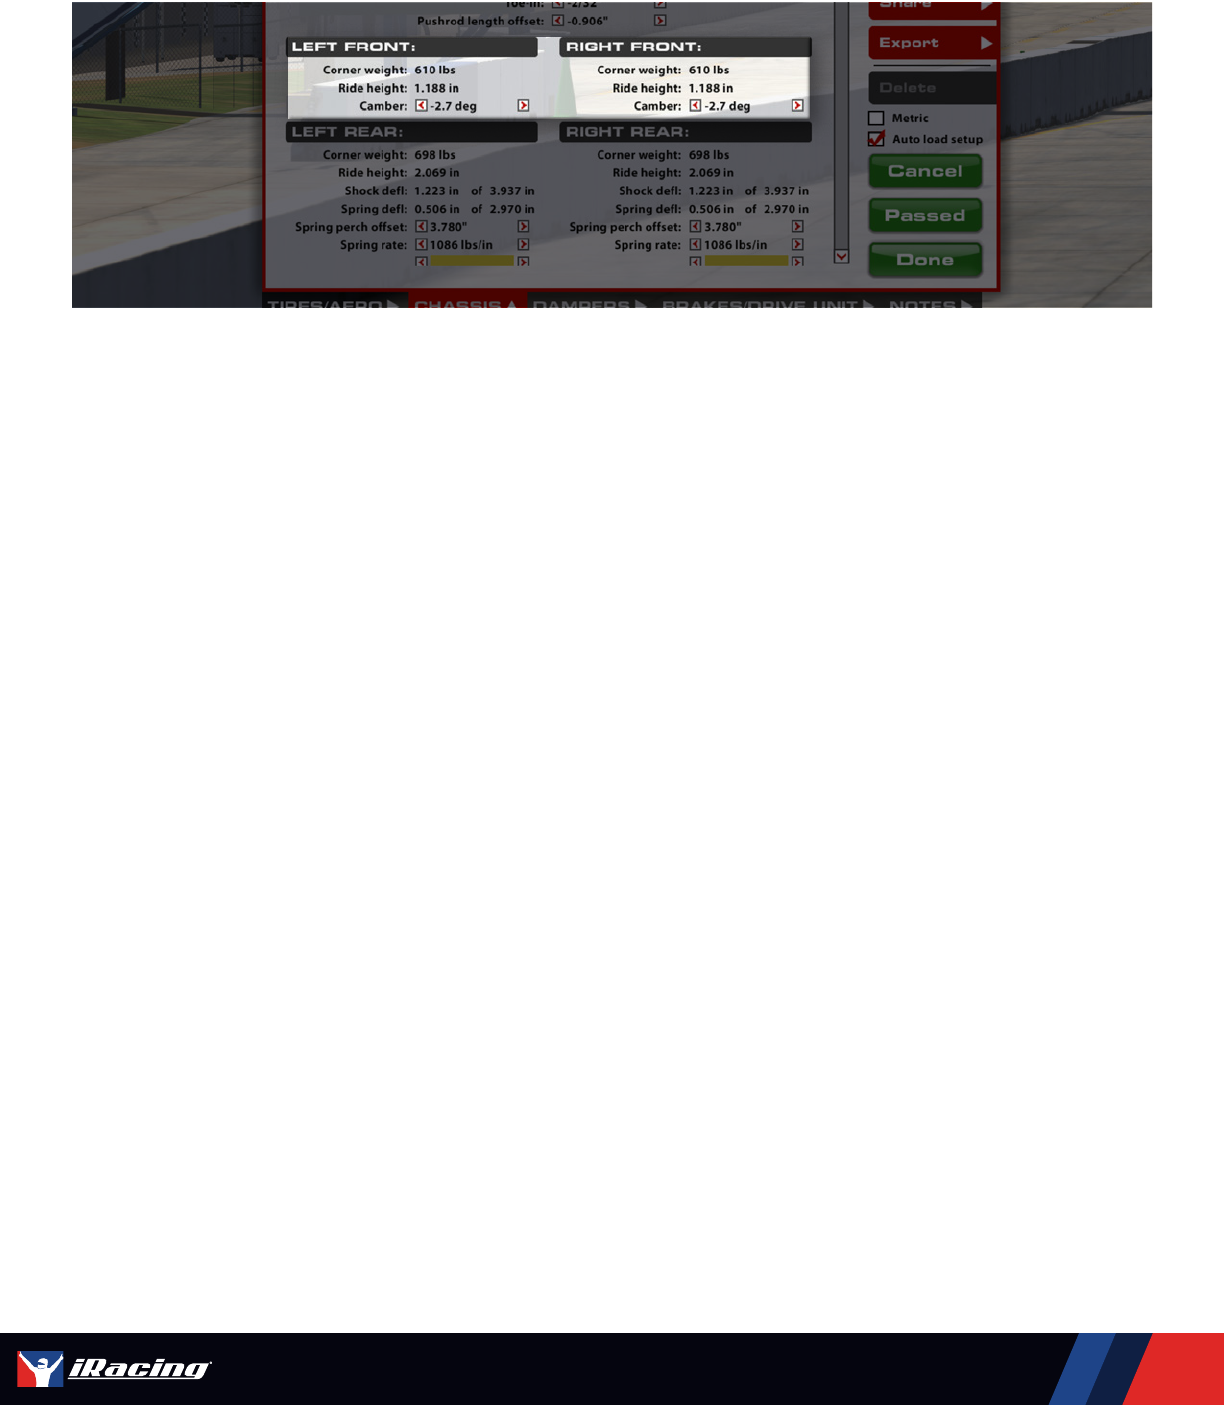
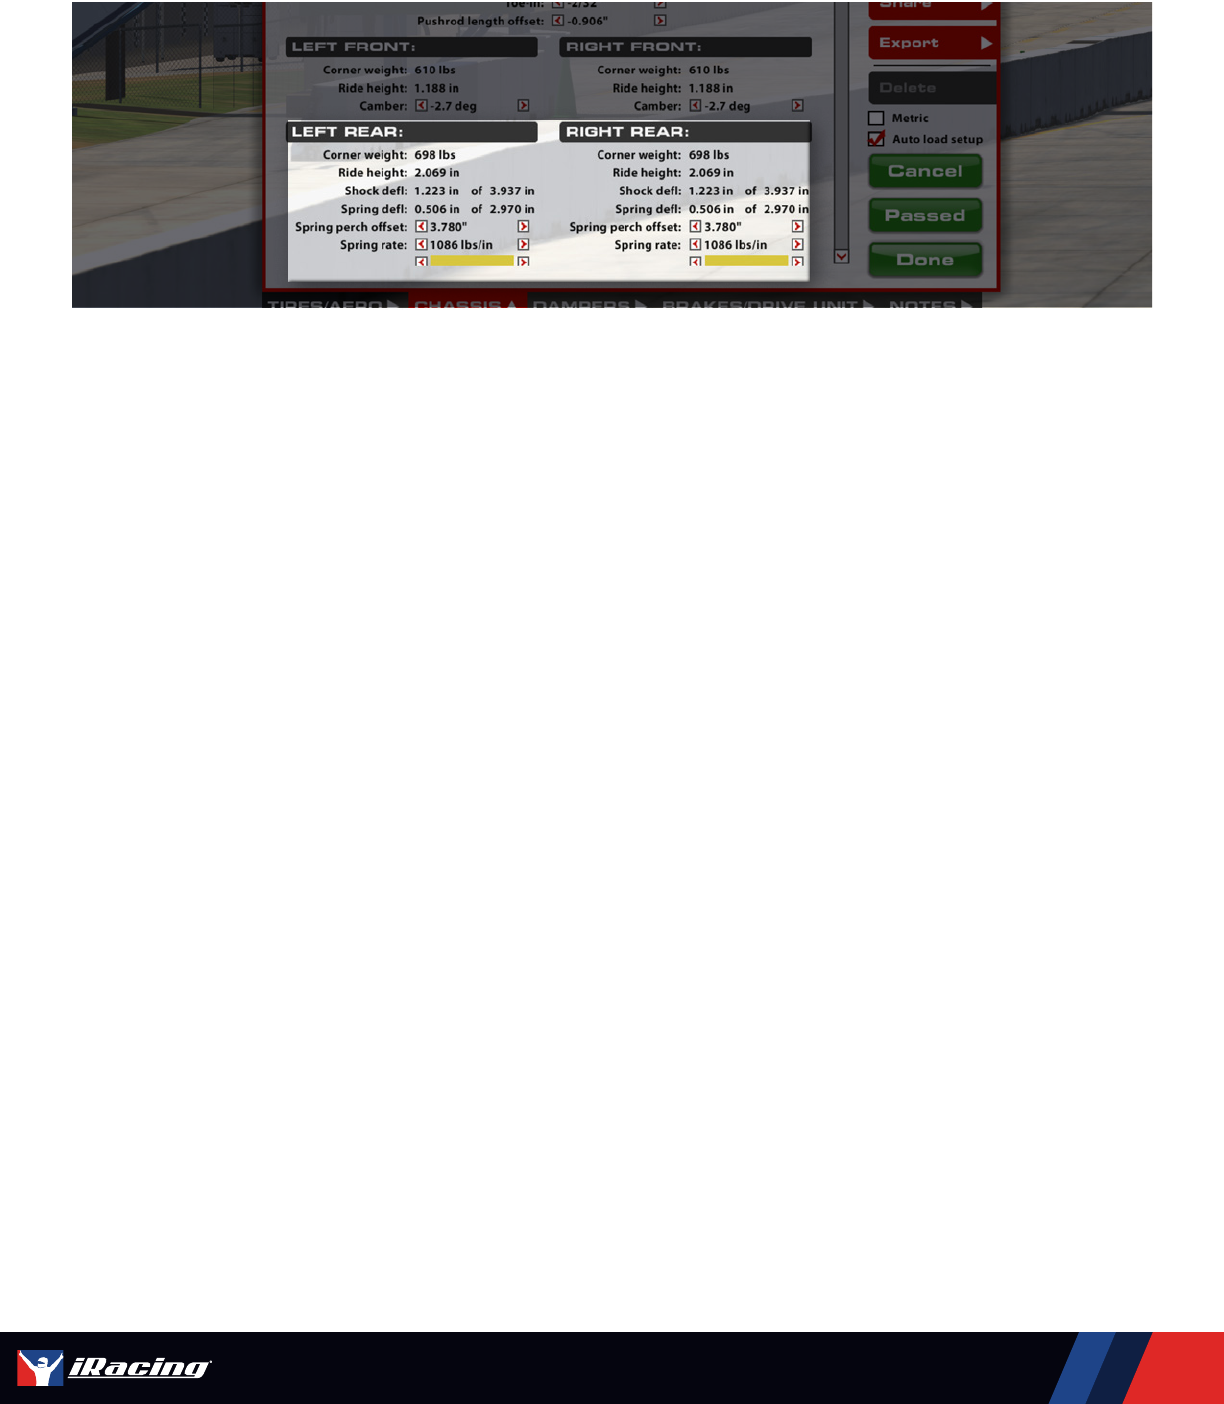
FRONT CORNERS
CORNER WEIGHT
The weight underneath each tire under static conditions in the garage. Correct weight arrangement around the car is crucial for
optimizing a car for a given track and conditions. Individual wheel weight adjustments and crossweight adjustments are made via
the Torsion Bar Turns setting on the front corners.
RIDE HEIGHT
Distance from ground to the bottom of the center skid plank on the underside of the chassis. Adjusting Ride Heights is key
for optimum performance, as they can directly influence the vehicle’s aerodynamic performance as well as mechanical grip.
Increasing the front ride height will decrease overall downforce and shift the aerodynamic balance rearward, but will decrease
drag slightly. Conversely, reducing front ride height will increase downforce and shift aero balance forward while slightly
increasing overall drag.
CAMBER
Camber is the vertical angle of the wheel relative to the center of the chassis. Negative camber is when the top of the wheel is
closer to the chassis centerline than the bottom of the wheel, positive camber is when the top of the tire is farther out than the
bottom. Due to suspension geometry and corner loads, negative camber is desired on all four wheels. Higher negative camber
values will increase the cornering force generated by the tire, but will reduce the amount of longitudinal grip the tire will have
under braking. Excessive camber values can produce very high cornering forces but will also significantly reduce tire life, so it is
important to find a balance between life and performance.
PORSCHE 963 GTP // CHASSIS
21
PORSCHE 963 GTP // USER MANUAL
REAR CORNERS
CORNER WEIGHT
The weight underneath each tire under static conditions in the garage. Correct weight arrangement around the car is crucial for
optimizing a car for a given track and conditions. Individual wheel weight adjustments and crossweight adjustments are made via
the Spring Perch Offset setting for the rear wheels.
RIDE HEIGHT
Distance from ground to the bottom of the center skid plank on the underside of the chassis. Adjusting Ride Heights is key for
optimum performance, as they can directly influence the vehicle’s aerodynamic performance as well as mechanical grip. Raising
the rear ride height will increase overall downforce and shift aero to the front of the car but will increase drag. Decreasing rear
ride height will do the opposite, with aero shifting rearward and overall downforce and drag decreasing.
SHOCK DEFLECTION
Shock Deflection is how much the shock has compressed from its fully extended length while under static conditions in the garage.
This is useful for determining how much shock travel is available before a bump stop is engaged on the shock.
SPRING DEFLECTION
Spring Deflection shows how much the spring has compressed from its unloaded length. This can be used to see spring preload
under static conditions and compare it across the rear corners of the car, with higher values representing more preload on
a given spring.
SPRING PERCH OFFSET
Used to adjust ride height and corner weight, adjusting this setting applies a preload to the spring under static conditions.
Decreasing the value increases preload on the spring, adding weight to its corner and increasing the ride height at that corner.
Increasing the value does the opposite, reducing height and weight on a given corner.
PORSCHE 963 GTP // CHASSIS

22
PORSCHE 963 GTP // USER MANUAL
SPRING RATE
Spring Rate changes how stiff the spring is, represented in a force per unit of displacement. Primarily responsible for maintaining
ride height and aerodynamic attitude under changing wheel loads, stiffer springs will maintain the car’s aero platform better while
sacrificing mechanical grip on a given corner. Softer springs will deal with bumps better and increase mechanical grip, but will
cause the car’s aerodynamic platform to suffer. Due to homologation rules, rear spring rates must be symmetrical across the
rear axle and can only be changed in pairs.
CAMBER
Camber is the vertical angle of the wheel relative to the center of the chassis. Negative camber is when the top of the wheel
is closer to the chassis centerline than the bottom of the wheel, positive camber is when the top of the tire is farther out than
the bottom. Due to suspension geometry and corner loads, negative camber is desired on all four wheels. Higher negative
camber values will increase the cornering force generated by the tire, but will reduce the amount of grip the tire will have under
acceleration and braking.
TOE-IN
Toe is the angle of the wheel, when viewed from above, relative to the centerline of the chassis. Toe-in (positive value in the garage)
is when the front of the wheel is closer to the centerline than the rear of the wheel, and Toe-out (negative value in the garage) is
the opposite. On the rear end, adding toe-in will increase straight-line stability but may hurt how well the car changes direction.
PORSCHE 963 GTP // CHASSIS
23
PORSCHE 963 GTP // USER MANUAL
REAR
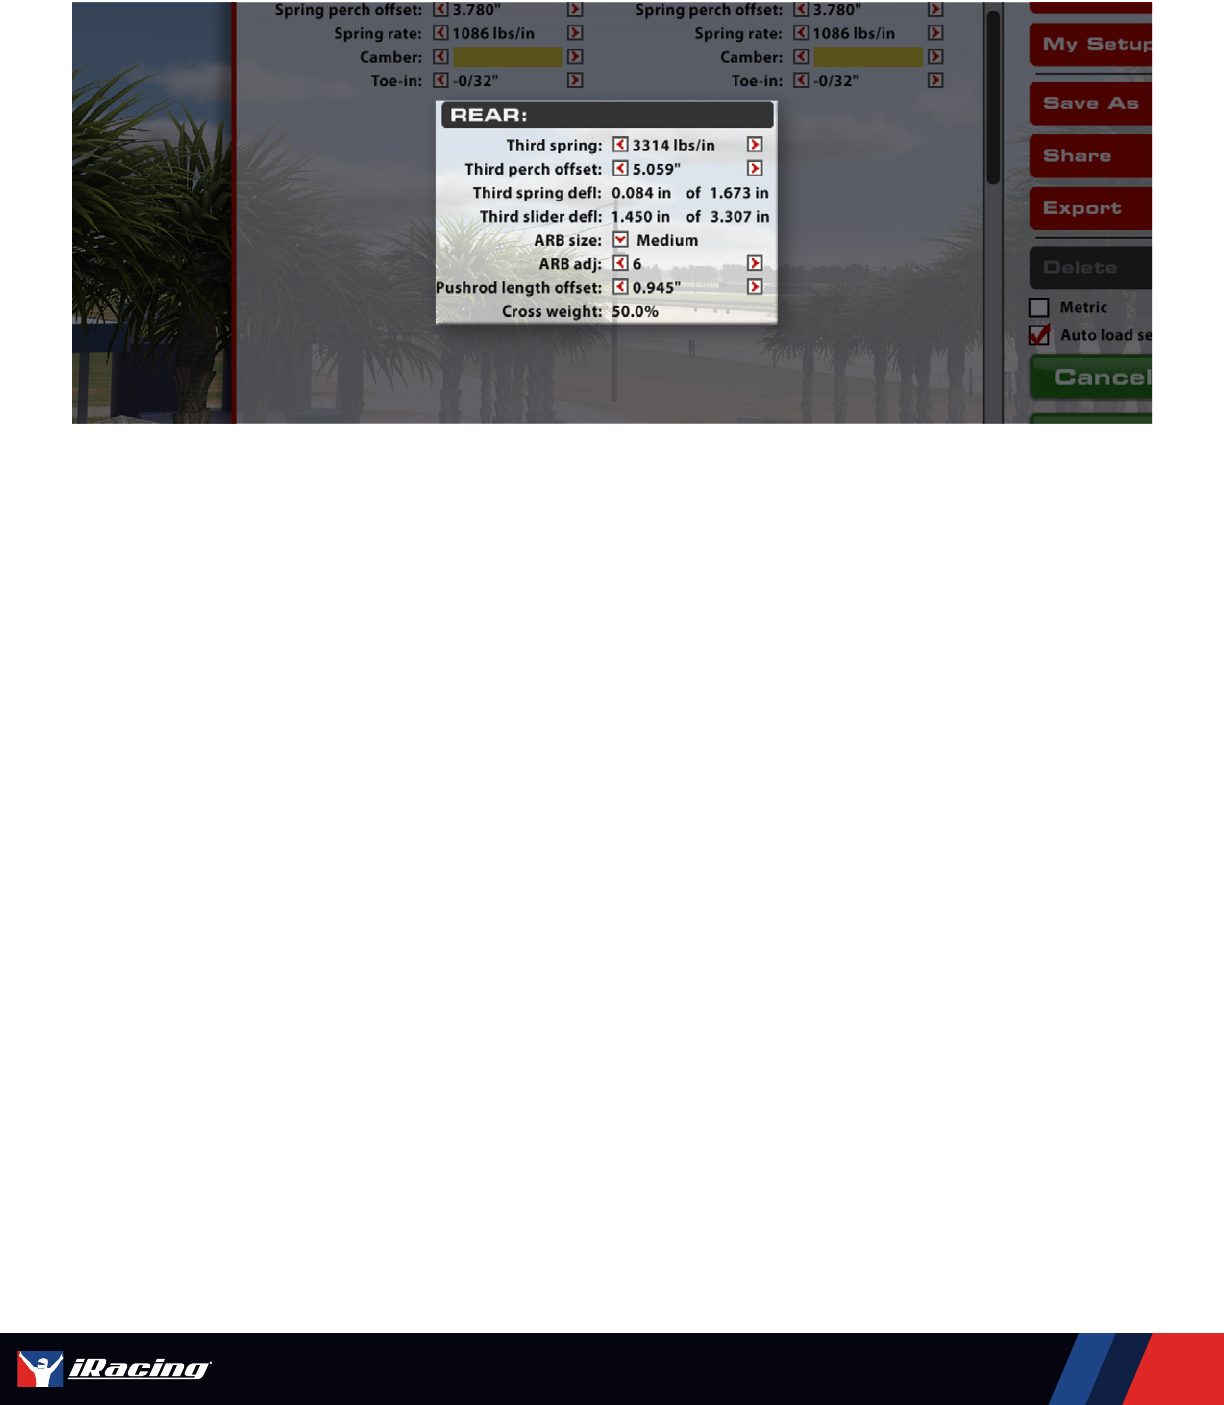
THIRD SPRING
The Third Spring, similar to the front Heave Spring, is a spring element configured to provide resistance only in vertical suspension
movement without affecting roll stiffness. This spring element is helpful with controlling increasing aerodynamic loads and
maintaining the proper aerodynamic attitude around a circuit. Higher rates will stiffen the rear suspension in heave and maintain
a more consistent chassis attitude through varying loads and speeds but can hurt rear mechanical grip. Lower rates will
increase mechanical grip but can result in the rear bodywork moving excessively through changing loads and producing
inconsistent aerodynamic performance.
THIRD PERCH OFFSET
The Third Perch Offset is used to adjust preload on the rear Third Spring. This will adjust ride height through the rear Third Spring
element, with lower values preloading the spring more and raising rear ride heights. Conversely, higher values will unload the
spring and lower rear ride heights.
THIRD SPRING DEFLECTION
Third Spring Deflection represents the amount the rear Third Spring is compressed under static conditions. This is not directly
adjustable but will change with adjustments to the Third Perch Offset and rear Spring settings.
THIRD SLIDER DEFLECTION
The Slider Deflection is how far the slider mechanism the Third Spring is mounted on has compressed from fully extended. Similar
to a shock but without any damping forces produced, this doesn’t influence the suspension’s behavior.
ARB SIZE
The ARB (Anti-Roll Bar) size alters the stiffness of the rear suspension in roll. Increasing the ARB size will increase the roll
stiffness of the rear suspension, resulting in less body roll but increasing mechanical oversteer. Conversely, reducing the ARB
size will soften the suspension in roll, increasing body roll but decreasing mechanical oversteer but can result in a less-responsive
feel from the steering, but grip across the rear axle will increase. Disconnecting the bar will greatly reduce the roll stiffness by
removing the ARB entirely, which will also disable the ARB Adjustment for the rear.
PORSCHE 963 GTP // CHASSIS

24
PORSCHE 963 GTP // USER MANUAL
PORSCHE 963 GTP // CHASSIS
ARB ADJUSTMENT
The configuration of the Anti-Roll Bar arms, or “blades”, can be changed to alter the overall stiffness of the ARB assembly. Higher
values transfer more force through the arms to the ARB itself, increasing roll stiffness in the rear suspension and inducing
oversteer. Conversely, lower values reduce the roll stiffness of the rear suspension and reduce oversteer. The rear
ARB Adjustment is available as an in-car adjustment via the F8 black box as the “RARB Setting”.
PUSHROD LENGTH DELTA
This adjusts the length of both rear suspension pushrods together, shown as an offset from a baseline length figure. This is a great
way to adjust rear ride height without altering the preload on the rear Third Spring or either of the rear Torsion Bars.
CROSSWEIGHT
Cross weight is the amount of weight on the car’s Left-Rear and Right-Front tires relative to the entire weight of the car, displayed
in percent. This is adjusted via the rear spring perch offset settings on the rear corner springs. This value should be around 50%
for most tracks.

25
PORSCHE 963 GTP // USER MANUAL
Dampers
FRONT HEAVE / REAR CORNERS / REAR 3RD
LS COMP DAMPING
Low Speed Compression affects how resistant the shock is to compression (reduction in length) when the shock is moving at
relatively low speeds, usually in chassis movements as a result of driver input (steering, braking, & throttle) and cornering forces.
Higher values will increase compression resistance and transfer load onto a given tire under these low-speed conditions more
quickly, inducing understeer on throttle application.
For shocks on the front end, increasing Low-Speed Compression can induce understeer under braking and at turn-in, reducing
it will reduce understeer. Increasing Low-Speed Compression on the rear of the car will increase traction on initial throttle
application, while reducing it can reduce on-throttle understeer.
HS COMP DAMPING
High-Speed Compression affects the shock’s behavior in high-speed travel, usually attributed to curb strikes and bumps in the
track’s surface. Higher compression values will cause the suspension to be stiffer in these situations, while lower values will allow
the suspension to absorb these bumps better but may hurt the aerodynamic platform around the track.
HS COMP DAMP SLOPE (REAR CORNERS ONLY)
The High-Speed Compression Damping Slope setting controls the overall shape of the high-speed compression side of the
shock. Lower slope values produce a flatter, more digressive curve while higher values result in a more linear and aggressive
compression graph. The value of the slope setting is very important in controlling bump absorption at high shock velocities and
controlling the aerodynamic platform. A lower slope will be helpful for rougher tracks in absorbing bumps and sharp impacts such
as curbs, while a higher slope will keep the suspension more rigid, which can be helpful in resisting compression and raising the
chassis above a bump in the track surface. It’s important to understand that these settings will affect the range the High-Speed
Compression will have, with higher slope values producing a higher overall force for high-speed compression.
PORSCHE 963 GTP // DAMPERS

26
PORSCHE 963 GTP // USER MANUAL
LS REBOUND DAMPING
Low-speed Rebound damping controls the stiffness of the shock while extending at lower speeds, typically during body movement
as a result of driver inputs. Higher rebound values will resist expansion of the shock, lower values will allow the shock to extend
faster. Higher rebound values can better control aerodynamic attitude but can result in the wheel being unloaded when the
suspension can’t expand enough to maintain proper contact with the track.
On the front of the car, higher Low-Speed Rebound can induce understeer on throttle application while higher settings on the rear
of the car can induce understeer under braking.
HS REBOUND DAMPING
High-speed rebound adjusts the shock in extension over bumps and curb strikes. Higher values will reduce how quickly the shock
will expand, while lower values will allow the shock to extend more easily. Despite not having as much of an effect on handling
in result to driver inputs, High-speed rebound can produce similar results in terms of aerodynamic control and uncontrolled
oscillations if set improperly.
PORSCHE 963 GTP // DAMPERS

27
PORSCHE 963 GTP // USER MANUAL
FRONT ROLL
LS DAMPING
The Low-Speed damping setting on the front Roll Damper will alter how resistant the damper is to both compression and
expansion during roll. Higher values will produce a stiffer shock with chassis roll, which can load the outer tire in a corner more
quickly, and lower values will soften the shock and delay load to the outer tire. Due to the Roll Damper’s operation, rolling the
chassis will result in both “compression” for one corner and “rebound” for the other corner, thus both compression and rebound
are adjusted equally together.
HS DAMPING
The High-Speed damping setting will alter how stiff the front Roll Damper is at higher velocities. As with the Low-Speed setting, the
compression and rebound values are linked as one.
HS DAMP SLOPE
The High-Speed damping slope setting will alter how digressive or linear the rear Roll Damper is when shock velocities are in the
high-speed regime. Higher values will produce a more linear response, with shock stiffness increasing as velocity increases, while
lower values will produce a more digressive response where stiffness doesn’t increase consistently with shock velocity.
PORSCHE 963 GTP // DAMPERS

28
PORSCHE 963 GTP // USER MANUAL
Brakes/Drive Unit
LIGHTING
HEADLIGHT COLOR ID
This setting will change the color of the small LED cluster in the headlights that illuminate whenever the Pit Limiter is active. This is
strictly a visual change for identifying the car in nighttime conditions and has no effect on the vehicle’s handling.
BRAKE SPEC
PAD COMPOUND
The vehicle’s braking performance can be altered via the Brake Pad Compound. The “Low” setting provides the least friction,
reducing the effectiveness of the brakes but allowing for better brake pressure modulation, while “Medium” and “High” provide
more friction and increase the effectiveness of the brakes while increasing the risk of a brake lockup.
FRONT MASTER CYLINDER
The Front Brake Master Cylinder size can be changed to alter the line pressure to the front brake calipers. A larger master
cylinder will reduce the line pressure to the front brakes, which will shift the brake bias rearwards and increase the pedal effort
required to lock the front wheels. A smaller master cylinder will increase brake line pressure to the front brakes, shifting brake
bias forward and reducing required pedal effort to lock the front wheels.
BRAKE BIAS MIGRATION
This sets how far forward or rearward the brake bias will shift with brake pedal travel. Positive values will migrate the bias forward
and increase the maximum brake bias by 1% per click, negative values will migrate it rearward and reduce the minimum brake
bias by 1%. This is adjustable in-car via the F8 black box.
PORSCHE 963 GTP // BRAKES/DRIVE UNIT

29
PORSCHE 963 GTP // USER MANUAL
HYBRID CONFIG
MGU-K DEPLOY MODE
The Hybrid power system on the BMW V8 can be set to one of five modes to change the target battery State of Charge (SoC)
after each lap. Each of these modes will use varying levels of energy throughout a lap to reach a target, and thus some will
produce more power over the course of a lap and faster lap times at the cost of discharging the battery.
• No Deploy - In the “No Deploy” mode, the Hybrid system will not use any energy stored in the battery. This essentially disables
the Hybrid drive system and will only charge the battery throughout a lap. This is only available in Qualifying and Test sessions
and is used to fully charge the battery before switching to Qual mode.
• Qual - This mode is intended to be used on flying laps during qualifying sessions and will attempt to use all of the battery
charge during a lap. This is only available during Qualifying and Test sessions and should be preceded by the No Deploy setting
on outlaps and warm-up laps to ensure the battery is fully charged before switching to the Qual mode.
• Attack - Attack mode reduces the target State of Charge to use more power during race sessions to help with overtaking.
Generally the laptime gain from this mode is not enough to offset the loss in pace from having to recharge and recover from
using Attack mode, so it should be used only when it is absolutely necessary to complete an overtake. This mode can also be
used on the final lap for a burst of speed since the battery is no longer needed. This mode is only available for Practice, Race,
and Test sessions
• Balanced - The Balanced mode is the primary Race mode for the Hybrid system. This mode will attempt to deploy electrical
charge to reduce lap times as much as possible while still maintaining a reasonable State of Charge over the duration of a lap.
At the start of a session, it will take a few flying laps for the Hybrid system to learn the track and optimize deployment for the
best lap times, and this mode is only available in Practice, Race, and Test sessions
• Build - The Build mode will attempt to build battery charge as quickly as possible in the event of a low battery charge or if it is
needed prior to switching to Attack mode. Note that this will compromise lap times significantly compared to Balanced, and
it’s important to switch back to Balanced mode once the battery has charged to avoid losing harvested energy and to prevent
unnecessary loss in pace. This mode is only available in Practice, Race, and Test sessions.
PORSCHE 963 GTP // BRAKES/DRIVE UNIT

30
PORSCHE 963 GTP // USER MANUAL
FUEL
FUEL LEVEL
Fuel level is the amount of fuel in the fuel tank when the car leaves the garage.
FUEL TARGET
The dash display’s Fuel Target value can be set via the garage’s Fuel Target setting. This will have no effect on the chassis handling
and only changes what is shown on the dash.
TRACTION CONTROL
TRACTION CONTROL GAIN
Gain is the amount of intervention the Traction Control will exert when wheel spin is detected. Higher values result in a more
aggressive throttle cut to control wheelspin. This value can be changed in the F8 black box while driving.
TRACTION CONTROL SLIP
Slip is how sensitive the Traction Control system will be to wheelspin. Higher values will activate the Traction Control system with
smaller amounts of wheelspin, while lower values will allow slightly more wheelspin prior to activating the system. This value can be
changed in the F8 black box while driving.
PORSCHE 963 GTP // BRAKES/DRIVE UNIT

31
PORSCHE 963 GTP // USER MANUAL
GEAR RATIOS
GEAR STACK
Gear Stack changes the gear ratios in the transmission. Two choices are available: Short and Long. The Short setting will choose
a more acceleration-focused gear set for tracks with shorter straights or slower corners, while the Long option will choose gears
more suited to high-speed tracks with long straights.
SPEED IN 1ST-7TH
Each of the transmission’s seven forward gears will show the approximate ground speed at which the engine will reach maximum
RPM. These values will change based on which Gear Stack is selected, but the true maximum speed may differ slightly due to
on-track conditions.
REAR DIFF SPEC
COAST/DRIVE RAMP ANGLES
Coast and Drive Ramp Angles affect the force exerted by the differential to keep both driven tires locked together under
acceleration. Lower values produce more locking force, and more locking force increases understeer during braking and
acceleration phases. Higher values will produce less locking force and induce oversteer in these situations.
CLUTCH FRICTION PLATES
The number of clutch faces affect how much overall force is applied to keep the differential locked. Treated as a multiplier, adding
more faces produces increasingly more locking force.
PORSCHE 963 GTP // BRAKES/DRIVE UNIT

32
PORSCHE 963 GTP // USER MANUAL
PRELOAD
The differential can be set with a static load applied. Higher values produce more locking force in the differential in all conditions,
producing more understeer under acceleration and deceleration. This value will also affect mid-corner performance, with higher
values not allowing the differential to unlock as much, increasing mid-corner understeer.
PORSCHE 963 GTP // BRAKES/DRIVE UNIT
