
Version 1.0 SOP: Preparing animal and plant cell slides
Written by: Science ASSIST
Disclaimer: ASTA excludes all liability to any person arising directly or indirectly from using this resource.
Date: Jan 2017
Page 1 of 5
STANDARD OPERATING PROCEDURE:
Preparing animal and plant cell slides
Note: To be undertaken only by trained personnel in conjunction with a current Safety Data Sheet
(SDS) and site-specific risk assessment.
___________________
1. Introduction
The examination and comparison of plant and animal cells is a hands-on activity suitable for
junior and senior secondary science students. Many cells are almost transparent under the
microscope and the use of simple stains allows the cells and some of their structures to be
easily visible.
A wet mount of an onion membrane is used to represent plant cells and is stained with an
iodine stain that reacts with any starch present to produce a blue/black colour. A cell smear
prepared from fresh meat purchased from retail stores is used to represent animal cells that
are stained with methylene blue stain. Methylene blue is a basic dye that is used to stain
animal cells making the nucleus more visible.
Cell type
Specific features
Some common features
Animal Cell
No cell wall
Irregular shape
One or more small vacuoles
Cell membrane
Nucleus
Cytoplasm
Mitochondria
Ribosomes
Endoplasmic reticulum
Plant Cell
Cell wall
Fixed shape
Chloroplasts
Large central vacuole
2. Context
• These instructions are for the use of science teachers, technicians and secondary school
students who are under the direct supervision of a teacher.
• Do not make up staining solutions for the first time without seeking practical advice from an
experienced colleague.
3. Safety notes
• Science ASSIST does not recommend the use of cells harvested from humans.
• Only science technicians or teachers should prepare the staining solutions.
• A chemical risk assessment should be performed before preparing solutions of iodine and
methylene blue. Avoid breathing dust, vapours or mist. These chemicals are toxic when
ingested and can cause skin and eye irritation. Consider if anyone is allergic to iodine.
• Pregnant women should take particular care to avoid exposure to iodine.
• Sensitive individuals may show symptoms of Iodism on exposure to small amounts of
iodine.

Version 1.0 SOP: Preparing animal and plant cell slides
Written by: Science ASSIST
Disclaimer: ASTA excludes all liability to any person arising directly or indirectly from using this resource.
Date: Jan 2017
Page 2 of 5
• Students should take care when using glass slides as breakage may occur and small chips
can be sharp and cause cuts.
• Ensure students demonstrate responsible behaviour while using sharp knives and other
dissecting instruments.
4. Regulations, licences and permits
None.
5. Equipment
Onion cell slide
• Light microscope
• 0.01M Iodine stain in a dropper bottle – teacher or technician to prepare.
• A fresh onion
• Glass microscope slides and No 1 glass or plastic cover slips
• Paper towel or tissue
• Forceps
• PPE including gloves and safety glasses
Animal cell slide
• Light microscope
• 0.15% Methylene blue stain in a dropper bottle – teacher or technician to prepare.
• Clean sharp knife
• One 2 cm cube of fresh beef or a sheep kidney purchased from a retail store.
• Glass microscope slides and No1 glass or plastic cover slips
• Paper towel or tissue
Personal Protective Equipment (PPE)
• Gloves and safety glasses
Version 1.0 SOP: Preparing animal and plant cell slides
Written by: Science ASSIST
Disclaimer: ASTA excludes all liability to any person arising directly or indirectly from using this resource.
Date: Jan 2017
Page 3 of 5
6. Operating procedure
Onion cell slide
1. Prepare a 0.01M Iodine stain two days prior to class. In an operating fume cupboard or
well-ventilated area, weigh 15 g potassium iodide and dissolve in 100 mL of distilled
water. Add 3 g iodine crystals and stir to dissolve. Iodine dissolves quickly in
concentrated potassium iodide solution. When dissolved, make up to 1 L with distilled
water. Store in a dark bottle in a cool area. Label and aliquot into class sets of amber
dropper bottles.
2. A teacher or technician should prepare onion sections by cutting the onion into quarters
and distributing to students.
3. Divide the onion into its fleshy layers.
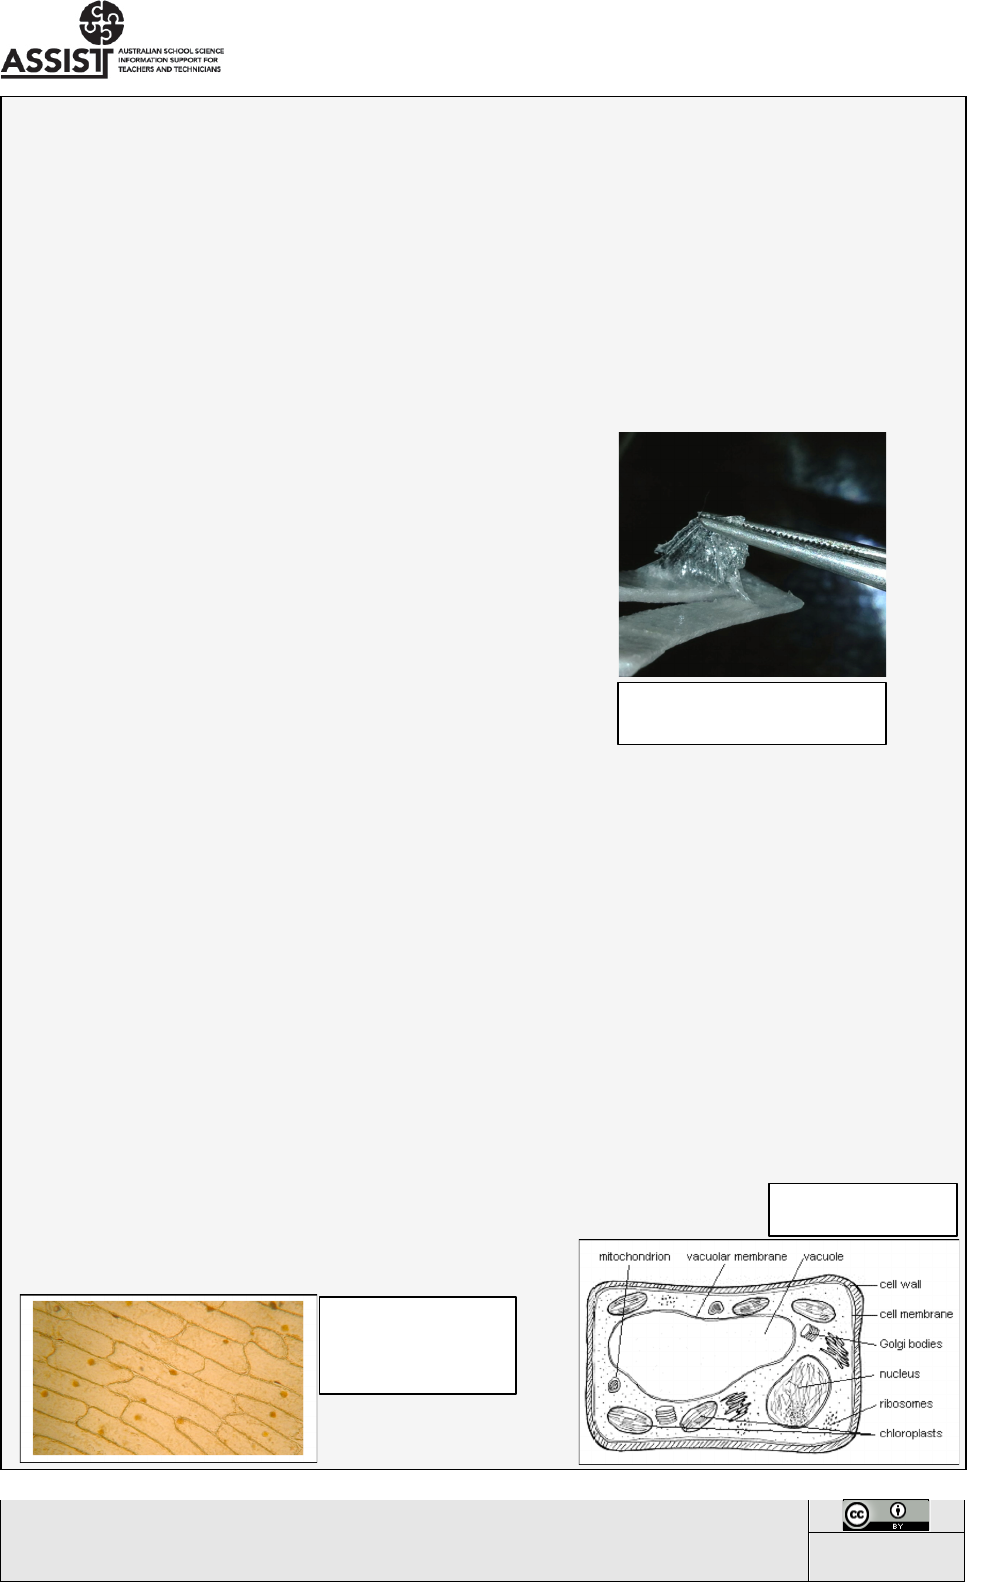
4. Using forceps, gently peel back a section of thin
epidermis from the concave underside of the layer
as shown in Figure 1. Alternatively break the onion
layer toward the shiny side and gently peel the two
pieces apart revealing the transparent layer of
epidermis.
5. Carefully place the epidermis in a single flat layer
on the centre of a microscope slide. Note that the
epidermis is very thin, easy to tear, wrinkle and can fold onto itself.
6. Place 1–2 drops of Iodine stain on the epidermis and spread it out carefully with forceps
if folded. Put one edge of a cover slip on the slide to one side of the stain and slowly
lower it by means of a mounting needle or toothpick. Make sure there are no air bubbles.
See the following references below
1,2,3.
7. Remove excess stain by touching the edge of the cover slip with a tissue or paper towel.
8. Examine cells under the microscope using the 4x objective. When focused, view at high
power (x400 magnification) to make observations of cell size, shape and visible cell
structures. Students can draw a labelled diagram.
9. Figure 2 shows a typical plant cell structure.
10. Figure 3 shows onion epidermis stained with Iodine stain at 400x magnification. There
are regularly shaped cells lying side by side in a pavement-like arrangement. The cells
have a distinct cell wall, cell membrane, nucleus, cytoplasm and vacuole present in the
centre of each cell.
11. Remove cover slip and dispose in sharps bin.
Wash slide in soapy water and rinse well
Figure 1: Peeling a section of
onion epidermis
Figure 2: Labelled
plant cell
Figure 3: Onion
epidermis at 100x
magnification. Iodine
stain.

Version 1.0 SOP: Preparing animal and plant cell slides
Written by: Science ASSIST
Disclaimer: ASTA excludes all liability to any person arising directly or indirectly from using this resource.
Date: Jan 2017
Page 4 of 5
Animal cell slide
1. Prepare a 0.15% methylene blue stain prior to class. Weigh 1.5g methylene blue
powder and dissolve in 100mL of ethanol and make up to 1L with distilled water while
stirring. Methylene blue can also be made up in water, however, it dissolves quickly in
ethanol. Label and aliquot into class sets of dropper bottles.
2. If using a kidney cut the organ open with a clean sharp knife. Take a glass microscope
slide and touch the surface of the cut area with the microscope slide.
3. Add one drop of the methylene blue stain to the microscope slide.
4. Gently place a cover slip over the stained smear by putting one edge of the cover slip
on the slide to one side of the stain and slowly lower it by means of a mounting needle
or toothpick. Should be free of air bubbles.
5. Remove excess stain by touching the edge of the cover slip with a tissue or paper
towel.
6. Examine under the microscope using the 4x objective. When focused, view at high
power (x400 magnification) to make observations of cell size, shape and visible cell
structures. Students draw a labelled diagram. Look for epithelial cells.
7. If using a piece of red meat cut along the grain line with a clean sharp knife. Take a
glass microscope slide and touch the surface of the cut area with the microscope slide.
Repeat steps 3-6. This time look for bundles of skeletal muscle fibres and individual
fibrils. They are striated in appearance. There may also be some spindle shaped
smooth muscle cells from blood vessels with a distinct central nucleus
8. Figure 4 shows a typical animal cell structure.
9. Figure 5 shows and epithelial cell stained with
methylene blue stain at 400x magnification. At this
magnification, flat, irregular shaped cells with thin cell
membrane and nucleus can be seen.
The cells do not have a cell wall
10. Figure 6 shows animal cells from a
beef sample stained at 400x
magnification. At this magnification,
striated muscle fibres and some
individual fibrils can be seen along with
cell walls, cytoplasm and some nuclei.
11. When finished, remove the glass cover slip and
dispose in sharps bin. Wash slide in soapy water
and rinse well.
Figure 4: Labelled animal cell.
Source:
http://www.oum.ox.ac.uk/thezone/a
nimals/life/respire1.htm
Figure 6: Cell smear showing striated muscle fibres at
400x magnification. Source:
http://www.aps.uoguelph.ca/~swatland/ch5_0.htm
Figure 5: Cell smear showing
an epithelial cell at 400x
magnification. Methylene blue
stain.

Version 1.0 SOP: Preparing animal and plant cell slides
Written by: Science ASSIST
Disclaimer: ASTA excludes all liability to any person arising directly or indirectly from using this resource.
Date: Jan 2017
Page 5 of 5
7. Trouble shooting/emergencies
• First aid: See latest SDS for more detailed information
o If swallowed: Do not induce vomiting. Rinse mouth with water, and then give water to
drink. Seek urgent medical attention.
o If in eyes: Hold open and irrigate with copious quantity of water for at least 15 minutes.
Seek medical attention.
o If on skin/clothes: If spilt on skin or clothes quickly wipe off with a dry cloth to absorb as
much liquid as possible. Remove contaminated clothes and drench the area with excess
water under a safety shower. Seek medical attention.
o If inhaled: Remove to fresh air and seek medical attention if symptoms persist.
o For further advice contact the Poisons Information Centre on 131 126.
8. Waste disposal
• Animal meat should be wrapped and placed in the regular waste for disposal.
• Microscope slides could be washed and reused or disposed of with broken glass, and
coverslips should be disposed of with broken glass See Science ASSIST AIS: Lab glass
and porcelain disposal
9. Related material
• Manufacturer’s Safety Data Sheet
• Science ASSIST SOP: Use and care of the compound light microscope
• Science ASSIST AIS: Lab glass and porcelain disposal
• Risk Assessment.
References:
1
‘Looking at plant cells (onions)’, 4science:educational resources agency website,
http://www.4science.org.uk/assets/files/pdf/02-looking-at-plant-cells.pdf (Accessed December
2016)
2
‘Making and staining a wet mount’, PowerPoint presentation, Oxford University Press website,
http://lib.oup.com.au/secondary/science/Biology-An-Australian-
Perspective/additional_resources/practicals/wet_mount.ppt (Accessed December 2016)
3
‘Microscope notes’, Living environment course, Mrs. DeBaise webpage,
http://lecoursedebiase.com/Microscope.html (Accessed December 2016)
Chem-Supply Pty Ltd. Safety Data Sheet: Potassium iodide.
https://www.chemsupply.com.au/documents/PA0011CH5J.pdf (December 2012)
Chem-Supply Pty Ltd. Safety Data Sheet: Iodine. http://chemsupply.customer-self-
service.com/images/IL0051CH37.pdf (September 2015)
Chem-Supply Pty Ltd. Safety Data Sheet: Methylene blue. http://chemsupply.customer-self-
service.com/images/ML0451CH4K.pdf (October 2015)
Dungey, Barbara. 2006. The Laboratory: a science reference and preparation manual for schools
(Rev. Ed), National Library of Australia: Traralgon, Vic.
Young, J. 2008. The Biolab Sourcebook. Triple Helix Resources Ltd, New Zealand
