
Server software page
Certificate Signing Request (CSR) Generation
Software
Apache (mod_SSL and OpenSSL) .................................................................................................................................... 2
cPanel and WHM ......................................................................................................................................................................... 3
Microsoft Exchange 2007 ........................................................................................................................................................ 8
Microsoft Exchange 2010 ........................................................................................................................................................ 9
F5 BigIP ............................................................................................................................................................................................... 13
IBM HTTP Server ............................................................................................................................................................................. 14
iPlanet 4.x /SunONE 6.x ........................................................................................................................................................... 14
Java-based Webservers ........................................................................................................................................................ 17
Microsoft IIS 4.x ............................................................................................................................................................................. 18
Microsoft IIS 5.x& 6.x .................................................................................................................................................................. 18
Microsoft IIS 7.x ............................................................................................................................................................................ 24
Oracle (using Oracle Wallet Manager) ...................................................................................................................... 27
Plesk .................................................................................................................................................................................................... 28
1/22/2018 9:04:00 AM 1

Apache (mod_SSL and OpenSSL)
To generate your CSR, you will need to log in to your server and use the OpenSSL software
to generate a CSR and private key.
• Log in to your server, and enter the following command:
OpenSSL req -nodes -newkey rsa:2048 -keyout myserver.key -out server.csr
• This will generate two files: a CSR called “server.csr” and a 2048-bit private key
called ““myserver.key.””
You will be prompted to enter some information for your CSR:
• Country Name (2 letter code) [AU]: GB
• State or Province Name (full name) [some state]: Yorks
• Locality Name (e.g., city) []: York
• Organization Name (e.g., company) [Internet Widgits Pty Ltd]: MyCompany Ltd
• Organizational Unit Name (e.g., section) []: IT
• Common Name (e.g., YOUR name) []: mysubdomain.mydomain.com
• Email Address []:
Please enter the following “extra” attributes to be sent with your certificate request:
• A challenge password []:
• An optional company name []:
• The Common Name (CN) field, where you should enter the fully-qualified domain
name of the website you require the certificate for.
Note, for wildcard certificates, the CN should be in the format: *.mydomain.com
• Your CSR is now generated.
• Open the “server.csr” file with a text editor and copy the contents, then paste them
into the enrollment form when requested.
Notes:
The “myserver.key” file should be kept secure (e.g., readable only by root on Linux systems).
Removing the “-nodes” option from the OpenSSL command will request a password and
encrypt the private key. This can increase security, but note that the password will be
required each time Apache is restarted.
Extended validation (EV) certificates require a minimum of a 1024-bit keysize if valid before
2011, and 2048-bit if they are valid into 2011. We recommend 2048-bit keysize as a minimum
for all certificates.
1/22/2018 9:04:00 AM 2

The two-letter CN field must be the ISO-3166 standard country code. Please note that “GB” is
correct for Great Britain, not “UK.” A complete list can be found here:
http://www.iso.org/iso/country_codes.htm.
cPanel and WHM
To generate your CSR, you will need to login to your cPanel or WHM account. Both cPanel
(the end-user control panel) and WHM (the administrator panel) have slightly different
ways to request certificates and generate CSRs.
cPanel
• Login to cPanel.
• Under the “Security” menu, click the “SSL/TLS Manager.”
• The first step is to create a private key by clicking the “Generate...” link.
1/22/2018 9:04:00 AM 3
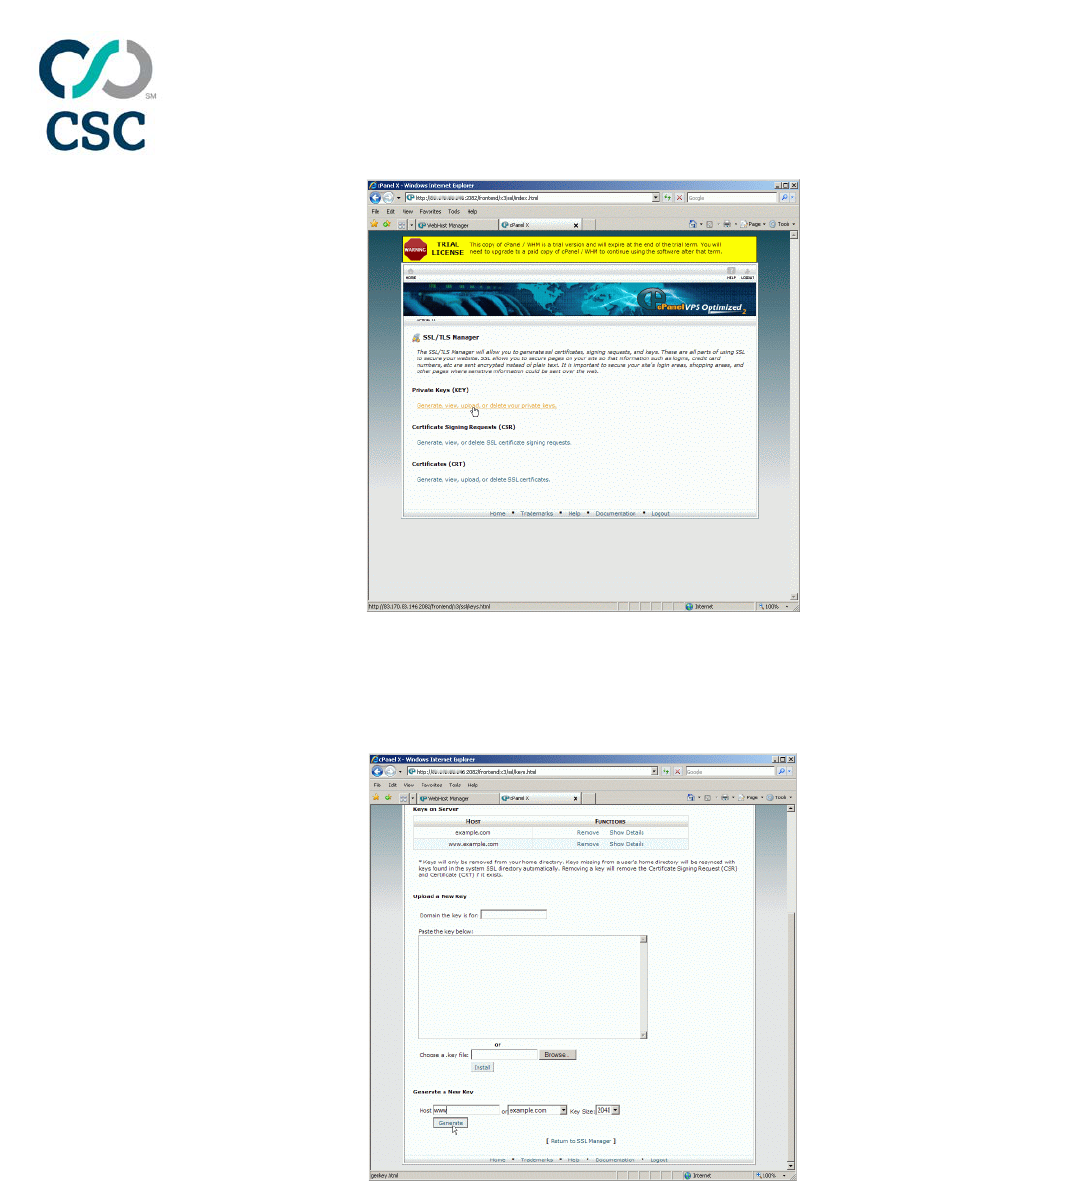
• Scroll to the bottom section “Generate a New Key” and enter your information. We
advise to use at least a 2048-bit key, which is the minimum for EV certificates. Click
“Generate.”
• You will be shown the private key and its information. Click the link at the bottom to
return to the “SSL/TLS Manager.”
• In the “SSL/TLS Manager,” click the “Generate...” link under “Certificate Signing
Requests.”
• Fill out your information in the “Generate a New Certificate Signing Request” form.
Click “Generate.”
1/22/2018 9:04:00 AM 4

• You will be shown the CSR and its associated information. Copy the contents of the
CSR and paste it into the enrollment form when requested.
WHM
• Log in to WHM.
• From the menu, navigate to the “SSL/TLS” section and click “Generate a SSL
Certificate and Signing Request.”
1/22/2018 9:04:00 AM 5
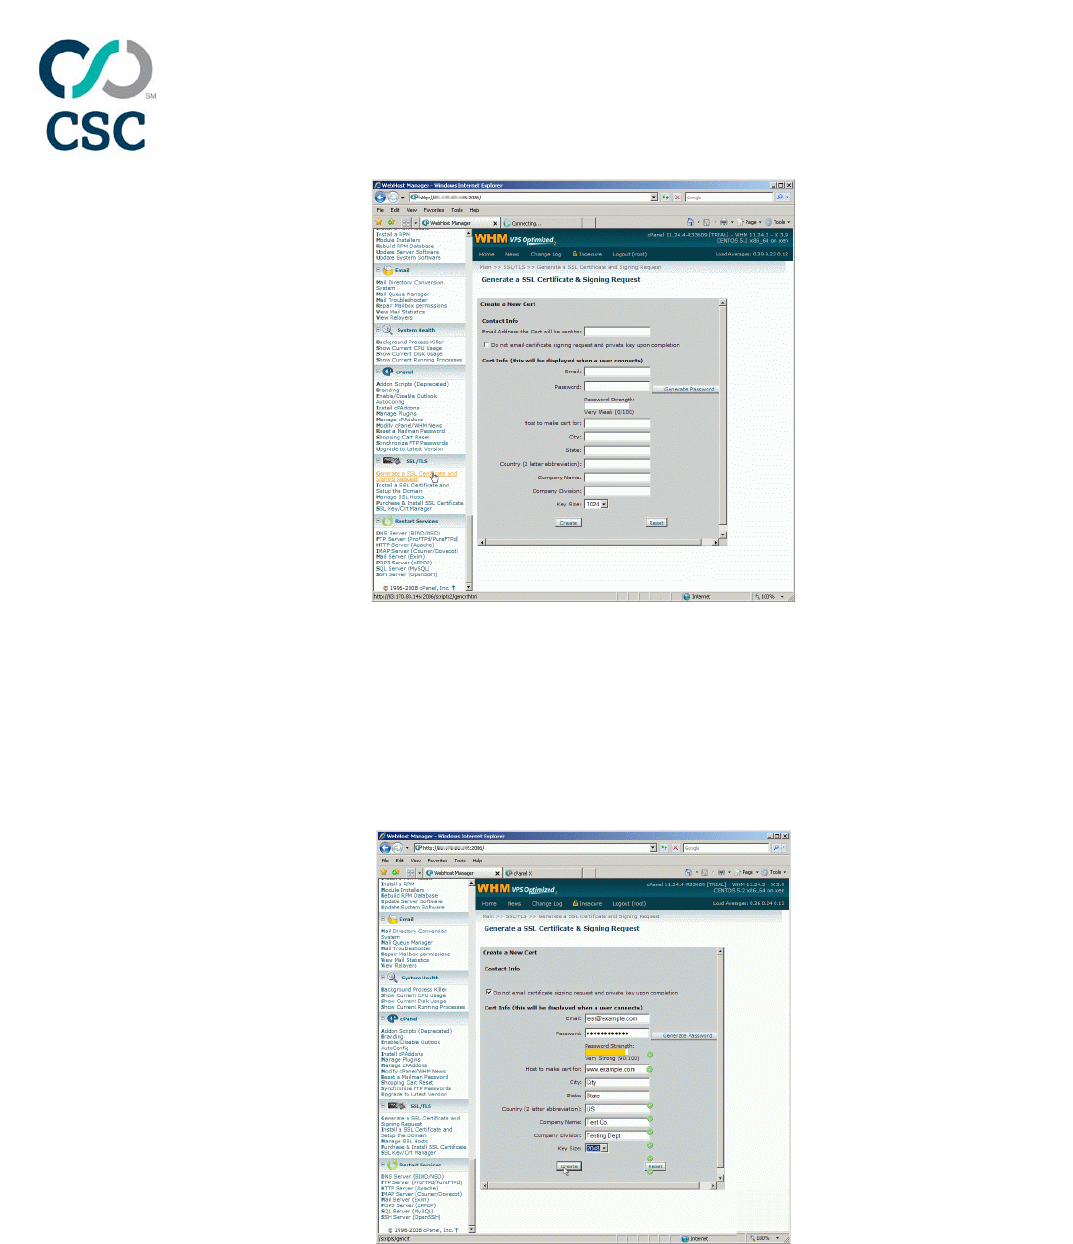
• Fill out the form. Enter the name of the site you want a certificate for in “Host to
make cert for.”
Note, for wildcard certificates, the CN should be in the format: *.mydomain.com.
• We advise to use at least a 2048-bit key, which is the minimum for EV certificates.
Click “Create.”
• Fill out the form. Enter the name of the site in “Host to make cert for.”
1/22/2018 9:04:00 AM 6

• Finally, you will be presented with the CSR (labelled “Signing Request”), the private
key, and a temporary self-signed certificate.
• Copy contents of the CSR and paste it into the enrollment form when requested.
1/22/2018 9:04:00 AM 7

Microsoft Exchange 2007
CSR generation on Microsoft Exchange 2007 uses a cmdlet accessed via the Exchange
Management Shell (EMS). To access the EMS, go to the Start menu > Programs > Microsoft
Exchange Server 2007 and choose “Exchange Management Shell.”
• Once EMS is open, enter the following command:
• New-ExchangeCertificate -GenerateRequest -KeySize 2048 -SubjectName
"C=US, O=Example Company, L=City, ST=State, CN=exchange.example.com" -
DomainName exampletwo.com, examplethree.com -Path
c:\exchange.example.com.req -PrivateKeyExportable:$true
o GenerateRequest: This is the command flag to create a new CSR.
o KeySize: This controls the size of your private key. We recommend at
least 2048 bit.
o SubjectName: This sets the Subject of your CSR. “C” is country, in the
ISO-3166 two-letter standard (note “GB” for Great Britain, US for USA,
etc.). “O” is organisation. “L” is locality. “ST” is state or province. “CN” is
common name, or your primary FQDN for the server.
o DomainName: This allows you to specify additional domain names, as
most Exchange 2007 installations require the certificate to secure more
than one FQDN.
o Path: This specifies where to place the CSR.
o PrivateKeyExportable: This sets that the private key being generated is
exportable, and will allow you to backup and/or move the private key
later.
• Open the CSR file (specified above with the “-Path” flag) with a text-editor, copy the
contents and paste them into the enrollment form when requested.
Notes:
Instead of specifying all the domains within the command, there are two additional flags
that can be specified: “-IncludeAcceptedDomains” and “-IncludeAutoDiscover.” Using these
instead of the “-DomainName” flag will automatically add the autodiscover Fully Qualified
Domain Names (FQDNs), as well as all of the domains Exchange is configured to accept.
The Microsoft TechNet article for this command is available here:
http://technet.microsoft.com/en-us/library/aa998327(EXCHG.80).aspx.
1/22/2018 9:04:00 AM 8

Microsoft Exchange 2010
CSR generation on Microsoft Exchange 2010 can be done via either the GUI or via a cmdlet
accessed via the Exchange Management Shell (EMS). Choose either option from below.
GUI
• Start the Exchange Management Console by going to Start > Programs > Microsoft
Exchange 2010 > “Exchange Management Console.”
• Click the link for “Manage Databases.”
• Select “Server Configuration” and choose “New Exchange Certificate” from the
actions. This will begin the wizard.
• Enter a name for the certificate; this name is for your own reference.
• Here you have the option to enable a wildcard; only choose this if you are ordering a
single wildcard certificate. In this case, skip the next step.
1/22/2018 9:04:00 AM 9

• Now you must select the services you require the certificate for, and enter the
appropriate FQDNs. As a general rule, you should enter all the names through which
your Exchange 2010 server is accessed.
• Review and confirm the list of domains and FQDNs to be added to the certificate.
1/22/2018 9:04:00 AM 10

• Now enter the information for your organization. You must also select a location for
the CSR file to be written to.
• Review the summary of the CSR generation, and the CSR file will be saved.
1/22/2018 9:04:00 AM 11

• Open the CSR file (specified above) with a text-editor and copy and paste the
contents into the enrollment form when requested.
cmdlet
• Open the EMS by Start menu > Programs > Microsoft Exchange Server 2007 and
choose “Exchange Management Shell”. The command you need to enter looks like
this:
• New-ExchangeCertificate -GenerateRequest -KeySize 2048 -SubjectName
"C=US, O=Example Company, L=City, ST=State, CN=exchange.example.com" -
DomainName exampletwo.com, examplethree.com -Path
c:\exchange.example.com.req -PrivateKeyExportable:$true
o GenerateRequest: This is the command flag to create a new CSR.
o KeySize: This controls the size of your private key. We recommend at
least 2048 bit.
o SubjectName: This sets the Subject of your CSR. “C” is country, in the
ISO-3166 two-letter standard (note “GB” for Great Britain, US for USA
etc.). “O” is organisation. “L” is locality. “ST” is state or province. “CN” is
common name, or your primary FQDN for the server.
o DomainName: This allows you to specify additional domain names, as
most Exchange 2007 installations require the certificate to secure more
than one FQDN.
o Path: This specifies where to place the CSR.
o PrivateKeyExportable: This sets that the private key being generated is
exportable, and will allow you to backup or move the private key later.
• Open the CSR file (specified above with the “-Path” flag) with a text-editor, copy the
contents then paste them into the enrollment form when requested.
Notes:
1/22/2018 9:04:00 AM 12

Instead of specifying all the domains within the command, there are two additional flags
that can be specified: “-IncludeAcceptedDomains” and “-IncludeAutoDiscover.” Using these
instead of the “-DomainName” flag will automatically add the autodiscover FQDN, as well as
all of the domains that Exchange is configured to accept.
The Microsoft TechNet article for this command is available here:
http://technet.microsoft.com/en-us/library/aa998327(EXCHG.80).aspx.
F5 BigIP
To generate your CSR, use the instructions based on your version of the BigIP software.
F5 BigIP version 9 and later
• Open and log into the BigIP web interface.
• Under the “Local Traffic” menu, select “SSL Certificates,” then click “Create.”
• Under “General Properties,” you can give the certificate a name to identify it on the
device. We suggest using the FQDN you are requesting the certificate for.
• Fill out the “Certificate Properties” form:
o Issuer: Certificate Authority.
o Common Name: Your FQDN, for example: www.example.com.
o Your CSR is now generated. Open the “certreq.txt” file with a text-editor, copy
the contents, then paste them into the enrollment form when requested.
F5 BigIP version 4.x
• Log in to the device as “root.” Execute the following command:
#/usr/local/bin/genconf
You will need to enter all of your company information, like name, address, etc.
• Now execute the command:
#/usr/local/bin/genkey www.yourdomain.com
Replace “www.yourdomain.com” with the FQDN you require the certificate for. This
will generate the CSR.
• The CSR will be saved in a file at the location:
/config/bigconfig/ssl.csr/www.yourdomain.com.csr
Copy and paste the contents into the enrollment form when requesting a certificate.
1/22/2018 9:04:00 AM 13

IBM HTTP Server
• First, you must create a new key database. Start the “IKEYMAN” software either by
running the command “IKEYMAN” or loading the GUI version.
• Select “Key Database File” from the main menu and choose “New.”
• Choose and enter a new key database name. Click “OK.”
• Now enter and confirm a password for the key database. Please take care to
remember the password you enter.
• Now we need to use the new key database to create a CSR. Start IKEYMAN again,
select “Key Database File” and choose “Open.”
• Now enter the password from Step 4 and click “OK.”
• Select “Create” from the main menu, and choose “New Certificate Request.”
• A form will appear, and all the fields require completion. Click “OK” when completed.
Notes on some of the fields are:
o Key Label: simply a descriptive label for the CSR.
o Keysize: we suggest the keysize be as large as possible, preferably 2048 bit.
o Common Name: where you should enter the fully qualified domain name of
the website you require the certificate for.
Note, for wildcard certificates, the Common Name should be in the
format: *.mydomain.com
o Country: the ISO-3166 two-letter country code for the country. “US” for the
USA, “GB” for Great Britain, etc.
o Certificate Request Filename: the path and filename for the CSR.
• Open the CSR file with a text-editor, copy the contents, then paste into the enrollment
form when requested.
iPlanet 4.x /SunONE 6.x
To generate your CSR, you need to log in to the administrative web-interface of your
iPlanet/SunONE server. This is usually at: http://<yourserver>:8888/
• Log into the iPlanet/SunONE administation interface. Select the server instance you
require the certificate for and click “Manage.”
1/22/2018 9:04:00 AM 14

• Click the “Security” tab at the top of the page, then on the left, click the link for
“Request a Certificate.”
• Fill your information into the form. Set the option for “Submit to Certificate Authority
via:” to “CA Email Address” and enter your own email address.
The “Common Name” is where you should enter the fully qualified domain name of
the website you require the certificate for.
Note, for wildcard certificates, the Common Name should be in the
format: *.mydomain.com
1/22/2018 9:04:00 AM 15

• After you have clicked “OK,” you will be presented with a summary of the
information, and the CSR. You can now copy and paste the contents of the CSR into
the enrollment form when requested. Be sure to include the whole CSR, including the
-----BEGIN NEW CERTIFICATE REQUEST----- line and the -----END NEW
CERTIFICATE REQUEST----- line.
1/22/2018 9:04:00 AM 16

Java-based Webservers
To generate your CSR, log in to the server and open a command prompt or shell, and use the
following instructions:
• Generate a new keystore and key with the following command:
keytool -genkey -keyalg RSA -alias server -keystore my_keystore.jks
Replace the file “my_keystore.jks” with the filename and path you wish to locate the
keystore. The alias “server” can be changed to the site or server name if needed.
For Tomcat, change the “-alias server” to “-alias tomcat.”
• You may be prompted for some information:
Enter keystore password:
What is your first and last name?
What is the name of your organizational unit? **This is your CN**
What is the name of your organization?
What is the name of your city or locality?
What is the name of your state or province?
What is the two-letter country code for this unit?
The “first and last name” actually means the fully-qualified domain name for your
site, e.g., www.mydomain.com.
Note, for wildcard certificates, the Common Name should be in the format: .mydomain.com.
Please take care to remember the password you enter.
• Now generate the CSR using the key and keystore you have just created:
keytool -certreq -alias server -file csr.txt -keystore my_keystore.jks
Ensure that the alias and keystore have the same name and filename as in Step 1.
You will be prompted to enter the password again. If successful, the file “csr.txt” will
be created. Open this file with a text editor, copy the contents, then paste them into
the enrollment form when requested.
Notes:
If you do not enter an alias with the “-alias” command flag, the default alias will be used,
“mykey.”
1/22/2018 9:04:00 AM 17

Microsoft IIS 4.x
To generate your CSR, you will need to log in to your server and use the following
instructions:
• Open the Microsoft Management Console.
• Expand the “Internet Information Server” and then expand your server name.
• Open the “Properties” of the website you require the CSR for. Do this by right-clicking
on the website.
• Open “Directory Security.”
• Under the “Secure Communications” area, choose “Key Manager” and select “Create a
New Key.”
• Fill out your information. The following characters are not allowed: ! @ # $ % ^ * ( )
~ ? > < & / \
• Click “Next” until you complete the process. Answer “Yes” to saving any changes.
• Open the CSR file that was created with a text-editor (usually notepad). Copy the
contents of the file, from:
-----BEGIN CERTIFICATE REQUEST-----
...to...
-----END CERTIFICATE REQUEST-----
Paste this information into the enrollment form when requested.
Microsoft IIS 5.x& 6.x
To generate your CSR, you will need to log in to your server and use the following
instructions.
If you are generating a CSR to renew a certificate, or a CSR for a site that has an existing
certificate, please see the notes at the end of this guide.
• Log in to the server. Go to “Control Panel” > “Administrative Tools” and double-click
“Internet Services Manager.”
1/22/2018 9:04:00 AM 18

• Right-click on the website you require the CSR for and choose “Properties.” Select the
“Directory Security” tab.
• Click the “Server Certificate” button. A wizard will start. Choose the option to “Create
a new certificate.” Click “Next.”
1/22/2018 9:04:00 AM 19

• Click “Prepare the request now, but send it later.” Click “Next.”
• Enter your information. The “Name” here refers to a friendly name for the certificate,
and is not your domain. The other options can be left at their defaults. Click “Next.”
1/22/2018 9:04:00 AM 20
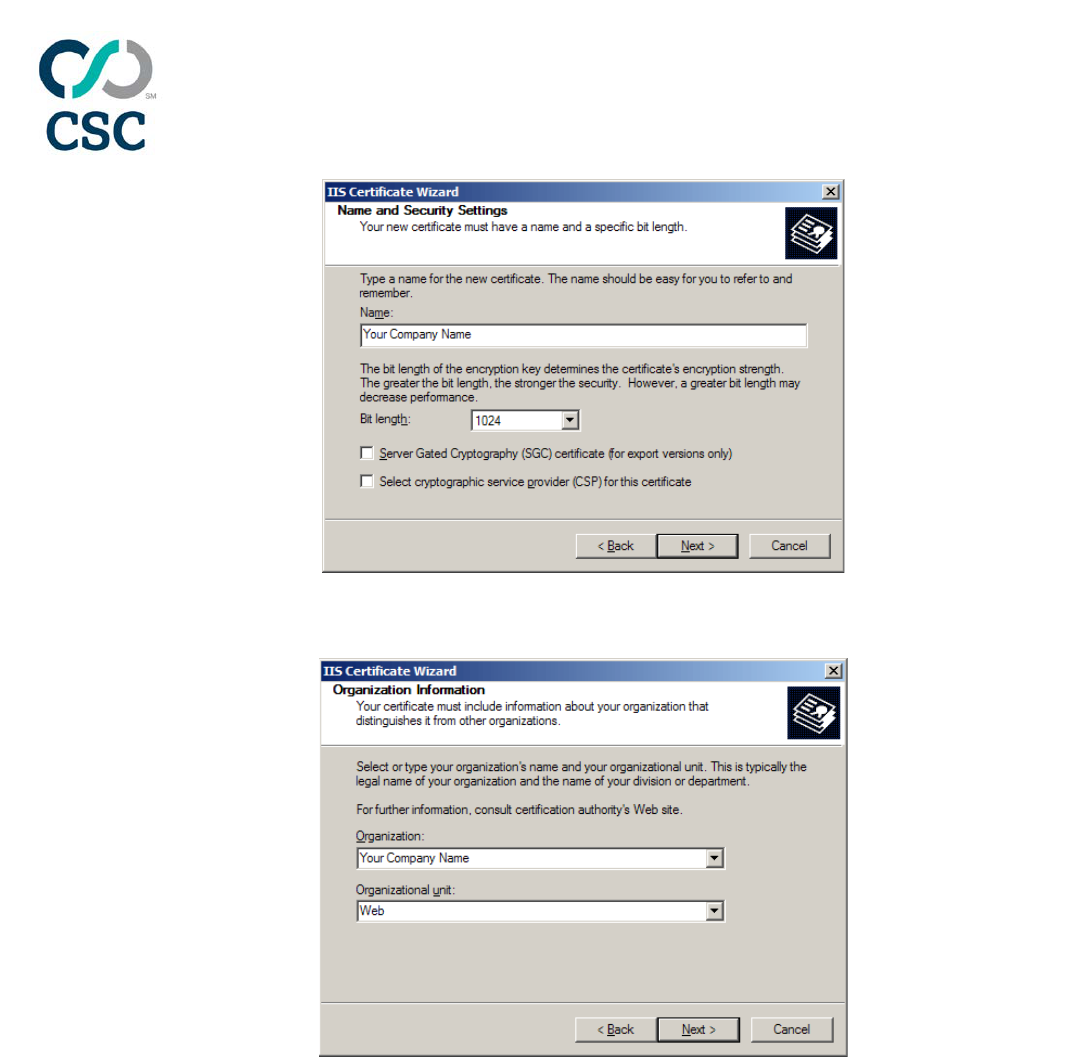
• Enter your organization and organizational unit information. Click “Next.”
• Enter the fully qualified domain name of the website you require the certificate for.
For wildcard certificates, enter in the format *.mydomain.com. Click “Next.”
1/22/2018 9:04:00 AM 21

• Enter your location information. Click “Next.”
• Choose a path and filename to save the CSR. Click “Next.”
1/22/2018 9:04:00 AM 22

• Review the information. Click “Next.”
• Your CSR is now generated. Open the “certreq.txt” file with a text-editor, copy the
contents, then paste them into the enrollment form when requested.
Notes:
If you are generating CSR for a renewal of a certificate, Step 3 should have an option to
renew the certificate and generate a new CSR. Select this and follow the wizard through to
create a renewal CSR for the certificate.
1/22/2018 9:04:00 AM 23

The CSR generation process will create a “Pending Request” on the website. DO NOT remove
this pending request. It will be completed once you receive and install the certificate.
Removing the Pending Request before you have installed your certificate will render the
certificate useless, and you will need to repeat the whole CSR generation process again, and
re-submit the CSR to us.
Microsoft IIS 7.x
To generate your CSR, you will need to log in to your server and use the following
instructions:
• Click the Start menu > Administrative Tools > Internet Information Services (IIS)
Manager.
• Click the server name.
• In the menu, click the “Server Certificates” button in the “Security” section.
• On the right-hand-side, click the “Create Certificate Request...” Action. This will begin
the Request Certificate Wizard.
1/22/2018 9:04:00 AM 24

• Fill out your information. The CN is where you should enter the fully qualified
domain name of the website you require the certificate for. For wildcard certificates,
this is in the format *.mydomain.com. Click “Next.”
• Leave the “cryptographic service provider” as default. The “bit length” can be
changed, we recommend a minimum of 1024-bit, and 2048-bit where possible. Click
“Next.”
1/22/2018 9:04:00 AM 25

• Choose a path and filename to save the CSR. Click “Finish.”
• Your CSR is now generated. Open the “certreq.txt” file with a text-editor, copy the
contents, then paste them into the enrollment form when requested.
Notes:
1/22/2018 9:04:00 AM 26

EV certificates require a minimum of a 1024-bit keysize if valid before 2011, and 2048-bit if
they are valid into 2011. We recommend a 2048-bit keysize as minimum for all certificates.
Oracle (using Oracle Wallet Manager)
To generate your CSR, start the Oracle Wallet Manager program.
• Select “Operations” from the main menu. Choose the option “Create Certificate
Request.”
• You will be presented with a form, complete the information.
The CN is where you should enter the fully qualified domain name of the website you
require the certificate for. Note that Oracle Wallet Manager does not currently
support wildcard certificates.
Set the keysize to at least 1024 bit, preferably 2048 if possible.
Do not click the “Advanced” button, unless you specifically have been instructed to.
• Click “OK” to create the request, and “OK” again to return to the menu.
• Select “Operations” from the main menu again, and choose the “Export Certificate
Request” option.
• Choose a path and filename to save the CSR. Click “OK.”
• Locate the CSR file in the path you just chose. Open with a text-editor, copy the
contents, then paste them into the enrollment form when requested.
1/22/2018 9:04:00 AM 27

Plesk
To generate your CSR, you will need to log in to your Plesk account. The screenshots are
from the latest Plesk release (v9), but the instructions apply to versions 7-9.
• Log in to Plesk. Click on “Domains” on the left, then click the domain you wish to
request the certificate for. Click the “SSL Certificates” icon.
• Click the “Add SSL Certificate” icon.
1/22/2018 9:04:00 AM 28

• Fill out your information in the form. Note, for wildcard certificates, the domain
name field should be in the format: *.mydomain.com.
• We advise to use at least a 2048-bit key, which is the minimum for EV certificates.
1/22/2018 9:04:00 AM 29

• Click the “Request” button.
• You will be returned to the “SSL Certificates” section. Click the name of the certificate
in the list.
• Scroll down to the section labelled “CSR.” Highlight the whole CSR as shown in the
screenshot, and then you can copy and paste the CSR into the web enrollment form.
• Your CSR is now generated.
1/22/2018 9:04:00 AM 30
