
OnePager® Pro User Guide Page 1
User Guide
Version 7.2 © 2023 Chronicle Graphics. All Rights Reserved.
Click on any blue text to go to that section of the document.
QUICK START GUIDE
1. Installation ....................................................................................................................... 4
2. Licensing ......................................................................................................................... 4
3. Creating your Chart ......................................................................................................... 6
4. Editing your Chart ............................................................................................................ 8
5. Exporting your Chart to PowerPoint ................................................................................. 9
6. Saving and Coming Back to your Chart ..........................................................................10
FURTHER EDITING YOUR CHART .........................................................................................12
7. Undoing/Redoing Edits ...................................................................................................12
8. Changing the Date Range ..............................................................................................12
9. Changing Default Shapes, Colors, and Labels of Task Bars and Milestones ..................13
10. Adding Percent Complete, Baseline, and Other Decorations ......................................14
11. Customizing the Legend .............................................................................................15
12. Showing/Hiding/Formatting the Time Cursor ...............................................................16
13. Changing Dimensions of your Chart ...........................................................................17
14. Modifying the Time Axis Units .....................................................................................19
15. Adding/Modifying the Title, Headers, and Footers .......................................................20
16. Changing Background Colors and Striping the Background ........................................21
POINT AND CLICK FORMATTING ..........................................................................................23
17. Warning About Point and Click Formatting ..................................................................23

OnePager® Pro Users Guide Page 2
18. Modifying the Appearance of an Individual Task Bar/Milestone...................................23
19. Changing the Location of an Individual Task Bar/Milestone ........................................24
20. Displaying Task Bars as Milestones ............................................................................25
21. Stretching or Hiding Time Axis Cells ...........................................................................25
CONDITIONAL FORMATTING ................................................................................................28
22. Setting up Conditional Formatting ...............................................................................28
GROUPING, SORTING, AND COLLECTING ...........................................................................30
23. Collecting Task Bars/Milestones into Rows .................................................................30
24. Grouping Rows into Swimlanes ..................................................................................30
25. Adding Multiple Text Columns to Label Rows .............................................................32
26. Changing Swimlane Labels or Text Columns ..............................................................32
27. Changing Row/Swimlane Borders ...............................................................................33
28. Moving Rows/Swimlanes ............................................................................................33
29. Changing Row/Swimlane Heights ...............................................................................33
30. Adding Blank Rows/Swimlanes ...................................................................................35
PAGINATION ...........................................................................................................................36
31. Adding/Removing Automatic Page Breaks ..................................................................36
32. Adding/Removing Manual Page Breaks ......................................................................39
33. Freezing Panes ...........................................................................................................39
SHARING .................................................................................................................................40
34. Copying your Chart to PowerPoint ..............................................................................40
35. Printing your Chart ......................................................................................................40
36. Exporting your Chart to an Image File or PDF .............................................................40
UPDATING ...............................................................................................................................42
37. Adding a Snapshot......................................................................................................42
38. Replacing a Snapshot .................................................................................................43
TEMPLATES ............................................................................................................................45
39. Creating a Standard Template to Share with your Team .............................................45
40. Editing and Using Templates ......................................................................................45
INSERTING ADDITIONAL VISUAL ELEMENTS .....................................................................48
41. Adding Comment Boxes .............................................................................................48
42. Adding Manual Task Links ..........................................................................................49

OnePager® Pro Users Guide Page 3
43. Adding Data-Driven Task Links ...................................................................................50
44. Adding Manual Curtains ..............................................................................................51
45. Adding Weekday or Working Hour Curtains ................................................................52
46. Adding Text Boxes ......................................................................................................53
VIEWS OF MULTIPLE PROJECTS ..........................................................................................55
47. Making a Chart Showing Multiple Projects ..................................................................55
48. Finding Missing Tasks with Where’s My Stuff?! ..........................................................56
49. Rehiding “Hidden” Rows and Swimlanes that Mysteriously Reappear ........................57
50. Getting Help ................................................................................................................59
INTELLECTUAL PROPERTY ..................................................................................................59

OnePager® Pro Users Guide Page 4
QUICK START GUIDE
NEED HELP? ASK US!
E-Mail Support: support@onepager.com
Phone Support (U.S.): +1.303.779.0344, option 2
(Outside the United States? Don’t worry! E-mail us your question, and we will give you a
toll-free number to call us, if you need to chat.)
FAQs Video Tutorials
1. Installation
(1) Find the OnePager Pro Vx.y.z.exe file you downloaded from our website or e-mail.
(Don’t have the file or need a new one? E-mail support@onepager.com.)
(2) Double-click on the exe file.
(3) Follow the prompts of the installation wizard. Generally, you should only install
OnePager on your own user account (Just me). Ask your system administrator if you
are unsure.
(4) Once the installation wizard completes, you will see a OnePager icon on your desktop:
< Back
2. Licensing
(1) Double-click the OnePager icon on your desktop (shown above). When the OnePager
Pro Start screen appears, click the HELP button and then click the Get Standard
License button:

OnePager® Pro Users Guide Page 5
(2) A new window will pop up. Click the Request License Key button at the bottom left.
(3) You will be taken to our website (the page is
https://www.onepager.com/support/license.php). Enter your name, company, e-mail
address, and Order Number. For Product select OnePager Pro. Your installation code has
been filled in for you. Your Order # can be found in the e-mail from which you downloaded
the .exe file. Specify your Reason for Request (New or Replacement key), then hit
Request Key.
(4) Check your e-mail. If all your information matches our records, a license key will be
automatically e-mailed to you. Go back to the OnePager Pro License Form (it should still

OnePager® Pro Users Guide Page 6
be open) and paste the key where it says [Paste license key Here]. Then, click Activate
License. You will get a message telling you that your license is permanently activated on
this computer.
< Back
3. Creating your Chart
(1) Double-click the OnePager icon on your desktop (see above).
(2) Choose New from the Start screen to make a brand-new chart.
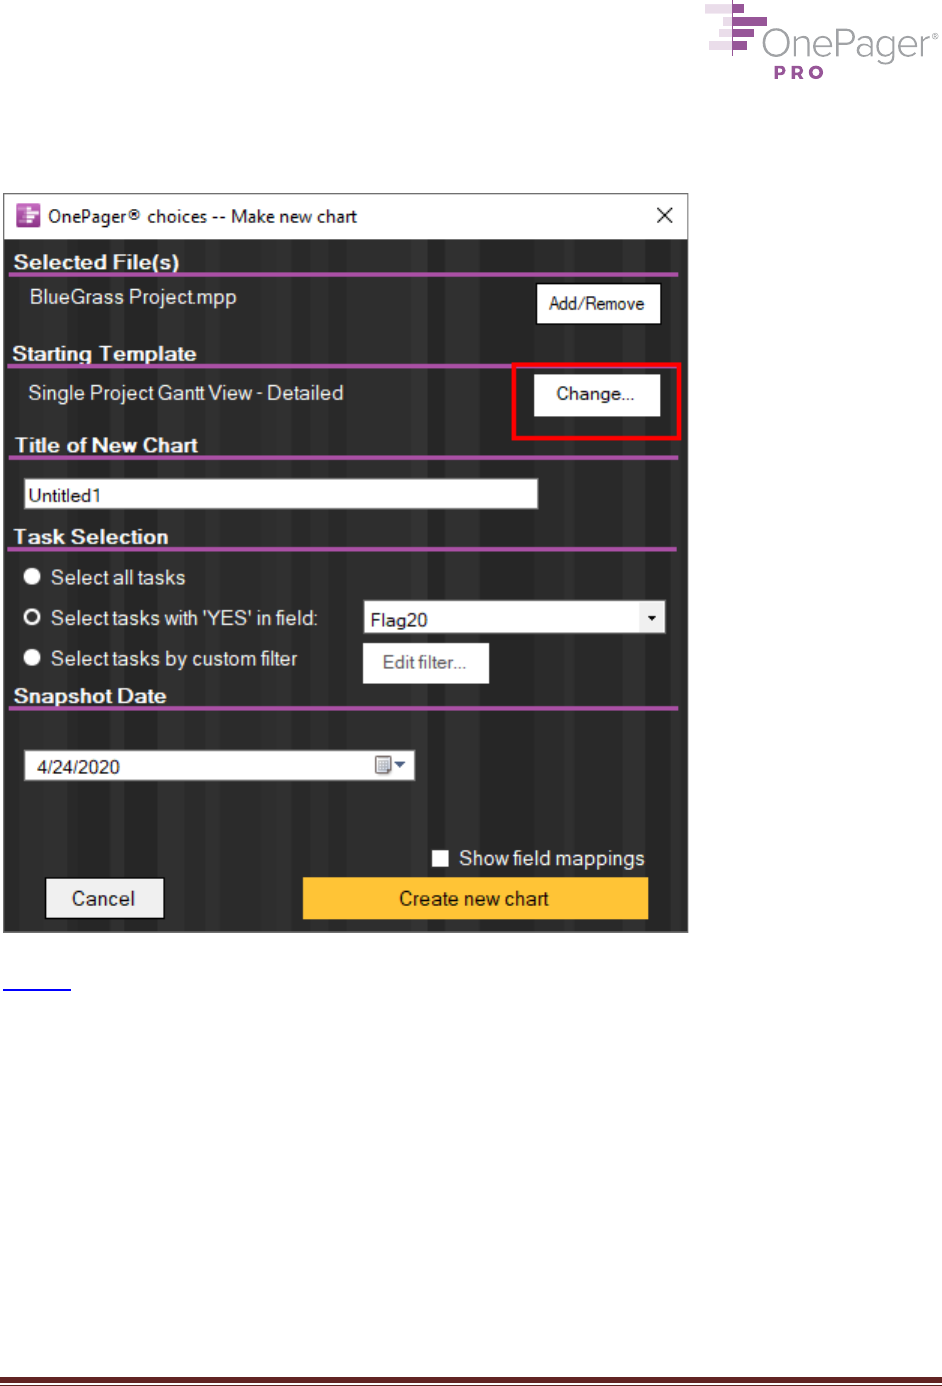
(3) The OnePager Choices Form will appear. Select which Microsoft Project file you would
like to use to create your chart by hitting the Select… button and browsing for the file.
a. Alternatively, just open the Microsoft Project file you would like to use. Go to the
Add-Ins tab and click the OnePager Pro button (see below). Then choose New.
(4) Once a file is selected, type a name for your new chart in the Title of New Chart box.

OnePager® Pro Users Guide Page 7
(5) In the Task selection group, decide whether you want to Select all tasks from your
Project file to display in your OnePager chart, or only some tasks. Here, we’ve chosen to
display only those tasks with the value of Yes in the column Flag20. (To select a different
column here, just use the dropdown menu.) You may also use the custom filter feature to
set a conditional import rule, i.e. only display tasks that are less than 100% complete.
(6) Choose a Snapshot date, the as-of date of your project plan. Today’s date is probably a
good start.
(7) Finally, hit Create new chart at the bottom right. OnePager Pro will import your data and
display your chart.
< Back
OnePager® Pro Users Guide Page 8
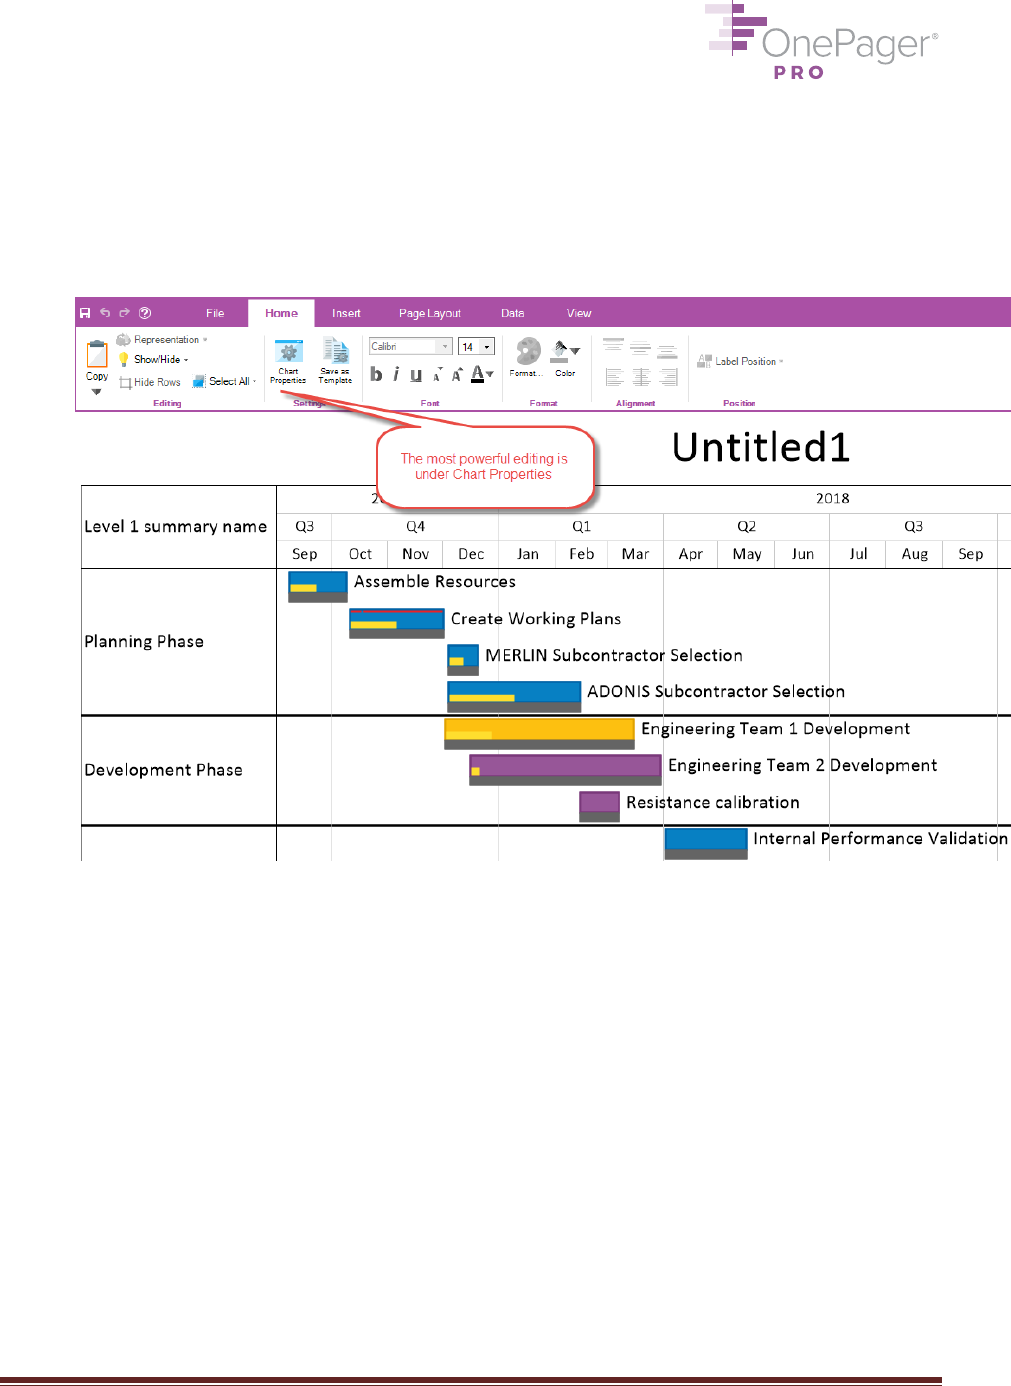
4. Editing your Chart
OnePager gives you two main ways to edit your chart:
1. Manually, by right-clicking and changing colors, fonts, and other formatting by hand
2. Automatically, by changing settings and rules under Home > Chart Properties form:
It’s often tempting to change your chart manually, because these PowerPoint-style edits are
very intuitive. However, when you edit your chart by hand, you are selling OnePager short, and
probably signing yourself up for even more editing in the future.
Here’s why it’s better to customize your chart through Chart Properties instead of making
changes by hand:
1. Speed: Changing settings through Chart Properties lets you change lots of things at
once. For example, if you want to change the font for all of your tasks, it’s much faster to
change your default font once through Chart Properties than it is to select tasks one at a
time and change fonts individually.
2. Repeatability: When you change settings through Chart Properties, those changes can
eventually be made into a template, making it easier to repeat the same formatting in
other reports. Manual edits cannot be incorporated into a template—ever. If you’re going
to invest a lot of time in getting your chart to look the way you want, make sure that you
can reuse those settings in the future.
3. Accuracy: The more hand-edits you make to a chart, the farther it gets from reality.
Letting OnePager dynamically assign colors is always going to be accurate. On the other
hand, if you are hand-painting colors in your OnePager chart, you’ll have to review each

OnePager® Pro Users Guide Page 9
one of those colors for accuracy every time your project changes, which leaves a lot of
room for error.
< Back
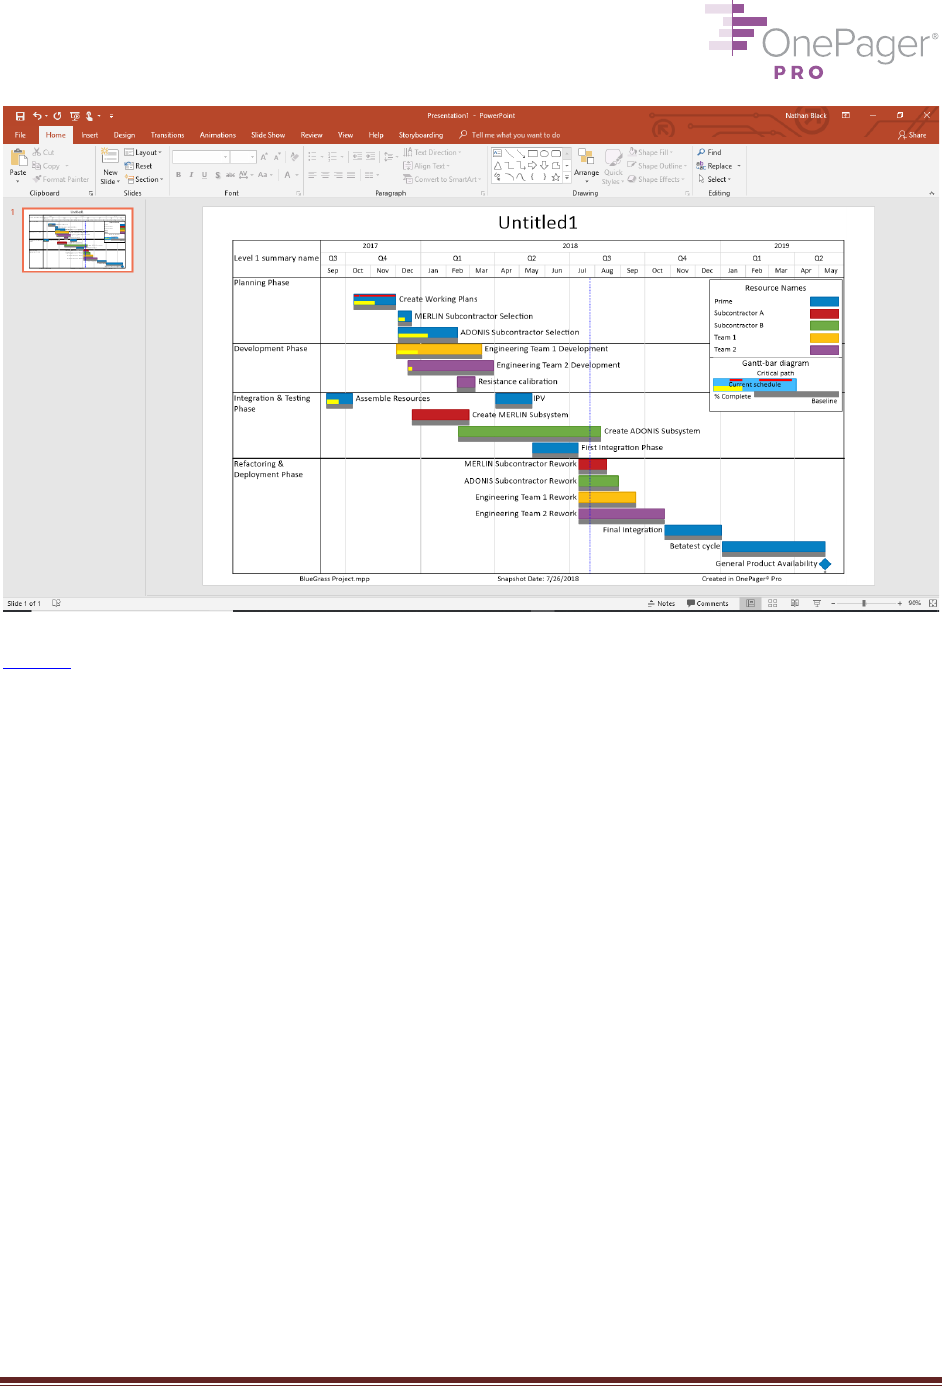
5. Exporting your Chart to PowerPoint
(1) Click the Copy button on the left-hand side of the Home tab.
(2) Open Microsoft PowerPoint, make a new slide, and paste (CTRL-V) your chart as a
resizable graphic into the slide. You’re all set!
OnePager® Pro Users Guide Page 10
< Back
6. Saving and Coming Back to your Chart
To Save your chart with all the edits you have made to it, hit the blue disk icon in the upper left-
hand corner. You will be prompted to name your file and choose a place to save it on your hard
drive, or in a network location for easy sharing.


OnePager® Pro Users Guide Page 12
FURTHER EDITING YOUR CHART
7. Undoing/Redoing Edits
To undo any action you took during your current session of OnePager, click the left-facing blue
arrow at the top left of the screen. To redo any previously undone action, click the right-facing
blue arrow. Hovering over these arrows with the mouse will tell you the next action you can
undo/redo. You can undo up to 100 changes in a single session, so don’t be afraid to
experiment a little!
< Back
8. Changing the Date Range
By default, OnePager sets the date range of your chart to include all of the tasks and milestones
that you have imported. If you want to show a longer or shorter date range, click the Chart
Properties button from the Home tab of the ribbon. From the Time Axis tab of Chart Properties
(Calendar sub-tab), simply enter the new desired start/finish date of your chart. Hit OK or Apply
to implement your changes.

OnePager® Pro Users Guide Page 13
OnePager may automatically adjust your date range if the Project data you import has a task
date earlier than your Start date, or a task date later than your Finish date. To prevent these
automatic adjustments, on the same tab of the Chart Properties menu, change the Auto-adjust
timeline dropdown selection to Always no.
< Back
9. Changing Default Shapes, Colors, and Labels of Task Bars and Milestones
Whenever possible, we recommend changing the formatting of all task bars and milestones at
once, rather than hand-editing them one by one. (On one-by-one editing, see #18 below.)
To change the default formatting for all task bars or milestones, click the Chart Properties
button from the Home tab of the ribbon. To modify task bars, go to the Task Bars tab of Chart
Properties; to modify milestones, go to the Milestones tab. From either tab, you can:
(a) Change default shape and fill pattern.
(b) Change default shape height.

OnePager® Pro Users Guide Page 14
(c) Change default shape color. Many users prefer to use the Color-code based on
dropdown, which allows you to choose a data field from Microsoft Project that will drive
color assignments (i.e., all tasks assigned to Team A get colored red; all tasks assigned
to Team B get colored blue).
NOTE: Any color-coding rule you set for task bars will also apply to milestones, and vice versa.
If you want task bars and milestones to follow separate color-coding rules, see #22 below.
Hit OK or Apply to implement your changes.
< Back
10. Adding Percent Complete, Baseline, and Other Decorations
Click the Chart Properties button from the Home tab of the ribbon and go to either the Task
Bars or Milestones tab (see screenshot above).
OnePager® Pro Users Guide Page 15
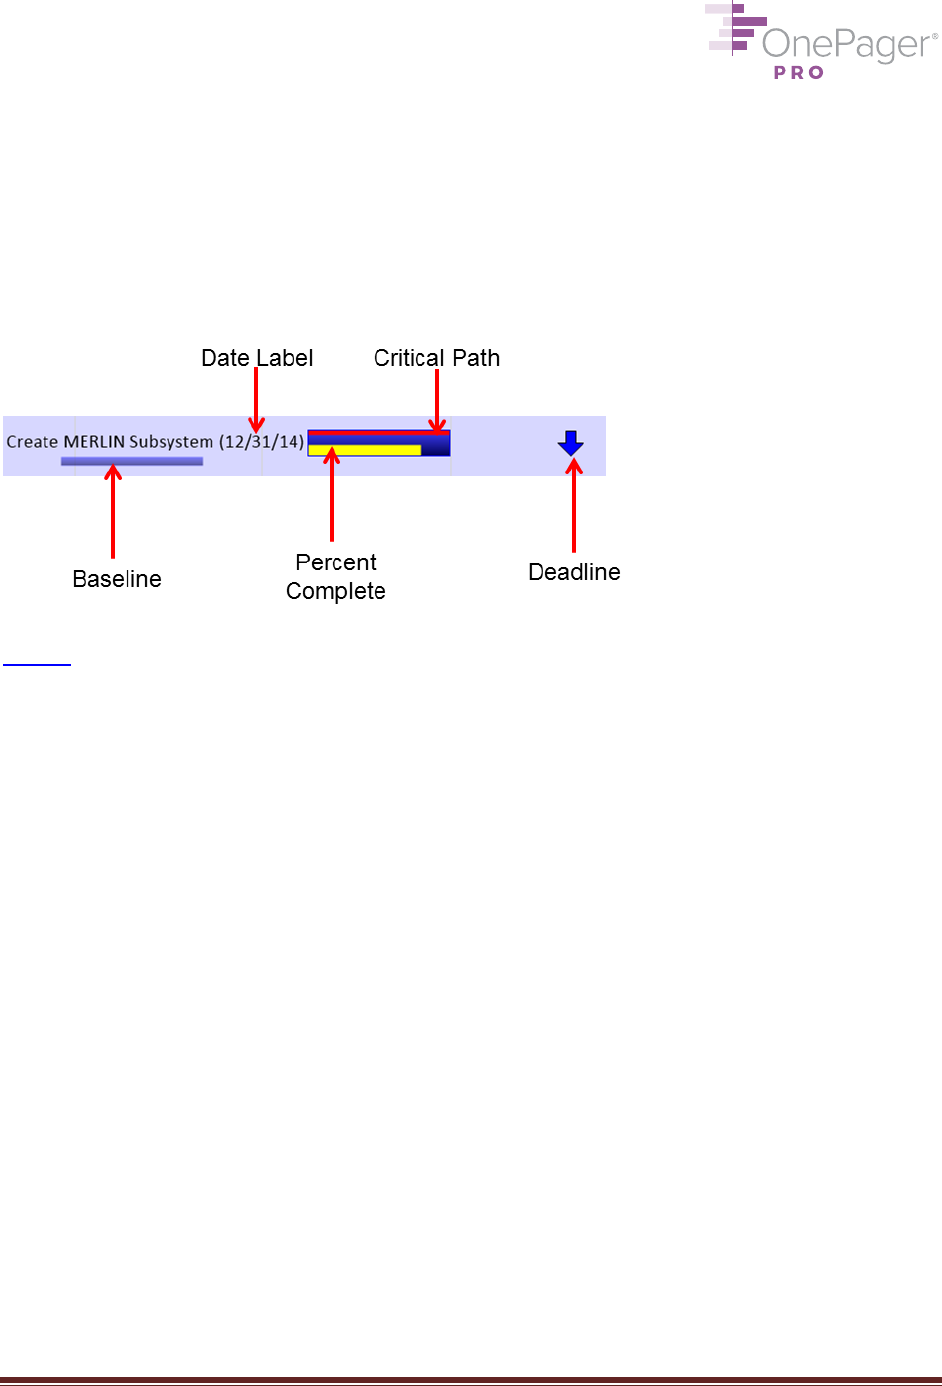
The checkboxes in the Gantt Bar/Milestone Symbol Decorations section allow you to turn on
decorations representing the percent complete, the baseline start/finish dates, and other
decorations such as date labels, deadlines, endpoints, and critical-path segments. You can
modify the fonts and colors of these decorations using the Properties buttons to the right of
each checkbox. For example, if you want to show percent complete as a different color, or you
want to show your baseline dates as text, you can do this through the properties of each type of
decoration. Hit OK or Apply to implement your changes.
< Back
11. Customizing the Legend
You can choose to show the legend anywhere on the page, or not at all. To turn the legend off,
go to the View tab of the ribbon, find the Graphic Elements group, and uncheck the Legend
checkbox.
To change the legend title, right-click on empty space in the legend and choose Edit legend
title… from the context menu.
The legend has an optional Gantt-bar diagram and Milestone diagram that show what the
decorations on each task bar and milestone mean (see below). To turn these diagrams on or
off, click the Chart Properties button from the Home tab on the ribbon and go to the Legend
tab. Check or uncheck Gantt-bar diagram and Milestone diagram at the bottom of the menu.
Hit OK or Apply to implement your changes.

OnePager® Pro Users Guide Page 16
< Back
12. Showing/Hiding/Formatting the Time Cursor
The time cursor is the vertical line on your chart that shows the snapshot or “as-of” date. It
displays by default. To hide it, from the View tab of the ribbon, find the Graphic Elements
group, and uncheck the Time Cursor checkbox.

OnePager® Pro Users Guide Page 17
To change the format of the time cursor, click the Chart Properties button from the Home tab
of the ribbon and go to the Time Axis tab. Click the Time cursor properties… button at the
bottom right of the Calendar sub-tab. This dialog box controls the line color, line width, and line
dash style of the time cursor.
< Back
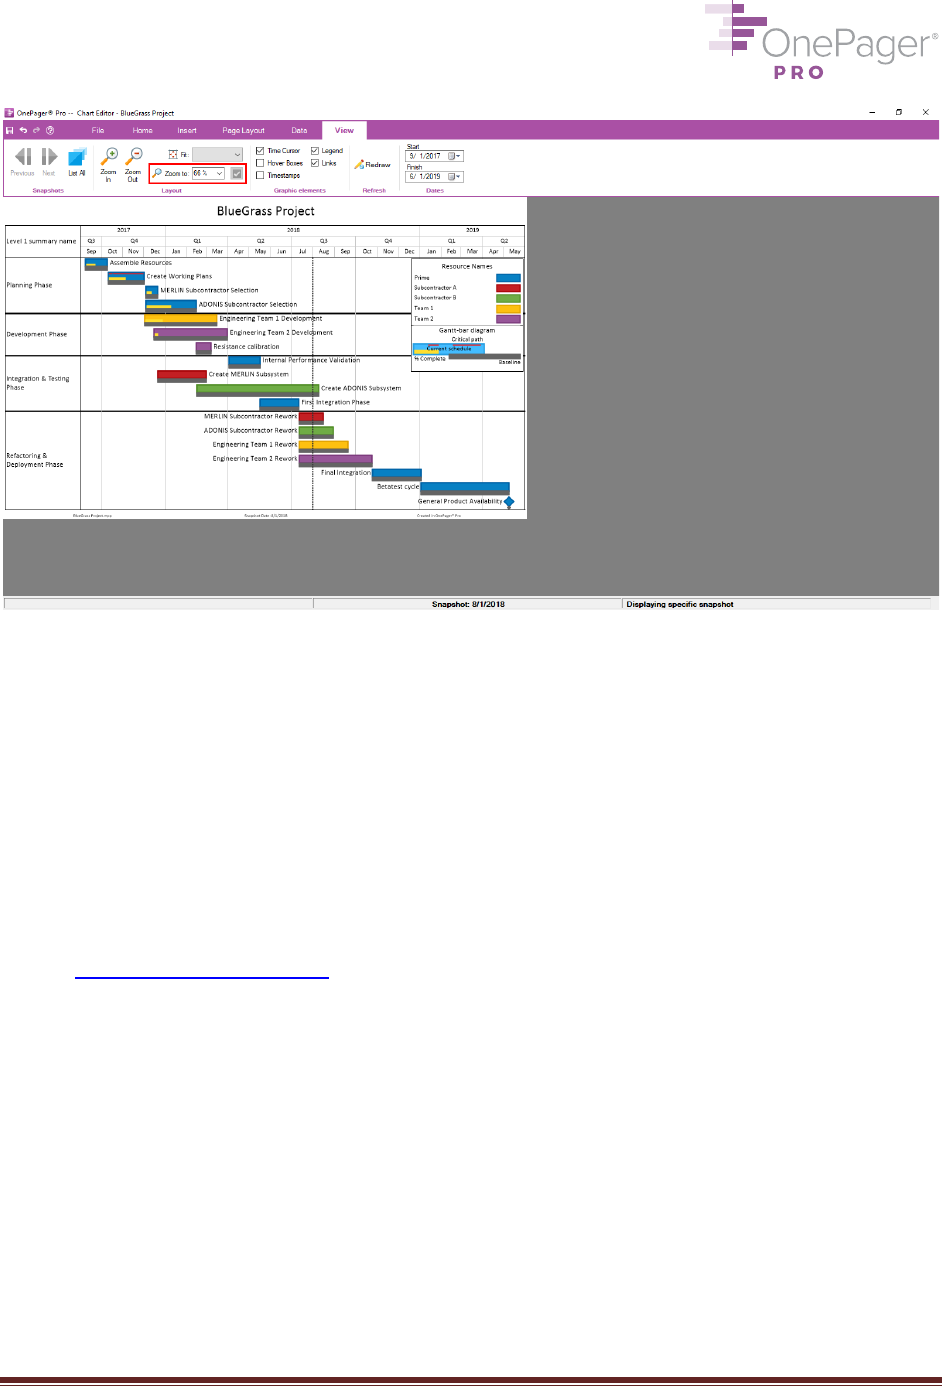
13. Changing Dimensions of your Chart
If your OnePager chart is too wide, narrow, tall, or short when you export or print it, you
probably need to change your aspect (width:height) ratio. You can do this in one of two ways:
Change aspect ratio by dragging
First, zoom out so that the edges of your chart are surrounded by gray space. To zoom out, go
to the View tab and change the Zoom to setting to a smaller percentage.
OnePager® Pro Users Guide Page 18
Second, drag the edges of your chart up, down, left, right, or diagonally to resize the chart, just
like you would a box or image in PowerPoint.
Change aspect ratio in Chart Properties
First, go to the Home tab and click the Chart Properties button. From there, click on the Page
Layout tab.
Second, manually adjust the Document width and Document height settings at the top of the
menu. For U.S. customers, these numbers are measured by default in inches; for most other
countries, centimeters. When possible, we recommend your width be approximately 5/3 of your
height; read our blog post on why. Hit OK or Apply to implement your changes.

OnePager® Pro Users Guide Page 19
< Back
14. Modifying the Time Axis Units
To change the units – years, quarters, months, days, etc. – of the time axis, go to Home >
Chart Properties > Time Axis, then select the subtab corresponding to the level for which you
want to change units (Top Level, Middle Level, or Bottom Level).

OnePager® Pro Users Guide Page 20
Modify the Tic units dropdown on each tab to specify which units should be used on that time
axis level. To get rid of a time axis level entirely, or to add a level, change the Show this level
checkbox at the top of each tab. OnePager allows you to have one, two, or three time axis
levels. Hit OK or Apply to implement your changes.
< Back
15. Adding/Modifying the Title, Headers, and Footers
You set your title when you created the chart, and it will display by default. To modify the text in
the title, double-click on it. To change the title font, font size, or font color, click the Chart
Properties button from the Home ribbon and go to the Headers/Footers tab. Title font controls
are at the top of this menu.

OnePager® Pro Users Guide Page 21
From this same tab, you can control headers and footers – whether they appear, what text
appears in them, and the font/font size/font color of this text.
Hit OK or Apply to implement your changes.
< Back
16. Changing Background Colors and Striping the Background
Click the Chart Properties button from the Home tab of the ribbon and go to the Main tab. The
Chart Background section at the top right of this menu allows you to choose 1-2 colors for the
background of your Gantt chart. There are also 7 different fill patterns available, including
options for alternating colors between adjacent rows or swimlanes. Hit OK or Apply to
implement your changes.


OnePager® Pro Users Guide Page 23
POINT AND CLICK FORMATTING
17. Warning About Point and Click Formatting
Whenever possible, we recommend formatting your Gantt chart from the Chart Properties
form. Changes made in Chart Properties apply to all tasks/milestones, and are much easier to
standardize into templates later. By contrast, changes made using point-and-click formatting will
generally only apply to the task bars and milestones you select. While convenient in some
cases, this point-and-click formatting is never saved to the Chart Properties (because it is not
applied globally). Therefore, if you ever decide to make a template from your chart (see #39
below), the changes you made using point-and-click formatting will not be passed to your
template, and you will have to redo those changes when you use that template to make a new
chart. By contrast, any changes you make through Chart Properties can be saved to a template
for future use with different project plans, because these settings are not tied to specific tasks
and milestones.
For example: If you want all task bars that are 0-50% complete to be colored red, the most
efficient approach is to open Chart Properties and set a conditional formatting rule (see #22
below). You can also individually select the task bars you want colored red and color them, but
this is less efficient, because those color changes are never saved to the Chart Properties and
are only applied to the specific tasks you selected by hand.
We recommend you use point-and-click formatting to make changes that you intend to apply to
only one task bar or milestone, or to only a small group of elements that cannot be identified in
the Chart Properties form. Rest assured that all point-and-click changes are saved with your
Chart, even though they are not saved to the global Chart Properties.
< Back
18. Modifying the Appearance of an Individual Task Bar/Milestone
Please first read the Warning in #17 above. If you are sure you want to reformat a task
bar/milestone outside of Chart Properties, continue reading.
Right-click on the task bar/milestone you want to modify and go to the Format… menu. From
this menu, you can change its shape or color, change its height, modify the font and position of
its label, and much more. To add or remove date labels, go to the Dates tab. To add or remove
decorations such as percent complete or baselines, go to the Percent Complete or Baselines
tab, as appropriate. Click OK to implement your changes.
You can also modify the position of a task label by left-clicking on the label and then using the
Label Position dropdown on the right-hand side of the Home tab of the ribbon.

OnePager® Pro Users Guide Page 24
To reformat multiple task bars/milestones at once (but not all task bars/milestones – see #9
above for a better way to do that), hold down the CTRL key while left-clicking on them. Then
right-click and follow the instructions above.
< Back
19. Changing the Location of an Individual Task Bar/Milestone
You can move task bars/milestones up or down in your Gantt chart – not side to side, as this
would change the start/finish dates of your task bars/milestones and break the fidelity of your
chart to the data in Microsoft Project. Moving up or down can be accomplished either with the
mouse or the keyboard. Note that the task bar/milestone will always “snap” to the row that
contains it.
To move using the mouse, left-click the task bar/milestone you want to move and drag it up or
down. To move using the keyboard, left-click the task bar/milestone you want to move and use
the up or down arrow keys to move the shape up or down.
To move multiple task bars/milestones at once, hold down the CTRL key while left-clicking on
them. Then follow the instructions above.
< Back

OnePager® Pro Users Guide Page 25
20. Displaying Task Bars as Milestones
If you want to display all task bars as milestone symbols, click the Chart Properties button from
the Home ribbon and go to the Advanced tab. Change Task representation on the right-hand
side of this menu from Gantt bar to either Milestone at start or Milestone at end. Hit OK or
Apply to implement your changes.
To change an individual task bar to a milestone symbol (see the warning on this practice in
#17 above), right-click on the task bar and choose Task Representation from the context
menu. Change the selected option to either As milestone at start or As milestone at finish.
< Back
21. Stretching or Hiding Time Axis Cells
OnePager allows you to expand, contract, or even hide cells on your time axis. This is useful for
calling out a particular period of time — if many important events happen in the fourth quarter of

OnePager® Pro Users Guide Page 26
2020, you might want to make that quarter display more prominently than the rest of your chart.
Conversely, you might want to hide other periods of time that are unimportant.
To change the width of a time axis cell, simply left-click on it and drag the left/right boundaries:
In this example, we’ve made the tasks and milestones in the first quarter of 2018 appear wider
than the others:
Or, we can just hide this quarter, by right-clicking on it and choosing Hide cell…
This omits the first quarter of 2018 from the chart.


OnePager® Pro Users Guide Page 28
CONDITIONAL FORMATTING
22. Setting up Conditional Formatting
OnePager allows you to automatically change the color, shape, and other formatting of task
bars and milestones based on the data in your project plan. For example, you could specify that
every task less than 10% complete be colored red, that tasks assigned to Bob are shown with a
chevron shape, or that summary tasks are larger than detail tasks. This is called conditional
formatting, and basically it works the same way as it does in Microsoft Excel.
To set a conditional formatting rule, go to either the Task Bars or Milestones tab of the Chart
Properties menu. In the Conditional Formatting section at the bottom, click Manage Rules…
Conditional formatting rules are shared between tasks and milestones, so you can manage
them all in one place.
OnePager® Pro Users Guide Page 29
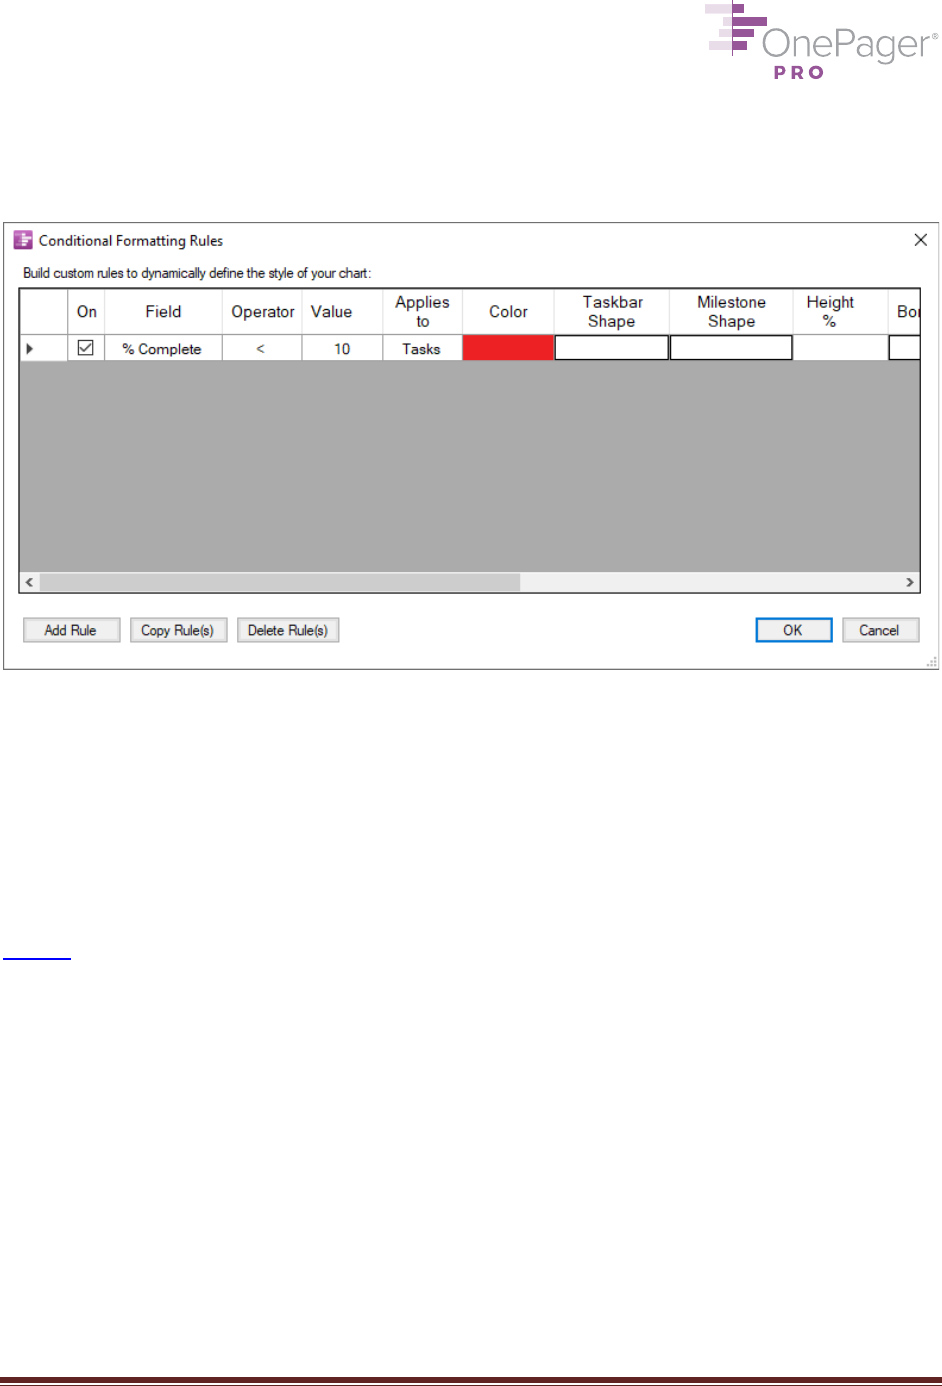
From the dialog box that pops up, you can add a rule by clicking on the Add Rule button. In this
example, we’ll set one of the rules we suggested above – that every task less than 10%
complete be colored red:
To apply this rule, we need to hit OK twice – once to close the Conditional Formatting Rules
form, and once to close the Chart Properties form.
The conditional formatting rule we’ve set will now be applied to our chart, and will be
reevaluated every time we update the chart with a new snapshot. So if a task changes from 5%
complete in one snapshot to 15% complete in another snapshot, its color will change in the
second snapshot from red to whatever color it would otherwise be assigned. Cool, right?
< Back

OnePager® Pro Users Guide Page 30
GROUPING, SORTING, AND COLLECTING
23. Collecting Task Bars/Milestones into Rows
By default, OnePager puts each task bar or milestone into its own horizontal row. This is called
Gantt chart mode. If you want to collect multiple task bars/milestones into the same row, click
the Chart Properties button on the Home ribbon and go to the Rows/Swimlanes tab. Select
Timeline (multiple tasks per row) and then select the field that will drive task collection. For
instance, in the screenshot below, if you choose to Align tasks on Resource Names, then
each unique value of Resource Name will get its own row, with multiple tasks/milestones
therein.
< Back
24. Grouping Rows into Swimlanes
A swimlane is a collection of rows. OnePager allows you to define up to three levels of
swimlanes, though for basic purposes one is generally sufficient. In the example screenshot

OnePager® Pro Users Guide Page 31
below, tasks are grouped into swimlanes by Level 1 Summary Name, and rows are labelled by
Level 2 Summary Name. Most users set swimlanes in their reports to Phase, Subproject,
Department, Resource Names, or other easily identifiable groupings.
To group your tasks into swimlanes, click the Chart Properties button from the Home tab of the
ribbon and go to the Rows/Swimlanes tab (see screenshot in #23 above). Turn on the
checkbox for Group by… and select a Microsoft Project field from the dropdown list. By default,
you will modify the “Left #1” swimlane grouping; the “Left #2” and “Left #3” tabs are for
additional swimlanes if you need them. Hit OK or Apply to implement your changes.
< Back

OnePager® Pro Users Guide Page 32
25. Adding Multiple Text Columns to Label Rows
OnePager allows you to display up to five Text Columns on the left-hand side of your chart. In
the example chart below, several text columns have been turned on, with two swimlanes on the
far left, and then four text columns to the right of that. This maximizes your ability to display
helpful text information alongside your graphics.
To enable Text Columns, click the Chart Properties button from the Home tab of the ribbon
and go to the Rows/Swimlanes tab (see screenshot in #23 above). In the Text Columns
section, check Display data from and select a column from your source file.
< Back
26. Changing Swimlane Labels or Text Columns
Double-click on any text column or swimlane label (i.e. “Level 1 summary name”) to change it,
then hit OK to implement your changes. Changes to these labels will not impact your underlying
Microsoft Project data, but we will save them in the chart so your labels stay intact for future
updates. Because these changes are made outside of Chart Properties, they will not be saved
to any templates you create from this chart (see #17 above for more detail).
If you want to completely show/hide row or swimlane labels, right-click on empty space in the
Gantt chart and select Show text columns or Show swimlane labels from the context menu
(see screenshot in #23 above).
< Back

OnePager® Pro Users Guide Page 33
27. Changing Row/Swimlane Borders
Click the Chart Properties button from the Home tab of the ribbon and go to the
Rows/Swimlanes tab (see screenshot in #23 above). The Row Border Formatting… button,
or the Swimlane Formatting… button (Swimlane Borders group) allows you to either
completely hide row/swimlane borders or change their color, weight, and dash type. Hit OK or
Apply to implement your changes.
< Back
28. Moving Rows/Swimlanes
Just like task bars/milestones, rows/swimlanes can be clicked and dragged up and down with
the mouse. Be sure to click on one of the text columns to move a row, or the swimlane
label to move a swimlane; otherwise, you may move the wrong thing. This means text
columns must be turned on in order to move a row; see #25 above on how to show text
columns.
Warning: Because row/swimlane movements of this kind are made outside of Chart Properties,
they will not be saved to any templates you create from this chart (see #17 above). You may
want to apply a global ordering rule to your rows/swimlanes instead. To do this, click the Chart
Properties button from the Home tab of the ribbon and go to the Rows/Swimlanes tab (see
screenshot in #23). From the Row Sorting or Swimlane Sorting groups, you can either order
rows/swimlanes as they are ordered in Microsoft Project, or you can order them according to the
Microsoft Project field of your choosing. Hit OK or Apply to implement your changes, which will
be applied to any templates you make from this chart in the future.
< Back
29. Changing Row/Swimlane Heights
Rows and swimlanes can be made taller or shorter by selecting a row or swimlane and dragging
its handlebars up or down. Be sure to click on a text column to resize a row, or the
swimlane label to resize a swimlane; otherwise, you may resize the wrong thing. This means
text columns must be turned on in order to resize a row; see #25 above on how to show text
columns.
To resize multiple rows/swimlanes at once, hold down the CTRL key while clicking on them,
then follow the instructions above.
OnePager® Pro Users Guide Page 34
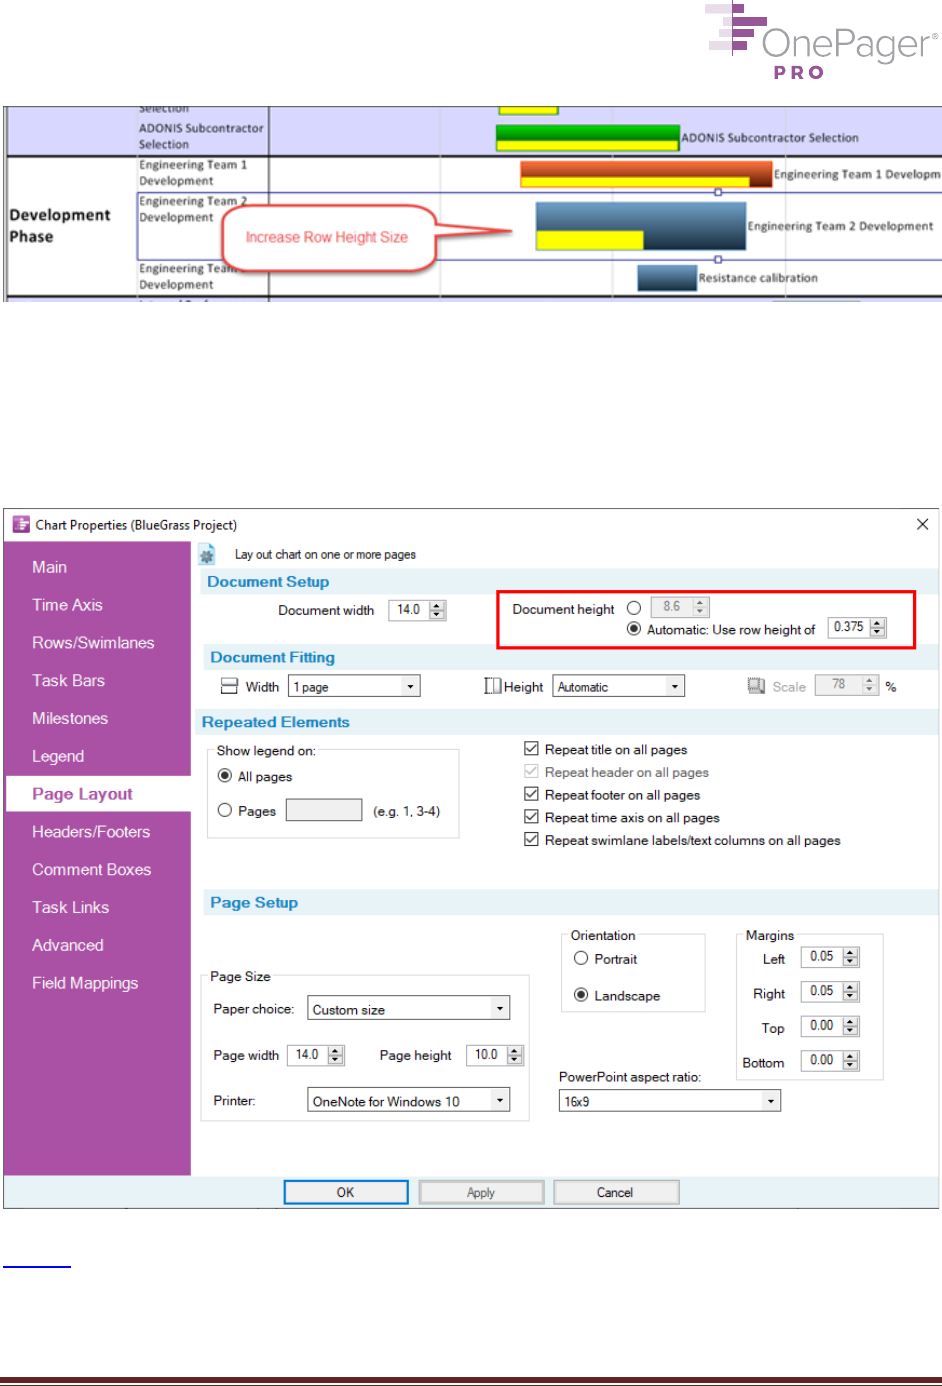
If you would prefer to make all rows taller or shorter, click on the Chart Properties button from
the Home ribbon and go to the Page Layout tab. For Document height choose Automatic:
Use row height of ___, and modify the default row height (inches for U.S. customers,
centimeters elsewhere) as needed. Click OK or Apply to implement your changes.
< Back

OnePager® Pro Users Guide Page 35
30. Adding Blank Rows/Swimlanes
To add a blank row or swimlane to your chart, right-click on empty space in your Gantt chart
and choose Add row or Add swimlane (for screenshot, see #23 above). You will be asked
whether to add the new row/swimlane Above or Below the current one.
< Back

OnePager® Pro Users Guide Page 36
PAGINATION
31. Adding/Removing Automatic Page Breaks
When importing a lot of tasks and milestones, users sometimes see that these long charts are
compressed down to a single page and appear very tall and skinny when printed:
The reason this chart appears so narrow is because it is being fit by the printer to a single page.
The longer a chart is, the skinnier it has to get in order to scale itself down to a single piece of
paper.
If your chart is too long to fit on a single page without looking like this, the best solution is to
allow the chart to print on multiple pages. OnePager has a setting that automatically inserts
page breaks and does a "best fit" across multiple pages for longer charts. Here's how:
(a) Click on the Page Layout tab on the ribbon and locate the Width and Height controls in
the Document Fitting panel:

OnePager® Pro Users Guide Page 37
By default, your document is set to print 1 page wide by 1 page tall, which is why if you look at
the Scale, you will see a very small number like 30%. This means that the document has been
reduced to 30% of its original size to fit vertically on a single page.
(b) When you have lots of tasks, it’s best to allow OnePager to automatically fit the
document to as many pages as necessary. Change the Height setting from 1 page to
Automatic.
(c) Now, click on Print Preview (also on the Page Layout tab, third button from the left)
and you will see that the chart now spans multiple pages at nearly full size, making it
much easier to read.


OnePager® Pro Users Guide Page 39
32. Adding/Removing Manual Page Breaks
OnePager also allows you to add manual page breaks to a chart. From the Page Layout tab on
the ribbon, click the Page Breaks button and choose Insert vertical page break – to insert a
horizontal line that divides the chart vertically – or Insert horizontal page break, to insert a
vertical line that divides the chart horizontally. Drag the page break to the desired position and
left-click the mouse to set it. To remove manually inserted page breaks, return to the Page
Breaks dropdown and choose Remove all inserted page breaks.
< Back
33. Freezing Panes
Just like in Microsoft Excel, OnePager allows you to freeze either the top, bottom, or left side of
your chart, so those elements are still visible as you scroll down or to the right. To freeze the top
time axis, go to the Page Layout tab on the ribbon, select the Freeze Panes dropdown, and
choose Freeze top time axis. (If you have a bottom time axis, you can freeze it in the same
way.) To freeze row and swimlane labels, go to the same dropdown and choose Freeze row
and swimlane labels. Now you can scroll without losing track of where you are!
< Back

OnePager® Pro Users Guide Page 40
SHARING
34. Copying your Chart to PowerPoint
Go to the Home tab and click the Copy button. You can then paste your Gantt chart as a
resizable graphic into PowerPoint or virtually any other application.
< Back
35. Printing your Chart
Go to File on the ribbon and choose the Print tab. You will see a print preview (similar to
Microsoft Word). Hitting the Print button will bring up the Windows Print screen, where you can
select a printer and a page range and print your document.
Hitting the Settings button will bring up the Page Layout tab of the Chart Properties menu. If
your chart is only one page wide and one page tall, and you want it that way, you may want to
make some small changes to these settings before printing; read more here.
< Back
36. Exporting your Chart to an Image File or PDF
Go to File on the ribbon and choose the Export tab. Under Send to Image File(s), choose an
image format; we recommend PNG. (If your chart is more than one page wide or tall, you should
also decide which pages to export, and adjust the settings under Page Range accordingly.)
Then, click the button to the left of Send to Image File(s) – shown in the screenshot below – and
Windows Explorer will open, prompting you to save your image file in the location of your
choosing.
You can also accomplish this by going to File > Save As and choosing the PNG file type rather
than the TAM file type from the Save as type: dropdown.
To create a PDF document of your chart, simply click Send to PDF, again specifying the page
or pages you wish to export.

OnePager® Pro Users Guide Page 42
UPDATING
37. Adding a Snapshot
When your project plan changes – start/finish dates move, percent complete values increase –
OnePager allows you to add a new snapshot to your chart reflecting those updates. Each
snapshot is associated with a date, so an individual chart might have one snapshot for October
1, 2020; another snapshot for November 1, 2020; and so forth. Over time, one chart will
accumulate a series of snapshots, giving you a periodic audit trail of how your project has
changed.
To add a new snapshot to your Gantt chart:
(a) Make the necessary changes in your Microsoft Project file.
(b) Open your OnePager chart, if it is not open already, by double-clicking on the file.
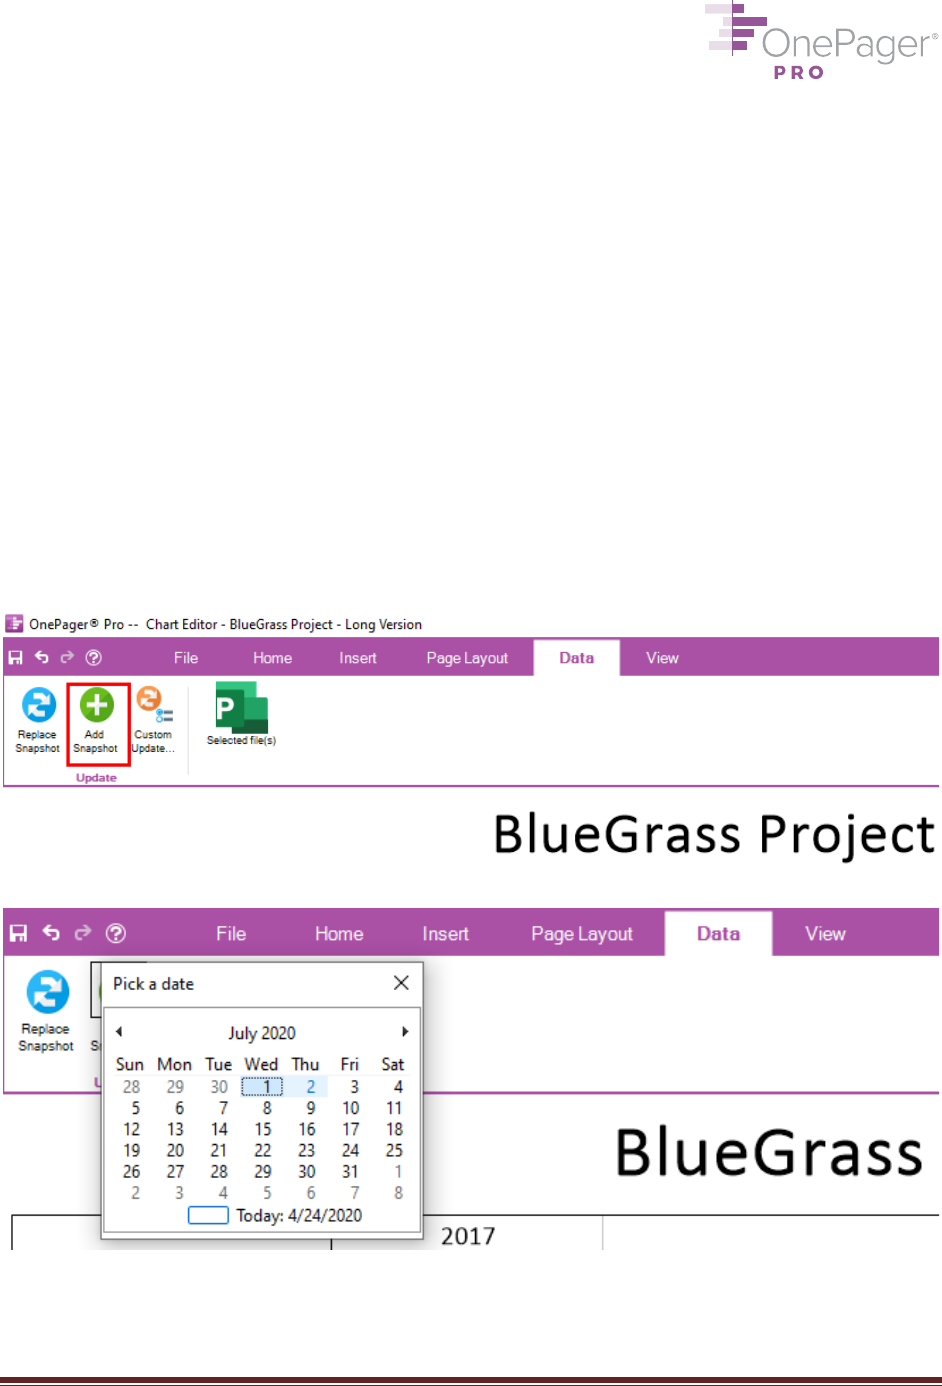
(c) From the Data tab, choose Add Snapshot.
(d) Choose a date for your new snapshot. Finally, click OK to create the new snapshot.
Your chart will display its new snapshot – but you haven’t lost the previous snapshots you
made. From the View tab of the ribbon, if you hit the Previous or Next arrows, you can browse
through the snapshots you have stored. Or you can click List All to see every snapshot, and

OnePager® Pro Users Guide Page 43
select the one you want to see. You can also change snapshot dates or even delete snapshots
from this List All form.
< Back
38. Replacing a Snapshot
From time to time, you may want to replace an existing snapshot, rather than create a new one.
For example, you may have just created a new snapshot, but forgot to update a couple of tasks
in your Microsoft Project file or to flag an important task for inclusion. To replace a snapshot:
(a) Make the necessary changes in your Microsoft Project file.
(b) Open your OnePager chart, if it is not open already, by double-clicking on the file.
(c) From the Data tab, choose Update Custom.
(d) The OnePager Choices form will appear (screenshot below). First, confirm how (if at all)
you will be filtering tasks from your Microsoft Project file. Second, under Snapshot Date,
choose REPLACE existing snapshot at date, and choose the snapshot you wish to
overwrite. By default, we’ll replace your most recent snapshot.
(e) You now need to choose between three Replace Modes.
a. Dates and progress mode will instruct OnePager to go back to Microsoft Project
and fetch updated start/finish dates, baseline start/finish dates, percent
complete/critical path values, and refresh any conditional formatting in your chart
(e.g., rules set in Chart Properties to color task bars/milestones based on status).
This mode works for most users most of the time; use the others only if you are
not getting the desired results.
NOTE: This mode, as well as the other two modes, lets you flag new
tasks for inclusion or de-flag existing tasks that you want to omit from the
snapshot.
b. All properties mode will instruct OnePager to refresh all of the properties in (a),
plus task names and the assignment of tasks to rows/swimlanes. Users most
commonly use the All properties mode to resynchronize their OnePager task
names with the task names in their Microsoft Project file, to undo manual name
changes made in OnePager, or when they have made significant changes to the
work breakdown structure (WBS) in Microsoft Project.
c. All properties (confirm) does the same thing as All properties, but it will ask you
to confirm each change. This mode is rarely used.


OnePager® Pro Users Guide Page 45
TEMPLATES
39. Creating a Standard Template to Share with your Team
If your team finds itself creating charts with the same basic format over and over, you can save
time by making a common template (or a set of them). That way, no one has to set up
formatting by hand.
Start with any existing chart. Once your chart’s formatting is just the way you want it, click the
Save as Template button to the right of the Chart Properties button on the Home tab:
You will be prompted to save your new template in the Templates directory on your file system.
Templates are stored as *.tat files. Templates will consist of your Chart Properties settings, but
will not capture any manual point-and-click changes that you made by hand; see #17 above for
more on this topic.
< Back
40. Editing and Using Templates
To edit a template, open Microsoft Project, click Add-Ins on the ribbon, and click the
Templates… button next to the OnePager Pro button.
The tabs on the template menu – shown below – are identical to the tabs in the Chart
Properties form inside OnePager. This is because when you hit the Save as Template button
earlier, you basically copied the Chart Properties settings from that chart into the menu you
see now.
OnePager® Pro Users Guide Page 46
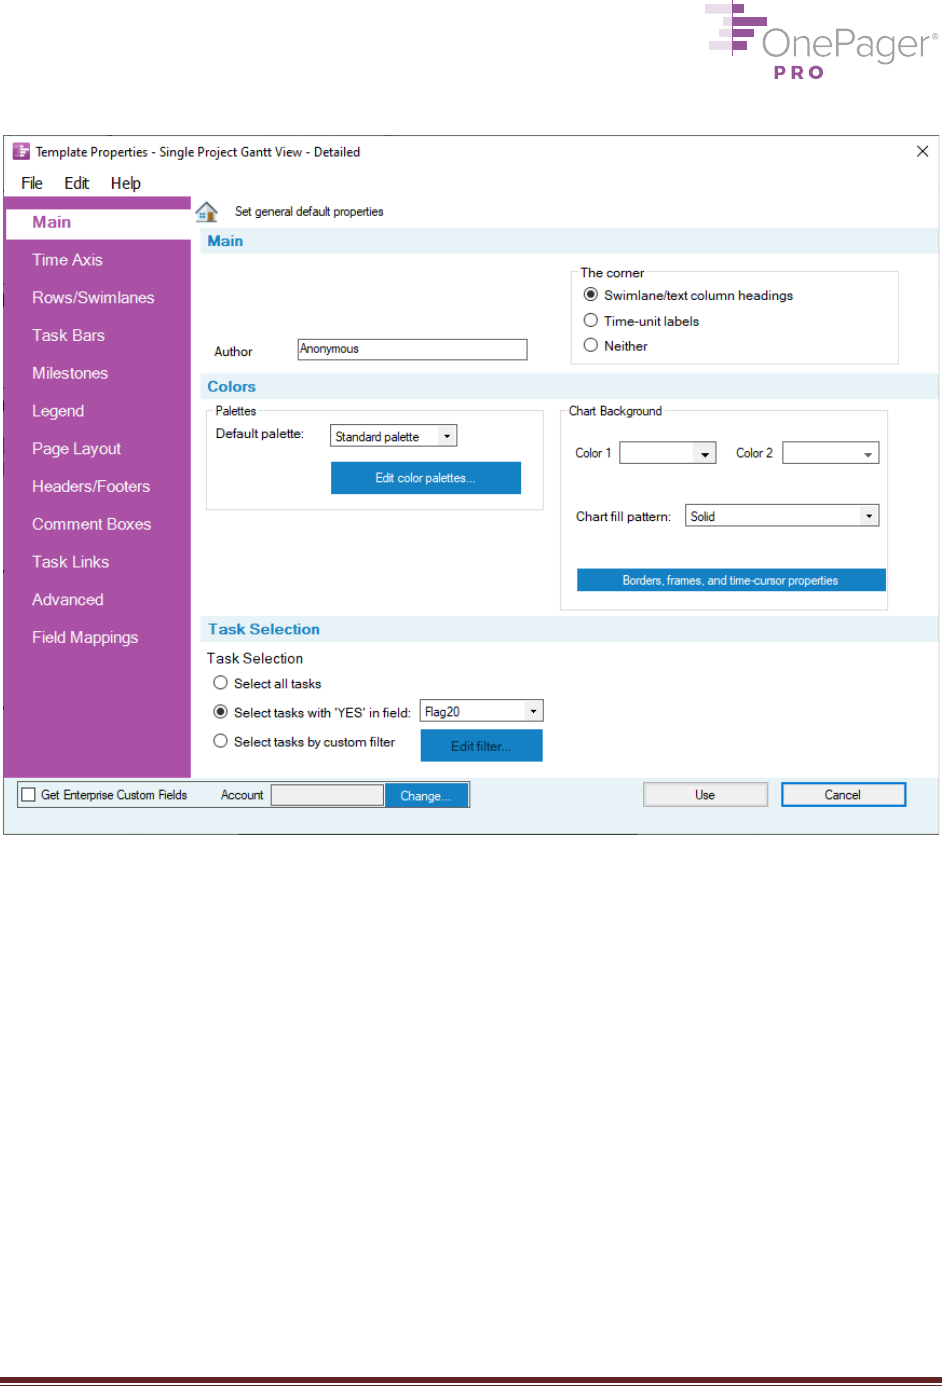
From this Templates menu, you can change the properties of future charts that you create from
this template. For example, if you want tasks to always be aligned into rows by “Resource
Names”, you can specify that in the Rows/Swimlanes tab, and then click Save and Use at the
bottom to save your changes.
To use your template, simply launch OnePager as normal, and from the Start screen choose
New to create a new chart. Unless you specify otherwise, OnePager will make this new chart
using the template you last created or edited. That means all the chart properties you copied
into your template will be applied to this brand-new chart.
You can change which template new charts are based upon from the Starting Template
section of the OnePager Choices Form (screenshot below). Hit Change… and you will be
prompted to load either a recently modified template, or to browse your file system for some
other template. You can also choose the permanent, read-only template (Single Project –
Permanent) that comes pre-loaded with your installation of OnePager.

OnePager® Pro Users Guide Page 48
INSERTING ADDITIONAL VISUAL ELEMENTS
41. Adding Comment Boxes
A comment box contains free text and can be associated with any task bar or milestone. To
add a comment box, right-click on the task bar/milestone you want it to be associated with, and
choose Comments…. In the submenu that pops up, type in your text, modify formatting as
needed, and click OK to make the box.
You can drag a comment box around on the screen to reposition it, or drag its handlebars to
resize it, just like in PowerPoint. To delete a comment box, right-click on it and navigate to
Delete, either From this snapshot or From all snapshots.
< Back

OnePager® Pro Users Guide Page 49
42. Adding Manual Task Links
To show a dependency between two task bars/milestones, you can add a task link (arrow)
between them. Holding down the CTRL key, left-click to select two or more task bars or
milestones you want to link. Then, from the Insert tab of the ribbon, click Task Link. Modify
formatting as needed, and click OK to draw the link. Once established, links will stay in place
through any future updates you make to the same chart.

OnePager® Pro Users Guide Page 50
Task links will also be retained as you reposition the linked task bars/milestones on the screen.
To delete a task link, right-click on it and navigate to Delete, either From this snapshot or
From all snapshots.
< Back
43. Adding Data-Driven Task Links
OnePager also allows you to add task links based on the Predecessor data you have in
Microsoft Project. These data-driven task links will not only draw automatically, but they will
also be updated as you modify predecessor data in your Project file (and then update your
OnePager chart).
To enable data-driven task links, go to Home > Chart Properties > Task Links and turn on the
Import and show links checkbox, near the bottom. At this point you have two choices: (a)
show all data-driven task links, or (b) use filtering rules to determine which task links to show.
We recommend you start with option (a), but consider using option (b) if there are too many task
links on the screen. Then hit OK or Apply to commit your changes.


OnePager® Pro Users Guide Page 52
To draw a manual curtain, from the Insert tab of the ribbon, click Curtain. Add any text you
want to your curtain, modify formatting as needed, and click OK to draw the curtain.
To delete a manual curtain, right-click on it and navigate to Delete, either From this snapshot
or From all snapshots. You can also select a curtain and adjust its date boundaries by
dragging the handlebars, just as you would resize a text box in PowerPoint.
< Back
45. Adding Weekday or Working Hour Curtains
In addition to manual curtains, OnePager also allows you to draw weekday or working hour
curtains. For instance, you can color Saturdays and Sundays gray, so that they are less
prominent in your chart (since usually less work is scheduled on weekends). Or you can block
out time outside business hours, if your team generally doesn’t work then.
To add a weekday curtains, go to Home > Chart Properties > Time Axis > Format and
change the Curtain Colors dropdown for the weekdays desired. Here we have Saturday and
Sunday colored:

OnePager® Pro Users Guide Page 53
Similarly, if you want non-working hours colored specially, use the dropdown next to the Show
Non-Working Hours checkbox on this same menu. Your working hours have been defined by
default as 8:00am to 5:00pm, Monday-Friday; to change this, click Define Working Hours…
It is also possible to hide specific weekdays or working hours from this same menu (of course,
you cannot hide all seven days of the week). Click OK or Apply to commit your changes.
< Back
46. Adding Text Boxes
OnePager allows you to draw a free box, commonly known as a text box, anywhere you want
on the screen. Free boxes differ from comment boxes (see #41) in that they are not attached
to a task or milestone. You can use them to store project-level comments, legal disclaimers, etc.
To draw a free box, from the Insert tab of the ribbon, click Free Box. Click and drag the left
mouse button to draw your box, and let go of the mouse button to see it on the screen.

OnePager® Pro Users Guide Page 54
To change “Text1” to your own text (or to delete the text), right-click on the box and navigate to
Properties. Other formatting, such as text alignment, border, and fill color, can also be
controlled from the Properties menu.
You can drag a free box around on the screen to reposition it, or drag its handlebars to resize it,
just like in PowerPoint. To delete a free box, right-click on it and navigate to Delete, either
From this snapshot or From all snapshots.
< Back

OnePager® Pro Users Guide Page 55
VIEWS OF MULTIPLE PROJECTS
47. Making a Chart Showing Multiple Projects
If you are managing multiple Microsoft Project files and want to display task data from all of
them in a single OnePager chart, this can be accomplished in four simple steps.
(a) Launch OnePager. From the Start screen, choose New.
(b) Select one of your .mpp files as the first Microsoft Project source file. Then, click
the Change... button to launch the Data source selection dialog box, from which you
can add the other files (as many as you like). Hit OK.
(c) To select which individual tasks and milestones you want to import, insert the same Flag
column into each of your Microsoft Project files (to insert a Flag column simply right-
click on any column heading and then select Insert Column). Place a Yes in the flag
column you chose to indicate which tasks you want to pull in to your OnePager
document.
a. Alternatively, you can set a custom filter rule, i.e. import all tasks that have a %
Complete value less than 100. This rule will be applied to all source files.
OnePager® Pro Users Guide Page 56
(d) Create a new chart as normal (see #3 above). OnePager will create a multi-project Gantt
chart, pulling in task data from each individual Project file automatically.
< Back
TROUBLESHOOTING
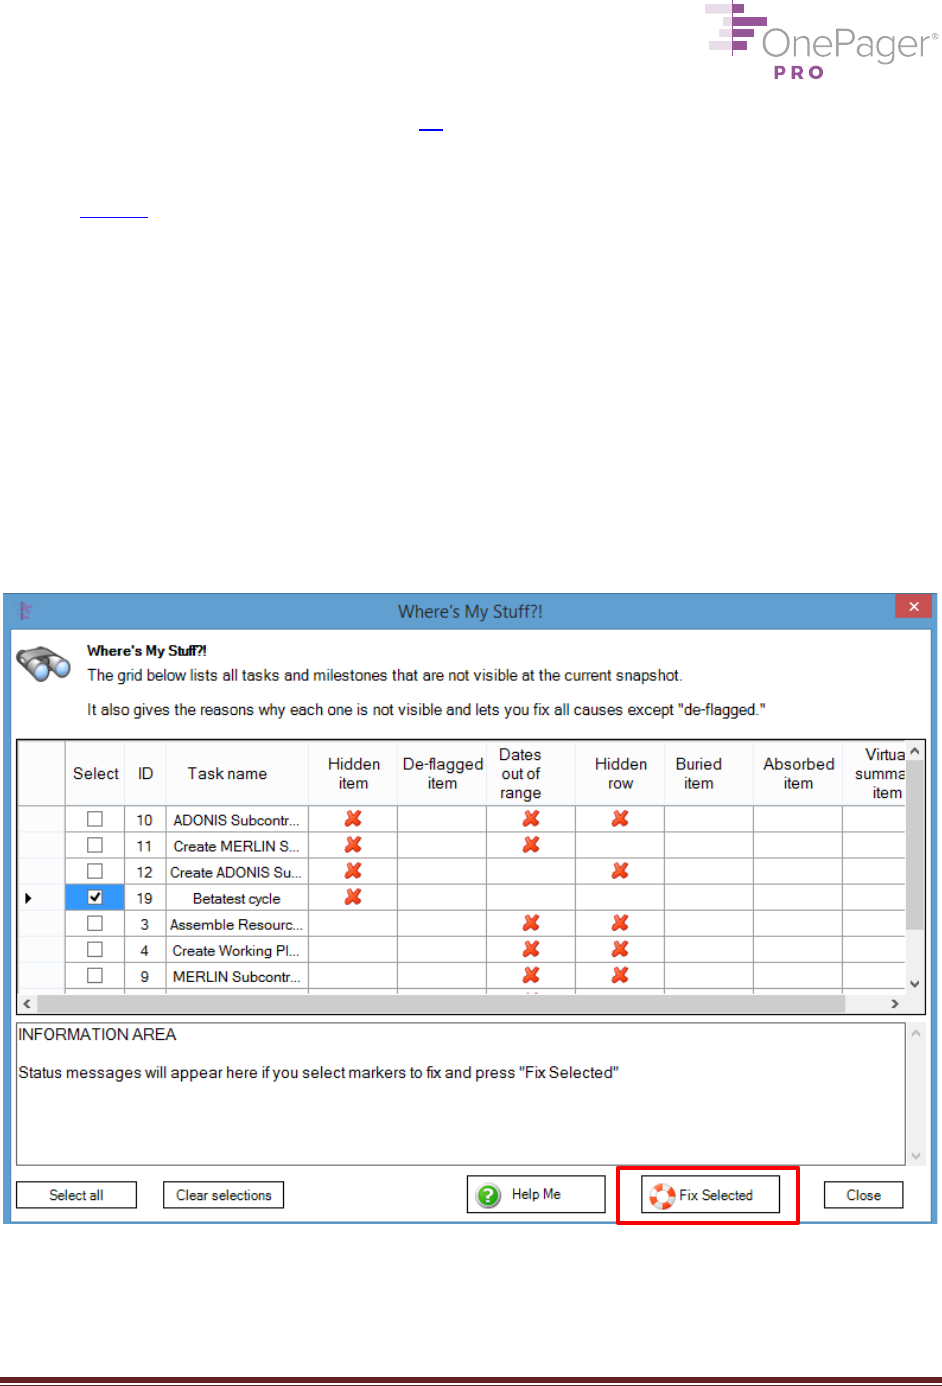
48. Finding Missing Tasks with Where’s My Stuff?!
The “Where’s My Stuff?!” feature allows you to find tasks that may have inadvertently
disappeared from your chart and make them appear again.
The “Where’s My Stuff?!” button is located on the Home tab of the ribbon, in the Editing group,
under the Show/Hide dropdown menu. Click it, and a dialog box appears.
The form lists every task available to show in the chart that is not currently displaying. A red X
also indicates the reason each task is not showing. For example, you may have hidden the task,
or the row or swimlane to which the task belongs.
OnePager® Pro Users Guide Page 57
To restore one or more missing tasks, use the Select checkboxes to select the task or tasks
you want returned to the chart, and then click Fix Selected. The task will automatically return to
the chart – unless the task was not flagged for the current snapshot (more on this below) – and
text at the bottom of the dialog box will indicate which tasks were returned.
If the task you’re looking for does not show up in Where’s My Stuff?!, it’s likely the task was
never flagged in Microsoft Project to begin with. To change that, simply go to Project and
change the flag value of the task you want to be visible to “Yes.” Or, if you are using a custom
filter rule, ensure that rule is satisfied by the task in question. Then add a new snapshot to your
chart, or replace your current snapshot (see #37 and #38 above), and your task will appear.
< Back
49. Rehiding “Hidden” Rows and Swimlanes that Mysteriously Reappear
When you hide a row or swimlane by right-clicking on its label and choosing Hide row or Hide
swimlane, you also hide all of the task bars or milestones inside that row/swimlane. If,
subsequently, the Flag value on one of those tasks gets changed (in Microsoft Project) from No
to Yes, OnePager by design unhides the row/swimlane so that the newly flagged task appears.
If this is not what you intend, you can easily suppress this unhiding behavior on
the Advanced tab of the Chart Properties menu (see screenshot below). Click the Row hiding
options button to bring up the Row Hiding Options dialog box. From there, simply uncheck
the Unhide rows for flagged tasks/milestones option (which is checked by default) and
hit OK or Apply. From now on, hidden rows/swimlanes will always stay hidden, even if the Flag
value on one of the tasks/milestones inside those hidden rows/swimlanes changes to Yes.

OnePager® Pro Users Guide Page 58

OnePager® Pro Users Guide Page 59
Note that this setting only applies to future snapshots in your chart, meaning you will still need
to manually hide any blank rows/swimlanes appearing in your current snapshot that you do not
want to see. You can do this most efficiently by clicking the Hide rows button next to the Copy
button on the Home tab of the ribbon. A Row hiding choices menu will then tell you how many
blank rows it sees and allow you to hide them all at once. You should only need to manually
hide rows once, however; thereafter, the setting will be applied to all future snapshots and the
rows will automatically be hidden.
The setting directly above this, Hide newly-empty rows on import, does something similar. It
automatically hides any rows that have become empty because you have unflagged all the
tasks that reside in that row. Like the setting below it, “Hide newly-empty rows on import” takes
effect on your next snapshot, not your current one.
< Back
50. Getting Help
We are eager to help you use OnePager Pro to its full potential. Please e-mail us with any
questions at suppo[email protected]m, or call us at +1.303.779.0344 (option 2). (Non-U.S.
customers, please e-mail first and we will provide you with a toll-free phone number for your
country if needed.) You may also find our FAQ and video tutorial pages answer your questions.
< Back
INTELLECTUAL PROPERTY
OnePager products are covered by U.S. Patent Numbers 7,999,810, 8,553,039, 9,251,487,
9,535,893, 10,282,688, 10,380,772, 11,016,651 and other Patents pending before the United
States Patent and Trademark Office.
Microsoft, Microsoft Office, Microsoft Office Project, and Microsoft Office Excel are trademarks
of Microsoft Corporation. “Rich Project Timeline” and “Tell Your Project Story” are trademarks of
Chronicle Graphics, Inc. Chronicle Graphics, Gantt Art, and OnePager are registered
trademarks of Chronicle Graphics, Inc.
< Back
