
INS14281-3 Z-Wave Getting Started for Controller Devices 2022-02-03
silabs.com | Building a more connected world.https://www.silabs.com/
Page i of iv
Instruction
Z-Wave Getting Started for Controller Devices
Document No.:
INS14281
Version:
3
Description:
-
Written By:
JFR
Date:
2022-02-03
Reviewed By:
JFR;JRM;MDUMBARE;JCC;SCBROWNI
Restrictions:
Public
Approved by:
Date CET Initials Name Justification
2022-02-03 10:13:00 JFR Jorgen Franck on behalf of NTJ
This document is the property of Silicon Labs. The data contained herein, in whole or in
part, may not be duplicated, used or disclosed outside the recipient for any purpose. This
restriction does not limit the recipient's right to use information contained in the data if it
is obtained from another source without restriction.

INS14281-3 Z-Wave Getting Started for Controller Devices 2022-02-03
silabs.com | Building a more connected world.https://www.silabs.com/
Page ii of iv
REVISION RECORD
Doc. Rev
Date
By
Pages
affected
Brief description of changes
1
20181206
AMUNKHAUS
ALL
Initial release of document
2
20211106
JFR
ALL
Minor typos
3
20220115
JFR
Front page
Removed 700

INS14281-3 Z-Wave Getting Started for Controller Devices 2022-02-03
silabs.com | Building a more connected world.https://www.silabs.com/
Page iii of iv
Table of Contents
1 ABBREVIATIONS............................................................................................................................5
2 INTRODUCTION ............................................................................................................................5
2.1 Purpose..............................................................................................................................................5
2.2 Audience and Prerequisites...............................................................................................................5
3 OVERVIEW OF CONTROLLER SDK ..................................................................................................6
3.1 Z/IP Gateway SDK ..............................................................................................................................6
3.2 Z-Ware SDK........................................................................................................................................6
3.3 Requirements ....................................................................................................................................7
4 GETTING STARTED WITH Z/IP GATEWAY .......................................................................................8
4.1 Z/IP Gateway Running on Ubuntu Linux............................................................................................8
4.1.1 Install Z/IP Gateway ................................................................................................................8
4.1.2 Configure Z/IP Gateway ..........................................................................................................9
4.1.3 Start the Z/IP Gateway ..........................................................................................................10
4.2 Z/IP Gateway Running on Raspberry Pi 3B......................................................................................11
4.2.1 Install Z/IP Gateway on the Raspberry Pi ..............................................................................11
4.2.2 Configure and Start the Z/IP Gateway on the Raspberry Pi ..................................................12
4.3 Using PyZ/IP for Debugging .............................................................................................................13
4.4 Z/IP Gateway Documentation .........................................................................................................14
5 GETTING STARTED WITH Z-WARE................................................................................................15
5.1 Z-Ware C API Library........................................................................................................................15
5.1.1 Build the C API Library on Ubuntu.........................................................................................15
5.1.2 Build the C API Library on Raspberry Pi.................................................................................16
5.1.3 Running the Sample Applications..........................................................................................17
5.2 Z-Ware Web API ..............................................................................................................................18
5.2.1 Install the Web Server for the Web API ................................................................................18
5.2.2 Run the Sample Web Portal ..................................................................................................19
5.2.3 Log Files.................................................................................................................................20
5.3 Start Developing with the Web-API.................................................................................................21
5.3.1 A quick View of the API with the PyZWare............................................................................21
5.3.2 First Web Site Using the Web API .........................................................................................22
5.4 Generate the Z-Ware Documentation.............................................................................................23
6 NETWORK SETUP ........................................................................................................................24
6.1 Z/IP Gateway Network Setup ..........................................................................................................24
6.2 Z-Ware Local....................................................................................................................................24
6.3 Z-Ware Portal (Cloud)......................................................................................................................25
6.4 Z-Ware Local with an Optional Cloud..............................................................................................26
6.5 Running Z/IP Gateway and Z-Ware on the Same Host Processor ...................................................26

INS14281-3 Z-Wave Getting Started for Controller Devices 2022-02-03
silabs.com | Building a more connected world.https://www.silabs.com/
Page iv of iv
REFERENCES.......................................................................................................................................27
Table of Figures
Figure 1: List of Connected USB Devices.............................................................................................9
Figure 2: Z/IP Configuration File.............................................................................................................9
Figure 3: Failed to Start Z/IP Gateway. Check settings. ...................................................................10
Figure 4: Z/IP Gateway Service Should Be 'running'.........................................................................10
Figure 5: Install File Copied to Target..................................................................................................12
Figure 6: Py/ZIP Running on Ubuntu ...................................................................................................13
Figure 7: Z-Ware Source Copied to Target and Extracted in Folder zwportal...............................16
Figure 8: Example of bin_switch Sample Application Running........................................................17
Figure 9: Configure Services to Auto-Start .........................................................................................19
Figure 10: PyZWare Client ....................................................................................................................21
Figure 11: Google Chrome Debugger .................................................................................................22
Figure 12: Setup with Z-Ware Local. No Support for Cloud. ............................................................24
Figure 13: Setup with Z-Ware Portal. Using Z-Ware Web Portal as Cloud. ..................................25
Figure 14: Setup with Z-Ware Local Using Customer C Application. Can be Extended with
Customer 3rd Party Cloud Solution. .............................................................................................26

INS14281-3 Z-Wave Getting Started for Controller Devices 2022-02-03
silabs.com | Building a more connected world.
Page 5
1 ABBREVIATIONS
Abbreviation
Explanation
API
Application Programming Interface
DTLS
Datagram Transport Layer Security
IP address
Internet Protocol address
LAN
Local Area Network
PAN
Personal Area Network
SDK
Software Development Kit
TAP
Layer 2, link interface
TLS
Transport Layer Security
TUN
Layer 3, IP Interface
UDP
User Datagram Protocol
Z/IP
Z-Wave to IP
ZIPGW
Z/IP Gateway
2 INTRODUCTION
2.1 Purpose
This document describes how to get started with Z-Wave 700 development for Controller devices.
2.2 Audience and Prerequisites
The audience is Z-Wave developers.

INS14281-3 Z-Wave Getting Started for Controller Devices 2022-02-03
silabs.com | Building a more connected world.
Page 6
3 OVERVIEW OF CONTROLLER SDK
The Z-Wave Controller SDK includes software for gateway development. The SDK includes:
Z/IP Gateway SDK
Z-Ware SDK
The hardware reference platform is the Raspberry Pi 3B (for Z-Wave 700 Beta. For mature release 3B+
will be supported).
3.1 Z/IP Gateway SDK
Z/IP Gateway is a UDP/IP wrapper for Z-Wave command classes. The Z/IP Gateway is an application
which allows internet Z/IP clients to contact and control nodes in a Z-Wave network. Through the Z/IP
Gateway each node on the Z-Wave network behaves as an IP client on the network. The Z/IP Gateway
handles all Z-Wave housekeeping such as network management, Z-Wave Security, mailbox for battery-
driven devices, Z/IP packaging, and multichannel support. Z/IP Gateway uses DTLS for LAN security and
can also connect to a remote server through a secure TLS1.1 tunnel making it ideal for use with a portal
server.
Starting with Z-Wave 700 series, it is now mandatory for all to use Z/IP Gateway. The Z/IP Gateway is
therefore not only an example application, it is the preferred implementation for your Z-Wave Gateway
to the Internet of Things. By using the Z/IP Gateway you will get the new features, such as S2 and
SmartStart without worrying about implementing them yourself.
The Z/IP Gateway is developed for the Linux® OS. For development purposes use Oracle VM VirtualBox,
if a dedicated Linux computer is not available.
See Chapter 4 for the Z/IP Gateway Getting Started Guide.
3.2 Z-Ware SDK
The Z-Ware SDK contains 5 packages:
Z-Ware Library C API
Z-Ware Library C API Sample Apps (client examples build using the Z-Ware C API)
Z-Ware Web Server (build using the C API)
Z-Wave Web API (API that connects against the Web Server)
Z-Wave Web API Sample Web site (client build using Web API)
The Z-Ware Library is a Z/IP Gateway client C API for easier development and certification of Z-Wave
controller applications. The C API can connect to a Z/IP Gateway and discover all connected Z-Wave
devices exposing them as software objects. One Z-Ware Library Client is the Z-Ware Web Server.
The Web Server can be compiled into Consumer Electronics (CE) or Portal mode. In Portal mode,
multiple ZIPGWs connect to the Web Server over TCP encrypted with TLS where the Web Server is

INS14281-3 Z-Wave Getting Started for Controller Devices 2022-02-03
silabs.com | Building a more connected world.
Page 7
expected to run in the Cloud. In CE mode, the Web Server connects to the ZIPGW via UDP encrypted
with DTLS where the Web Server is expected to run on the same target as ZIPGW.
Because this Getting Started Guide covers the CE mode, it does not cover the Portal mode, as CE mode
is more frequently used and implemented.
See Chapter 5 for the Z-Ware Getting Started Guide.
3.3 Requirements
Download the Controller SDK, including Z/IP Gateway and Z-Ware.
You need a UZB Bridge Controller; A hardware USB controller flashed with Serial API Bridge Controller.
This is part of the Z-Wave Development Kit.
Optional
You can download Ubuntu from Ubuntu Official Web site. The required version is Ubuntu 16.04.
It is also possible to run the Gateway and Z-Ware from a virtual machine. This guide is tested with
Oracle VM VirtualBox.

INS14281-3 Z-Wave Getting Started for Controller Devices 2022-02-03
silabs.com | Building a more connected world.
Page 8
4 GETTING STARTED WITH Z/IP GATEWAY
This chapter will guide you through the following steps:
Z/IP Gateway Running on Ubuntu Linux
Z/IP Gateway Running on Raspberry Pi 3B
Using PyZ/IP for Debugging
Z/IP Gateway Documentation
4.1 Z/IP Gateway Running on Ubuntu Linux
This section describes how to install and run the Z/IP Gateway on Ubuntu Linux. The assumption is that
the SDK is already downloaded to your machine.
4.1.1 Install Z/IP Gateway
a. Update
$ sudo apt-get update
b. Install dependencies
32bit Ubuntu
$ sudo apt-get install libusb-1.0-0 libssl1.0.0 radvd parprouted
bridge-utils
64bit Ubuntu
$ sudo apt-get install libusb-1.0-0:i386 libssl1.0.0:i386 radvd:i386
parprouted:i386 bridge-utils:i386
c. Install Z/IP Gateway Debian package
Locate the Debian package from the SDK download, in the ‘Binaries’ folder.
$ sudo dpkg -i zipgateway-7.00.0-Linux-i386.deb
Installation might fail if any of the Z/IP Gateway dependencies are not installed for any reason. Steps
below can fix this issue by installing the dependencies automatically.
$ sudo apt-get update
$ sudo apt-get -f install
d. Installation wizard prompts for the following information
Serial port for the Z-Wave Controller. When using the UZB Controller that ships with the
Development Kit, the value should usually be ‘ttyUSB0’. This setting can also be changed
later, when the correct port is found.
IPV6 address of Z/IP Gateway. Leave default.
IPV6 prefix of Z-wave Network. Leave default.
The type of network interface: ‘wireless’ or ‘wired’. The network interface in question
here is the interface where Z/IP Gateway will listen for Z/IP Client connection requests. This
guide is using ‘wired’.
e. Reboot system
Because of various network configuration changes, reboot the system after the Z/IP Gateway
installation.
INS14281-3 Z-Wave Getting Started for Controller Devices 2022-02-03
silabs.com | Building a more connected world.
Page 9
4.1.2 Configure Z/IP Gateway
a. Plug in hardware
Plug in the Z-Wave Bridge Controller.
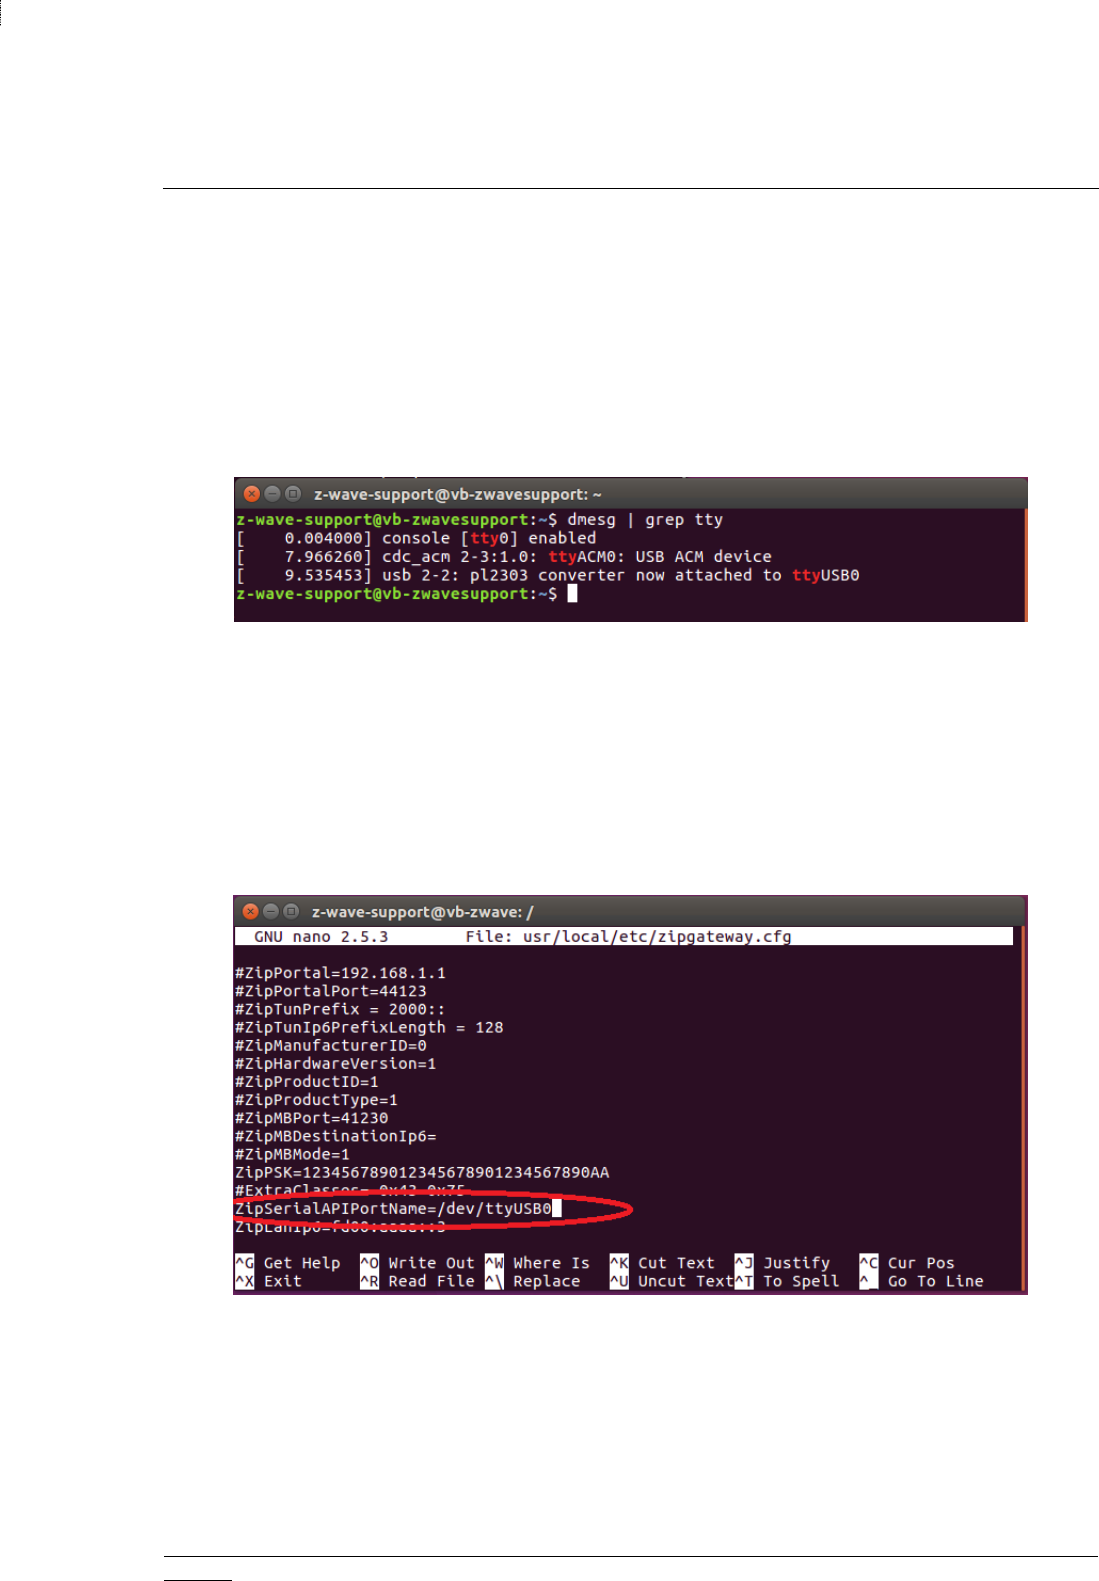
Determine which port the USB device is using, by using the following command after the USB device is
plugged in:
$ dmesg | grep tty
In this guide, devices are both attached to ‘ttyACM0‘ and ‘ttyUSB0’. Be sure to choose the correct
port. If you are unsure which port to use, disconnect your device and run the command again. In this
guide, we are using ‘ttyUSB0’.
Figure 1: List of Connected USB Devices
b. Configuration file
If the port differs from the one during installation, the Z/IP Configuration file needs to be changed. The
config-file is located:
/usr/local/files/zipgateway.cfg
Nano can be used as editor, which comes preinstalled on Ubuntu. Change the variable
‘ZipSerialAPIPortName’.
Figure 2: Z/IP Configuration File
A simpler user interface for changing the port can be found by calling the following command, which
will have the same prompts as while installing:
$ sudo dpkg-reconfigure zipgateway

INS14281-3 Z-Wave Getting Started for Controller Devices 2022-02-03
silabs.com | Building a more connected world.
Page 10
4.1.3 Start the Z/IP Gateway
The Z/IP Gateway service can be controlled with these commands:
$ sudo /etc/init.d/zipgateway start
$ sudo /etc/init.d/zipgateway stop
$ sudo /etc/init.d/zipgateway restart
$ sudo /etc/init.d/zipgateway status
In another terminal, open up the Z/IP Gateway log file:
$ sudo tail -f /tmp/zipgateway.log
If the following message, some settings are not correct, or the USB device is not plugged in:
Figure 3: Failed to Start Z/IP Gateway. Check settings.
Change the port name and / or plug in the USB, and then restart the service. The log file should start
writing a lot of log information, indicating the connection is successful. Check the status of the service.
If the status is ‘exited’, the service is not running. The status should show ‘running’.
Figure 4: Z/IP Gateway Service Should Be 'running'
The Z/IP Gateway Service is now up and running!

INS14281-3 Z-Wave Getting Started for Controller Devices 2022-02-03
silabs.com | Building a more connected world.
Page 11
4.2 Z/IP Gateway Running on Raspberry Pi 3B
The Raspberry Pi 3B comes with an SD card loaded with Raspbian Jessie with a Desktop interface. This
guide will connect to the Raspberry Pi using SSH, but you can also choose to connect a monitor, mouse,
and keyboard to the Pi.
In addition, you can choose to load the Raspbian Stretch Lite image to the Pi, which only comes with a
command line interface.
Manually enable the SSH interface. Follow the official Raspberry SSH guide. A simple way to enable SSH,
is to mount the SD card on your host PC and create an empty file named “ssh” (no extension) in the
root of the boot partition.
When you are all set up, check your router (or use an IP Scanner) to detect the IP address of the
Raspberry Pi.
4.2.1 Install Z/IP Gateway on the Raspberry Pi
a. Connect to the Raspberry Pi
On a Windows host PC, you can use PuTTY to connect using SSH to the Raspberry Pi.
On a Linux / Mac host PC run the following command to connect using SSH to the Raspberry Pi.
$ ssh -l pi ipaddress
The default username / password for the Raspberry is: pi / raspberry
Upgrade the target to get the latest fixes:
$ sudo apt-get update
$ sudo apt-get upgrade
You can check the version using:
$ cat /etc/debian_version
This guide uses Raspbian Jessie for demos and explanations.
b. Copy the Z/IP Gateway Debian Package to the Raspberry Pi
On the host PC, navigate to the download path of the Gateway binaries from the SDK and locate
”zipgateway-7.00.0-Linux-armhf.deb”, which will give you the debian package to transfer.
Open a terminal / command prompt in the folder containing the file (not from the terminal which is
connected to the Pi) and run the follow command to transfer the file to the root directory of the Pi:
If you are using a Linux / Mac Host PC:
$ scp zipgateway-7.00.0-Linux-armhf.deb pi@ipaddress:
If you are using a Windows Host PC:
$ pscp zipgateway-7.00.0-Linux-armhf.deb pi@ipaddress:

INS14281-3 Z-Wave Getting Started for Controller Devices 2022-02-03
silabs.com | Building a more connected world.
Page 12
From the terminal connected to the target, you should now see the file in the root directory.
Figure 5: Install File Copied to Target
c. Install the Z/IP Gateway on the Raspberry Pi
In the terminal connected to the Raspberry Pi, do the following:
$ sudo apt-get install libusb-1.0-0 libssl1.0.0 radvd parprouted
bridge-utils
$ sudo dpkg -i zipgateway-7.00.0-Linux-armhf.deb
d. Installation wizard prompts for the following information
Serial port for the Z-Wave Controller. When using the UZB Controller that ships with the
Development Kit, the value should usually be ‘ttyUSB0’. This setting can also be changed
later, when the correct port has been found.
IPV6 address of Z/IP Gateway. Leave default.
IPV6 prefix of Z-Wave Network. Leave default.
The type of network interface: ‘wireless’ or ‘wired’. The network interface in question
here is the interface where Z/IP Gateway will listen for Z/IP Client connection requests. This
guide is using ‘wired’.
e. Reboot system
Because of various network configuration changes, reboot the system after the Z/IP Gateway
installation.
4.2.2 Configure and Start the Z/IP Gateway on the Raspberry Pi
To configure and start the Z/IP Gateway, see 4.1.2 Configure Z/IP Gateway and 4.1.3 Start the Z/IP
Gateway, as these steps are independent of the hardware platform.

INS14281-3 Z-Wave Getting Started for Controller Devices 2022-02-03
silabs.com | Building a more connected world.
Page 13
4.3 Using PyZ/IP for Debugging
PyZ/IP is a GUI application written using Python. You may use PyZ/IP to manage and test your Z-Wave
network.
This guide will demonstrate how to install the client on Ubuntu Linux.
a. Source code
When downloading the Gateway SDK, part of this package is the source code for the PyZ/IP Client.
Extract the files and change the directory to the uncompressed files:
$ unzip pyzip_ver1_17.zip
$ cd pyzip
b. Install Python.
Set the PYTHONPATH to where the Pyzip sources are uncompressed and install Python.
$ export PYTHONPATH=$PWD
$ sudo apt-get install python-wxgtk3.0
c. Run the application.
$ cd pyzip
$ python2 gui.py
d. Set up the network.
The PyZ/IP client is now running and will automatically detect the gateway. Connect to it and start
adding nodes to the network.
Figure 6: Py/ZIP Running on Ubuntu

INS14281-3 Z-Wave Getting Started for Controller Devices 2022-02-03
silabs.com | Building a more connected world.
Page 14
4.4 Z/IP Gateway Documentation
The Z/IP Gateway SDK comes with a lot of documentation.
Basic information and documentation on all settings can be found using the man command. The man
pages are built into the Z/IP Gateway distribution.
$ man zipgateway
The Doxygen documentation contains detailed information on building and cross-compiling the
gateway for other targets as well as documentation for the source code. The Doxygen documentation is
usually part of the SDK zip-file but can also be generated using Doxygen.
a. Install dependencies
$ sudo apt-get install doxygen roffit cmake gcc
b. Build documentation
Navigate to the source code directory, create a new folder called ‘build’, and enter that folder:
$ mkdir build
$ cd build/
Make the documentation:
$ cmake ..
$ make doc
c. See the user guide for detailed description on compiling and using Z/IP Gateway
Open src/doc/html/index.hml in browser.
$ xdg-open src/doc/html/index.html

INS14281-3 Z-Wave Getting Started for Controller Devices 2022-02-03
silabs.com | Building a more connected world.
Page 15
5 GETTING STARTED WITH Z-WARE
This chapter will guide you through the following steps:
Z-Ware C API Library
Z-Ware Web API
Start Developing with the Web-API
Generate the Z-Ware Documentation
Before proceeding with this guide, the assumption is that the Z/IP Gateway is installed and running. See
chapter 4 Getting Started with Z/IP Gateway.
5.1 Z-Ware C API Library
The Z-Ware C API allows you to connect to a Z/IP Gateway and control all the nodes in the network. For
a detailed overview of all API methods, build settings, and so on, see “INS14416 Z-Ware Library User
Guide” [1].
With the Z-Ware C API Library, you can develop your own application which connects to a Z/IP
Gateway. To use the Z-Ware Web Server with the Z-Ware Web API, skip this section and go to 5.2 Z-
Ware Web API.
The source code and sample applications are located in (NB, the path should not contain white-spaces):
<download-path>/src/zwportal/src/zwave/hcapi
5.1.1 Build the C API Library on Ubuntu
In this directory, build the External Library:
$ source install_openssl_lib.sh
$ source build_openssl_lib.sh linux debug no-shared
and then build the Z-Ware C API library:
$ make TARGET_PLATFORM=LINUX_ZIP2 DEBUG=1 SHARED=0
When the C API has been built, enter the /demos directory and build the sample applications:
$ make TARGET_PLATFORM=LINUX_ZIP2 DEBUG=1 SHARED=0

INS14281-3 Z-Wave Getting Started for Controller Devices 2022-02-03
silabs.com | Building a more connected world.
Page 16
5.1.2 Build the C API Library on Raspberry Pi
This approach copies the entire C API source code to the target. Another approach is to cross-compile
from a Ubuntu machine. For instruments to set up the build environment and toolchain for cross-
compile, see Z-Ware Library User Guide [1], section Build System Setup.
On the host PC navigate to the download path of the Z-Ware SDK and locate the file
“zwportal.tar.gz”. Open a terminal / command prompt in the folder containing the file (NB, not
from the terminal which is connected to the target) and run the follow command to transfer the file to
the root directory of the target:
If using a Linux / Mac Host PC:
$ scp zwportal.tar.gz pi@ipaddress:
If using a Windows Host PC:
$ pscp zwportal.tar.gz pi@ipaddress:
In a terminal to the target, extract the source code.
$ tar -zxvf zwportal.tar.gz
From the terminal connected to the target, you should now see the extracted files in a new folder called
“zwportal” in the root directory.
Figure 7: Z-Ware Source Copied to Target and Extracted in Folder zwportal
From the C-API directory ~/zwportal/src/zwave/hcapi, build the External Library:
$ source install_openssl_lib.sh
$ source build_openssl_lib.sh raspberry debug no-shared
This might take several minutes.
When finished, build the Z-Ware C API library:
$ make TARGET_PLATFORM=RASPBERRY_ZIP2 DEBUG=1 SHARED=0
When the C API has been built, enter the /demos directory and build the sample applications:
$ make TARGET_PLATFORM=RASPBERRY_ZIP2 DEBUG=1 SHARED=0

INS14281-3 Z-Wave Getting Started for Controller Devices 2022-02-03
silabs.com | Building a more connected world.
Page 17
5.1.3 Running the Sample Applications
Each sample application is in a separate folder. All sample applications except Gateway Discovery
sample application require a configuration file, named app.cfg, to be configured.
Entry Name
Description
ZipLanPort
The host (where the sample application resides) listening and sending port. To allow
the OS to select the port, enter port number 0.
ZipRouterIP
The ZIPGW IPv4 or IPv6 address.
DTLSPSK
DTLS pre-shared key (PSK) in a hexadecimal string with maximum string length of 64
(i.e., 32 hexadecimal bytes).
Ensure the ZipRouterIP matches your Gateway IP. The Gateway IP can be seen in the gateway log file, or
by using the Avahi daemon:
$ sudo apt-get install avahi-utils
$ avahi-browse _z-wave._udp -r
Run the sample apps. The command below is an example from the “bin_switch” directory.
$ ./bin_switch
This will allow you to turn a switch on and off, if it is already included in the Z-Wave network. For a
complete list and instructions to run each sample app, see Z Ware Library User Guide [1], chapter
Sample Applications.
Figure 8: Example of bin_switch Sample Application Running

INS14281-3 Z-Wave Getting Started for Controller Devices 2022-02-03
silabs.com | Building a more connected world.
Page 18
5.2 Z-Ware Web API
The Z-Ware Web API is built on top of the C API and allows to you develop a Web site for easy end-user
experience. This guide demonstrates how to set up the CE mode of the library, where the Web Server
and client is running in the home, normally in the same device as the Z/IP Gateway.
You will need the following documents:
INS14486 Z-Ware Web Server & Native Apps Installation Guide [2]
INS14428 Z-Ware Web User Guide [3]
INS14430 Z-Ware Web Developer Guide [4]
5.2.1 Install the Web Server for the Web API
This section describes how to install a local Web Server to build Web sites using the Z-Ware Web API.
The Web Server uses the Z-Ware C API to connect to the Z/IP Gateway, so, in a way, it is a sample of
how to use the C API but is also needed to use the Web API. The full source code is available as part of
the SDK.
This Getting-Started will not focus on how to build the source code, but use the precompiled installers,
which will work on Ubuntu and Raspberry Pi. For instructions to build the source code for your specific
target and for more information, see Web Server & Native Apps Installation Guide [2], chapter Building.
From the image folder, extract the installer that matches your target:
zwarelocal-x86_64.tar.gz => 64-bit
zwarelocal-i386.tar.gz => 32-bit
zwarelocal-beaglebone.tar.gz => 32-bit for the Raspberry Pi.
If using the Raspberry, copy the installer to the target, before proceeding.
If you are using a Linux / Mac Host PC:
$ scp zwarelocal-beaglebone.tar.gz pi@ipaddress:
If you are using a Windows Host PC:
$ pscp zwarelocal-beaglebone.tar.gz pi@ipaddress:
On the target, extract the file, browse to the folder zwarelocal-beaglebone, and run the install script.
tar -zxvf zwarelocal-beaglebone.tar.gz
./install.sh /home/<user name>/zwarelocal
The installer will ask for various configuration settings during installation. You can leave the default
value by clicking enter. For a more detailed understanding of the settings or to change the settings
later, see the Web Server & Native Apps Installation Guide [2].
Two services must be up and running when using the local Z-Ware Web Server:
Apache HTTP Server
Z-Ware Portal Daemon
INS14281-3 Z-Wave Getting Started for Controller Devices 2022-02-03
silabs.com | Building a more connected world.
Page 19
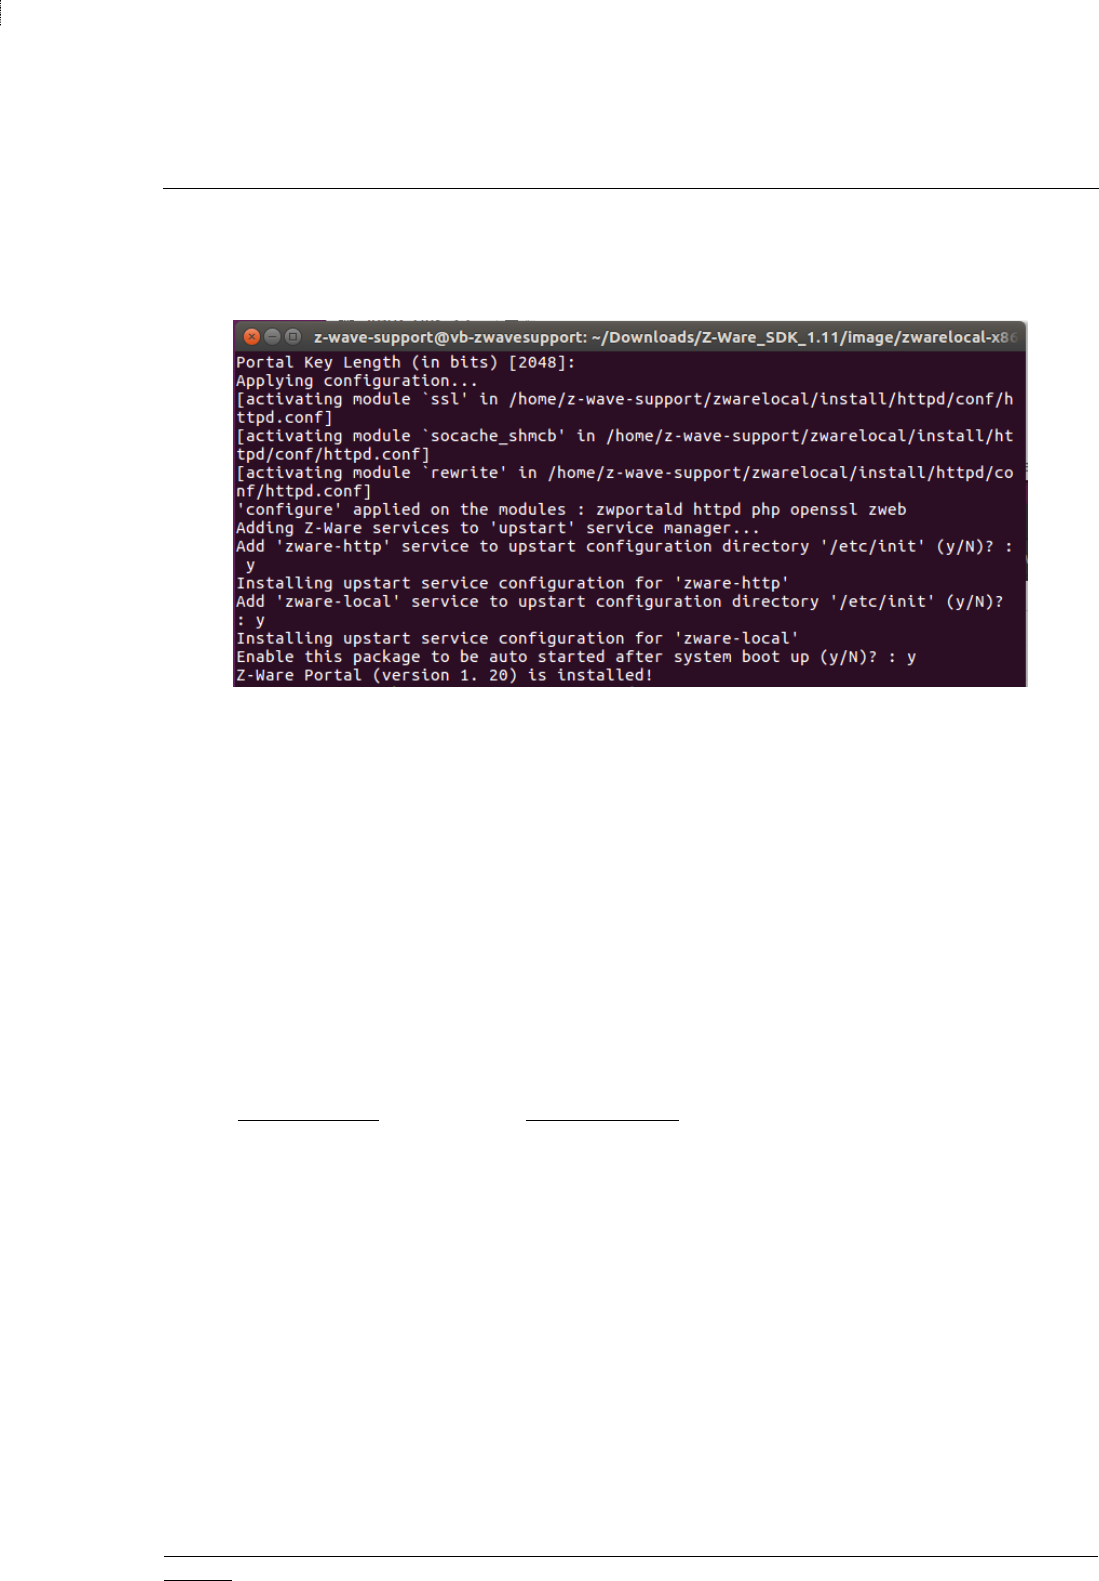
During installation, it is possible to enable auto-start of the Z-Ware services after system boot. If the
target platform is PC, the option will be OFF by default. For Raspberry, the default value is ON. Below,
the services are forced to start automatically, independently of the target.
Figure 9: Configure Services to Auto-Start
With this configuration, you can start the services:
$ sudo /etc/init.d/zware-service start
but it should now automatically start on system boot.
If you turn off the auto-start, you can start the services manual from the install directory /home/<user
name>/zwarelocal
$ ./service/service.sh start
When the services are running, you are ready to use the Web Server.
5.2.2 Run the Sample Web Portal
With the Web Server up and running, the sample Web site can now be access through any browser.
http://localhost or http://ip-address
When ‘y’ is selected for “Use Secure HTTP?” configuration option, even when the browser accesses
unsecure URL (HTTP), it gets redirected to a secure URL (HTTPS). The browser will show a security
warning, such as “Connection is not secure” or “The server certificate is self-signed”, which you will
have to accept in the test setup. In a production setup, such warnings are typically not acceptable and
need an appropriate fix in the Web Server.
The default username / password for the sample Web site is: user / smarthome.
From here, you can add and remove nodes, control them, and set up scenes.

INS14281-3 Z-Wave Getting Started for Controller Devices 2022-02-03
silabs.com | Building a more connected world.
Page 20
For a more advanced Engineering Interface, see:
http://localhost/ui/eng/index.html
This gives you a more detailed view, with more information about the nodes, the possibility for
firmware update, and more, but the GUI is less intuitive.
For more help and information about the GUI, see Z-Ware Web User Guide [3].
5.2.3 Log Files
Below are locations of the relevant log-files.
Apache HTTP Server
Location for access-log: <install-path>/install/httpd/logs/access_log
Location for error-log <install-path>/install/httpd/logs/error_log
Z-Ware Portal Daemon
Location: <install-path>/install/zwportald/var/log/zwportald.log
Z-Ware Web
Location for access-log: <install-path>/install/zweb/logs/access_log
Location for error-log <install-path>/install/zweb/logs/error_log

INS14281-3 Z-Wave Getting Started for Controller Devices 2022-02-03
silabs.com | Building a more connected world.
Page 21
5.3 Start Developing with the Web-API
This section describes two approaches to develop with the Web API.
5.3.1 A quick View of the API with the PyZWare
The sample client application written in Python, PyZWare, is not part of the SDK, but can be
downloaded from github. The documentation can be found here.
Figure 10: PyZWare Client
The documentation mentioned above is a good starting point to understand the API.
The application can be compiled for both Windows and Linux operating systems. If compiled for Linux
OS, it can run on the same machine as the Z-Ware Web Server.
Python3 is required and makes use of tkinter GUI toolkit, which comes preinstalled with Python3 on
Windows OS, but must be installed separately on Linux OS.
$ sudo apt-get install python3-tk
With this, you should be able to run the zwareClient.py script.
$ python3 zwareClient.py

INS14281-3 Z-Wave Getting Started for Controller Devices 2022-02-03
silabs.com | Building a more connected world.
Page 22
5.3.2 First Web Site Using the Web API
To better understand how the Web API can be integrated into a Web site, use the sample portal:
http://localhost/ui/eng/index.html
Use the built-in debugger in Google Chrome to understand the flow and the function calls. As an
example, add a binary switch to the network and toggle the value.
Figure 11: Google Chrome Debugger
After understanding the Web API, start modifying the sample source code, located in:
<install-path>/install/zweb/htdocs/
Depending on the selected GUI, the locations can also be as follows:
<install-path>/install/zweb/htdocs/ui/pc
<install-path>/install/zweb/htdocs/ui/eng

INS14281-3 Z-Wave Getting Started for Controller Devices 2022-02-03
silabs.com | Building a more connected world.
Page 23
5.4 Generate the Z-Ware Documentation
In addition to user guides listed in this document, Doxygen can be used to generate the documentation
for the source code.
Z-Ware C API
<download-path>/src/zwportal/src/zwave/hcapi/doc/doxygen
$ chmod +x generate_doc.sh
$ ./generate_doc.sh ce moderate
Z-Ware portal daemon
<download-path>/src/zwportal/src/zwave/zwportald
$ doxygen
Z-Ware web (CGI)
<download-path>/src/zwportal/src/zwave/zweb/classic
$ doxygen
Z-Ware Scenes library (libzwscene)
<download-path>/src/zwportal/src/zwave/libzwscene
$ doxygen
The generated documentation can be viewed in any browser.

INS14281-3 Z-Wave Getting Started for Controller Devices 2022-02-03
silabs.com | Building a more connected world.
Page 24
6 NETWORK SETUP
This chapter provides an overview of various network setups.
6.1 Z/IP Gateway Network Setup
Z/IP Gateway is a native IPv6 host, mapping IPv4 to IPv6 internally. Z/IP Gateway requests IPv4
addresses from the existing IPv4 network via DHCP and maps the IPv4 addresses to individual Z-Wave
nodes.
On the Linux OS, the raw Ethernet connectivity is achieved by using the Linux TAP/TUN driver. Z/IP
Gateway application works as an IPv6 gateway between a LAN network and a Z-Wave PAN (Personal
Area Network).
The Z/IP Gateway creates a TAP interface, usually named tap0. The tap interface is by default bridged to
the physical network interface.
Use the Z/IP Gateway “locally” to connect directly to Z-Ware on the same host. As a result, external
incoming/outgoing connections are not needed, so you can use the tap0 interface directly, without
attaching it to a bridge.
6.2 Z-Ware Local
By using the Z-Ware Local setup, the Web Server is hosted on the local device in each home. The users
connect directly to the Web Server in their home. Some port forwarding might be needed to open for
external access.
Figure 12: Setup with Z-Ware Local. No Support for Cloud.

INS14281-3 Z-Wave Getting Started for Controller Devices 2022-02-03
silabs.com | Building a more connected world.
Page 25
6.3 Z-Ware Portal (Cloud)
By using the Z-Ware Portal setup, the Z-Ware Web Server is hosted in the cloud. Every user connects to
the cloud to get access to their specific home, based on login rights.
Figure 13: Setup with Z-Ware Portal. Using Z-Ware Web Portal as Cloud.

INS14281-3 Z-Wave Getting Started for Controller Devices 2022-02-03
silabs.com | Building a more connected world.
Page 26
6.4 Z-Ware Local with an Optional Cloud
The most used solution is based on the Z-Ware C-API. By building your own application running side-by-
side with the Z/IP Gateway, you can connect to a 3
rd
party cloud service. Each user connects to your
cloud service to get access to their home.
Figure 14: Setup with Z-Ware Local Using Customer C Application. Can be Extended with Customer 3rd Party Cloud Solution.
6.5 Running Z/IP Gateway and Z-Ware on the Same Host Processor
When running both the Z/IP Gateway and Z-Ware on the same host processor, the connection is DTLS-
encrypted between the two applications. Though adding an extra layer of safety, it also adds time to
encrypt and decrypt messages as well as latency, which is inconvenient when sending the same
command to multiple devices.
Currently, users can’t disable DTLS encryption.

INS14281-3 Z-Wave Getting Started for Controller Devices 2022-02-03
silabs.com | Building a more connected world.
Page 27
REFERENCES
[1] INS14416 Z-Ware Library User Guide
[2] INS14486 Z-Ware Web Server & Native Apps Installation Guide
[3] INS14428 Z-Ware Web User Guide
[4] INS14430 Z-Ware Web Developer Guide
