
TTerm for Linux
®
User Guide
Host Connectivity for Linux®
TTerm
for Linux
®
Host connectivity for Linux
Copyright Notice
© Copyright Turbosoft Pty Ltd.
Document Version 1.19
This manual refers to software version 2.0 and above.
All rights reserved. This manual is protected by copyright. No part of this manual may be reproduced in any
form without written permission of the copyright owner.
All efforts have been made to ensure the contents of this manual are correct. If any errors are detected, please
inform Turbosoft. The contents of this manual are subject to change without notice. Turbosoft can assume no
responsibility for errors in this manual or their consequence.
The software described in this manual is supplied under a license agreement and may be used or copied only
in accordance with the terms of that agreement.
Licenses and Trademarks
All Licenses, Copyright and Trademarks are the property of their respective owners.
Linux® is the registered trademark of Linus Torvalds in the U.S. and other countries.
Contact Information
Address: Turbosoft Pty Ltd
Head Office
Level 14, 275 Alfred Street
North Sydney NSW 2060
Australia
Email: [email protected]
Web: www.ttwin.com
The latest contact information can always be found at https://www.ttwin.com/contact
Table of Contents
About This Manual ................................................................10
Organization of this Manual.........................................................10
How to use this Manual ............................................................11
Conventions......................................................................12
Online Resources..................................................................13
PART ONE - BASIC CONCEPTS
Chapter 1: Introduction
What is TTerm for Linux?...........................................................15
Features Highlights ................................................................15
System Requirements ..............................................................16
Hardware Requirements ............................................................16
Installation .......................................................................16
Uninstalling TTerm for Linux .......................................................16
Licensing TTerm for Linux..........................................................17
Chapter 2: Getting Started
Quick Configuration ...............................................................22
Saving Your Settings ...............................................................24
Connecting.......................................................................24
Disconnecting ....................................................................24
PART TWO - ADVANCED OPERATION
Chapter 3: File Menu
Import Profiles ...................................................................27
Save as Startup . . . . . . . . . . . . . . . . . . . . . . . . . . . . . . . . . . . . . . . . . . . . . . . . . . . . . . . . . . . . . . . . . . . . 28
Print… ..........................................................................28
Close print run....................................................................28
Print setup… .....................................................................28
Exit TTerm ......................................................................28
Chapter 4: Edit Menu
Copy ............................................................................31
Cut .............................................................................31
Paste ............................................................................31
Select display .....................................................................31
Select all .........................................................................32
Clear display......................................................................32
Clear all..........................................................................32
Clear history......................................................................32
Chapter 5: View Menu
Profile Directory ..................................................................35
Toolbar .........................................................................35
Status Bar .......................................................................36
Session Panel ....................................................................36
Full screen .......................................................................36
Chapter 6: Actions Menu
Connect .........................................................................39
Capture..........................................................................39
Break............................................................................40
Unlock flow control ...............................................................40
Reset terminal ....................................................................40
Chapter 7: Configure Menu
Profile Options....................................................................43
Language Selection ................................................................44
Chapter 8: Help Menu
License Information................................................................47
About ...........................................................................48
PART THREE - PROFILE CONFIGURATION
Chapter 9: Session Preferences
How to Automate Login ............................................................52
Chapter 10: Display
Cursor Configuration ..............................................................56
Scroll History Configuration ........................................................56
Chapter 11: Printer
Printer Configuration ..............................................................59
Print to File ......................................................................61
Chapter 12: Macros
Format ..........................................................................65
Macro Variables ...................................................................70
Macro Examples...................................................................71
Host Initiated Macros ..............................................................72
Macro Assistant ...................................................................75
Chapter 13: Communications
Selecting a Communications Module .................................................79
HP NS/VT .......................................................................80
SSH – Secure Shell ................................................................81
Telnet ...........................................................................83
Express Logon Feature for IBM Hosts.................................................89
Certificate Manager ................................................................90
Chapter 14: Emulations
Selecting an Emulation Module ......................................................95
ADDS2020 Viewpoint..............................................................96
ADM11..........................................................................97
ANSI Color ......................................................................98
Bull VIP7800 ....................................................................101
Data General Series ...............................................................104
DEC VT Series ..................................................................107
Fujitsu 6681 .....................................................................112
HP Series .......................................................................113
IBM 3101 and IBM 3151 ..........................................................119
IBM 3164 Color..................................................................124
IBM 3270 . . . . . . . . . . . . . . . . . . . . . . . . . . . . . . . . . . . . . . . . . . . . . . . . . . . . . . . . . . . . . . . . . . . . . . . 128
IBM 3287 (IBM Printer)...........................................................134
IBM 5250 . . . . . . . . . . . . . . . . . . . . . . . . . . . . . . . . . . . . . . . . . . . . . . . . . . . . . . . . . . . . . . . . . . . . . . . 138
IBM 5250 Printer.................................................................142
ICL 7561........................................................................146
ICL VT220 Plus..................................................................147
Liberty Freedom One .............................................................151
Linux Terminal...................................................................153
McDonnell Douglas P12...........................................................154
Prime PT25 .....................................................................156
Prime PT250S ...................................................................157
QNX System Console.............................................................159
SCO ANSI Color Console .........................................................161
Siemens Nixdorf 97801............................................................164
Stratus V102 .....................................................................169
Stratus V103 .....................................................................172
Stratus V105 .....................................................................175
Tandem T653X ..................................................................180
Televideo 955 ....................................................................182
Unisys T27......................................................................185
UNIX ANSI Console .............................................................190
Wang 2110 ......................................................................192
Wyse Series......................................................................196
Chapter 15: Keyboard Mapping
Mapping Physical Keys ............................................................204
Saving a Mapping.................................................................206
List and Export Mappings ..........................................................207
Chapter 16: Character Mapping
Selecting a Character Map .........................................................210
Adding a New Language Mapping ...................................................210
Editing a Character Map ...........................................................210
Saving a Character Set.............................................................211
Chapter 17: Color Configuration
Color Scheme Options ............................................................213
Emulation Attributes Configuration .................................................215
Miscellaneous Color Scheme Options................................................216
Chapter 18: Miscellaneous Configuration
Clipboard Settings ................................................................220
Capture.........................................................................221
Chapter 19: Hotspots
Screen Regions...................................................................225
Creating, Copying and Editing Hotspots..............................................228
Specifying the Hotspot Match String.................................................229
Setting the Hotspot Color..........................................................232
Deleting Hotspots ................................................................233
PART FOUR - APPENDICES
Appendix A
Glossary ........................................................................235
Appendix B
Command Line Options ..........................................................238
Appendix C
Support ........................................................................239
Index ...........................................................................240

About This Manual
The TTerm for Linux User Guide is a comprehensive document designed to help you work easily and effi-
ciently with Turbosoft's TTerm for Linux terminal emulation package. This manual is relevant to version 2.0
and above.
Organization of this Manual
The TTerm for Linux User Guide is divided into four parts:
Part One - Basic Concepts
Chapter 1 Introduction. A brief description of the TTerm for Linux product, system requirements
and installation process.
Chapter 2 Getting Started. How to connect your machine to a remote host and the basic steps
required to work with TTerm for Linux.
Part Two - Advanced Operation
This section offers more detail on the menus and options that make up the TTerm for Linux package. It pro-
vides a detailed reference guide for these components.
Chapter 3 File menu. The standard operations: opening and saving session definition files, print and
print setup utilities.
Chapter 4 Edit menu. Selecting, copying, clearing and pasting regions.
Chapter 5 View menu. Operations related to the TTerm for Linux screen and interface.
Chapter 6 Actions menu. All the operations carried out by TTerm for Linux: connecting, disconnect-
ing captures and terminal control.
Chapter 7 Configure Menu. Menu driven options for program display and profile manipulation.
Chapter 8 Help Menu. User help, licensing and related functions.
Part Three - Profile Configuration
A profile is a set of configuration options that is used to generate a session to a host. This section covers all fea-
tures related to creating, editing or importing a profile in TTerm for Linux.
Chapter 9 Session Preferences. Configuring session related preferences.
Chapter 10 Display. Setting up the TTerm for Linux window format and scroll history parameters.
Chapter 11 Printer. Specifying how the printer handles a print job.
Chapter 12 Working with Macros. Macro format, host-initiated macros, examples.
Chapter 13 Communications. Setting up the type of communications (transport) module.

11TTerm for Linux User Guide : About This Manual
Chapter 14 Emulations. Configuring your required emulation.
Chapter 15 Keyboard. Remapping the keyboard.
Chapter 16 Character Mapping. Editing and creating character mappings and languages sets.
Chapter 17 Colors. Creating and changing the color scheme.
Chapter 18 Miscellaneous. Other TTerm for Linux configuration options.
Chapter 19 Hotspots. Creating mouse driven terminal events.
Part Four - Appendices
Appendix A Glossary
Appendix B Command Line Options
Appendix C Customer Support
How to use this Manual
The structure of this manual is largely based on the organization of the TTerm for Linux menus. For example,
Chapter 3 File Menu, covers all the options on the File menu, with each option under a main heading. All
the menus are documented in this manner in Part Two - Advanced Operation, with the exception of the
Configure menu.
The Configure menu is described in Part Three - Profile Configuration. Each chapter in Part Three
covers one section of the Profile configuration menu options.
The information provided in Parts Two and Part Three is closely linked to the options available under the
TTerm for Linux menu. Chapter order mirrors that of the options available under each menu.
The first-time user of TTerm for Linux will probably find it necessary to read the complete section related to
the operation that they are performing. In application hints are also available in many configuration areas of
TTerm for Linux. These display when hovering over an input field.
This manual assumes some familiarity with the Linux operating system. The screenshots in this document are
taken from OpenSUSE and appearances may vary slightly depending on your Linux distribution. If you have
any suggestions regarding this guide, please contact Turbosoft. Refer to Appendix C for contact details.

Conventions
To assist you to read and understand this guide we have used a number of conventions:
Conventions TTerm for Linux is Turbosoft's terminal emulation product for Linux
®
.
Device refers to any hardware device capable of running TTerm for Linux.
Tile is the TTerm for Linux term for a dialog box.
Lower case bold courier typeface indicates things you need to type, such as ./setup.
Courier typeface indicates a filename or directory name, such as ~\.tterm\data.
All keys are shown in upper case courier typeface and bracketed. For example, the Shift key
is shown as [SHIFT]; the Escape key is [ESC].
Tips, warnings and other important pieces of information are displayed on a gray back-
ground with an icon as shown below.
Hints, tips and other important pieces of information are displayed like this.
A sequence of simultaneous keystrokes is indicated with an underscore. For example,
[ALT_F8] is the sequence generated when the [ALT]key is held down while [F8] is
pressed.
Bold typeface indicates menus, menu options, tile titles, tile options, tile fields and buttons.
For example, click on the Colors... button on the Configure IBM 5250 tile then select
Blink.
Where a step-by-step procedure is presented each action will be sequentially numbered 1,
2, 3 and so on.
Where a configuration option is described its default value is given in brackets. For example:
Horizontal scroll bar (Auto hide)
An underscore in a bolded word such as, File, refers to a menu item which can also be
called using the short cut key sequence [ALT_F]. This feature is not available on every
option, but a large number of relevant menu locations do offer a short cut key.
A multi- level menu option is displayed with an angle bracket between items, for example
File > Exit indicates that the Exit option is available as a sub item of the File menu.

13TTerm for Linux User Guide : About This Manual
Online Resources
This manual is a dynamic document which is constantly evolving . While we do our best to ensure this manual
contains the latest and most accurate information you may wish to use our online support center to find the
latest tips and problem-solving documentation. You can access support resources, installation downloads and
other resources online at:
https://www.ttwin.com/support

Chapter 1: Introduction
A brief overview of the TTerm for Linux product,
system requirements and installation process.

15TTerm for Linux User Guide : Chapter 1 - Introduction
What is TTerm for Linux?
TTerm for Linux is Turbosoft's offering for superior terminal emulation software for Linux operating systems.
Supporting over 80 terminal types and numerous communications protocols, it is a complete host connectivity
solution.
Features Highlights
Single Product Terminal Coverage
TTerm for Linux includes terminal emulations for more terminals within one package. No need to switch
products to get different emulations.
Reduce Keystrokes with Keyboard Macros
Single keystrokes can do complex tasks. TTerm for Linux allows you to map macros to keys (including alpha
keys in various shift states). These macros will do the work for you. Reduced keystrokes mean less time to do
the job, and a more accurate result.
Scroll History
TTerm for Linux increases productivity in many ways. Its Scroll History allows you to review information that
has rolled off the screen, and use cut and paste to move this into and out of other applications such as spread-
sheets and word processors.
Multiple Sessions
TTerm for Linux allows you to run as many sessions as you need to the one host system or to many. What's
more each session can be configured independently to your requirements.
64-bit
TTerm for Linux is available as a native 64-bit application.
Data Security
Security to be an essential part of a terminal session and as such, TTerm for Linux supports industry standard
encryption.
Screen Enhancing Features
Give your system a 'make-over' and extend its life through the use of 'hot spots' and macros.

System Requirements
TTerm for Linux supports the following 64-bit distributions:
> Ubuntu 16+
> Red Hat 7+
> CentOS 7+
> Suse 12 SP2+
> OpenSuse 42+
Other distributions are available on request.
Hardware Requirements
> Approximately 50MB of free disk space.
> A network connection.
Installation
Suse/OpenSuse/CentOS/Red Hat
1 Run sudo rpm -i TTermForLinux-Dist-x.x-x.x86_64.rpm
2 You will find the TTerm for Linux shortcut in the Internet section of your applications menu.
3 You are now ready to begin working with TTerm for Linux.
Ubuntu
1 Run sudo dpkg -i TTermForLinux-x.x.x.x-Dist_amd64.deb
2 You will find the TTerm for Linux shortcut in the Internet section of your applications menu.
3 You are now ready to begin working with TTerm for Linux.
Uninstalling TTerm for Linux
Suse/OpenSuse/CentOS/Red Hat
To uninstall TTerm for Linux you should follow the standard software uninstallation process for your operat-
ing system. For example, rpm -qa | grep TTermForLinux | xargs sudo rpm -e
Ubuntu
To uninstall TTerm for Linux you should follow the standard software uninstallation process for your operat-
ing system. For example, sudo dpkg –-remove ttermforlinux

17TTerm for Linux User Guide : Chapter 1 - Introduction
Licensing TTerm for Linux
Licensing TTerm for Linux is a two step process, uploading a license certificate and then activating that certificate.
A license certificate is provided by Turbosoft or a Turbosoft distributor in the form of a .key file. If you do
not have a license file but have purchased TTerm for Linux please contact your Turbosoft representative to
obtain your license file.
To import the license select Help > About from the program menu and select the License tab. Click the
Upload License button and locate your license file.
Once successfully imported TTerm for Linux will attempt to activate the license automatically.
License Activation
License activation is a one time process which stamps a license certificate with a unique identifier and com-
pletes the licensing process. There are two activation methods, in program activation (online) or manual activation
(offline).
In Program Activation
In-program activation of a license is the default method and is an automated, transparent process.
When a license file is added to TTerm for Linux the program will attempt to automatically submit the file to
the Turbosoft license servers where it will be stamped and returned to the installation. Once the license is acti-
vated TTerm for Linux will be fully licensed and functional.
In situations where a TTerm for Linux installation has limited or no access to external networks in-program
activation will not be possible as TTerm for Linux will not be able to directly communication with the
Turbosoft license servers.
In such a scenario TTerm for Linux will report the license activation as incomplete and offer manual activation
as shown in Figure 1.1 (following page.)
Manual Activation
Where an in-program activation attempt has failed TTerm for Linux will provide an intermediate license file
(.act). Manually activating a license requires downloading this file and then uploading it to a Turbosoft web
page from a device that does have internet access. The file will then be processed and returned for upload back
into TTerm for Linux.
When a valid license has been uploaded into TTerm for Linux but has not yet been activated TTerm for Linux
will function in a fully licensed state for a grace period of seven (7) days. During this time the activation must
be completed or TTerm for Linux will revert to an unlicensed state.

.
Figure 1.1. To manually activate TTerm for Linux, download an .act file.
To manually activate TTerm for Linux follow these steps:
1 Click Download .act (Offline Activation) to retrieve an .act file as shown in Figure 1.1.
2 Save the resulting .act file.
3 Copy this file to a computer or device that has internet access.
4 Open a browser to https://mercury.ttwin.com/ttermforlinux
5 Fill out the activation form selecting the .act from the local device. Once completed the form will return
a direct link to download the activated license file, optionally, enter an email address where the newly acti-
vated certificate will also be sent.
6 Select the Retrieve Certificate File button to submit the activation form.
A link will then be presented which will download a new .key certificate file and, if email details were
entered in step 5, the file will also be sent to the nominated email address.
Transfer the file to the device running TTerm for Linux to complete the process.
1 Start TTerm for Linux and select Help > About from the program menu.
2 Select the License tab, click the Upload License button and locate the activated.key file.
The license file details will be loaded into TTerm for Linux and display as valid. TTerm for Linux is now
licensed and fully functional.

19TTerm for Linux User Guide : Chapter 1 - Introduction

Chapter 2: Getting Started
How to connect your machine to a remote host
and the basic steps required for getting started
with TTerm for Linux.

21TTerm for Linux User Guide : Chapter 2 - Getting Started
Getting Started
TTerm for Linux defines a profile a as set of configuration options that is used to generate a session to a host.
When the TTerm for Linux application is opened it will display the Profile Directory, a list of all avail-
able saved profile configurations. On installation this will be limited to a single, preconfigured profile titled
Default.
The Default profile may be edited or duplicated but it may not be deleted. When creating a new profile, it is
used as a template and its settings are copied across to the new profile.
When creating a new profile, TTerm for Linux prefills configuration options using
the default profile as a template. You might find it useful to edit the default pro-
file if, for example, you intend on creating a number of profiles with slight varia-
tions in their configuration.
Figure 2.1 The Profile Directory, showing the default profile.

Quick Configuration
Before initiating a connection there are a few pieces of information you will need in order to complete a suc-
cessful connection to a host system.
Firstly, you need to know what sort of terminal you wish to emulate. TTerm for Linux supports numerous
emulations and you will need to know which one to choose in order to successfully interact with your host
applications.
Next, you need to know how you are going to communicate with the host system. You will need to know what
method of communications your host is expecting, as well as your host address and any related settings that
you require.
This information, along with any other settings that you require, should be available from your System
Administrator.
Once you have this information create a new profile by clicking the Create New Profile button at the bottom
of the Profile Directory as shown in Figure 2.1 or select Configure > Create New Profile from the pro-
gram's main menu.
This will create a new profile prefilled with settings from the Default profile.
Click the Open for Editing button on the tile that appears to open the Profile Editor. Access to different
configuration options such as Character Mapping, Color Configuration and Keyboard Mapping and more are
available via the Profile Editor.
Figure 2.2. The Profile Editor
The Summary section shown in Figure 2.2 lists the basic settings for a profile such as the profile Name,
Description, Host Address, Emulation type and Communications transport. Clicking the Edit button
that appears alongside these items opens the relevant detail section for further editing.

23TTerm for Linux User Guide : Chapter 2 - Getting Started
The Default profile is configured to use a VT220 emulation. To switch to a different emulation select the Edit
button on the Emulation summary field as shown in Figure 2.2 or simply click Emulation from the left col-
umn of the Profile Editor.
Figure 2.3. Emulation Configuration
Upon selecting a different emulation TTerm for Linux will display a new set of configuration options specific
to the selected terminal below.
Figure 2.4. Communications Configuration
The communications module may be modified in a similar manner to the emulation either by selecting
Communications from the left column of the Profile Editor or clicking the Edit button in the communica-
tions summary field.

The Remote Host Address field defines the host name or IP address of the system the profile will attempt to
connect to. If left blank, TTerm for Linux will prompt for a host address when a connection attempt is made.
TTerm for Linux offers a wide range of configuration options for accurate terminal emulation, however in
many cases the default options are suitable, and you may not need to edit outside the basic settings denoting
host address, communications transport and emulation type.
Please refer to Part Three of this document for more in-depth detail on how to
configure TTerm for Linux.
Saving Your Settings
Once the required emulation and communication settings are selected, be sure to save the configuration for
future use. Select Save to finish editing or Save and Connect to retain the profile settings and connect to the
host immediately.
Connecting
To initiate a connection select the Profiles directory tab (if the Profiles Directory is hidden, make it visible by
selecting View > Profile Directory from the program menu) and click the Connect button alongside the
desired profile. Note that, if a profile is not set to automatically connect when launched, the button will be
labelled Start rather than Connect.
Alternately, whilst viewing an open session tab select the Action > Connect menu function on the desired
session tab or click the connect icon from the program toolbar.
Disconnecting
A TTerm for Linux session may be disconnected from the host computer in a number of different ways, usu-
ally as a result of the user logging out from the host computer.
To manually disconnect, you may select the Action > Disconnect function from the TTerm for Linux menu
as shown in Figure 2.5 or click the disconnect icon from the program toolbar.
Figure 2.5. Disconnecting.

25TTerm for Linux User Guide : Chapter 2 - Getting Started

Chapter 3: File Menu
The standard operations: Import profiles and
saving startup sessions, print and print setup.

27TTerm for Linux User Guide : Chapter 3 - File Menu
File Menu
The File menu contains commands associated with importing and saving configuration profiles and printer
operations.
Figure 3.1. TTerm for Linux File Menu
Import Profiles
Selecting this option will open a File Browsing window, where you can select a previously exported profile or
group of profiles (*.ttexp). Profiles can be imported into TTerm for Linux from a number of sources:
> Another TTerm for Linux installation
> Turbosoft's Windows® Terminal Emulator TTWin 4 (version 4.8.4.4634 or above)
> Turbosoft's HTML5 terminal emulator TTerm Connect (all versions) .
On opening the file the Import Profiles tile will be displayed (see Figure 3.2, following page), listing the pro-
file and profile resources available for importing.
Select the item(s) you wish to import and click the Import button.

You can also import a profile via the Profiles Directory tab by clicking the Import from File button.
Figure 3.2. Import Profile options.
Save as Startup
The Save as Startup menu option saves the currently open tabs as a layout. The next time TTerm for Linux is
started the tabs and associated profiles will be loaded.
Print…
Selecting the Print... menu option activates the Print Screen tile. The Current Printer is displayed at the
top of the Print Screen tile.
Text to print
> Entire screen (default): The entire contents of the current screen are sent to the defined printer.
> Selected text only: This option is only available when a region of the screen has been selected.
You can select text by left clicking and dragging the mouse across a region. The selected area will be visible by a
shaded background.
Close print run
Selecting the Close print run option closes any active print run.
This is used when 'print through' is employed in an emulation. The Close print run command sends any out-
standing, buffered data to your printer and then closes down the print job.

29TTerm for Linux User Guide : Chapter 3 - File Menu
Unless a profile is configured with the setting General > Printer > Keep print job open set to on, this
option is grayed out. See Chapter 11 for more detail on this setting.
Print setup…
Selecting the Print setup... command activates the Printer Setup tile. This directly interfaces with the Linux
print setup and allows you to specify and configure your preferred printer.
Exit TTerm
Selecting the Exit option closes the TTerm for Linux program.
Once you have completed your work on the remote host, it is good practice to
log out FIRST or close the connection to the remote host before exiting TTerm.
A program exit action can also be initiated through the right-click context menu.
Right click anywhere on the application and select Exit TTerm from the pop-up
menu.

Chapter 4: Edit Menu
Selecting, copying, clearing & pasting regions.

31TTerm for Linux User Guide : Chapter 4 - Edit Menu
Edit Menu
The Edit menu covers commands dealing with the manipulation of terminal content. When viewing the
Profile Directory tab the options available in this menu are disabled.
Figure 4.1. Edit Menu
Copy
The Copy command will copy a selected region to the clipboard for later use by the Paste command. The
region to be copied is selected by dragging the mouse while either the left mouse button is held down or the
[SHIFT] key and left mouse button are held down together.
Cut
When using IBM block mode terminals, this option allows you to cut text from unprotected fields directly to
the clipboard.
Paste
The Paste command will insert, at the current position of the cursor, the contents of the clipboard.

Paste Next
The Paste Next is a special option for use with an IBM 3270 emulation. It's used to paste data from the sys-
tem clipboard that is greater in size than the available space in an IBM 3270 field.
Use the Paste menu option to paste data into a field as normal. Once the field is full TTerm for Linux will
stop. The Paste Next command may then be used to continue pasting the remaining clipboard data into
another field.
You can continue using Paste Next until the clipboard buffer is empty. Using Paste will reset the Paste Next
buffer.
Select Display
The Select display command will select the full contents of the currently displayed TTerm for Linux session
window.
Select All
The Select all command will select the contents of the current TTerm for Linux session window and the
entire scroll history buffer.
Clear Display
To clear the contents of the current display region, use the Clear display command. After the display area is
cleared the cursor is positioned at the top left corner of the screen.
Clear All
To clear the entire contents of the current scroll history buffer along with the current display region, use the
Clear all command.
After the display is cleared the cursor is positioned at the top left corner of the screen.
Clear History
To clear the contents of the scroll history buffer only, use the Clear history command.

33TTerm for Linux User Guide : Chapter 4 - Edit Menu

Chapter 5: View Menu
Operations related to the TTerm for Linux screen
and interface.

35TTerm for Linux User Guide : Chapter 5 - View Menu
View Menu
The View menu controls aspects of the program appearance.
Figure 5.1. View Menu
Profile Directory (on)
The Profile Directory allows users to easily create, import or edit existing session profiles. This menu options
shows or hides the profile directory tab. If the Session Panel is visible (see the following page) the Profile
Directory will be shown as button at the top of the session panel.
Menu (on)
This option shows or hides the program menu. When hidden the program menu may be redisplayed by right
clicking your mouse on the screen to display a pop-up menu and then checking the Menu option.
Toolbar (on)
Controls the display of the program Toolbar. Uncheck if you do not wish to display the Toolbar.
Status Bar (on)
Controls the display of the program Status bar, displayed at the bottom of the program window. Uncheck if
you do not wish to display the Status Bar.

Session Panel (on)
The Session panel displays small graphic versions of each currently open session allowing you to easily switch
between active sessions. If the View > Profile Directory option is set to on the Profile Directory will be
shown as button at the top of the session panel.
If a session is disconnected the preview in the session panel will be tinted red.
Figure 5.2. Session Panel (highlight added).
Full Screen
Select Full screen to enable full screen mode, this will expand the TTerm for Linux terminal display area to
entirely fill your device screen. Once you have selected Full Screen this becomes the default mode.
To deselect full screen mode right click your mouse on the screen to display a pop-up menu and uncheck the
Full screen option.
TTerm For Linux will retain previous display choices when the program is next
launched. There are also command line options that can set many of the options
found in the view menu when launching the program. Refer to Appendix B for
more detail.

37TTerm for Linux User Guide : Chapter 5 - View Menu

Chapter 6: Actions Menu
All the operations carried out by TTerm for
Linux: connecting, disconnecting, captures and
terminal control.

39TTerm for Linux User Guide : Chapter 6 - Actions Menu
Actions Menu
The Actions menu controls terminal activity such as connecting to and disconnecting from a host system.
Figure 6.1. Actions Menu
Connect
Selecting the Connect menu item will initiate an attempt to connect to a host (either a tile requesting host
details will appear or the host detail specified in your profile configuration will be used). If a connection is suc-
cessful, the Connect menu item toggles to read Disconnect.
A connect action can also be initiated through the right-click context menu. Right
click anywhere on the application and select Connect from the pop-up menu.
Ensuring Clean Disconnections
To prevent a user from closing the TTerm for Linux program or an active session without first logging off from
the remote host set the following parameter in any profile: General > Session Setting > Allow manual
disconnect.
This will not allow the program or session to be closed whilst a host connection remains active.
Note that this feature requires the host to support a disconnection as opposed to, for example, simply re-dis-
playing a login prompt, and failure to do so may prevent the user from closing the TTerm for Linux program
or session.

Capture
A 'capture' is a feature of TTerm for Linux where all communications between TTerm Connect and a remote
host are logged to a file (.cap). Selecting the Capture menu item activates the Capture tile where an output
file can be specified.
The capture file is buffered and is not immediately written to disk. Attempting to
capture a problem which causes your PC to hang or reboot may not be successful.
Upon selecting OK to start the capture the Capture menu option toggles to Stop Capture To close the cap-
ture file select the Stop Capture option.
This menu option will be unavailable unless the connected profile has it's Enable Capture configuration set
to On. For more detail refer to Chapter 18.
Break
Selecting Break sends a break signal to the remote host. A break is a time delay signal transmitted to the
remote host used to interrupt the remote computer, overriding any other task it may be executing.
Unlock flow control
Selecting Unlock flow control unlocks flow control between your PC and the remote host. Occasionally
your PC and the remote host can lose synchronization of their flow control status. This stops the screen from
updating. Unlock flow control overcomes this problem.
Reset terminal
Selecting Reset terminal option resets the terminal. This is to clear garbage characters that appear on screen,
due to line noise etc. The Reset terminal command clears the screen, puts the cursor in the home position
and resets the emulation parameters to their default settings.

41TTerm for Linux User Guide : Chapter 6 - Actions Menu

Chapter 7: Configure Menu
Menu driven options for program display and
profile manipulation.

43TTerm for Linux User Guide : Chapter 7 - Configure Menu
Configure Menu
The Configure menu contains options for general program configuration. Refer to "Session Preferences"
on page 51 for information on configuring TTerm for Linux to connect to a particular host system.
Figure 7.1. Configure Menu
Open Profile Directory
Selecting the Open Profile Directory menu item will switch the focus from a host session and open the pro-
file directory, a list of all available saved profile configurations.

Create New Profile
This menu options offers the same functionality as the Create New Profile button found on the Profile
Directory. When selected it will create a new profile using the default profile as a template.
Edit Current Profile
Selecting this menu option opens the currently focused session in the profile editor. This option will be
unavailable when viewing the profile directory.
Language
Select a language for the TTerm for Linux user interface. Language changes are applied immediately. The fol-
lowing languages are supported:
> System Default: Utilizes the locale of the device on which TTerm for Linux is running. This is the default
option and may be overridden by selecting an alternate.
> English (US)
> English (UK)
> French
> German
> Spanish
> Spanish (Mexico)
> Japanese
> Korean
> Chinese (Simplified)
> Chinese (Traditional)

45TTerm for Linux User Guide : Chapter 7 - Configure Menu

Chapter 7: Help Menu
Product version, licensing and related functions.

47TTerm for Linux User Guide : Chapter 8 - Help Menu
Help Menu
The Help menu provides access to product version and license detail.
User Guide
Opens the TTerm for Linux user guide document. The user guide is a PDF format document and requires
compatible reader software on your device.
Quick Start Guide
Opens the TTerm for Linux quick start guide document. The quick start guide is a PDF format document and
requires compatible reader software on your device.
License Information
The License Information menu option opens the About tile with the License tab in focus as shown in
Figure 8.1
Figure 8.1 TTerm for Linux License information.
For information on how to license TTerm for Linux please refer to Chapter 1.
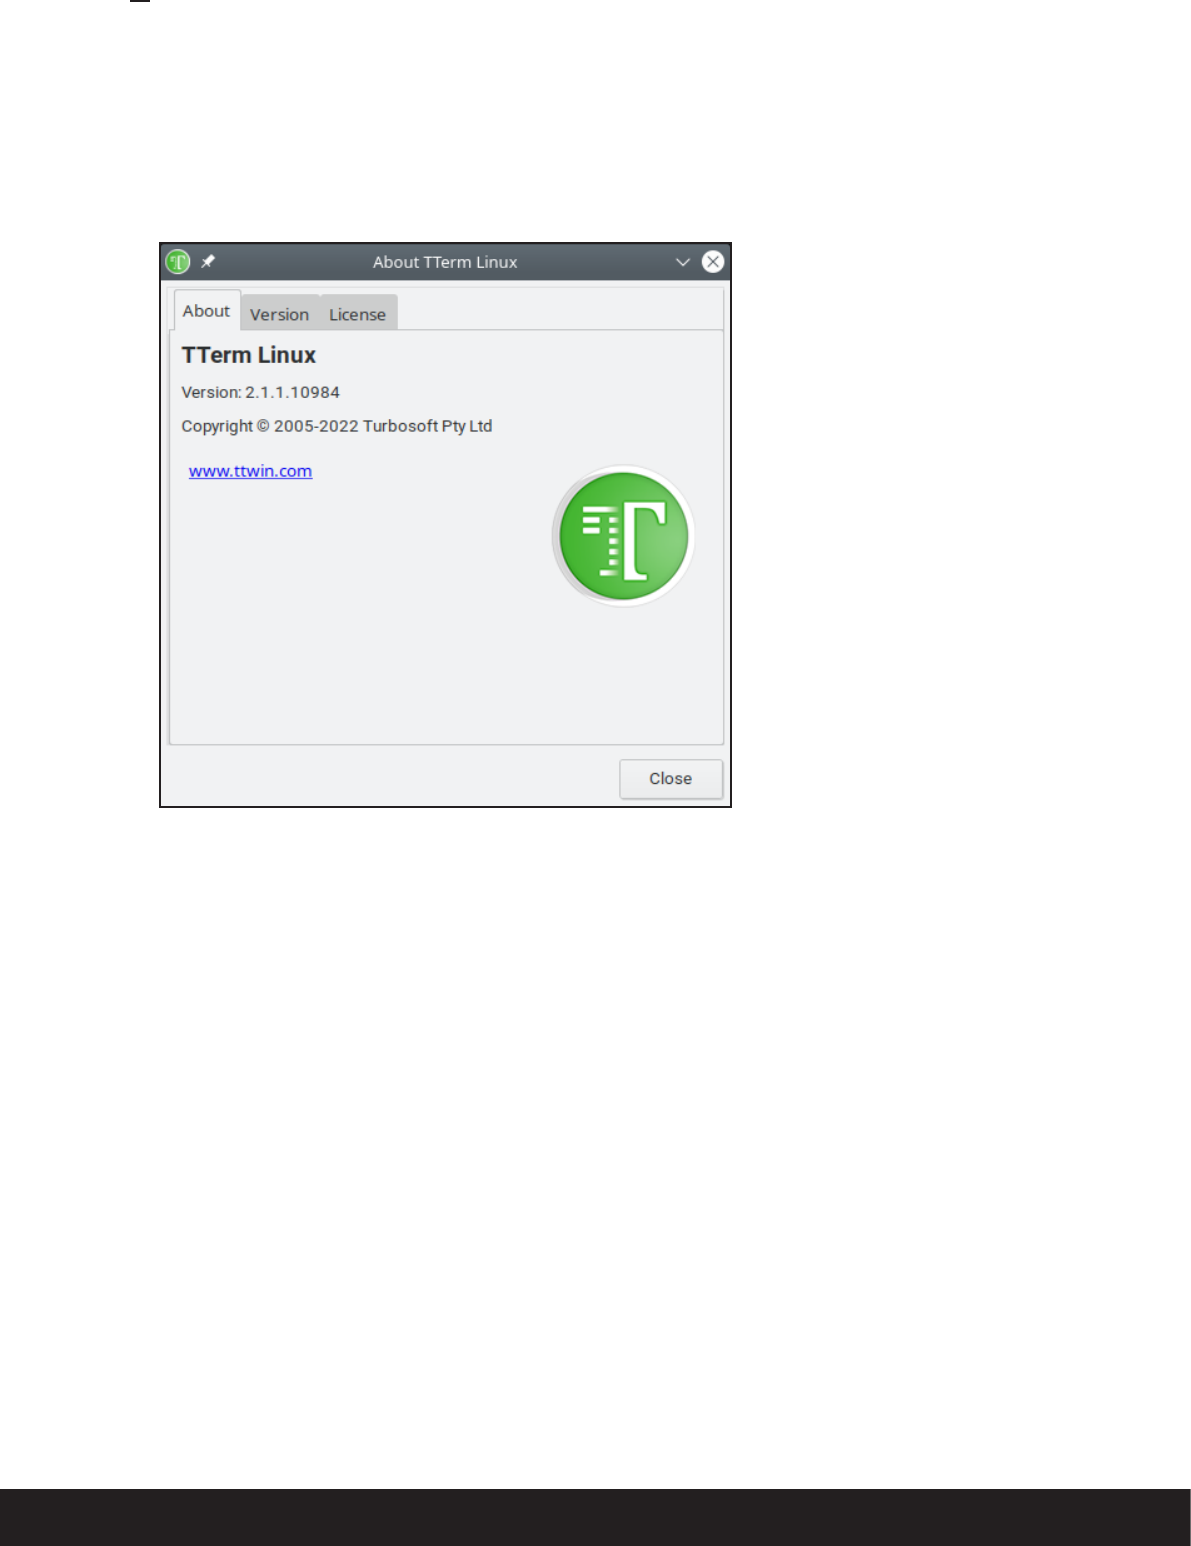
About
Selecting this menu option displays the program About tile. This provides access to detailed information on
the program version and the licensing options.
About:
The About tab provides information on the overall program version and a link to the Turbosoft website. This
version information should be quoted in dealings with Turbosoft support staff.
Figure 8.2 TTerm for Linux About Tile.
Version:
The Version tab provides more in-depth product version information including version information on vari-
ous program components. This version information should be quoted in dealings with Turbosoft Support staff.
License:
The License tab displays information about the status of the current TTerm for Linux license.
A licensed version of TTerm for Linux will display the licensee's name, a serial number and a status entry of
'valid' as shown in Figure 8.1

49TTerm for Linux User Guide : Chapter 8 - Help Menu

Chapter 9: Session Preferences
Configuring Session based preferences.

51TTerm for Linux User Guide : Chapter 9 - Session Preferences
Session Preferences
Session preferences control connect and disconnect options along with other session dependent options.
To configure session preferences select Configure > Edit Current Profile from the program menu or, from
the Profile Directory, selecting More > Edit on the profile of your choice.
Select General from the Profile Editor. Session Settings will be displayed as shown below.
Figure 9.1. Session preferences configuration.
Auto connect on startup (on)
Deselect this if you do not want TTerm for Linux to automatically connect to the host when launched.
Startup Macro ()
As soon as TTerm for Linux is loaded, prior to attempting to initiate a connection to a nominated host, the
Startup Macro, is executed.

Reset emulation on connect (off)
Selecting this clears the screen prior to connecting to the host.
Connect Macro ()
If the Auto connect on startup option is selected AND a connection to the remote host succeeds, the
Connect Macro is then executed. E.g. the string \p010username\r\p010password\r equates
to \p010: pause 1 second, username\r: send the username and enter/return, \p010: pause 1 second,
password\r: send the password and enter/return.
How to Automate Login
You can use the connect string session preference and a macro to automate the login process. If combined with
an Auto connect on startup setting of on, TTerm for Linux will automatically connect and login to your
host when launched. To automate the login process complete the following steps:
1 Select Configure > Edit Current Profile from the program menu or, from the Profile Directory,
selecting More > Edit on the profile of your choice
2 Select General from the Profile Editor.
3 In the Connect Macro item enter the login details follow by the emulation keys in braces, a pause at the
beginning will give the host time to respond. For example:
\p010UserName{Return}\p010Password{Return}
The above macro will pause for 1 second send the username, send the [RETURN] key, then pause for anoth-
er second, send the Password, then send a second [RETURN] key. For a list of macro options refer to Chapter
12.
The name of the {Return} key may change depending on the emulation being
used.
4 Click Save to retain these settings. Refer to Chapter 2 for information on saving a profile.
Allow manual disconnect (on)
Allows user to disconnect without logging off from the host first.
Reset emulation on disconnect (on)
Selecting this clears the screen on disconnecting from the host.

53TTerm for Linux User Guide : Chapter 9 - Session Preferences
Disconnect Macro ()
Runs a macro when the user presses the disconnect button.
The Disconnect Macro needs to include a disconnect command otherwise the dis-
connect will be aborted.
Action on disconnect (Notify)
When a session is disconnected from the remote host (logout, [CTRL_D], exit, quit etc.) TTerm for Linux can
do one of serveral things:
No action
The connection is quietly closed. On disconnection the session remains open is a disconnected state.
Notify s
A message will appear stating that the connection has been disconnected. The user is given the option to Do
Nothing, Close Session Window or Reconnect.
Reconnect
Causes TTerm for Linux to reconnect to the host.
Exit
Closes the session tab without any notification.
Shutdown Macro ()
Runs a macro string when the user closes the session tab. This macro needs to include a close command other-
wise the close will be aborted.

Chapter 10: Display
Configuring the TTerm for Linux window format
and scroll history parameters.

55TTerm for Linux User Guide : Chapter 10 - Display
Display
Display options can be configured to alter the appearance of the TTerm for Linux terminal display.
To configure display preferences select Configure > Edit Current Profile from the program menu or, from
the Profile Directory, selecting More > Edit on the profile of your choice.
Select General from the Profile Editor. Scroll down to Display Settings as shown below.
Figure 10.1. TTerm for Linux display configuration.

Cursor Configuration
Cursor visible (on)
Deselect this option if you have an application where the cursor must be invisible.
Cursor blink (on)
Sometimes locating your cursor on the screen can be a daunting task. Setting the cursor to blink makes finding
it easy.
Cursor shape (standard) (Horizontal Line)
The actual shape of the cursor can be set to suit particular applications running on your remote system. The
cursor styles available for normal operation are:
> Small Block: A half height block filling the lower half of a character.
> Full Block: A full character solid block.
> Horizontal Line: An underscore character.
> Vertical Line: A centered horizontal full character height line.
Cursor shape (insert) (Horizontal Line)
The actual shape of the cursor can be set to suit particular applications running on your remote system. The
cursor styles available when in insert mode are:
> Small Block: A half height block filling the lower half of a character.
> Full Block: A full character solid block.
> Horizontal Line: An underscore character.
> Vertical Line: A centered horizontal full character height line.
Scroll History Configuration
History enabled (off)
The scroll history facility enables information that has scrolled off the top of the screen to be viewed. Check to
enable the scroll history feature.
The remaining Scroll History Configuration items listed below are hidden unless
History enabled is set to ON.
Copy on a screen clear (on)
Copies the content of the screen to history once a clear screen has been sent.
Retain colors and attributes (off)
When deselected, information once scrolled off the screen is only saved as ASCII text. When selected, all
screen colors or attributes are retained through the scroll history.

57TTerm for Linux User Guide : Chapter 10 - Display
Lines to retain (500)
The number of lines to keep in the scroll history.
Scroll Configuration
Jump scroll (4 lines)
Select from the drop down to set the scroll rate. For example, a setting of 4 lines, for example, will cause the
display to be updated whenever 4 lines have been scrolled. Available options are:
> Unlimited
> Page
> 1 line
> 2 lines
> 4 lines
> 8 lines
> 16 lines
> 32 lines
> 64 lines

Chapter 11: Printer
Specifying how the printer handles a print job.
59TTerm for Linux User Guide : Chapter 11 - Printer Configuration
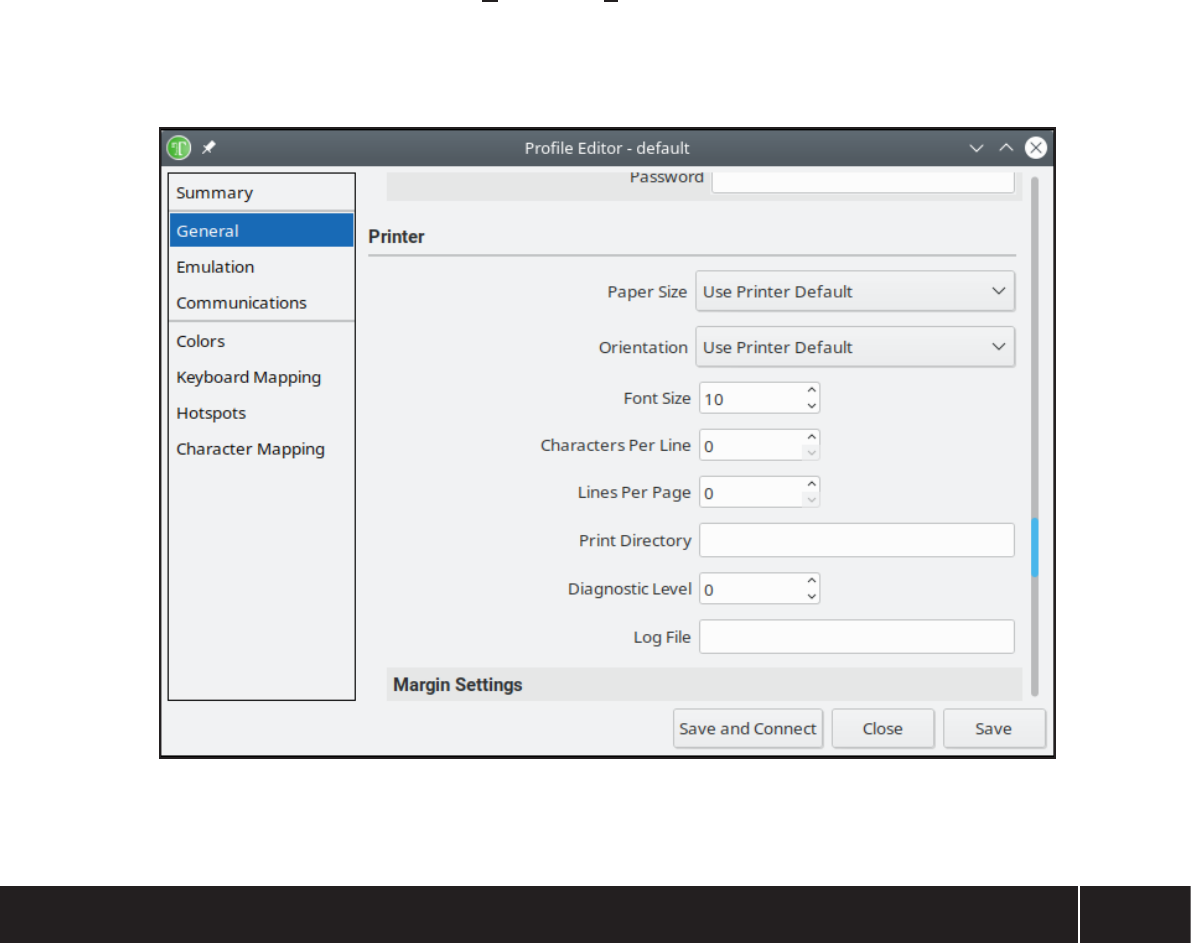
Printer Configuration
To simplify printing operations, the TTerm for Linux printer configuration provides the facility to send print
control sequences over and above that which is offered in the standard printing environment.
To configure printer preferences select Configure > Edit Current Profile from the program menu or, from
the Profile Directory, selecting More > Edit on the profile of your choice.
Select General from the Profile Editor. Scroll down to Printer as shown below.
Figure 11.1 Printer configuration.

The printer configuration options are as follows:
Paper Size (Use Printer Default)
Selecting from a list of available document sizes. Selecting Use Printer Default will use the paper size as con-
figured by default.
Orientation (Use Printer Default)
Printer orientation options are:
> Use Printer default: Uses the orientation as configured for the printer by default.
> Portrait: Overrides the printer default orientation to portrait.
> Landscape: Overrides the printer default orientation to landscape.
Font Size (10)
Set a font size for printer output in points. The standard TTerm for Linux terminal font will be used.
Characters Per Line (0)
Set the number of characters per line. A maximum value is suggested based on the font size selected in Font
Size.
Lines Per Page (0)
Set the number of lines per printed page.
Print Directory ()
Set a directory for printer output.
Diagnostic Level (0)
Higher is more verbose.
Log File ()
Specify a file name and path for log output.

61TTerm for Linux User Guide : Chapter 11 - Printer Configuration
Margin Settings
Margin Units
Set the paper margin unit of measurement. Options are:
> Inches
> Centimeters
Top Margin
Valid settings are from 0.10cm/0.039" to 20cm/7.874"
Bottom Margin
Valid settings are from 0.10cm/0.039" to 20cm/7.874"
Left Margin
Valid settings are from 0.10cm/0.039" to 20cm/7.874"
Right Margin
Valid settings are from 0.10cm/0.039" to 20cm/7.874"
Print-Through
Print in Raw Data Mode (off)
Printing raw data involves the print job data stream being sent directly to your selected printer with no TTerm
for Linux intervention. When printing in raw data mode, the Process LFs, Process CRs and Wrap lines lon-
ger than the page width options will have no effect.
Keep Print Job Open (off)
There may be times when you need to close a print job manually. If this option is selected, the Close print
run option becomes available on the File menu to close the print job.
Print Job Close Delay (5)
Specify time in seconds to keep print job open. This item is hidden if Keep Print Job Open is set to OFF.
Print to File
Print To File (off)
Select this option to direct all print job output to a file.
Print File
Specify an output filename and path.

Print to Serial
Print To Serial Port (off)
Select this option to direct all print job output to a nominated serial port.
Serial Port Device ()
Select a COM port from 1-32.
Baud Rate (9600)
Select a baud rate from 300-256000.
Parity (None)
Select a parity option. Options available are:
> None
> Odd
> Even
> Mark
> Space
Byte Size (8)
Stop Bits (1)
Stop bit options available are:
> 1
> 1.5
> 2

63TTerm for Linux User Guide : Chapter 11 - Printer Configuration

Chapter 12: Macros
An overview of the extended macro
language in TTerm for Linux.

65TTerm for Linux User Guide : Chapter 12 - Macros
TTerm for Linux Macro Language
Macros can be simply described as a string that provides the ability to execute several operations consecutively
from one initiating action. This is done by constructing the macro from a combination of text and "tokens",
these "tokens" representing such functions as ASCII control codes, emulation keys, predefined TTerm for
Linux functions and so on.
Format
A TTerm for Linux macro consists of standard text which is sent to the host, with embedded tokens. The
tokens are either translated into text (e.g. \r) or perform an action (e.g. pause).
Macro Tokens
Tokens can be grouped into three main categories:
> C-Style text replacements
> Brace enclosed tokens
> TTWin Version 3 compatibility tokens
C-Style Replacement Tokens
These tokens start with a backslash and translate to a single character value.
Token Character Code
\r
13, 0x0D (CR)
\n
10, 0x0A (LF)
\t
9, 0x09 (TAB)
\b
8, 0x08 (BS)
\f
12, 0x0C (FF)
\xnn
Translates to the hex code nn. Can be 2 to 4 digits, giving values
from 0 to 0xFFFE
\c
Removes any special meaning from the character c. E.g.
\\ = The backslash character
\{ = The character { rather than the start of a brace token.

TTWin Version 3 Compatibility Tokens
These tokens are implemented for compatibility with version 3 of Turbosoft TTWin terminal emulator.
Token Character Code
\e’name’
Replaced with the value of the environment variable name. For
example, \e PATH would return your current PATH settings.
\E'vi'
Execute an external command. If no absolute path is provided TTerm
for Linux will use the system path.
\pnnn
Pause the macro where nnn is in tenths of a second.
\m
Move the terminal cursor to the current mouse position.
\v’name’
Replace 'name' with Password or LoginName, the variables from the
User Details parameter described in "Macro Variables" on page 70.
\U'url'
Launch the default browser with the given URL.
Brace Enclosed Tokens
These tokens are enclosed in curly braces {}. They can be further broken down into one of the following
types:
> Function calls (e.g. {.Connect()} )
> Flow control statements (e.g. {%if(r=0)} )
> Emulations keys (e.g. {F1} )
Function Calls
The following macro functions are available. some of which replicate program menu items.
Function Parameters Action
{.ClearScreen()}
Clears the screen.
‘r’ register left unchanged.
{.Ch(value)}
value = ASCII Decimal code Sends ASCII Character
{.Connect()}
Attempts to connect. Result placed
in ‘r’ register
{.Copy()}
Copies the selected text to the clip-
board.

67TTerm for Linux User Guide : Chapter 12 - Macros
Function Parameters Action
{.CopyAppend()}
Performs the same operation as
Copy but appends the selected text
to text already stored in the clip-
board.
{.Cut()}
When using IBM block mode termi-
nals, this macro will cut selected text
from unprotected fields directly to
the clipboard.
{.CutAppend()}
The CutAppend macro performs the
same operation as Cut but appends
the selected text to text already
stored in the clipboard. As with the
Cut macro, this macro is only sup-
ported by IBM terminals.
{.Disconnect()}
Attempts to disconnect.
Result placed in 'r' register
{.EditClearAll()}
Edit > Clear All menu option.
{.EditClearDisplay()}
Edit > Clear Display menu option.
{.EditClearHistory()}
Clear the History.
{.EditSelectAll()}
Select All.
{.EditSelectDisplay()}
Select the Display.
{.EmBreak()}
Send a Break
{.EmReset()}
Reset the emulation.
{.EmUnlockFlow()}
Unlock Flow Control

Function Parameters Action
{.EnvVar(var)}
var = name of an environment
variable
Sends the value of the environment
variable.
‘r’ register left unchanged.
{.MsgBox(text)}
text = text message
Shows a message box with OK &
Cancel buttons. Cancel button exits
the macro.
‘r’ register left unchanged.
{.NextSession()}
Displays the next session tab as
listed under the Window program
menu.
{.NoOp()}
No Operation. This macro is useful
for keymapping where the object is
to suppress a key-press. Assigning a
NoOp macro to a keymapping will
ensure TTerm for Linux discards
those key presses.
{.Paste()}
Edit > Paste menu option.
{.PasteNext()}
Edit > Paste Next menu option.
{.Pause()}
Period, time in tenths of a
second
Pauses macro execution.
{.PrevSession()}
Displays the previous session tab as
listed under the Window program
menu.
{.Print()}
File > Printer menu option.
{.PrinterSetup()}
File > Printer setup menu option.
{.ScrollDownLine()}
Scroll Down one line in History.
{.ScrollDownPage()}
Scroll Down one page in History.

69TTerm for Linux User Guide : Chapter 12 - Macros
Function Parameters Action
{.ScrollBottom()}
Scroll to bottom of History.
{.ScrollLeft()}
Scroll left.
{.ScrollLeftEdge()}
Scroll to the left edge of the display.
{.ScrollRight()}
Scroll right.
{.ScrollRightEdge()}
Scroll to the right edge of the dis-
play.
{.ScrollTop()}
Scroll to top of History.
{.ScrollUpLine()}
Scroll Up one line in History.
{.ScrollUpPage()}
Scroll Up one page in History.
{.ShowRuler()}
0 (hide) or 1 (show) Show or hide the on-screen ruler.
{.Undo()}
Undo last paste action. Valid for
Block Mode terminals only (IBM
3270, IBM 5250).
{.UserVar("var")}
var = 'Password' or
'LoginName', these variable
are defined in each profile
configuration. See "Macro
Variables" on page 70 for
more details.
Sends the value of the property.
‘r’ register left unchanged.

Macro Variables
Each profile configuration contains two definable macro variables which can be used in conjunction with the
{.UserVar()} macro as described on the previous page. These options can be found under the General
> Macro Variables section of the profile configuration.
LoginName ()
This information is made available for use as a Macro variable.
Password ()
This information is made available for use as a Macro variable.
Figure 12.1. Variables for use with the {.UserVar()} macro are defined in each profile configuration.

71TTerm for Linux User Guide : Chapter 12 - Macros
Flow Control Statements
Label {:name} Action
goto
{%goto :label}
if
{%if(expr)} ..
{%endif}
expr = a restricted boolean
expression. See below.
while
{%while(expr)} ...
{%wend}
expr = a restricted boolean
expression. See below.
exit
{%exit}
Exits a macro
Restricted Boolean Expressions
A limited boolean expression restricted to the form
<ident><op><const_value>
where
<ident> = a variable identifier. Currently only the result register ‘r’ is recognized.
<op> = One of =, <>, <, >, <=, >=
<const_value> = a numeric constant.
Emulations Keys
Brace enclosed tokens consisting of a single identifier are interpreted as emulation keys.
{F1} {Enter}
Macro Examples
Tries to connect and shows a message box if successful.
{.Connect()}{%if(r=0)}{.MsgBox("Connected!")}{%endif}
Continually displays a message box until the cancel button is pressed.
{:start}{.MsgBox("Hello")}{%goto :start}
Connects and logs in.
{.Connect()}{%if(r<>0)}{.MsgBox("Connect failed"){%exit}{%endif}mylogin\
n{Pause(20)}mypassword\n

Host-Initiated Macros
This section only applies if you are able to modify applications or write programs
for your host.
It is possible to automatically trigger events in TTerm for Linux in response to sequences sent from the host.
One way to do this is to use a host-initiated macro.
The first step is to set up a macro trigger sequence in TTerm for Linux. Sending the trigger sequence from the
host is dependent upon the host’s operating system. You will need to be familiar with the operating system on
your host.
For example in a UNIX environment you can use an ECHO command in a shell script.
If, after consulting your operating system literature, you require further assistance please contact Turbosoft for
guidance.
Defining Host Initiated Macros
To configure these settings select Configure > Edit Current Profile from the program menu or, from the
Profile Directory, selecting More > Edit on the profile of your choice.
Select General from the Profile Editor. Scroll down to Host Initiated Macros as shown in Figure 12.2
(following page).
Macro Settings
Macro Prefix/Trigger sequence
The trigger sequence is defined with the Macro prefix string. It is recommended that you define a sequence
that is unlikely to occur. For this reason ESC is not a good character to start the sequence. An example trigger
sequence is \x1f~, where \x indicates that the next two characters are a hex value, i.e., 1F.
When the trigger sequence is detected in the host data stream, TTerm for Linux will take one of several actions
depending on the data which immediately follows the trigger sequence.
> One of up to ten predefined local macros can be executed. These are defined in Macro 0 through Macro 9.
> The host may append a delimited macro to the trigger sequence which will be executed by TTerm for Linux.
> Alternately, the host can append content to the trigger sequence in the form of a text macro.
This feature opens up many possibilities for greater host interaction, particularly where a host system may
dynamically create and send a macro to the TTerm for Linux client.

73TTerm for Linux User Guide : Chapter 12 - Macros
Figure 12.2 TTerm for Linux host macro configuration.
Macro timeout (200)
Enter the maximum time allowed to execute a macro, shown in milliseconds.
For information on using macros to automate a login, refer to Chapter 9 - Session
Preferences.

Interpretation of the Input Stream
When running the session, TTerm for Linux scans the input stream for the trigger sequence defined with the
Macro prefix or trigger string. On recognizing the trigger, TTerm for Linux looks for the next character and
responds as follows:
Character Response
MacroN
TTerm for Linux executes the predefined macro N. For example the host could
send the following string to TTerm for Linux.
\x1f~1
Where MacroN equals 1 and Macro1 is defined in TTerm for Linux as:
Macro1=cd ~\n\p020ls -las\n
This sequence would do the following when triggered:
cd ~\n change to the user's home directory
\p020 pause for 2.0 seconds
ls -las\n generate an extended directory listing
mString
Executes a macro defined by String that includes a start and end delimiter. For
example the host could send the following string to TTerm for Linux:
\x1f~m\x01cd ~\n\p020ls -las\n\x01
and TTerm for Linux would perform the same operation as the stored macro
above.
75TTerm for Linux User Guide : Chapter 12 - Macros
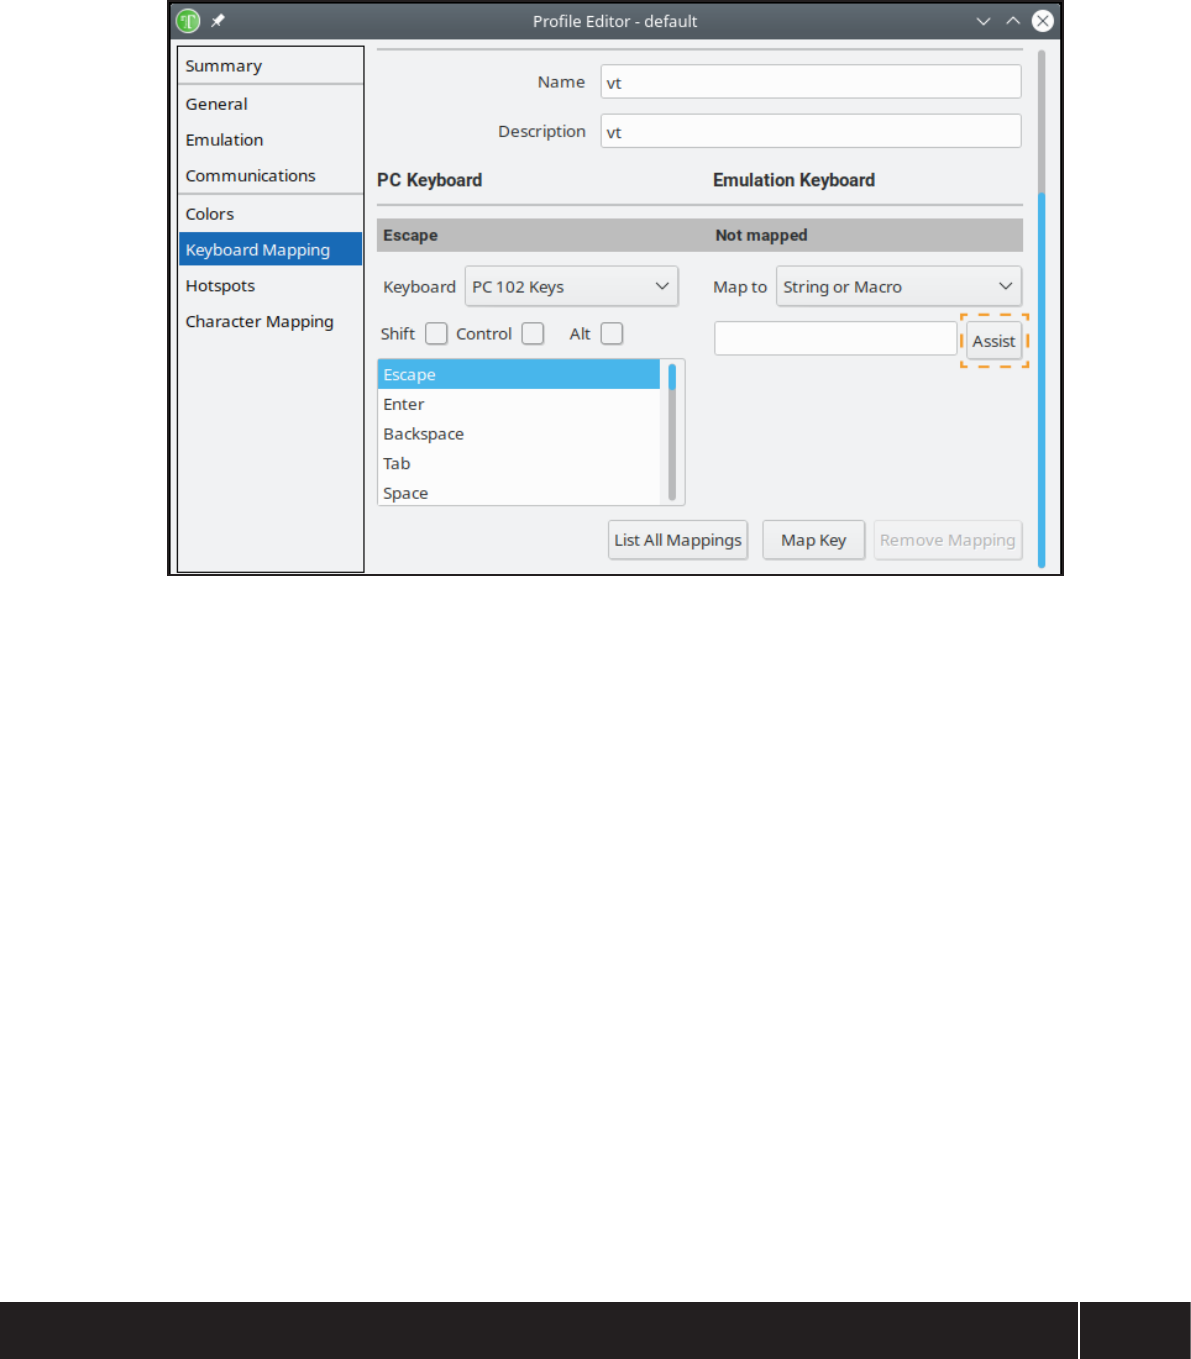
Macro Assistant
The Macro Assistant allows for text strings and Macros to be created via a graphical interface, it can be
launched from several places within TTerm for Linux, most notably from the Keyboard Mapping section of
the Profile Editor. Selecting the String/Macro option when mapping a key will display the "Assist" button.
Pressing this button initiates the Macro Assistant.
Figure 12.3 The 'Assist' button will launch the macro assistant (highlight added).
This interface allows the elements of the Macro to be selected from a list of valid entries and for the resulting
string to be easily viewed, understood and modified if required. In addition the Macro Assistant ensures that
the elements of the Macro are correctly entered and formatted.

.
Figure 12.4 TTerm for Linux Macro Assistant tile.
Raw Macro Text
This dialog box is used to display the text of the Macro in question. As the Macro is created the display reflects
the changes that are made. In addition the Macro text can be edited directly, and any changes that are made are
interpreted and listed in the Token Details section of the tile.
Token List
Shown on the left of the Macro Assistant tile, this list identifies each of the token of the macro, displaying the
type of token and its value. If you select a token of the Macro from this list, such as the Function token shown
selected in Figure 13.3, its Token Details will be displayed to the right of the list.
Tokens of the Macro can be rearranged by selecting the appropriate entry and using the up and down arrow
buttons to adjust its location. By default a blank text token is placed in this list when the Macro Assistant is
started.
Token Types
Several different component types are available in the Macro Assistant. These include:
Text
This is used to enter standard text.
Character
This is used to enter either special characters such as LF, CR etc. or to enter hexadecimal values. See Macro
Commands for details.

77TTerm for Linux User Guide : Chapter 12 - Macros
Emulation key
This is used to add a predefined Emulation key to the Macro. The Emulation keys that are available to the
Macro are dependent on the currently selected emulation module, and a key that is available in one module
may not be valid in a different module.
Function
This is used to execute a macro function.
Function (classic)
This is used to execute a TTWin version 3 compatibility token.
If statement
Start an If statement routine. The If statements allows the execution of statements based on a condition.
EndIf statement
This is used to state that the end of the If statement has been reached.
While statement
This is used to start a While statement routine. The While statement executes a group of statements in a
loop as long as a condition remains true.
Wend statement
This is used to state that the end of the While statement has been reached.
Goto statement
Transfers the execution of the script to a specified line (Label) within the same procedure.
Break statement
This is used to Break from a statement.
Exit statement
This is used to perform an Exit from a statement.
Label
This is used as a line reference for transfer of execution used in a Goto statement.
Parameters
Insert
The Insert button is used to add a new token to the Macro, causing it to be placed after the highlighted entry
in the Token List. When selected, a list of valid token types is displayed. Once a token type is chosen, an entry
is placed in the Token List and the Token Details for that token type is displayed to the right of the tile. This
can then be used to set the appropriate values for that component.
Delete
The Delete button removes the selected component from the Token List, and therefore the Macro. If only one
token is listed when the Delete button is pressed, that token is removed, and a blank text component is added.

Chapter 13: Communications
Selecting and configuring profile communi-
cations (transport).
79TTerm for Linux User Guide : Chapter 13 - Communications
Communications Configuration
The communications configuration determines the method of connection to your remote host and ensures all
data transmission is accurate and dependable.
Selecting a Communications Module
To configure the communications transport for the profile of your choice select Configure > Edit Current
Profile from the program menu or, from the Profile Directory, select More > Edit on the desired profile.
Select Communications from the Profile Editor. Configuration options will be displayed as shown in
Figure 13.1.
Figure 13.1 Configuring Communications
To choose a different communications transport select from the drop-down list of available communications
modules in the Select Communications option.
Upon changing the communications type the options under Connection will populate with options specific
to the new selection. Options for each communications module are described on the following pages

HP NS/VT
Hewlett Packard's Network Services/Virtual Terminal protocol.
Connection
Remote host address ()
The name or IP address of the remote host you wish to connect to.
Advanced
Local NS nodename ()
The NS name of the Local PC, used to identify the terminal to the remote host. Consists of three labels repre-
senting host.department.organisation i.e. PC31.DEV.TURBOSOFT.
Use custom prompt (off)
When enabled the prompt string sent by the host is replaced by the users customized string.
Custom prompt (HP:)
Enter a custom prompt string. Maximum length 8 characters. This option is hidden when Use custom
prompt is set to off.
Stream mode (on)
The TTerm for Linux VT protocol supports the newer Stream Mode connection as well as the standard
Message Mode. Enable this option to try to establish a Stream Mode connection first, if it fails HP NS/VT will
automatically fall back to Message Mode.
Display diagnostics (off)
Enabling this feature displays various diagnostic messages during connection establishment.
Silent Errors (off)
When set to on this disables notification of TCP stack errors.

81TTerm for Linux User Guide : Chapter 13 - Communications
SSH – Secure Shell
Connection
Remote host address()
The Name or the IP address of the remote host you wish to connect to.
Prompt User for Connection Details (if blank)
Deselect this if you do not wish TTerm for Linux to prompt you for a host name or IP address. Options
include:
> Never
> If Blank: prompts the end user for a host when the Remote Host Address configuration option is not
specified.
> Always: will prompt the user and prefill the tile with any entry supplied in Remote Host Address .
Ask for port when prompting for host (off)
When set the end user will be prompted for a host port prior to attempting a host connection.
Remember host on successful connect (on)
On a successful connection to a host the hostname is retained on the connection tile for subsequent connec-
tion attempts.
Prompt User for Password (on)
When set to off keyboard interactive mode is enabled.
Port No (22)
Assign a port number for this connection. The default is 22, as this is the port that is reserved for SSH com-
munications.
Use TCP IPv6 (off)
Select if you wish to enable IPv6 support.
User Details
Username ()
Enter the default login username.
Password ()
Enter the password for the login username.
Please consider your corporate security guidelines prior to implementing the User
Details entries.

Authentication key file ()
Select an RSA private key from either the file system or TTerm for Linux's built in certificate manager. For
more information on the certificate manager refer to page 90.
Authentication key pass-phrase ()
Optional key pass-phrase.
Enable FIPS-140-2 (off)
Sets mode to FIPS-140-2 complaint.
Terminal
Override Terminal Type (off)
TTerm for Linux will automatically supply the most appropriate Terminal Type for the SSH connection. You
may need to override this depending on your host’s SSH support.
Terminal Type ()
The SSH protocol allows the terminal to inform the host or the host to ask the terminal for a terminal type
identifier (such as VT220), to allow the host to correctly setup terminal-specific variables such as the codes to
clear the screen.
This setting is hidden when Override Terminal Type is set to off.
Security
Strict Security (on)
If selected the host RSA key must match the key listed in the known hosts file.
Miscellaneous
Enable Window Size (on)
When set to on TTerm for Linux will notify the host when local changes are made to the terminal row and
column sizing. Some hosts may not support this feature and in such cases, it is recommended that Enable
Window Size be set to Off.
Keep Alive (seconds) (0)
This setting is typically used for dial on demand connections, e.g. DSL. During a period of inactivity TTerm
for Linux will poll the host to keep the connection alive. The poll interval is defined in seconds.
Suppress trying messages (off)
On attempting a host connection TTerm for Linux will display "Trying [Address]..." message on the terminal
display. This option will suppress such a message.

83TTerm for Linux User Guide : Chapter 13 - Communications
Telnet
Connection
Security (Plain)
> Plain: no security enabled (standard Telnet).
> SSL: uses SSL encryption. By default SSL3 is used, for other options see the Security section below.
> Telnet over SSH: SSH session with Telnet extensions.
Remote host address ()
Enter the IP address of the remote host you wish to connect to.
Use TCP IPv6 (off)
Select if you wish to enable IPv6 support.
Port No (23)
This is an integer that identifies the destination within the remote host. 23 is reserved for Telnet.
Username ()
Enter the username for the SSH service (optional). This option is visible when Security is set to Telnet over
SSH. This option will only be visible when the Security setting is set to Telnet over SSH.
Password ()
Enter the password for the SSH service (optional). This option is visible when Security is set to Telnet over
SSH. This option will only be visible when the Security setting is set to Telnet over SSH.
.LU Name ()
This is used to identify the terminal as an LU (Logical Unit) to an IBM Mainframe. This option will only be
visible when the selected emulation is set to an IBM 5250, 3270 or Fujitsu terminal. The LU Name can accept
the following macros.
> %s - Send Local HOSTNAME
> %u - Send username
> %.{Number} - Send first x number of characters. %.4s will send the first 4 characters of HOSTNAME
> %-.{Number} - Send last x number of characters. %-.4s will send the last 4 characters of HOSTNAME
> %d{Number}% - Send connection number up to x number of connections. %d4% will cycle through 1
to 3 then 0
For more information refer to Chapter 14 - Emulations.

Associate ()
This option has no effect unless you are using the IBM3287 printer emulation. This is used to associate an
existing Terminal LU (Logical Unit) to this session. For more information refer to the IBM 3287 section in
Chapter 13 - Emulations.
The LU name and Associate options are mutually exclusive.
Advanced
Prompt for host (if blank)
Deselect this if you do not wish TTerm for Linux to prompt you for a host name or IP address. Options
include:
> Never
> If Blank: prompts the end user for a host when the Remote Host Address configuration option is not
specified.
> Always: will prompt the user and prefill the dialog with any entry supplied in Remote Host Address .
Ask for port when prompting for host (off)
When set the end user will be prompted for a host port prior to attempting a host connection.
Ask for LU name when prompting for host (off)
When set the end user will be prompted for an LU name when to attempting a host connection to an IBM
5250, 3270 or Fujitsu terminal.
Remember host on successful connect (on)
On a successful connection to a host the hostname is retained on the connection tile for subsequent connec-
tion attempts.
Connection Attempt Timeout (seconds) (6)
Time, in seconds, that a connection attempt will timeout in the event of a host not responding.
Keep Alive (seconds) (0)
During a period of inactivity TTerm for Linux will poll the host to keep the connection alive. The poll interval
is defined in seconds.
Option Negotiation
Initiate Negotiation (off)
A Telnet connection is generally initiated from the remote host. Selecting this option forces the Telnet
negotiation to start from the TTerm for Linux end.
Show Negotiations (off)
When selected, the Telnet negotiation during the initial connection is shown

85TTerm for Linux User Guide : Chapter 13 - Communications
Security
Strict (off)
If selected the host RSA key must match the key listed in the known hosts file.
SSL
Options in the SSL configuration section are only utilized when Security is set to SSL.
SSL Enabled Protocols
Protocol options for SSL communications.
Auto select certificate (off)
TTerm for Linux will automatically use a certificate in the user's name or prompt with a list where more
than one certificate exists:
Certificate ()
Select an RSA private key from either the file system or TTerm for Linux's built in certificate manager.
For more information on the certificate manager refer to page 90.
Enable Express Logon Features (tn3270e only) (off)
Enables the Express Logon Feature (ELF) for IBM TN3270 sessions. ELF is also known as Certificate
Logon Feature. This configuration item is only utilized when the emulation is set to IBM 3270.
ELF Application ID ()
The application ID that the user is logging on to via Express Logon Feature (ELF). This configuration
item is only utilized when the emulation is set to IBM 3270.
IBM 3270 Options
These configuration items are only utilized when the emulation is set to IBM 3270.
Enabled Tn3270e (off)
Select this if you wish to enable extended attributes when using the 3270 emulation.
IBM5250 Options
These configuration items are only utilized when the emulation is set to IBM 5250.
User ()
Enter the username for TN5250 connections.
Password ()
Enter the password for TN5250 connections.

Encryption Required (off)
Indicates whether the user and password fields require 3DES encryption.
MSGQNAME ()
5250 environment parameter. Please refer to your host documentation.
MSGQLIB ()
5250 environment parameter. Please refer to your host documentation.
KBDTYPE ()
5250 environment parameter. Please refer to your host documentation.
CODEPAGE ()
5250 environment parameter. Please refer to your host documentation.
CHARSET ()
5250 environment parameter. Please refer to your host documentation.
IBMSENDCONFREC ()
5250 environment parameter. Please refer to your host documentation.
IBMCURLIB ()
5250 environment parameter. Please refer to your host documentation.
IBMIMENU ()
5250 environment parameter. Please refer to your host documentation.
IBMPROGRAM ()
5250 environment parameter. Please refer to your host documentation.

87TTerm for Linux User Guide : Chapter 13 - Communications
General Options
Terminal
Override terminal characteristics (off)
TTerm for Linux will automatically supply the most appropriate Terminal Type and Telnet Mode for the
Telnet connection. Select this option to override the supplied Terminal Type and Telnet Mode.
Terminal Type ()
The Telnet protocol allows the terminal to inform the host, or the host to ask the terminal, for a terminal
type identifier (such as VT100). This allows the host to correctly setup terminal-specific variables such as
the codes to clear the screen. This option is only visible when Override Terminal Characteristics is set
to on.
Telnet Mode (NVT)
The type of Telnet communications between your local machine and the remote host can vary depending
on the type of emulation you are using. The available settings are
> NVT
> IBM3270
> IBM5250
This option is only visible when Override Terminal Characteristics is set to on.
Send Location
Send Location (None)
Sends a location identifier, valid selection types are:
> None
> String: If this option is selected the Location field entry is sent to the host.
> Hex IP
> Decimal IP
Location String ()
If the Send Location field is set to String, then the contents of Location are sent to the host. Arbitrary
text may be entered into this field or combinations of the following macro tokens may be used to dynami-
cally create a location string.
#x Hexadecimal IP
#d Decimal IP
#p Port number
#s Telnet Session ID (Not necessarily the TTerm for Linux Session Number)
#u Username
## Inserts the '#' character.
This option is only visible when Send Location is set to String.

Miscellaneous
Transmission Type (1)
When this option is set to on SGA (Suppress Go Ahead) is enabled. Set to 0 to disable.
Binary (off)
All data is handled as 8-bit characters. There are no additional functions performed on characters such as
end-of-line, or any other ASCII characters. This option is mutually exclusive with Line Mode.
Line Mode (off)
In Line Mode, characters, like the end-of-line character, are translated. Line Mode is also known as charac-
ter mode.
CR Handling (CR NULL)
This option specifies the character(s) to be used in terminating a packet. Available options are:
> CR and NULL
> CR Only
> CR and LF
Remote Echo (on)
When selected all data must first go to the remote host, then on return it is displayed on your screen.
‘Break’ Action (Interrupt)
Set the Break Action, available selections are
> Interrupt
> Break
> Abort Output
> Sync
Enable Window Size (on)
When set to on TTerm for Linux will notify the host when local changes are made to the terminal row and
column sizing. Some hosts may not support this feature and in such cases, it is recommended that Enable
Window Size be set to Off.

89TTerm for Linux User Guide : Chapter 13 - Communications
Express Logon Feature for IBM Hosts
TTerm for Linux supports Express Logon Feature (ELF) for IBM hosts. Follow the steps listed below to con-
figure TTerm for Linux for use with ELF.
1 Open the desired profile for editing from the Profile Directory.
2 Select the Emulation item from the left column of the Profile Directory.
3 Select the IBM3270 from the Select Emulation Selection drop down list.
4 Select the Communications item from the left column of the Profile Directory.
5 Select Telnet from the Select Communications drop down list.
6 In the Telnet settings under Remote Host Address, enter your host name or address.
7 In Port Number set the port number used by your host.
8 In Security section set the Security setting to SSL.
0 In the Security > SSL section and do the following:
Select Certificate and then Edit.
Select or add the required Certificate and select OK.
Select the Enable Express Logon Feature (TN3270 only) and set it to On.
Set the ELF Application ID
Close the Profile Editor by clicking either Save or Save and Connect.

Certificate Manager
The Certificate Manager appears throughout TTerm for Linux wherever SSL certificate configuration is
required, typically in a profile that uses either SSH with certificate authentication or a Telnet via SSL connec-
tion. The Manager's purpose is to store within TTerm for Linux, SSL certificates and their related configura-
tions for repeat use in multiple profiles.
Figure 13.2 Configuration for a profile which connects via SSH and uses certificate authentication.
Where a profile configuration requires a certificate selection, such as shown in Figure 13.2, TTerm for
Linux offers the option of selecting a certificate from the device file system or using an entry in the internal
Certificate Store.
The Certificate Manager is a convenience option, it is not compulsory. Alternately,
select the File option to reference a certificate file located on your device.
Selecting the Certificate Store option will display a list of existing certificates to select from. Initially this list
will be empty. Click the Certificate Manager button to bring up the Certificate Manager window and add a
new certificate to the store.

91TTerm for Linux User Guide : Chapter 13 - Communications
.
Figure 13.3 The Certificate Manager tile.
Adding A Certificate
To add a new certificate to the manager follow these steps:
1 Click the Import new... button.
2 Select a certificate file from your file system.
3 Once the file is loaded, complete the Certificate Details section. The Name field will be pre-populated
with the file name, however you may optionaly alter this to something more memorable.
4 Optionally, enter text in the Description field.
5 Set the certifcate Type from the drop-down list. Supported certificate types are:
> P7B
> PFX
> PEMKey
> PublicKey
> SSHPublickKey
> PPK (Putty private key)
> XML
6 Click the Save button.

Repeat the process for each individual certificate you wish to add. When the Certificate Manager is closed,
the list of available certificates in the Certificate Store will be updated, allowing you to select one of the newly
added certificates.
Figure 13.4 Selecting a newly added certificate from the internal Certificate Store.
Editing A Certificate
To edit a certificate follow these steps:
1 With the Certificate Manager open select the desired certificate from the drop-down list at Select a certifi-
cate to view or edit.
2 The Certificate Details section will be populated with the selected certificate settings. Edit as required.
3 When finished click the Save button.
When the Certificate Manager is closed, the list of available certificates in the Certificate Store will be updated
with the changes.
Deleting A Certificate
To delete a certificate follow these steps:
1 With the Certificate Manager open select the desired certificate from the drop-down list at Select a certifi-
cate to view or edit.
2 To delete simply click the Delete button below.
When the Certificate Manager is closed, the field containing the Certificate Manager button will be updated
and the deleted certificate(s) removed.

93TTerm for Linux User Guide : Chapter 13 - Communications

Chapter 14: Emulations
Configuring your required terminal emulation.

95TTerm for Linux User Guide : Chapter 14 - Emulations
Emulation Configuration
This chapter covers emulation configuration options for the various terminals emulated by TTerm for Linux.
Selecting an Emulation Module
To configure the emulation for the profile of your choice select Configure > Edit Current Profile from the
program menu or, from the Profile Directory, select More > Edit on the desired profile.
Select Emulation from the Profile Editor. Configuration options will be displayed as shown in Figure 14.1.
Figure 14.1 Configuring Communications
To choose a different emulation select from the available terminals in the Select Emulation drop down list.
Note that a selection may cover several emulations, for example the DEC VT Series module supports emula-
tions such as the DEC VT 52, the VT100, VT220 and others. Configuration options for each of the emulation
modules supported by TTerm for Linux are listed alphabetically in this chapter.

ADDS2020 Viewpoint
Personality
Emulation Personality (Native Mode)
Available modes are:
> Wyse
> Native Mode
Options
Wrap End of Line (Stop)
> Wrap: When this item is selected and the cursor reaches the last column on a line, the cursor will be moved
to the first column of the next line.
> Stop: If this item is selected then the cursor will not move and incoming characters will overwrite the last
column on the screen.
Scroll Setting (Scroll)
> Scroll: When selected, the screen will scroll up upon receiving a linefeed if the cursor is on the last line of
the page.
> Loop: When selected, the screen and cursor position will remain the same.
Display Status Line (on)
The ADDS 2020 terminal supports a status line across the bottom of the display region. Select this option to
display the status line.
Character Mapping
For information on how to create or alter custom languages or character sets, please refer to chapter 16.
Character Sets
Available sets for this terminal are as follows:
> Native text set
> Native graphics set
> Monitor mode character set
> To host

97TTerm for Linux User Guide : Chapter 14 - Emulations
ADM11
Personality
ADM Mode (ADM11 /R)
Four terminal modes are supported on the ADM11 emulation.
> ADM 11/R: Standard Pick System mode. This mode emulates most of the functions of the AWA VTE-6/R
terminal.
> ADM 11/H: Hybrid mode. This emulation responds to both VTE-6/R and Prism II commands. In cases
where the command codes or sequences clash, the Prism II command is executed.
> ADM 11/P: Prism II mode. Emulating the Microdata Prism II terminal.
> ADM 11/W: Wordmate mode. Specially designed for use with the Wordmate Word Processing Package.
> ADM 11 (LSI) Native mode of operation.
Display Mode
Screen Size
Select from one of the following options:
> 24x80
> 24x132
Status Line Attribute (Normal)
The ADM11 terminal supports a status line across the bottom of the display region, available formats:
> Normal: The status bar appears with the normal attribute settings.
> Reverse: The status bar appears using the reverse attribute settings.
> Blank: The status bar is not visible; it uses the current normal text background attribute.
> Blink: The status bar uses the blink attribute settings.
Options
Insert Carriage Return Between Lines (off)
This option governs whether a CR (carriage return) is inserted between each line of data sent to the host dur-
ing a send operation.
Auto Scroll (on)
This affects the behavior of the terminal when a linefeed is issued on the last line. When selected, the screen
scrolls up one line, and the cursor remains on the last line. When not selected, the screen remains unchanged,
but the cursor wraps around to the first column of the screen.
Use Uppercase Only (off)
When selected, the keyboard will behave the same as when the [CAPS LOCK] key is on.

Disable Keyboard (except RESET) (off)
When selected, the keyboard is disabled. All keystrokes except for the RESET function will be ignored. The
emulation will continue to display normally while the keyboard is disabled. When the emulation is first loaded
it assumes a default state of the keyboard enabled (unlocked).
Character Mapping:
For information on how to create or alter custom languages or character sets, please refer to chapter 16.
Character Sets
Available sets for this terminal are as follows:
> Normal character set
> Monitor mode character set
> LSI mode graphics set
> To host

99TTerm for Linux User Guide : Chapter 14 - Emulations
ANSI Color
Display Mode
Display Size (24x80)
Available options are:
> 24x80
> 24x132
> Custom: uses the width and height as defined in the Custom Height and Custom Width options.
Custom Height (24)
Enter the number of rows required.
Custom Width (80)
Enter the number of columns required.
Options
Wrap End of Line (on)
When selected and the cursor is in the last column, incoming text is written to the beginning of the next line.
When not selected, incoming characters will overwrite the last column until an EOL (end-of-line) character is
received.
Convert Incoming Line Feed to CR/LF (Received) (off)
If selected, then on receipt of a linefeed (LF) from the remote host TTerm for Linux performs a carriage return
(CR) as well as a linefeed.
Insert Mode (Overtype incoming text at cursor)
Available options are:
> Insert incoming text at cursor: Inserts incoming text at the position of the cursor. Existing text will be
moved to the right to make space.
> Overtype incoming text at cursor: From the current cursor position overwrites text to the right on the
current line.
Box Drawing Character Set (Single line)
The ANSI emulation supports two styles of box drawing characters, these are:
> Single line
> Double line
Use Current Attribute on Erase (on)
When selected, the current character attribute will be used when an erase operation is performed.

Character Mapping
For information on how to create or alter custom languages or character sets, please refer to chapter 16.
Languages
Available languages for this terminal are as follows:
> English
> English (UK)
> Dutch
> Finnish
> French
> French/Canadian
> German
> Greek
> Italian
> Norwegian/Danish
> Spanish
> Swiss
> Swedish
> Cyrillic
Character Sets
Available sets for this terminal are as follows:
> ASCII
> Extended ASCII
> Graphics (single line box characters) - Single line box drawing character set.
> Graphics (double line box characters) - Double line box drawing character set.
> To host

101TTerm for Linux User Guide : Chapter 14 - Emulations
Bull VIP7800
Display Mode
Number of display lines (Default)
The number of lines for the display. The default number of lines is 24. The Custom option allows the user to
specify the number of lines.
Options
Operating Mode (Character)
Available options are:
> Character
> Text
Initially, the terminal is set to either Character or Text mode. Character and Text modes allow the host or
user to define the screen attributes and fields that become active when Form mode is activated.
Enquiry ID (730G)
This configuration gives the user the ability to customize the first four characters sent to the host, such as dur-
ing an enquiry response. These characters act as a terminal identification string for the hosts that require cus-
tom strings to be sent.
Convert CR to CR/LF (off)
This option causes the [RETURN] key to generate the two bytes CR/LF, instead of the normal CR.
Insert CR/LF Between Line Sends (off)
This option governs whether a CR/LF is inserted between each line of data sent to the host during a send
operation.
Auto Tab (Immediate)
> Immediate: The cursor will immediately tab to the next unprotected field once the end of the current
unprotected field has been reached.
> Delayed: The cursor will remain at the start of the next field then on the next valid keypress, the tab opera-
tion will occur.
Terminator (ETX)
The character appended to the end of data sent to the host during a send operation. Options are:
> EOT
> ETX

Insert Mode (on)
When selected, all screen data received causes all data, line graphics and attributes from the cursor to the end of
the line to shift right. When not selected, the data will overwrite data at the cursor position.
Roll Mode (off)
This item governs the screen behavior when the cursor is on the last line of data space (which can be line 24 or
line 72 if 72-line scroll is set) and a line feed is received. If Roll mode is on, then all data will be rolled up one
line and the data that was on line 1 of data space is lost. Otherwise a DATA OVERFLOW error is generated on
the status line.
Echoplex (on)
When selected, data entered at the terminal is transmitted without being displayed locally. This mode is only
valid when in Character mode and Local mode is toggled on. When not selected, entered data is simultane-
ously displayed locally and sent to the host.
Transmit on Return (off)
Provides an alternative method of transmitting data whilst in Text mode, by enabling the sending of spe-
cially formatted data from the screen when the [RETURN] key is pressed. When this mode is disabled the
[RETURN] acts as normal.
Enable Bell Sound (on)
When selected, the bell will sound if a bell character [CTRL_G] is received from the host.
Suppress Trailing Spaces (on)
This option causes the terminal to suppress trailing spaces from being sent to the host during various send
operations. When not selected, all spaces are sent.
Enable 72-line Scroll Area (off)
When selected this mode sets the terminal to operate with a 72 line data space instead of the standard 24 lines.
The displayable text at any time is 24 lines, which will then scroll up and down over the 72 lines available in
the data space.
Display 8 bit (off)
This option is set to off by default.
Strip 8th bit (on)
This option is set to on by default.
Printer
Start Print Character Combination (CR)
This option sets the combination of characters sent to the printer before a print job. Available options are:
> CR
> CR-LF
> CR-FF
> CR-VT

103TTerm for Linux User Guide : Chapter 14 - Emulations
End Print Character Combination (CR)
This option sets the combination of characters sent to the printer after a print job. Available options are:
> CR
> CR-LF
> CR-FF
> CR-VT
PENQ Mode (off)
When selected, a receipt of a PENQ command (printer enquiry) will disable the use of the [PRINT] key. If not
selected, then the [PRINT] key will not be disabled on receipt of a PENQ.
Print Mode (All)
> All: When selected, both unprotected and protected data is sent to the printer.
> Unprotected: When selected, only unprotected data is printed.
Character Mapping
For information on how to create or alter custom languages or character sets, please refer to chapter 16.
Character Sets
Available sets for this terminal are as follows:
> Standard map
> Line graphics
> To host

Data General Series
Personality
Emulation Personality (DG470)
Available personality options are:
> DG210
> DG211
> DG216
> DG216E
> DG410
> DG411
> DG412
> DG460
> DG461
> DG462
> DG470
Terminal Mode
Terminal mode (DG)
Available options are:
> ANSI
> DG
Data bits (8-BIT)
Available options are:
> 7-BIT
> 8-BIT
Options
Scroll Setting (Scroll)
Available scroll modes are:
> Stop
> Loop
> Wrap
> Scroll

105TTerm for Linux User Guide : Chapter 14 - Emulations
Null Character Handling (None)
Various NULL character representations have been implemented by Data General. The default setting of None
is almost always required, other options are Single or Double.
> None
> Single
> Double
Display the 81st Column (off)
When selected the screen will show the 81st column (Applicable to DG4xx personalities only).
Clear Screen on Display Width Size Change (off)
When selected, this will cause a screen clear whenever a screen change between 80 and 132 columns occurs. If
history is enabled, the screen data will be saved to the scroll history buffer otherwise the data is lost.
Character Sets
G0 Character Set (US ASCII)
Available options are:
> KEYBOARD
> US ASCII
> WP SET
> LINEDRAW
> DG INTERNAT
> UK
> FRENCH
> GERMAN
> SWED FIN
> SPANISH
> DAN NORW
> SWISS
> KATAK G0
> KATAK G1
G1 Character Set (DG INTERNAT)
Available options are:
> KEYBOARD
> US ASCII
> WP SET
> LINEDRAW
> DG INTERNAT
> UK
> FRENCH
> GERMAN
> SWED FIN
> SPANISH

> DAN NORW
> SWISS
> KATAK G0
> KATAK G1
Character Mapping
For information on how to create or alter custom languages or character sets, please refer to chapter 16.
Character Sets
Available sets for this terminal are as follows:
> Keyboard character set
> U.S. character set
> Word processing set
> Line drawing characters
> Data General International
> United Kingdom set
> French character set
> German character set
> Swedish/Finnish set
> Spanish character set
> Danish/Norwegian set
> Swiss character set
> Katakana G0 set
> Katakana G1 set
> To host

107TTerm for Linux User Guide : Chapter 14 - Emulations
DEC VT Series
Display Mode
Display Size (24x80)
Available options are:
> 24x80
> 24x132
> 36x80
> 36x132
> 48x80
> 48x132
> Custom: uses the width and height as defined in the Custom Height and Custom Width options.
Custom Height (24)
Enter the number of rows required. This option is only visible is Display Size is set to Custom.
Custom Width (80)
Enter the number of columns required. This option is only visible is Display Size is set to Custom.
Display Options
Status Line Display (None (hide the status line))
> None (hide the status line): The status line is not displayed.
> Indicator: The status display is always visible.
> Host writable: Host applications can write messages in place of the status line.
Enable Local Echo (off)
If selected, as a character is typed on the keyboard it is immediately echoed to your screen. If disabled, the
entered character is sent to the remote host which in turn echoes it back. On its return the character is dis-
played on your screen. In this way, passwords and other sensitive information do not appear on your screen.
Insert Mode (off)
This mode determines how characters are added to the screen. When selected, the character is inserted at the
cursor, moving previously displayed characters to the right. When not selected, new display characters replace
old display characters at the current cursor position.
Wrap End of Line (on)
When selected and the cursor is in the last column, incoming text is written to the beginning of the next line.
When not selected, incoming characters will overwrite the last column until an EOL (end-of-line) character is
received.
Enable Clear Character Retains Attributed (off)
Specifies whether a cleared character retains an attribute.

Clear on Display Size Change (off)
When selected, this will cause a screen clear whenever a switch between 80 and 132 columns occurs. If history
is enabled, the screen data is moved to the scroll history buffer, otherwise it is lost.
Responses
Answerback Message ()
The string specified here is used as the answerback message which is sent from the terminal to the host when
the host sends the ENQ character.
Operating Mode (VT400)
Select to change between the following modes:
> VT52
> VT100
> VT400
7 or 8 bit (7 Bit)
Select between 7 or 8 bit modes.
Terminal ID (VT 220)
Select between
> VT100
> VT101
> VT102
> VT220
> VT240
> VT320
> VT340
> VT420
Use Custom DA string (off)
Select to enable the Custom DA string function.
Custom DA string (?64;1;2;6;7;8;9;15;21)
Enter your custom DA string. This option is only visible is Use Custom DA string is set to On.

109TTerm for Linux User Guide : Chapter 14 - Emulations
Keyboard Configuration
Keypad Mode (Application)
Select between Application and Numeric keypad state.
> Application: Selects application keypad mode. The keypad generates application control functions.
> Numeric: Selects numeric keypad mode. The keypad generates characters that match the numeric, period,
plus, minus, star and forward-slash keys on the main keypad.
Cursor Keys Mode (Normal)
The characters generated by the cursor keys depend on the state of the Cursor Keys mode.
> Normal: Causes the cursor keys to generate ANSI cursor control sequences.
> Application: Causes the cursor keys to generate application control functions.
Convert LF to CR/LF (off)
When selected, this causes a received [RETURN] to transmit as both a CR and a LF. When not selected and a
[RETURN] is received only a CR is transmitted.
Macros Ignore Keyboard Lock State (off)
When the keyboard is locked, no codes can be transmitted from the keyboard to the host. You can unlock the
keyboard either by deselecting this option or resetting the terminal.
Lock User Defined Keys (off)
The lock parameter determines whether the downloaded key definitions are locked or not, after you load them.
To unlock the keys you must either deselect user defined keys locked option or a reset is required.
Enable Compose (off)
A compose sequence is a series of two or three keystrokes that produce a single character. Pressing the
[COMPOSE CHARACTER] key starts the compose sequence.
Disable Numeric Keypad (on)
Disables application and numeric mode for the numeric keypad.
Reset Clears the Terminal Screen (off)
Reset clears the terminal screen.
Tilda and Left Quote Key (Sends tilda/left quote)
This option allows the user to define the TILDA/LEFT QUOTE key (i.e., ~/‘ key) to operate either as normal
or as an escape key sequence.
> Sends escape: Redefine the TILDA/LEFT QUOTE key to send an escape key sequence.
> Sends tilda/left quote: Leave the TILDA/LEFT QUOTE key as normal, i.e., LEFT QUOTE and with the
SHIFT key, TILDA.

Advanced
Character Set Mode (Normal)
Select between the following character set mode:
> Normal
> DBCS
> UTF-8
CodePage (950)
Sets the code page to be used when DBCS is enabled. See also Character Set Mode. This option is only vis-
ible is Character Set Mode is set to DBCS.
User Preferred Character Set (DEC Supplemental)
There are two 8-bit character sets, and both include the standard ASCII character set and a supplemental set.
> DEC Supplemental: DEC Multinational set.
> ISO Latin
Favor Diacritics (off)
When enabled uses European characters rather than line draw characters.
Print Extent (Print Region)
Select from the following options:
> Print Region: to send just the selected region to the printer
> Print Screen: to send entire screen contents to printer.
Print Form Feed (off)
Send a form feed character at the end of the print job.
Character Mapping
For information on how to create or alter custom languages or character sets, please refer to chapter 16.
Languages
Available languages for this terminal are as follows:
> English
> English (UK)
> Dutch
> Finnish
> French
> French/Canadian
> German
> Greek
> Italian
> Norwegian/Danish

111TTerm for Linux User Guide : Chapter 14 - Emulations
> Spanish
> Swiss
> Swedish
> Cyrillic
> Croatian
Character Sets
Available sets for this terminal are as follows:
> HostsNational
> ASCII
> ASCII (8-bit)
> DEC Special Graphics
> DEC Supplemental
> ISO Latin Supplemental
> DEC Technical
> To host

Fujitsu 6681
Configuration options for the Fujitsu 6681 terminal are covered by the IBM 3270
emulation. Select this emulation and refer to the section on IBM 3270 configura-
tion in this chapter for more detail.

113TTerm for Linux User Guide : Chapter 14 - Emulations
HP Series
Model (70092)
Select a Hewlett Packard terminal model. Available options are:
> 2392A
> 70092
> 0094
Display
Display Size (24x80)
Select from the two available options:
> 24 lines x 80 columns
> 24 lines x 132 columns
Start Column (1)
This is a value in the range of 1 – 80.
Smooth Scroll (off)
When selected, rolling data up and down the screen is done smoothly. When not selected (0), the scroll jumps
a line at a time.
General
User Terminal ID (70092)
Select from the two available options:
> 2392A
> 70092
Block Mode Settings
Operate in Block mode (off)
When not selected, the terminal operates in Character mode. In Character mode, data is transmitted a char-
acter at a time as it is entered through the keyboard. Control codes (such as CR and LF) are also transmitted.
When selected, the terminal operates in Block mode. In Block mode, data is NOT transmitted at the time
it is entered through the keyboard. Instead, you transmit an entire block of data by first typing the data and
then pressing the [ENTER] key. When the terminal is in Block mode, control codes (such as CR and LF)
are acted upon locally but NOT transmitted with the data block.

Block Mode Send (Send By Line)
Select from the two available options:
> Send By Line
> Send By Page
This field specifies whether the terminal, when operating in Block mode, will transmit data a line at a time
or a page at a time.
Block Terminator Character (ASCII) (30)
Can be any ASCII character. For data transfers between the terminal and a host computer, the terminal
transmits the specified block terminator character at the end of the transfer operation.
Field Separator Character (ASCII) (31)
Must be an ASCII character. When you press the [ENTER] key while the terminal is in block page mode
and display memory contains a formatted display, the terminal automatically transmits the specified field
separator character at the end of each protected field (except the final one).
Remote (on)
When selected, if you press an alphanumeric key the associated character code is transmitted to the host
computer. When not selected (Local mode), if you press an alphanumeric key the associated character is
displayed at the current cursor position on the screen. Nothing is transmitted to the host computer.
Handshake Settings
InhDC2 (off)
Together, InhHndShk and InhDC2 fields determine what type of handshaking is to be used when trans-
ferring blocks of data from the terminal to the host computer.
InhHndShk (off)
See InhDC2.
Host-Prompt Settings
Enable Host-Prompt (on)
Uses a host originated user-definable character value to release the keystrokes, stored previously via Type-
ahead.
Host-Prompt Text (ASCII) (17)
Decimal ASCII character value used by the host prompt. This option is only visible is Enable Host
Prompt is set to On.
Type-ahead Settings
Type-ahead (on)
While the keyboard is locked, keystrokes are stored and released when the keyboard is unlocked.

115TTerm for Linux User Guide : Chapter 14 - Emulations
Type-ahead Size (100)
The number of keystrokes permitted whilst keyboard is locked before the buffer fills and locked state is
resumed. This option is only visible is Type-ahead is set to On.
Type-ahead Delay (0)
This setting gives the delay between each key when the type-ahead buffer is purged; i.e. its contents sent to
the host. Measured in milliseconds. This option is only visible is Type-ahead is set to On.
Miscellaneous
Local Echo (off)
If selected, characters entered through the keyboard are displayed on the screen and transmitted to the host
computer. When not selected, characters entered through the keyboard are transmitted to the host comput-
er only. If they are to appear on the screen, the host computer must echo them back to the terminal.
XmitFnctn (off)
This field specifies whether the escape code functions are both executed at the terminal and transmitted to
the host computer.
Inhibit End of Line wrap (off)
This field specifies whether the end-of-line wrap is inhibited.
Space Overwrites/Advances (off)
This field specifies whether or not spaces entered through the keyboard will overwrite existing characters.
Transfer Escape Sequences (off)
This field controls the transfer of escape sequences to a printer and has no effect if there is no second port.
Margin Bell (off)
This specifies whether the terminal's bell is enabled or disabled. If not selected, the bell will still sound in
response to an ASCII Bell control code (decimal 7, [CTRL_G]).
Send Cursor Position (off)
When selected, if the [ENTER] key, [SELECT] or a user defined key (set to transmit) is pressed, the cur-
rent cursor position is sent to the computer.
EnqACK (on)
When selected, all ENQ characters from the incoming data are stripped off and in turn responds by trans-
mitting an ACK. When deselected, all incoming characters (including ENQ and ACK but excluding NULLS
and DELS) are treated as data bytes, NULLS and DELS are stripped from the incoming data.
Insert Mode (off)
This option determines how characters are added to the screen. When selected, the character is inserted at
the cursor, moving previously displayed characters to the right. When not selected, new characters replace
old characters at the cursor position.
Format (off)
When selected, the terminal user can only enter data into unprotected fields.

LineModify (off)
When the terminal is in Remote mode and Character mode and you are communicating interactively with
a host computer, you may sometimes enter an erroneous command string to which the computer responds
with an error message. If the command string is a lengthy one and the error consists of only a few charac-
ters, it is a nuisance to have to retype the entire string. In such a case, you may instead enable Line modify
mode (which temporarily switches the terminal to a special form of Block mode). You can then move the
cursor to the erroneous line on the display and correct the command string. When the string is edited to
your satisfaction, you retransmit the line to the host computer by pressing either the [ENTER] key or the
[RETURN] key. Line modify is automatically disabled when you press either [ENTER] or [RETURN].
Modify All (off)
When the terminal is in Character mode, you can enable Modify All, which switches the terminal to a spe-
cial form of Block mode. Modify All is the same as Line Modify except that it is NOT disabled when you
press [ENTER] or [RETURN].
DisplayFns (off)
When selected, the terminal operates as follows In Local mode, it displays control codes and escape
sequences but does not execute them. In Remote mode, it transmits control codes and escape sequences
but does not execute them locally.
Record (off)
Record mode copies from the host to the selected destination (to) device, e.g., an external printer. When the
Record mode is not selected, the contents of a partially filled buffer will be sent to the destination device(s).
LogBottom (off)
Logging is a mechanism whereby data can be automatically routed to an external device e.g., a printer.
With bottom logging, each time the cursor moves from one line to another, the line from which the cursor
moved is sent to the external device.
LogTop (off)
When the display memory is full and another line of data is entered, the top line in the display is purged to
make room for the new line. With top logging, each purged line is sent to the external device. Thus, while
the line is lost from display memory, it is maintained in hard copy form.
AutoKeyboard Lock (off)
When a terminal is connected to a packet switching network (using X.25 protocol) via a controller/multi-
plexer, it is necessary to ensure that the packet sent is received and acted upon before another is sent (from
the terminal). To achieve this, the keyboard must automatically lock, in such a way that it can only be
unlocked by the receiving host.
8-Bit Mode (on)
This enables 8-bit data input streams.

117TTerm for Linux User Guide : Chapter 14 - Emulations
Keyboard Settings
Use Uppercase Only (off)
This field specifies whether the terminal generates the full 128 character ASCII set or only the Teletype com-
patible codes.
Destructive Backspace (off)
With Destructive Backspace, pressing [BACKSPACE] moves the cursor back one character and clears the char-
acter. Normally, [BACKSPACE] moves the cursor back one character but the character is not cleared.
Return Acts as Enter (off)
This is the flag to make the [RETURN] key (on main keyboard) act like the [ENTER] key (number pad).
Convert TAB to Spaces (off)
When selected, the [TAB] virtual key produces the number of spaces required to reach the next tab stop to
the right. When not selected, the [TAB] key behaves as normal, (i.e., sends a tab character). Similarly, this flag
causes [BACK TAB] to send out the required number of backspace characters (^H) to reach the nearest tab
stop to the left.
Convert LF to CR/LF (on)
Converts a LF to a CR/LF.
Convert Keyboard Linefeed to CR/LF (off)
When selected a line feed control code is automatically appended to each carriage return control code generated
through the keyboard.
Numpad TAB Settings (Tab)
Configure the number pad [TAB] virtual key to behave as one of the following virtual keys:
> Ta b
> Return
> Enter

Function Key Settings
For Function Keys F1 to F8
Key Definition
This option allows the user to assign functions and labels of their choosing to the first eight function keys.
Key Definition Action (Normal)
The attribute is selected from the following options:
> Normal: The key definition string acts as data entered normally from the keyboard.
> Transmit: For transmission only. The key definition string is sent to the host. It is not echoed locally.
> Local: For local use only. The key definition string is sent only to the screen and not to the host.
Key Label 1st Line (“”)
Specify the first line of text to appear on the displayed key.
Key Label 2nd Line (“ “)
Specify the second line of text to appear on the displayed key.
Character Mapping
For information on how to create or alter custom languages or character sets, please refer to chapter 16.
Languages
Available languages for this terminal are as follows:
> Danish
> Dutch
> English
> English (UK)
> Finnish
> French
> French/Flemish
> French/Canadian
> German
> Italian
> Norwegian
> Spanish - European
> Spanish - Latin
> Swedish
> Swiss French/German.
Character Sets
Available sets for this terminal are as follows:
> Standard map
> Line drawing characters
> Display functions map
> ASCII
> Special graphics
> To host

119TTerm for Linux User Guide : Chapter 14 - Emulations
IBM 3101 and IBM 3151
Terminal Mode
Emulation Personality (IBM3151)
Available personalities are:
> IBM3101
> IBM3151
Display Mode
Display Size (24x80)
Available options are:
> 24x80
> 24x132
> 25x80
> 25x132
> Custom: uses the width and height as defined in the Custom Height and Custom Width settings.
Custom Height (24)
Enter the number of rows required. This option is only visible is Display Size is set to Custom.
Custom Width (80)
Enter the number of columns required. This option is only visible is Display Size is set to Custom.
Options
Operating mode (Echo)
> Char: Sends the character to the host and to the screen at the same time.
> Block: This option only updates the screen. The data from the screen is sent to the host only when request-
ed by pressing the [SEND] keys or on request from the host via a READ command.
> Echo: Sends the character only to the host. The host then echoes the character to the screen.
Terminal ID ()
This can be set to any string (of up to 20 characters in length) you choose and is used by the host to identify
the terminal.
Convert CR to CR/LF (off)
When selected, a linefeed is generated automatically when a carriage return is received. That is, both a car-
riage return and linefeed are sent to the screen. When not selected, only a carriage return is sent when one is
received.

Wrap End of Line (off)
When selected, if the current cursor position is on the last column of the screen, the cursor will be moved to
the first column of the next. When not selected, then the cursor will not move and incoming characters will
overwrite the last column on the screen.
Force Insert Line (on)
When selected, and there is no room to insert a NULL line, the rest of the screen will be scrolled down when
an insert line operation is requested. When not selected then the insert line request is ignored if there is no
room.
Force Insert Character (on)
When selected and there is no room to insert a character, then space is created for the character by moving the
rest of the line right. If Line Wrap is OFF or ON, then the last character is dropped from either the field or
the page. When not selected and there is no room to satisfy a request to insert a character then the request is
ignored.
Lock Keep MDT (on)
If selected then after performing the send function MDT bit @ SEND, the MDT bit is not reset, and the key-
board is locked. The only key enabled after this is the [RESET] key. If not selected, then the MDT bit is reset
to 0.
Send NULLs to Host (off)
When selected trailing NULLs are converted to blanks when sent to the host. When not selected, trailing NULLs
are not sent to the host.
Linefeed Character (LineFeed)
> LineFeed: When selected and a linefeed is entered or received, the cursor will move to the same column on
the next line.
> Carriage Return: When selected and a linefeed is entered or received, the cursor will move to the first col-
umn on the next line.
Enable Transparent Mode (on)
This option is set to on by default.
Line Turnaround Character (ASCII) (13)
This is used to set your line turnaround character. This character is sent to the host at the end of a data stream
when a [SEND] key is pressed. The default is ASCII character 13.
SEND Data Format (<Text><LTA>)
> <Text><LTA>: When selected and the [SEND] key is pressed, both text and the LTA (line turnaround)
character are sent to the host.
> <AID><LTA>: The identification character followed by the line terminator is sent to the host when a
[SEND] key is pressed.

121TTerm for Linux User Guide : Chapter 14 - Emulations
Character Set Mode
Available options:
> Normal
> DBCS
> UTF-8
Code Page ()
Use up and down options to set appropriate code page.
Advanced
Scroll Setting (Auto-scroll)
The scroll function relates to what happens when a linefeed is received and the cursor is on the last line of the
screen.
> Auto-scroll: When selected, the screen is scrolled up.
> Loop: When selected, the cursor is sent to the top of the screen.
Send Line (off)
This option is set to off by default.
Short Model Response (T)
Used to obtain the basic terminal characteristics.
XT Model Response (&(! B)
This command is used when additional information is required on the 3151. Refer to the IBM3151 Reference
manual for further details.
Pass Through
Aux Port (COM1)
This setting is used to nominate the port to which Auxiliary devices are attached. For example, “COM1”,
"COM2".
Pass-out Device (off)
The following options are available:
> None: No pass-through printer attached.
> Aux printer: Data is directed to the device attached to the AUX port specified above.
> System printer: Data is directed to the system printer.
Pass-out Local LineFeed Expansion (on)
When set, toggles linefeed (LF) to carriage return + linefeed (CR/LF).

Aux Input Device (None)
This is used to nominate the type of device attached as inbound passthrough data source.
> None No device attached.
> Dynjab DVR: The inbound data will be created using a Dynjab Document Verification Reader.
Keyboard
Tab key (Field)
Available options are:
> Field
> Column
Send key (Page)
Available options are:
> Page
> Line
Enter key (Return)
Available options are:
> Return
> Send
Return key (Field)
Available options are:
> Field
> Newline
Newline Key (Carriage Return)
Available options are
> Carriage Return
> Carriage Return/Line Feed
Insert Key (Toggles insert/replace mode)
Available options are:
> Insert SPACE
> Toggles insert/replace mode

123TTerm for Linux User Guide : Chapter 14 - Emulations
Character Sets
G0 Character Map (ASCII)
Select from the following options:
> ASCII
> Special graphics
> Auxiliary Page 1
> Auxiliary Page 2
G1 Character Map (Special Graphics)
Select from the following options:
> ASCII
> Special graphics
> Auxiliary Page 1
> Auxiliary Page 2
Character Mapping
For information on how to create or alter custom languages or character sets, please refer to chapter 16.
Languages
Available languages for this terminal are as follows:
> Multinational
Character Sets
Available sets for this terminal are as follows:
> ASCII control characters
> Delete character
> ASCII
> Special graphics
> Auxiliary Page 1
> Auxiliary Page 2
> To host

IBM 3164 Color
Display Size
Display Size (24x80)
Available options are:
> 24x80
> 24x132
> Custom: uses the width and height as defined in the Custom Columns and Custom Lines settings.
Custom Columns (80)
Enter the number of columns required. This option is only visible is Display Size is set to Custom.
Custom Lines (24)
Enter the number of lines required. This option is only visible is Display Size is set to Custom.
General
Wrap End of Line (on)
When selected and the current cursor position is on the last column of the screen, the cursor will be moved to
the first column of the next. If not selected, the cursor will not move and incoming characters will overwrite
the last column on the screen.
Convert CR to CR/LF (off)
When selected, a linefeed is generated automatically when a carriage return is received. That is, both a car-
riage return and linefeed are sent to the screen. When not selected, only a carriage return is sent when one is
received.
Send NULLs to Host (off)
When selected trailing NULLs are converted to blanks when sent to the host. When not selected, trailing NULLs
are not sent to the host.
Disable Set Field (off)
When selected, field attributes cannot be modified by the operator. When not selected, they can be modified.
Enable Transparent Mode (on)
This controls whether the operator can switch to transparent mode by entering a DLE sequence from the key-
board.
Enable Prog Colors (on)
When not selected the terminal can display only the default colors of an IBM3164 terminal which are green,
blue, red and white. When selected the emulation can also display black, yellow, magenta and turquoise.
Terminal ID ()
This can be set to a string (up to 20 characters in length) that the host can use to identify the IBM3164 terminal.

125TTerm for Linux User Guide : Chapter 14 - Emulations
Trace (Trace All)
Available options are:
> Off
> Trace send
> Trace receive
> Trace all
Lock Keep MDT (on)
If selected then after performing the send function MDT bit @ SEND, the MDT bit is not reset and the key-
board is locked. The only key enabled after this is the [RESET] key. If not selected, then the MDT bit is reset
to 0.
Keyboard
TAB (Field)
> Field: When selected the tab stop positions defined by the field attribute character are used, instead of the
column tab definitions.
> Column: When selected the column tab stop positions are used, instead of the field tab stop positions.
SEND (Page)
> Page: When selected and the [SEND] key is pressed, the contents of the current page will be sent to the host.
When selected and the [SEND LINE] key is pressed then contents of the current line are sent to the host.
> Line: When selected, the [SEND] key will send the contents of the current line and the [SEND LINE]
key will send the contents of the current page.
ENTER (Return)
This enables you to define the [ENTER] key as either a [SEND] or [RETURN] key.
RETURN (Field)
Available options are:
> Field
> New line
NEWLINE (CR)
> CR: Pressing the [RETURN] key will send only a carriage return when this is set to CR.
> CR/LF: When set to CR/LF it will also send a linefeed.
PRINT (Page)
This controls whether the contents of the page, screen or viewport are sent to the printer when the [PRINT]
key is pressed.
INSERT (Toggle)
> Toggle: When selected, pressing the [INSERT] key will cause the terminal to go into Insert mode.
> Ins SP: When selected, pressing the [INSERT] key will insert a space character after the current cursor
position.

Advanced
Scroll Mode (Loop)
The scroll function relates to what happens if a linefeed is received when the cursor is on the last line of the
screen.
> Off: When selected, the display does not scroll.
> Scroll: When selected, the screen is scrolled up.
> Loop: When selected, the cursor is sent to the top of the screen.
Operating Mode (Echo)
This determines what happens when a key is pressed.
> Character: Sends the character to the host and to the screen at the same time.
> Block: This option only updates the screen. The data from the screen is sent to the host only when request-
ed by pressing the [SEND] key or on request from the host via a READ command.
> Echo: Sends the character only to the host. The host then echoes the character to the screen.
Line End (CR/LF)
> CR: When selected, pressing the [RETURN] key will send only a carriage return.
> CR/LF: When selected, pressing the [RETURN] key will send a linefeed and a carriage return.
Send Data Format (Send Text + <LTA>)
> Send Text + <LTA>: When selected and the [SEND] key is pressed, both text and the LTA (line turn-
around) character are sent to the host
> Send Identification Character + <LTA>: Otherwise, it sends only the identification character followed
by the line terminator.
LTA (turnaround) Char (CR)
This setting sets the line turnaround character. This character is sent to the host at the end of a data stream
when a [SEND] key is pressed. Options are:
> CR
> EOT
> ETX
> DC3
Controls
Print NULL (on)
When selected, trailing NULLs are converted into blanks and sent to the printer when a print is requested.
When not selected, trailing NULLs are not sent to the printer.
Print EOL (on)
When selected the defined line end character is sent to the printer at the end of each printed line. (See also
Line end.)
Default FA (on)
Default field attribute enable.

127TTerm for Linux User Guide : Chapter 14 - Emulations
ASCII LF Ctrl (off)
If this is selected, receiving a linefeed from either the host or the keyboard will also generate a carriage
return. That is, the cursor will move to the first column of the next line. When not selected, the cursor will
just move down one line.
Number of Time Fill Chars (0)
May be set to 0, 1, 2 or 3. This enables you to set the number of time fill characters (DELs) at the end of
each line that are sent to the printer.
Character Mapping
For information on how to create or alter custom languages or character sets, please refer to chapter 16.
Character Sets
Available sets for this terminal are as follows:
> ASCII control characters
> Delete character
> ASCII
> Special graphics
> Alternate characters
> To host

IBM 3270
For Express Logon Feature (ELF) configuration for TN3270e sessions refer to Telnet
SSL options in Chapter 12 - Communications.
Models
Model (IBM 3279-2 24x80)
The following Fujitsu and IBM terminals are supported
> IBM 3278-2 24 x 80 display
> IBM 3278-3 32 x 80 display
> IBM 3278-4 43 x 80 display
> IBM 3278-5 27 x 132 display
> IBM 3279-2 24 x 80 display
> IBM 3279-3 32 x 80 display
> IBM 3279-4 43 x 80 display
> IBM 3279-5 27 x 132 display
> IBM DYNAMIC 62 x 160 display
> Fujitsu 6681-2 24 x 80 display
> Fujitsu 6681-3 32 x 80 display
> Fujitsu 6681-4 43 x 80 display
> Fujitsu 6681-5 27 x 132 display
> Fujitsu 6681-6 27 x 136 display
IBM 3270 DYNAMIC Custom Screen Size
These configuration items are only visible when the model is set to IBM DYNAMIC.
Primary Screen Rows (24)
Set to 24 by default. Use the up and down controls to adjust to required number of rows.
Primary screen columns (80)
Set to 80 by default. Use the up and down controls to adjust to required number of columns.
Alternate screen rows (62)
Set to 62 by default. Use the up and down controls to adjust to required number of alternate rows.
Alternate screen columns (160)
Set to 160 by default. Use the up and down controls to adjust to required number of columns.
IBM 3270 Extended Attributes
Extended Attributes (off)
Select to enable additional terminal characteristics.

129TTerm for Linux User Guide : Chapter 14 - Emulations
Colors
IBM3270 Default Colors
Available color selections are Black, Blue, Red, Pink, Green, Turquoise, Yellow, Deep Blue, Orange, Purple,
Pale Green, Pale Turquoise, Gray, and White.
Alpha (Green)
Protected Alpha (Blue)
Numeric (Green)
Protected Numeric (Blue)
Highlight Alpha (Red)
Highlight Protected Alpha (White)
Highlight Numeric (Red)
Highlight Protected Numeric (White)
Status Bar Colors
Available color selections are Black, Blue, Green, Cyan, Red, Magenta, Brown, Light Grey, Grey, Light Blue,
Light Green, Light Cyan, Light Red, Light Magenta, Yellow and White.
Foreground Color (Black)
Background Color (Cyan)
Clipboard Paste Options
Enable Advanced Pasting (off)
After Paste Reset Cursor (on)
When enable the cursor remains at current location after paste.
Clear to end of Field after Paste (off)
Clears text from the last pasted character to the end of field.
Wrap Tet to Next Field (off)
Text that runs past the end of a field starts filling in the next field.
Wrap to Field Below (off)
Text that runs past the end of a field, moves to the next line.
Align Text to Input Fields (off)
A New-Line in pasted text will go to the next field instead of the next line.
Use Field Delimiters (off)
When a New-Line character lands in a protected position, it tabs to the next field.

Replace Tabs (off)
Replaces tab characters in the paste text with the text from the Replace Tabs With setting.
Replace Tabs With ()
Character to use instead of Tab. This option is only visible when Replace Tabs is set to On.
Replace Cut Text With Nulls (off)
Replace cut text with NULL characters.
Advanced
Status Line Display (Plain)
There are three possible status lines settings:
> Plain
> Average response
> Last response
Enable ‘dot’ Facility (off)
This option places a dot in input fields for every character.
Enable TypeAhead (off)
While the keyboard is locked, keystrokes are stored and released when the keyboard is unlocked.
TypeAhead Size (100)
The number of keystrokes permitted whilst keyboard is locked before the buffer fills and locked state is
resumed. This option is only visible when Enable TypeAhead is set to On.
Map Backslash to Yen (for Japanese) (off)
The backslash key is mapped to the Yen character for usage on Japanese host systems.
Character Encoding
Code Page (37(US))
Select from a list of supported Code Pages:
> 37(US)
> 37-2(US)
> 273(Austria/Germany)
> 277(Denmark/Norway)
> 278(Finland/Sweden)
> 280(Italy)
> 284(Spain)
> 285(UK)
> 297(France)
> 420(Arabic Bilingual)
> 423(Greek)
> 424(Hebrew)
> 500(International)

131TTerm for Linux User Guide : Chapter 14 - Emulations
> 833(Korean Extended)
> 870(Latin 2/Poland/Romania/Slovakia/Slovenia)
> 871(Iceland)
> 875(Greece)
> 880(Cyrillic Russian)
> 924(Multinational ISO Euro)
> 930(Japanese)
> 930(Japanese - Extended Katakana)
> 939(Japanese - Extended English)
> 1025(Cyrillic Belarus/Bulgaria/FYR Macedonia/Russia/Serbia-Montenegro)
> 1026(Latin 5 Turkey)
> 1047(US Open Systems)
> 1140(Euro Belgium/Brazil/Canada-Bilingual/Netherlands/Portugal/US)
> 1141(Euro Austria/Germany)
> 1142(Euro Denmark/Norway)
> 1143(Euro Finland/Sweden)
> 1144(Euro Italy)
> 1145(Euro Spain)
> 1146(Euro UK)
> 1147(Euro France)
> 1148(Euro International)
> 1149(Euro Iceland)
> 1155(Euro Latvia Latin 5/Lithuania/Turkey)
> 2975(Czech)
> 2978(Poland)
> 2979(Russian)
Enable DBCS (off)
Select to enable DBCS support (Double Byte Character Set).
DBCS/SBCS Input Mode Follows Screen Data (on)
By default TTerm for Linux will automatically toggle DBCS/SBCS mode depending on the type of field
that cursor is currently positioned in. This option allows automatic DBCS/SBCS mode toggle to be dis-
abled. This option is only visible when Enable DBCS is set to On.
Word Wrap Enabled (off)
Determines whether this capability is permitted. Word wrapping is available in DBCS mode only. This
option is only visible when Enable DBCS is set to On.
Word Wrap (on)
When set to on this enables word wrapping in multiline fields. When it is disabled, words spanning two
lines are moved to the start of a new line in a multiple line field. For this setting to be honored Word Wrap
Enabled must be set to On. This option is only visible when Enable DBCS is set to On.

Miscellaneous
Use Alternate Addressing (off)
This option is set to off by default.
Enable Screen Size Switching (off)
Controls whether screen size changing is permitted.
Reset Clears the Terminal Screen (off)
If selected the screen will be cleared and the cursor is placed in the home position.
Clear Padding (off)
This setting determines whether a clear is performed using a clearpad character.
Clear Padding (0)
The character used for padding. This option is only visible if Clear Padding is set to On.
Insert Mode is Persistent (on)
This option maintains the current insert mode when moving between fields. When this is setting is dis-
abled, the insert is turned off on entering a new field.
Enable Destructive Backspace (off)
With Destructive Backspace, pressing [BACKSPACE] moves the cursor back one character and clears the
character. Normally, [BACKSPACE] moves the cursor back one character but the character is not cleared.
Honor Numeric Field Type (off)
When set to off TTerm for Linux will allow any input in a field designated as numeric by the host.
Printer
These settings link a 3270 host session to an associated IBM 3287 printer session. For more information refer
to the "IBM 3287 (IBM Printer)" section of this chapter.
Use Associated Printer (off)
Set to On to use an IBM 3287 printer emulation in conjunction with your 3270 host session.
Printer Profile ()
Select a TTerm for Linux profile specifying the associated 3287 session. This list will be populated with
TTerm Connect profiles which have be configured to use an IBM 3287 printer emulation. If none have
been created, the list will be empty. This option is only visible if Use Associated Printer is set to On.

133TTerm for Linux User Guide : Chapter 14 - Emulations
Character Mapping
For information on how to create or alter custom languages or character sets, please refer to chapter 16.
Languages
Available languages for this terminal are as follows:
> English (US)
> English (UK)
> Austrian/German
> Belgian
> Canadian (French)
> Danish/Norwegian
> Finnish/Swedish
> French
> Greek
> International
> Italian
> Japanese (English)
> Spanish
> Spanish Speaking
Character Sets
Available sets for this terminal are as follows:
> Standard character set
> Graphics character set
> ASCII to EBCDIC
> EBCDIC to ASCII
> To host

IBM 3287 (IBM Printer)
The IBM 3287 is a 3270-data-stream color printer, designed to be used in conjunction with the TTerm for
Linux IBM 3270 emulation.
IBM Printer Configuration
Paper Size (Use Printer Default)
Selecting from a list of available document sizes.
Margin Units (Inches)
Set the paper margin unit of measurement. Options are:
> Inches
> Centimeters
Orientation (Use Printer Default)
Printer orientation options are:
> Use Printer Default: Uses the orientation as configured for the printer by default.
> Portrait: Overrides the printer default orientation to portrait.
> Landscape: Overrides the printer default orientation to landscape.
Document Settings
Font Size (10)
Set a font size for printer output in points. The standard TTerm for Linux terminal font will be used.
Characters Per Line (0)
Set the number of characters per line. A maximum value is suggested based on the font size selected in
Font Size.
Lines Per Page (0)
Set the number of lines per printed page. A maximum value is suggested based on the font size selected in
Font Size.
Left margin (25)
The page left margin in millimeters.
Top Margin ()
Valid settings are from 0.10cm/0.039" to 20cm/7.874"
Bottom Margin ()
Valid settings are from 0.10cm/0.039" to 20cm/7.874"
Left Margin ()
Valid settings are from 0.10cm/0.039" to 20cm/7.874"

135TTerm for Linux User Guide : Chapter 14 - Emulations
Right Margin ()
Valid settings are from 0.10cm/0.039" to 20cm/7.874"
Character Encoding
Code Page (37(US))
Select from a list of supported Code Pages:
> 37(US)
> 273(Austria/Germany)
> 277(Denmark/Norway)
> 278(Finland/Sweden)
> 280(Italy)
> 284(Spain)
> 285(UK)
> 297(France)
> 420(Arabic Bilingual)
> 423(Greek)
> 424(Hebrew)
> 500(International)
> 833(Korean Extended)
> 870(Latin 2/Poland/Romania/Slovakia/Slovenia)
> 871(Iceland)
> 875(Greece)
> 880(Cyrillic Russian)
> 924(Multinational ISO Euro)
> 930(Japanese)
> 930(Japanese - Extended Katakana)
> 939(Japanese - Extended English)
> 1025(Cyrillic Belarus/Bulgaria/FYR Macedonia/Russia/Serbia-Montenegro)
> 1026(Latin 5 Turkey)
> 1047(US Open Systems)
> 1140(Euro Belgium/Brazil/Canada-Bilingual/Netherlands/Portugal/US)
> 1141(Euro Austria/Germany)
> 1142(Euro Denmark/Norway)
> 1143(Euro Finland/Sweden)
> 1144(Euro Italy)
> 1145(Euro Spain)
> 1146(Euro UK)
> 1147(Euro France)
> 1148(Euro International)
> 1149(Euro Iceland)
> 1155(Euro Latvia Latin 5/Lithuania/Turkey)
DBCS Enabled (off)
For use with Double Byte Character System sessions.

Advanced Settings
Time Out (10 Seconds)
Period in seconds, after which the print buffer if flushed if a print job has started and there is no activity
from the host.
All Caps (off)
When selected all printer output is converted to upper case.
Space Lines (off)
When set to on, lines are spaced proportionally to fill the available page space.
Space Characters (off)
When set to on, characters are equally spaced to fill the entire line space.
Continue Lines (off)
When set to on, long lines that extend beyond the right page boundary are wrapped. When set to off they are
truncated.
Continue Pages (on)
When set to on, long pages that extend beyond the page edge boundary are continued on the following page.
When set to off they are truncated.
Inhibit Separator Page (on)
Disable separator printing between consecutive print jobs.
SCS Host Formatting Options
Host Formatting (Apply Format)
Handling options for SNA Character String (SCS) host formatting. Valid options are:
> Ignore format: Ignore host formatting
> Apply format: Apply host formatting
> Apply and save format: Apply and save host formatting
PDT Printing
A PDT, or Printer Definition Table, is a file that is used to translate the IBM 3270 host data stream into
a format suitable for outputting to a Linux printer, bypassing the standard print driver. Each Printer
Definition Table is created from the PDF, or Printer Definition File, specified in the setting below.
Use PDT (off)
Enable Printer Definition Tables. PDTs are disabled by default.
PDF to use ()
Specify the Printer Definition File specific to the output printer. This option is only visible if Use PDT
is set to on.
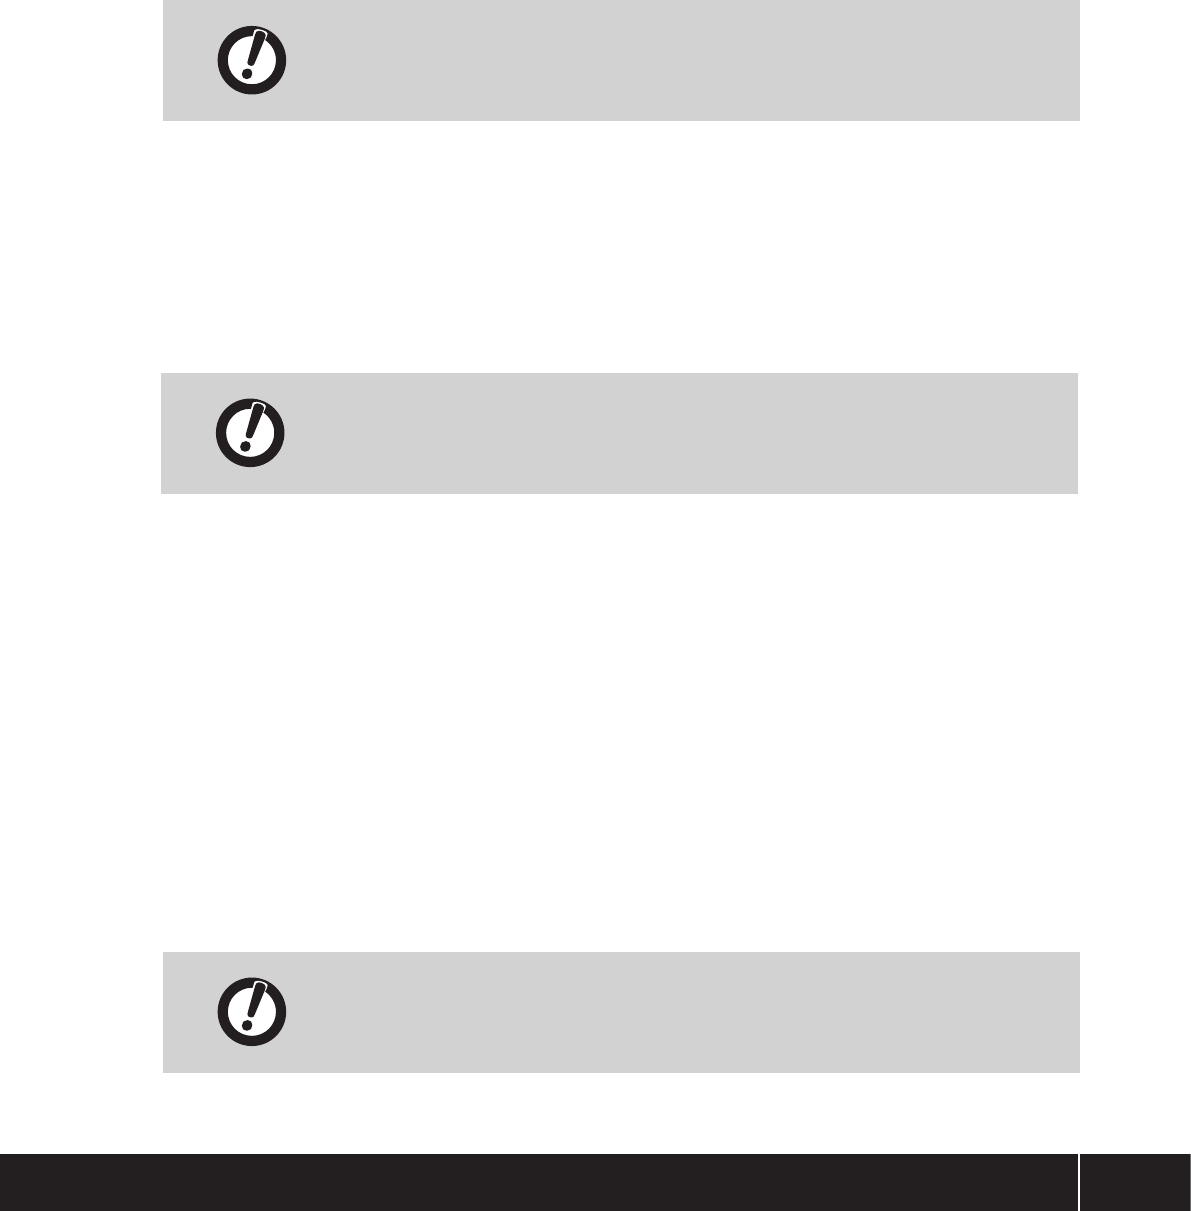
137TTerm for Linux User Guide : Chapter 14 - Emulations
Initiating a 3287 Session
An IBM 3287 printing session works in conjunction with IBM 3270 host session. To make use of the printer
emulation TTerm for Linux requires a 3270 and a 3287 session to be simultaneously open. To configure TTerm
for Linux to automatically initiate the 3287 session when you connect to a host via 3270, follow these steps:
1 Open a new session by selecting Create New Profile from the Profiles Directory tab.
2 Selecting the IBM 3287 emulation module under the Emulation section.
3 Configure the communications by selecting the Telnet option under the Communications section. For
more information on configuring communications protocol settings refer to Chapter 13 - Communications.
Ensure that the Telnet module is configured to use TN3270e (this is the default
and must remain selected.) TN3270e is required for printer communications.
4 In the Telnet settings listing enter a name under Connection > Associate.
5 Click Save to save the profile.
6 Create a second profile by selecting Create New Profile from the Profiles Directory tab. Configure it to
use Telnet and an IBM 3270 emulation.
Again, ensure that the Telnet module on your 3270 session is configured to use
TN3270e (this is the default and must remain selected.) TN3270e is required for
printer communications.
7 In the 3270 emulation settings, check the box next to Printer > Use Associated Printer.
8 Under Printer Session, set the Printer to the profile created in step 5.
0 Click Save to save the profile.
Now, when connecting to a host system using this 3270 session a second, associated 3287 session will be
opened automatically using the settings specified in your saved configuration.
An alternate option is to specify an LU under the Telnet settings on your 3287 session. Connect this 3287 ses-
sion to your host first and open a subsequent 3270 host session. Specify the LU of your 3287 printer where
required by your host applications when initiating printing. The LU field can accept several special macros,
refer to page 83 for further details.
The LU name and Associate options are mutually exclusive.

IBM 5250
Model (IBM 3477-FC)
Support for the IBM5250 terminal modes is extensive. Currently supported modes are:
> IBM 3179-2
> IBM 3179-220
> IBM 3180-2
> IBM 3196-A1
> IBM 3477-FG
> IBM 3477-FC
> IBM 5251-1
> IBM 5251-11
> IBM 5252
> IBM 5291-1
> IBM 5292-2
> IBM 5555-C01 (DBCS)
> IBM 5555-B01 (DBCS)
> IBM Printer. See also IBM 5250 Printer Configuration, in this chapter.
Printer Settings
Options
Enable TypeAhead (off)
While the keyboard is locked, keystrokes are stored and released when the keyboard is unlocked.
TypeAhead Size (100)
The number of keystrokes permitted whilst keyboard is locked before the buffer fills and locked state is
resumed. This option is only visible when Enable TypeAhead is set to On.
Dot Attribute (Dots)
Dot Attribute display settings. Available display options are:
> Dots
> Underlines
> Spaces
Insert Cursor Skip to Unprotected (off)
This option is set to off by default.

139TTerm for Linux User Guide : Chapter 14 - Emulations
Code Page
Code Page (37(US))
Select from a list of supported Code Pages. If selecting a DBCS codepage such as '930(Japanese - Extended
Katakana)', '930(Japanese)' or '939(Japanese - Extended English)', please ensure that the Model option is set
to a DBCS capable terminal.
> 37(US)
> 37-2(US)
> 273(Austria/Germany)
> 277(Denmark/Norway)
> 278(Finland/Sweden)
> 280(Italy)
> 284(Spain)
> 285(UK)
> 297(France)
> 420(Arabic Bilingual)
> 423(Greek)
> 424(Hebrew)
> 500(International)
> 833(Korean Extended)
> 870(Latin 2/Poland/Romania/Slovakia/Slovenia)
> 871(Iceland)
> 875(Greece)
> 880(Cyrillic Russian)
> 924(Multinational ISO Euro)
> 930(Japanese)
> 930(Japanese - Extended Katakana)
> 939(Japanese - Extended English)
> 1025(Cyrillic Belarus/Bulgaria/FYR Macedonia/Russia/Serbia-Montenegro)
> 1026(Latin 5 Turkey)
> 1047(US Open Systems)
> 1140(Euro Belgium/Brazil/Canada-Bilingual/Netherlands/Portugal/US)
> 1141(Euro Austria/Germany)
> 1142(Euro Denmark/Norway)
> 1143(Euro Finland/Sweden)
> 1144(Euro Italy)
> 1145(Euro Spain)
> 1146(Euro UK)
> 1147(Euro France)
> 1148(Euro International)
> 1149(Euro Iceland)
> 1155(Euro Latvia Latin 5/Lithuania/Turkey)
> 2975(Czech)
> 2978(Poland)
> 2979(Russian)
> 037(Chinese Traditional)
> 836(Chinese Simplified)

Status Bar Options
Foreground Color (Black)
Select the desired status bar foreground color from drop down list.
Background Color (Cyan)
Select the desired status bar background color from drop down list.
TTWin Status Line (off)
Utilize old style Status Line Display from Turbosoft's TTWin for Windows terminal emulator.
Advanced
Map ENTER to FIELD+ENTER (on)
By default this item is set to on.
Map Backslash to Yen (for Japanese) (on)
The backslash key is mapped to the yen character for usage on Japanese host systems.
Max. Packet Size Buffer (kb) (6)
This option is set to '6' by default. Use up and down keys to adjust accordingly.
Honor Numeric Field Type (on)
When set to off TTerm for Linux will allow any input in a field designated as numeric by the host. x
Enable 5250 Extensions (on)
This option is set to on by default.
Allow the Host to Control the Cursor Blink state (off)
This option is set to off by default.
Disable Keyboard Lock on Host Error (off)
With this option enabled host error messages are displayed but do not require an acknowledgement before
the host will accepting further user input. This option is set to off by default.

141TTerm for Linux User Guide : Chapter 14 - Emulations
Character Mapping
For information on how to create or alter custom languages or character sets, please refer to chapter 16.
Languages
Available languages for this terminal are as follows:
> Austria/Germany
> Belgium
> Canadian French
> Denmark/Norway
> Finland/Sweden
> France
> Italy
> Portugal
> Spain
> United Kingdom
> U.S./Canada/Netherlands
Character Sets
Available sets for this terminal are as follows:
> Standard character set
> ASCII to EBCDIC
> EBCDIC to ASCII
> To host

IBM 5250 Printer
The IBM 5250 Printer emulation is available by selecting IBM Printer from the list of models available under
the IBM 5250 Emulation configuration. For more information refer to the "IBM 5250" item in this chapter.
Terminal Display
Function Keys
When initiated the IBM 5250 terminal display shows printer status messages such as the number of total pages
and jobs spooled. The printer can be further configured through function key options F1 through F5.
Hold (F1)
Pauses the current print job. This option is only valid when printing is active.
FF (F2)
Form feed. When in a Hold condition the page will be advanced until the first print line of the next page is
reached.
Cancel (F3)
When in a Hold condition pressing F3 sends a Cancel Print message to the host and the print buffer is
cleared, halting the current print job.
Flush (F4)
Flush the contents of the host print buffer. The contents of the buffer are sent to the printer rather than
discarded, as occurs when pressing Cancel (F3).
Config (F5)
Opens the IBM 5250 Printer tile with extended configuration options.
Printer Settings
Paper Size (Use Printer Default)
Selecting from a list of available document sizes.
Dimensions
Margin Units (Inches)
Set the paper margin unit of measurement. Options are:
> Inches
> Centimeters
Orientation (Use Printer Default)
Printer orientation options are:
> Use Printer Default: Uses the orientation as configured for the printer by default.
> Portrait: Overrides the printer default orientation to portrait.
> Landscape: Overrides the printer default orientation to landscape.

143TTerm for Linux User Guide : Chapter 14 - Emulations
Landscape Settings
Font Size (10)
Set a font size for printer output in points. The standard TTerm for Linux terminal font will be used.
Characters Per Line (0)
Set the number of characters per line. A maximum value is suggested based on the font size selected in
Font Size.
Lines Per Page (0)
Set the number of lines per printed page. A maximum value is suggested based on the font size selected in
Font Size.
Top Margin ()
Valid settings are from 0.10cm/0.039" to 20cm/7.874"
Bottom Margin ()
Valid settings are from 0.10cm/0.039" to 20cm/7.874"
Left Margin ()
Valid settings are from 0.10cm/0.039" to 20cm/7.874"
Right Margin ()
Valid settings are from 0.10cm/0.039" to 20cm/7.874"
Portrait Settings
Font Size (10)
Set a font size for printer output in points. The standard TTerm for Linux terminal font will be used.
Characters Per Line (0)
Set the number of characters per line. A maximum value is suggested based on the font size selected in
Font Size.
Lines Per Page (0)
Set the number of lines per printed page. A maximum value is suggested based on the font size selected in
Font Size.
Top Margin ()
Valid settings are from 0.10cm/0.039" to 20cm/7.874"
Bottom Margin ()
Valid settings are from 0.10cm/0.039" to 20cm/7.874"
Left Margin ()
Valid settings are from 0.10cm/0.039" to 20cm/7.874"
Right Margin ()
Valid settings are from 0.10cm/0.039" to 20cm/7.874"

Advanced Settings
Time Out (0)
Period in seconds, after which the print buffer is flushed if a print job has started and there is no activity
from the host.
All Caps (off)
When selected all printer output is converted to upper case.
Space Lines(off)
When set to on, lines are spaced proportionally to fill the available page space.
Space Characters (off)
When set to on, characters are equally spaced to fill the entire line space.
Continue Lines (off)
When set to on, long lines that extend beyond the right page boundary are wrapped. When set to off they
are truncated.
Continue Pages (off)
When set to on, long pages that extend beyond the page edge boundary are continued on the following
page. When set to off they are truncated.
Inhibit Separator Page(on)
Disable separator printing between consecutive print jobs.
SCS Host Formatting Options
Host Formatting (Apply Format)
Handling options for SNA Character String (SCS) host formatting. Valid options are:
> Ignore format: Ignore host formatting
> Apply format: Apply host formatting
> Apply and save format: Apply and save host formatting
PDT Printing
A PDT, or Printer Definition Table, is a file that is used to translate the IBM 3270 host datastream into a for-
mat suitable for outputting to a Windows printer, bypassing the Windows print driver. Each Printer Definition
Table is created from the PDF, or Printer Definition File, specified in the setting below.
Use PDT (off)
Enable Printer Definition Tables. PDTs are disabled by default.
PDF to use ()
Specify the Printer Definition File specific to the output printer. This option is only visible if Use PDT is
set to on.

145TTerm for Linux User Guide : Chapter 14 - Emulations
Initiating an IBM 5250 Printer Session
An IBM 5250 printing session works in conjunction with IBM 5250 host session. To make use of the printer
emulation TTerm for Linux requires a 5250 host session and a 5250 printer session to be open simultaneously.
When configuring the printer profile, select the Communications section and specify a LU (Logical Unit)
under the Telnet settings. Connect this printer session to your host first and open a subsequent 5250 host ses-
sion. Specify the LU of your 5250 printer where required by your host applications when initiating printing.

ICL 7561
Options
7-bit Mode (on)
All data is restricted to 7 bits.
Use Session Single Character Strings (off)
Single Character start String (\x1b)
This option is only visible when Use Session Single Character Strings is set to On.
Single Character End String (\x0d)
This option is only visible when Use Session Single Character Strings is set to On.
Use Session Send Strings (off)
Send Start String ()
This option is only visible when Use Session Send Strings is set to On.
Send end string (\r)
This option is only visible when Use Session Send Strings is set to On.
Lock Keyboard (on)
TypeAhead Buffer Size (0)
The number of keystrokes permitted whilst keyboard is locked before the buffer fills and locked state is
resumed.
Field Marker Type ([])
Valid field markers are [ ], < >, > <, ( ), none or default.
SOM Marker Type (box)
Valid Start Of Message (SOM) markers are:
> box
> vertline
Allow Consecutive Protected Fields (off)
Character Mapping
For information on how to create or alter custom languages or character sets, please refer to chapter 16.
Character Sets
Available sets for this terminal are as follows:
> Default ICL Character Set
> To host

147TTerm for Linux User Guide : Chapter 14 - Emulations
ICL VT220 Plus
Display Mode
Display Size (24x80)
Select from the following options
> 24x80
> 24x132
> 25x80
> 25x132
> Custom: uses the width and height as defined in the Custom Rows and Custom Columns options.
Custom Rows (24)
Enter the number of rows required. This option is only visible is Display Size is set to Custom.
Custom Columns (80)
Enter the number of columns required. This option is only visible is Display Size is set to Custom.
Display Options
Status Line Display (None (hide the status line))
> None (hide the status line): The status line is not displayed.
> Indicator: The status display is always visible.
> Host writable: Host applications can write messages in place of the status line.
Enable Local Echo (off)
When selected, as a character is typed on the keyboard it is immediately echoed to your screen. When not
selected, the entered character is sent to the remote host which in turn echoes it back. On its return the char-
acter is displayed on your screen. In this way, passwords and other sensitive information do not appear on your
screen.
Insert Mode (off)
This option determines how characters are added to the screen. When selected, the character is inserted at the
cursor, moving previously displayed characters to the right. When not selected, new display characters replace
old display characters at the current cursor position.
Warp End of Line (off)
When selected and the cursor is in the last column, incoming text is written to the beginning of the next line.
When not selected, incoming characters will overwrite the last column until an EOL (end-of-line) character is
received.
Enable Cleared Character Retains Current Attribute (off)
Clear the screen using the current attribute.

Clear on Display Size Change (on)
When selected the screen is cleared once the screen size changes.
Responses
Answerback Message ()
The string specified here is used as the answerback message which is sent from the terminal to the host when
the host sends the ENQ character.
Operating Mode (VT300)
Select to change between the following modes:
> VT52
> VT100
> VT300
7 or 8 bit Mode (7 Bit)
Select either 7 or 8 bit modes as required.
Terminal ID (VT220)
Select from the following:
> VT100
> VT101
> VT102
> VT220
> VT240
> VT320
> VT340
> VT420
Use Custom DA String (off)
Select to enable the Custom DA string function.
Custom DA String (?64;1;2;6;7;8;9)
Enter your custom DA string. This option is only visible when Use Custom DA String is set to On.

149TTerm for Linux User Guide : Chapter 14 - Emulations
Keyboard Configuration
Keypad Mode (Numeric)
The numeric keypad generates either numeric characters or control functions. Selecting Application or
Numeric keypad mode, determines the type of characters. The terminal emulation when first selected, or after
a reset, will be set to numeric keypad mode.
> Application: selects application keypad mode. The keypad generates application control functions.
> Numeric: selects numeric keypad mode. The keypad generates characters that match the numeric, period,
plus, minus, star and forward-slash keys on the main keypad.
Cursor Keys (Normal)
The characters generated by the cursor keys depend on the state of the Cursor Keys mode.
> Normal: causes the cursor keys to generate ANSI cursor control sequences.
> Application: causes the cursor keys to generate application control functions.
Convert LF to CR/LF (off)
When selected, causes a received [RETURN] to transmit as both a CR and a LF. When not selected and a
[RETURN] is received only a CR is transmitted.
Lock Keyboard (off)
When the keyboard is locked, no codes can be transmitted from the keyboard to the Host. You can unlock the
keyboard either by deselecting this option or resetting the terminal.
Macros Ignore Keyboard Lock State (on)
This option is set to off by default.
Lock User Defined Keys (off)
The lock parameter determines whether the downloaded key definitions are locked or not, after you load them.
Once the keys are locked, to unlock you must either deselect the User defined keys locked option or a reset
is required.
Disable Numeric Keypad (on)
This option is set to on by default.
Reset Clears the Terminal Screen (on)
If selected the screen will be cleared and the cursor is placed in the home position.
Tilda and Left Quote Key (Sends tilda/left quote)
This option allows the user to define the TILDA/LEFT QUOTE key (i.e., [~/‘] key) to operate either as nor-
mal or as an escape key.

Advanced
Character Set Mode (Normal)
Select between the following character set modes:
> Normal
> DBCS
> UTF-8
CodePage (950)
Sets the code page to be used when DBCS is enabled. This option is only visible when Character Set Mode
is set to DBCS.
User Preferred Character Set (ISO Latin)
Two 8-bit character sets are built into the ICL VT220. These are:
> DEC Supplemental: DEC Multinational set
> ISO Latin
Both 8-bit sets include the standard ASCII character set and a supplemental set.
Favor Diacritics (on)
When enabled uses European characters rather than line draw characters.
Print Extent (Print Region)
Select from the following options:
> Print region: Sends just the selected region to the printer.
> Print screen: Sends the entire screen contents to the printer.
Print Form Feed (off)
Send a form feed character at the end of the print job.
Character mapping
For information on how to create or alter custom languages or character sets, please refer to chapter 16.
Character Sets
Available sets for this terminal are as follows:
> Hosts National
> ASCII
> ASCII (8bit)
> DEC Special Graphics
> DEC Supplemental
> ISO Latin Supplemental
> DEC Technical
> ICL special graphics
> To host

151TTerm for Linux User Guide : Chapter 14 - Emulations
Liberty Freedom One
Display Settings
Display Size (24x80)
Select from the following options:
> 24x80
> 24x132
Truncate Lines (off)
Any characters extending past the end of line are truncated.
General Settings
Block mode (off)
When selected, no communication takes place to the host computer until the [ENTER] or [SEND] key is
pressed. It does, however, respond to commands and characters received from the host.
Duplex Mode (Full)
> Full: duplex every typed character is transmitted to the host. The host must then decide what to do in
response to the character it has received. In most cases, it will simply echo the character back to the screen
(or take some action, if it is a control character such as a carriage return).
> Half: duplex mode, character strings are displayed on the screen without waiting for the host to echo them
back. The emulation also responds to characters sent from the host, displaying or executing them, as appro-
priate.
Insert Mode (off)
When selected, Insert Mode causes text to be inserted without overwriting existing data. As new text is entered,
existing text is shifted right to the next character position.
Scroll Setting (Scroll)
Available scroll modes are:
> Stop
> Loop
> Wrap
> Scroll
Editing Settings
Local Editing Only (do not send to host) (off)
When selected, limits editing functions to the display and does not communicate them to the host system.
Allow Editing on Entire Screen (off)
When selected, allows editing functions to operate on the entire scrolling page. When not selected, limits
the effects of editing functions to the current line.

Insert Character (32)
Several editing, erase, clear and scrolling functions use an insert character to clear the screen, the default
insert character is ASCII 32.
Character Mapping
For information on how to create or alter custom languages or character sets, please refer to chapter 16.
Character Sets
Available sets for this terminal are as follows:
> ASCII
> Graphics character set
> To host

153TTerm for Linux User Guide : Chapter 14 - Emulations
Linux Terminal
Display Mode
Display Size (24x80)
Select from the following options
> 24x80
> 24x132
> 36x80
> 36x132
> 48x80
> 48x132
> Custom: uses the width and height as defined in the Custom Rows and Custom Columns options.
Custom Rows (24)
Enter the number of rows required. This option is only visible is Display Size is set to Custom.
Custom Columns (80)
Enter the number of columns required. This option is only visible is Display Size is set to Custom.
Options
Wrap End of line (off)
When selected and the cursor is in the last column, incoming text is written to the beginning of the next line.
When not selected, incoming characters will overwrite the last column until an EOL (end-of-line) character is
received.
Character Mapping
For information on how to create or alter custom languages or character sets, please refer to chapter 16.
Character Sets
Available sets for this terminal are as follows:
> HostsNational
> ASCII
> ASCII (8 bit)
> DEC Special Graphics
> DEC Supplemental
> To host

McDonnell Douglas P12
Personality
Emulation Personality (MCDP)
Select the emulation mode:
> MCDP
> ANSI
> MF40
Display Mode
Display Size (80x24)
Select from the following:
> 24x80
> 24x132
Switching from 132 to 80 will truncate text in columns 81 to 132.
Options
Enable Function Keys (on)
When selected, this causes the standard code sequences to be generated by all function keys.
Enable Programmable Function Keys (on)
It is possible to define a different string for each of the function keys when they are used with or without
the [SHIFT] key. When selected, this causes the function keys to generate the programmed string. When
not selected, this causes the standard code sequences to be generated by all function keys. The strings are not
cleared.
Clear All Function Keys (off)
When selected, this clears the strings defined for all the programmed function keys.
Blank Character (NUL)
Select the NUL or SPACE character to represent blanks.
Soft-reset Clear Screen (on)
This option is set to on by default.

155TTerm for Linux User Guide : Chapter 14 - Emulations
Character Mapping
For information on how to create or alter custom languages or character sets, please refer to chapter 16.
Languages
Available languages for this terminal are as follows:
> English
Character Sets
Available sets for this terminal are as follows:
> US - ASCII character set
> MDC British character set
> British ASCII character set
> MDC National Extension set
> MDC Multinational Extension set
> MDC Graphics character set
> DEC Supplemental
> MDC Spanish National Extension set
> To host

Prime PT25
Display Settings
Display Size (24x80)
Select from the following options:
> 24x80
> 24x132
> Custom: Select to enable the custom sizes as defined in Custom Rows and Custom Columns.
Custom Rows (24)
Enter the number of rows required. This option is only visible is Display Size is set to Custom.
Custom Columns (80)
Enter the number of columns required. This option is only visible is Display Size is set to Custom.
Display Status Line (on)
Show or hide the terminal status line.
Options
Convert CR to CR/LF (off)
Defines how to handle received carriage return characters from the remote host. Received carriage returns can
be transmitted as a carriage return or converted to carriage return and a line feed.
Wrap End of Line (on)
When selected and the cursor is in the last column, incoming text is written to the beginning of the next line.
When not selected, incoming characters will overwrite the last column until an EOL (end-of-line) character is
received.
Scroll mode (Scroll)
Available scroll modes are:
> Stop
> Loop
> Wrap
> Scroll
Character Mapping
For information on how to create or alter custom languages or character sets, please refer to chapter 16.
Character Sets
Available sets for this terminal are as follows:
> Native text character set
> Native graphics character set
> To host

157TTerm for Linux User Guide : Chapter 14 - Emulations
Prime PT250S
Display Mode
Display Size (24x80)
Available screen mode options are:
> 24x80
> 48x80
> 27x132
> 24x160
> 25x80
> Custom: Select to enable the custom sizes as defined in the Display width and Display Height settings.
Custom Width (80)
Enter the number of columns required. This option is only visible is Display Size is set to Custom.
Custom Height (24)
Enter the number of rows required. This option is only visible is Display Size is set to Custom.
Options
Strip 8th Bit (on)
When selected the eighth bit on the incoming data byte is stripped.
Convert LF to CR/LF (off)
This effects how the line feed (LF) character is interpreted in receipt from the host. Normally line feed char-
acters move the cursor down one line (possibly scrolling the screen up), and carriage return (CR) characters
move the cursor to the start of the current line.
When selected, line feed characters received from the host are translated to a LF/CR sequence. When not
selected, the line feed is not translated.
Auto Wrap (on)
When selected and the cursor is in the last column, incoming text is written to the beginning of the next line.
When deselected, incoming characters will overwrite the last column until an EOL (end-of-line) character is
received.
Edit Extent (Screen)
This parameter effects how much of the screen is affected by the INSERT and DELETE character commands.
> Screen: When selected, the region from the cursor to the end of the screen is moved.
> Line: When selected, the whole line to the right of the cursor position is moved.

Character Mapping
For information on how to create or alter custom languages or character sets, please refer to chapter 16.
Character Sets
Available sets for this terminal are as follows:
> Standard character set
> Alternate character set
> Line drawing font
> Block drawing font
> To host

159TTerm for Linux User Guide : Chapter 14 - Emulations
QNX System Console
Display Mode
Display Size (24x80)
Available screen size options are:
> 24x80
> 25x80
> 24x132
> 25x132
> Custom: Select to enable the custom sizes defined in the Custom Height and Custom Width settings.
Switching from 132 to 80 will truncate text in columns 81 to 132.
Custom Height (24)
Enter the number of rows required. This option is only visible is Display Size is set to Custom.
Custom Width (80)
Enter the number of columns required. This option is only visible is Display Size is set to Custom.
Options
Wrap End of Line (on)
When selected and the cursor is in the last column, incoming text is written to the beginning of the next line.
When not set incoming characters overwrite the last column until an EOL (end-of-line) character is received.
Auto Scroll (on)
This affects the behavior of the terminal when a linefeed is issued on the last line. When selected, the screen
scrolls up one line and the cursor remains on the last line. When not selected, the screen remains unchanged
but the cursor wraps around to the first column of the screen.
Convert CR to CR/LF (off)
Defines how to handle received carriage return characters from the remote host. When set to on received car-
riage returns are converted to carriage return and a line feed.

Character Mapping
For information on how to create or alter custom languages or character sets, please refer to chapter 16.
Character Sets
Available sets for this terminal are as follows:
> ASCII
> Alternate set
> To host

161TTerm for Linux User Guide : Chapter 14 - Emulations
SCO ANSI Color Console
Display
Display Size (24x80)
Available screen size options are:
> 24x80
> 24x132
> Custom: Select to enable the custom sizes defined in the Custom Rows and Custom Columns settings.
Custom Rows (24)
Enter the number of rows required. This option is only visible is Display Size is set to Custom.
Custom Columns (80)
Enter the number of columns required. This option is only visible is Display Size is set to Custom.
Options
Auto Wrap (on)
When selected and the cursor is in the last column, incoming text is written to the beginning of the next line.
When not selected, incoming characters will overwrite the last column until an EOL (end-of-line) character is
received.
Clear Screen on Width Change (on)
When selected, this will cause a screen clear whenever a screen change between 80 and 132 columns occurs. If
history is enabled, the screen data will be saved to the scroll history buffer otherwise the data is lost.
Preserve Colors on Attribute Reset (off)
When selected, retain color attributes on attribute reset.
Character Set Mode (Normal)
Available options are.
> Normal
> UTF-8
> UTF-8 (limited to C3)
Answerback Settings
Enable Answerback (off)
Transmit the string defined within the Answerback Message String field when the ENQ character is
received from the remote host.
Answerback Message ()
The string specified here is used as the answerback message which is sent from the terminal to the host
when the host sends the ENQ character. This option is only visible when Enable Answerback is set to On.

Printing
Disable Non-printable Chars (on)
Select to enable non-printable characters to be passed on to the printer.
Enable Special Printing (on)
This option is set to on by default.
Print Line Termination (None)
Options available include:
> None
> CR, LF
> CR/LF
> LF/CR
Printer Acknowledgement Char (13)
Decimal character value.
Enable Transparent Print (on)
Deselect if you wish to disable transparent print function.
Character Mapping
For information on how to create or alter custom languages or character sets, please refer to chapter 16.
Languages
Available languages for this terminal are as follows:
> English
> English (UK)
> Dutch
> Finnish
> French
> French/Canadian,
> German
> Greek
> Italian
> Norwegian/Danish
> Spanish
> Swiss
> Swedish (437)
> Swedish (850)
> Cyrillic

163TTerm for Linux User Guide : Chapter 14 - Emulations
Character Sets
Available sets for this terminal are as follows:
> Low Character Set
> High Character Set
> US ASCII set
> UK ASCII set
> Graphics set
> To host

Siemens Nixdorf 97801
Display Mode
Display Size (24x80)
Available screen size options are:
> 24x80
> 24x132
> 36x80
> 36x132
> 48x80
> 48x132
> Custom: Select to enable the custom sizes defined in the Custom Rows and Custom Columns settings.
Custom Rows (24)
Enter the number of rows required. This option is only visible is Display Size is set to Custom.
Custom Columns (80)
Enter the number of columns required. This option is only visible is Display Size is set to Custom.
Display Modes
Status Line Display (None (hide the status line))
> None (hide the status line): The status line is not displayed.
> Indicator: The status display is always visible.
> Host writable: Host applications can write messages in place of the status line.
Enable Local Echo (off)
When selected, as a character is typed on the keyboard it is immediately echoed to your screen. When not
selected, the entered character is sent to the remote host which in turn echoes it back. On its return the char-
acter is displayed on your screen. In this way, passwords and other sensitive information do not appear on your
screen.
Insert Mode (off)
This option determines how characters are added to the screen. When selected, the character is inserted at the
cursor, moving previously displayed characters to the right. When not selected, new display characters replace
old display characters at the current cursor position.
Wrap End of Line (on)
This affects the behavior of the terminal when a linefeed is issued on the last line. When selected, the screen
scrolls up one line and the cursor remains on the last line. When not selected, the screen remains unchanged
but the cursor wraps around to the first column of the screen.

165TTerm for Linux User Guide : Chapter 14 - Emulations
Enable Clear Character Retains Attribute (off)
Clear the screen using the current attribute.
Clear on Display Size Change (on)
When selected the screen is cleared once the screen size changes.
Auto scroll (on)
When selected and the cursor reaches the bottom of the screen, the display page scrolls up. When not selected,
the cursor jumps back up to the top of the screen.
Responses
Answerback Message ()
The string specified here is used as the answerback message which is sent from the terminal to the host when
the host sends the ENQ character.
Operating Mode (SN97801)
Select to change between the following modes:
> VT52
> VT100
> SN97801
7 or 8 bit Mode (7 Bit)
Select either 7 or 8 bit modes as required.
Terminal ID (SN97801)
Select from the following:
> VT100
> VT101
> VT102
> VT220
> VT240
> VT320
> VT340
> VT420
> SN97801
Use Custom DA string (off)
Select to enable the Custom DA string function.
Custom DA string (?62;1;2;6;7;8;9)
Enter your custom DA string. This option is only visible when Use Custom DA String is set to On.

Keyboard Configuration
Keypad Mode (Numeric)
The numeric keypad generates either numeric characters or control functions. Selecting Application or
Numeric keypad mode, determines the type of characters. The terminal emulation when first selected, or after
a reset, will be set to Numeric keypad mode.
> Application: selects application keypad mode. The keypad generates application control functions.
> Numeric: selects numeric keypad mode. The keypad generates characters that match the numeric, period,
plus, minus, star and forward-slash keys on the main keypad.
Cursor Key Mode (Normal)
The characters generated by the cursor keys depend on the state of the cursor keys mode.
> Normal: causes the cursor keys to generate ANSI cursor control sequences.
> Application: causes the cursor keys to generate application control functions.
Convert LF to CR/LF (off)
When selected, causes a received [RETURN] to transmit as both a CR and a LF. When not selected and a
[RETURN] is received only a CR is transmitted.
Lock Keyboard (off)
When the keyboard is locked, no codes can be transmitted from the keyboard to the Host. You can unlock the
keyboard either by deselecting this option or resetting the terminal.
Macros Ignore Keyboard Lock State (off)
When the keyboard is locked, no codes can be transmitted from the keyboard to the host. You can unlock the
keyboard either by deselecting this option or resetting the terminal.
Lock User Defined Keys (off)
The lock parameter determines whether the downloaded key definitions are locked or not, after you load them.
Once the keys are locked, to unlock you must either deselect the User defined keys locked option or a reset
is required.
Enable Compose (on)
A compose sequence is a series of two or three keystrokes that produce a single compose character. Pressing the
[COMPOSE CHARACTER] key starts the composed sequence.
Disable Numeric Keypad (on)
Disables application and numeric mode for the numeric keypad.
Reset Clears the Terminal Screen (off)
Reset clears the terminal screen.

167TTerm for Linux User Guide : Chapter 14 - Emulations
Tilda and Left Quote key (Sends tilda/left quote)
This option allows the user to define the TILDA/LEFT QUOTE key (i.e., ~/‘ key) to operate either as normal
or as an escape key sequence.
> Sends escape: Redefine the TILDA/LEFT QUOTE key to send an escape key sequence.
> Sends tilda/left quote: Leave the TILDA/LEFT QUOTE key as normal, i.e., LEFT QUOTE and with the
SHIFT key, TILDA.
Advanced
Character Set Mode (Normal)
Select between the following character set mode:
> Normal
> DBCS
> UTF-8
CodePage (950)
Sets the code page to be used when DBCS is enabled. This option is only visible when Character Set Mode
is set to DBCS.
User Preferred Character Set (DEC Supplemental)
There are two 8-bit character sets and both include the standard ASCII character set and a supplemental set.
> DEC Supplemental: DEC Multinational set
> ISO Latin
Favor Diacritics (off)
When enabled uses European characters rather than line draw characters.
Print Extent (Print Region)
Select from the following options:
> Print Region: to send just the selected region to the printer
> Print Screen: to send entire screen contents to printer.
Print Form Feed (off)
Send a form feed character at the end of the print job.

Character Mapping
For information on how to create or alter custom languages or character sets, please refer to chapter 16.
Languages
Available languages for this terminal are as follows:
> ISO 8859-1
> ISO 8859-2
> ISO 8859-3
> ISO 8859-4
> ISO 8859-5
> ISO 8859-7
Character Sets
Available sets for this terminal are as follows:
> HostsNational
> ASCII
> ASCII (8bit)
> DEC Special Graphics
> DEC Supplemental
> ISO Latin Supplemental
> DEC Technical
> International A
> International
> German
> Euro
> Brackets
> Facet
> IBM
> Mathematics
> Blanks
> ISO Right
> To host

169TTerm for Linux User Guide : Chapter 14 - Emulations
Stratus V102
Personality
Compatibility Mode (tvi955)
Select tvi950 or tvi955 for compatibility with either of these emulations.
> tvi950
> tvi955
Display Mode
Display Size (24x80)
Available screen mode options are:
> 24x80
> 24x132
> 25x80
> 25x132
> 42x80
> 42x132
> 43x80
> 43x132
Options
Duplex Mode (Full)
The mode in which the terminal communicates with the host.
> Full: The terminal sends characters to the host and the host then echoes them back to the screen. In this
mode, the terminal and the host can transmit simultaneously.
The VOS operating system ONLY supports Full duplex mode.
> Half: in half duplex mode, entered characters are displayed on the screen without being sent to the host for
echo back.
Attributes Effect (Page)
This determines whether display attributes apply to each line, or each page. Display attributes are set by the
host software; they include invisible, blinking, reverse video, underline and intensity.
> Character: Assigns display attributes to the character at current cursor position.
> Line: Assigns display attributes from the current cursor position to the end of the current line.
> Page: Assigns display attributes from the current cursor position to the end of the current page.

Background Character (Space)
On a terminal reset or screen initialization, a character referred to as the background character is used to refill
the screen. Select either the Space character or the NUL character.
8-bit Mode (on)
When selected no stripping occurs. When not selected the 8th bit of every byte from the host is stripped.
Enable Status Line (on)
When selected the status line is displayed.
Insert Character
Default to Space (on)
Several editing, erase, clear and scrolling functions use an insert character to clear the screen. Set this option
to set the insert character to an ASCII Space character.
Other Character (32)
Set the insert character to an alternate ASCII character value. This option is only visible when Default to
Space is set to Off.
Miscellaneous
Auto Wrap (on)
When selected and the cursor is currently in the last column, incoming text is written to the beginning of
the next line. When not selected, incoming characters will overwrite the last column until an EOL (end-of-
line) character is received.
Auto Scroll (on)
When selected and the cursor reaches the bottom of the screen, the display page scrolls up. When not
selected, the cursor jumps back up to the top of the screen.
Auto Page (off)
When selected and the cursor reaches the bottom of the screen, the cursor will jump to the next memory
page. This flag overrides Auto scroll.
Enhancements Mode (on)
When selected, this option enables the sending and receiving of more control sequences than are otherwise
enabled on a standard V102 terminal. When not selected, only the basic set of V102 control sequences are
sent and received.
Hidden Field Attributes (off)
When selected, attributes occupy a character space. When not selected, attributes do not occupy a character
space.
Insert Mode (off)
When selected, this option causes text to be inserted without overwriting existing data. As new text is
entered, existing text is shifted right to the next character position.

171TTerm for Linux User Guide : Chapter 14 - Emulations
Local Edit (off)
When selected, this option limits editing functions to the display and does not communicate them to the
host system.
Block Mode (off)
When selected, no communications takes place with the host computer until the [ENTER] or [SEND] key
is pressed. It does, however, respond to commands and characters received from the host.
Page Mode (off)
When selected, this allows editing functions, e.g. insert, delete etc. to operate on the entire scrolling page.
When not selected, limits the effects of edit functions to the current line.
Responses
Enable Answerback
When set TTerm for Linux will transmit the string defined within the Answerback Message field when the
ENQ character is received from the remote host.
Answerback Message ()
The terminal answerback is the string supplied to the host in response to an answerback enquiry from the host,
by default this is blank. This option is only visible when Enable Answerback is set to Off.
Enable Custom Terminal ID (off)
The Terminal ID is a semi-standardized string supplied to the host during negotiations. Select this option to
override the standard response string.
Custom Terminal ID ()
This option is only visible when Enable Custom Terminal ID is set to On.
Character Mapping
For information on how to create or alter custom languages or character sets, please refer to chapter 16.
Character Sets
Available sets for this terminal are as follows:
> ASCII
> High set
> Graphics set
> Monitor Mode set
> Multinational set
> To host

Stratus V103
Personality
Compatibility Mode (tvi955)
Select from the list below for compatibility with either of these emulations.
> tvi950
> tvi955
Display Mode
Display Size (24x80)
Available screen mod options are:
> 24x80
> 24x132
> 25x80
> 25x132
> 42x80
> 42x132
> 43x80
> 43x132
Options
Duplex Mode (Full)
The mode in which the terminal communicates with the host.
> Full: The terminal sends characters to the host and the host then echoes them back to the screen. In this
mode, the terminal and the host can transmit simultaneously.
The VOS operating system ONLY supports Full duplex mode.
> Half: In half duplex mode, entered characters are displayed on the screen without being sent to the host for
echo back.
Attributes Effect (Page)
This determines whether display attributes apply to each line, or each page. Display attributes are set by the
host software; they include invisible, blinking, reverse video, underline and intensity.
> Character: Assigns display attributes to the character at current cursor position.
> Line: Assigns display attributes from the current cursor position to the end of the current line.
> Page: Assigns display attributes from the current cursor position to the end of the current page.

173TTerm for Linux User Guide : Chapter 14 - Emulations
Background Character (Space)
On a terminal reset or screen initialization, a character referred to as the background character is used to refill
the screen. Select either the Space character or the NUL character.
8-bit Mode (on)
When selected no stripping occurs. When not selected the 8th bit of every byte from the host is stripped.
Enable Status Line (on)
When selected the status line is displayed.
Insert Character
Default to Space (on)
Several editing, erase, clear and scrolling functions use an insert character to clear the screen. Set this option
to set the insert character to an ASCII Space character.
Other Character (32)
Set the insert character to an alternate ASCII character value. This option is only visible when Default to
Space is set to Off.
Miscellaneous
Auto Wrap (on)
When selected and the cursor is currently in the last column, incoming text is written to the beginning of
the next line. When not selected, incoming characters will overwrite the last column until an EOL (end-of-
line) character is received.
Auto Scroll (on)
When selected and the cursor reaches the bottom of the screen, the display page scrolls up. When not
selected, the cursor jumps back up to the top of the screen.
Auto Page (off)
When selected and the cursor reaches the bottom of the screen, the cursor will jump to the next memory
page. This flag overrides Auto scroll.
Enhancements Mode (on)
When selected, this option enables the sending and receiving of more control sequences than are otherwise
enabled on a standard V102 terminal. When not selected, only the basic set of V102 control sequences are
sent and received.
Hidden Field Attributes (off)
When selected, attributes occupy a character space. When not selected, attributes do not occupy a character
space.
Insert Mode (off)
When selected, this option causes text to be inserted without overwriting existing data. As new text is
entered, existing text is shifted right to the next character position.

Local Edit (off)
When selected, this option limits editing functions to the display and does not communicate them to the
host system.
Block Mode (off)
When selected, no communications takes place with the host computer until the [ENTER] or [SEND] key
is pressed. It does, however, respond to commands and characters received from the host.
Page Mode (off)
When selected, this allows editing functions, e.g. insert, delete etc. to operate on the entire scrolling page.
When not selected, limits the effects of edit functions to the current line.
Responses
Enable Answerback
When set TTerm for Linux will transmit the string defined within the Answerback Message field when
the ENQ character is received from the remote host.
Answerback Message ()
The terminal answerback is the string supplied to the host in response to an answerback enquiry from the
host, by default this is blank. This option is only visible when Enable Answerback is set to Off.
Enable Custom Terminal ID (off)
The Terminal ID is a semi-standardized string supplied to the host during negotiations. Select this option to
override the standard response string.
Custom Terminal ID ()
This option is only visible when Enable Custom Terminal ID is set to On.
Character Mapping
For information on how to create or alter custom languages or character sets, please refer to chapter 16.
Languages
Available languages for this terminal are as follows:
> Greek
Character Sets
Available sets for this terminal are as follows:
> ASCII
> High set
> Graphics set
> Monitor Mode set
> Multinational set
> To host

175TTerm for Linux User Guide : Chapter 14 - Emulations
Stratus V105
Display Mode
Display Size (24x80)
Select from the following options
> 24x80
> 24x132
> 36x80
> 36x132
> 48x80
> 48x132
> Custom: uses the width and height as defined in the Custom Rows and Custom Columns options.
Custom Rows (24)
Enter the number of rows required. This option is only visible is Display Size is set to Custom.
Custom Columns (80)
Enter the number of columns required. This option is only visible is Display Size is set to Custom.
Display Options
Status Display (None (hide the status line))
> None (hide the status line): The status line is not displayed.
> Indicator: The status display is always visible.
> Host writable: Host applications can write messages in place of the status line.
Enable Local Echo (off)
When selected, as a character is typed on the keyboard it is immediately echoed to your screen. When not
selected, the entered character is sent to the remote host which in turn echoes it back. On its return the char-
acter is displayed on your screen. In this way, passwords and other sensitive information do not appear on your
screen.
Insert Mode (off)
This option determines how characters are added to the screen. When selected, the character is inserted at the
cursor, moving previously displayed characters to the right. When not selected, new display characters replace
old display characters at the current cursor position.
Wrap End of Line (off)
When selected and the cursor is in the last column, incoming text is written to the beginning of the next line.
When not selected, incoming characters will overwrite the last column until an EOL (end-of-line) character is
received.
Enable Clear Character Retains Attributed (off)
Clear the screen using the current attribute.

Clear on Display Size Change (on)
When selected the screen is cleared once the screen size changes.
Responses
Answerback Message ()
The string specified here is used as the answerback message which is sent from the terminal to the host when
the host sends the ENQ character.
Operating Mode (VT300)
Select to change between the following modes:
> VT52
> VT100
> VT300
7 or 8 bit (7 Bit)
Select either 7 or 8 bit modes as required.
Terminal ID (VT220)
Select from the following:
> VT100
> VT101
> VT102
> VT220
> VT240
> VT320
> VT340
> VT420
Use Custom DA String (off)
Select to enable the Custom DA string function.
Custom DA String (?62;1;2;6;7;8;9)
Enter your custom DA string. This option is only visible is Use Custom DA string is set to On.
Keyboard Configuration
Keypad Mode (Numeric)
The numeric keypad generates either numeric characters or control functions. Selecting Application or
Numeric keypad mode, determines the type of characters. The terminal emulation when first selected, or after
a reset, will be set to Numeric keypad mode.
> Application: selects application keypad mode. The keypad generates application control functions.
> Numeric: selects numeric keypad mode. The keypad generates characters that match the numeric, period,
plus, minus, star and forward-slash keys on the main keypad.

177TTerm for Linux User Guide : Chapter 14 - Emulations
Cursor Keys Mode (Normal)
The characters generated by the cursor keys depend on the state of the Cursor Keys mode.
> Normal: causes the cursor keys to generate ANSI cursor control sequences.
> Application: causes the cursor keys to generate application control functions.
Convert LF to CR/LF (off)
When selected, this causes a received [RETURN] to transmit as both a CR and a LF. When not selected and a
[RETURN] is received only a CR is transmitted.
Macros Ignore Keyboard Lock State (off)
When the keyboard is locked, no codes can be transmitted from the keyboard to the host. You can unlock the
keyboard either by deselecting this option or resetting the terminal.
Lock User Defined Keys (off)
The lock parameter determines whether the downloaded key definitions are locked or not, after you load them.
To unlock the keys you must either deselect user defined keys locked option or a reset is required.
Enable Compose (off)
A compose sequence is a series of two or three keystrokes that produce a single character. Pressing the
[COMPOSE CHARACTER] key starts the compose sequence.
Disable Numeric Keypad (on)
Disables application and numeric mode for the numeric keypad.
Reset Clears the Terminal Screen (off)
Reset clears the terminal screen.
Tilda and Left Quote Key (Sends tilda/left quote)
This option allows the user to define the TILDA/LEFT QUOTE key (i.e., ~/‘ key) to operate either as normal
or as an escape key sequence.
> Sends escape: Redefine the TILDA/LEFT QUOTE key to send an escape key sequence.
> Sends tilda/left quote: Leave the TILDA/LEFT QUOTE key as normal, i.e., LEFT QUOTE and with the
SHIFT key, TILDA.

Advanced
Character Set Mode (Normal)
Select between the following character set mode:
> Normal
> DBCS
> UTF-8
CodePage (950)
Sets the code page to be used when DBCS is enabled. See also Character Set Mode. This option is only vis-
ible is Character Set Mode is set to DBCS.
User Preferred Character Set (DEC Supplemental)
There are two 8-bit character sets and both include the standard ASCII character set and a supplemental set.
> DEC Supplemental: DEC Multinational set.
> ISO Latin
Favor Diacritics (off)
When enabled uses European characters rather than line draw characters.
Print Extent (Print Region)
Select from the following options:
> Print Region: to send just the selected region to the printer
> Print Screen: to send entire screen contents to printer.
Print Form Feed (off)
Send a form feed character at the end of the print job.

179TTerm for Linux User Guide : Chapter 14 - Emulations
Character Mapping
For information on how to create or alter custom languages or character sets, please refer to chapter 16.
Languages
Available languages for this terminal are as follows:
> English
> English (UK)
> Dutch
> Finnish
> French
> French/Canadian
> German
> Greek
> Italian
> Norwegian/Danish
> Spanish
> Swiss
> Swedish
> Cyrillic
Character Sets
Available sets for this terminal are as follows:
> HostsNational
> ASCII
> ASCII (8-bit)
> DEC Special Graphics
> DEC Supplemental
> ISO Latin Supplemental
> DEC Technical
> To host

Tandem T653X
Display Mode
Display Size (25x80)
The Tandem T653X terminal has four standard screen resolution modes:
Switching from 132 to 80 truncates text in columns 81 to 132.
> 25 x 40
> 25 x 80
> 28 x 132
> 28 x 66
When TTerm for Linux receives a remote host generated sequence to change resolution modes, the screen is
erased and the cursor moves to the home position.
Show Status Field (on)
When selected, the status field is displayed at the bottom of the screen.
Multiple Page Display Size (10)
The Tandem T653X allows multiple page display.
Options
Operating Mode (Conversational)
The two available modes are:
> Conversational: Data is transmitted to the host one character at a time.
> Block: Data is transmitted to and from the host in blocks. Block mode allows the user to edit locally before
sending the data to the host.
Half Duplex Mode (off)
When not selected (full duplex), characters entered on the keyboard are not processed until they are echoed
back by the host.
Enable Telnet (on)
Deselect this option if a Telnet session is not required.
Sound Bell at Column Number (70)
The column at which a bell will sound.

181TTerm for Linux User Guide : Chapter 14 - Emulations
Keyboard
Return Operates as Function Key (off)
This option is used with Block mode and determines whether the [RETURN] key is treated as an addi-
tional function key.
Disable Carriage Return on Send Key (off)
Set to off by default.
Insert Mode (off)
When selected, all characters entered from the keyboard are inserted by shifting the existing characters to
the right.
Inline Editor
Enable Inline Editor (off)
Set to off by default.
Use Emulation Colors for Editor (off)
Set to off by default.
Character Mapping
For information on how to create or alter custom languages or character sets, please refer to chapter 16.
Character Sets
Available sets for this terminal are as follows:
> Standard map
> To host

Televideo 955
Personality
Compatibility Mode (tvi955)
Select tvi950 or tvi955 for compatibility with either of these emulations.
> tvi950
> tvi955
Display Mode
Display Size (24x80)
Available screen mode options are:
> 24x80
> 24x132
> 25x80
> 25x132
> 42x80
> 42x132
> 43x80
> 43x132
Options
Duplex mode (Full)
The mode in which the terminal communicates with the host.
> Full: The terminal sends characters to the host and the host then echoes them back to the screen. In this
mode, the terminal and the host can transmit simultaneously.
The VOS operating system ONLY supports Full duplex mode.
> Half: in half duplex mode, entered characters are displayed on the screen without being sent to the host for
echo back.
Attributes Effect (page)
This determines whether display attributes apply to each line, or each page. Display attributes are set by the
host software; they include invisible, blinking, reverse video, underline and intensity.
> char: Assigns display attributes to the character at current cursor position.
> line: Assigns display attributes from the current cursor position to the end of the current line.
> page: Assigns display attributes from the current cursor position to the end of the current page.

183TTerm for Linux User Guide : Chapter 14 - Emulations
Background character (Space)
On a terminal reset or screen initialization, a character referred to as the background character is used to refill
the screen. Select either the Space character or the NUL character.
8-bit mode (on)
When selected no stripping occurs. When not selected the 8th bit of every byte from the host is stripped.
Enable Status line (on)
When selected the status line is displayed.
Default to Space (on)
An ASCII space.
Other Character (32)
The insert character can be selected from any one of the ASCII characters.
Insert Character ()
Several editing, erase, clear and scrolling functions use an insert character to clear the screen.
Auto Wrap (on)
When selected and the cursor is currently in the last column, incoming text is written to the beginning of the
next line. When not selected, incoming characters will overwrite the last column until an EOL (end-of-line)
character is received.
Auto Scroll (on)
When selected and the cursor reaches the bottom of the screen, the display page scrolls up. When not selected,
the cursor jumps back up to the top of the screen.
Auto Page (off)
When selected and the cursor reaches the bottom of the screen, the cursor will jump to the next memory page.
This flag overrides Auto scroll.
Enhancements Mode (off)
When selected, this option enables the sending and receiving of more control sequences than are otherwise
enabled on a standard V102 terminal. When not selected, only the basic set of V102 control sequences are sent
and received.
Hidden Field Attributes (off)
When selected, attributes occupy a character space. When not selected, attributes do not occupy a character space.
Insert Mode (off)
When selected, this option causes text to be inserted without overwriting existing data. As new text is entered,
existing text is shifted right to the next character position.
Local Edit (off)
When selected, this option limits editing functions to the display and does not communicate them to the host
system.

Block Mode (off)
When selected, no communications takes place with the host computer until the [ENTER] or [SEND] key is
pressed. It does, however, respond to commands and characters received from the host.
Page Mode (off)
When selected, this allows editing functions, e.g. insert, delete etc. to operate on the entire scrolling page.
When not selected, limits the effects of edit functions to the current line.
Responses
Enable Answerback
When set TTerm for Linux will transmit the string defined within the Answerback Message field when the
ENQ character is received from the remote host.
Answerback Message ()
The terminal answerback is the string supplied to the host in response to an answerback enquiry from the host,
by default this is blank. This option is only visible when Enable Answerback is set to Off.
Enable Custom Terminal ID (off)
The Terminal ID is a semi-standardized string supplied to the host during negotiations. Select this option to
override the standard response string.
Custom Terminal ID ()
This option is only visible when Enable Custom Terminal ID is set to On.
Character Mapping
For information on how to create or alter custom languages or character sets, please refer to chapter 16.
Character Sets
Available sets for this terminal are as follows:
> ASCII
> Graphics set
> Monitor Mode set
> Multinational set
> To host

185TTerm for Linux User Guide : Chapter 14 - Emulations
Unisys T27
The T27 emulation provides a single-environment rendition of Unisys’ Burroughs-originated T27 terminal.
The emulation is designed for use with Telnet and Burroughs Poll/Select protocols. Selecting any communica-
tions module other than Telnet configures the emulation for raw data operation.
Personality
Personality (T27)
Select from the available models:
> T27
> TD830-ASCII
> TD830-NDL
Display Settings
Display Size (24x80)
The T27 emulation has five standard screen resolution modes:
> 24 x 80
> 12 x 80
> 24 x 40
> 12 x 40
> 24 x 132
While possible, host-initiated resolution switching is not a normal feature of T27 operation and is not currently
supported by the emulation.
Miscellaneous
Display Status Line (on)
When selected the status line is displayed.
Display Application Status Line Only (off)
Allows the sizes of the Environment Window Area and the display font to be maximized at the expense of
the indications available on the second and third (Environment and System) status lines.
Display TAB Ruler (off)
When checked, this causes the separator line between the Environment Window Area and the first
(Application) status line to display a ruler-style visual indication of tab stop settings.
Enable Visible TAB Key Marker (off)
TAB moves the cursor to the next tabstop or, in forms mode, to the next field. It doesn’t normally entail
additional on-screen indication, however a HT marker can be written.

Enable Visible ETX marker (off)
The ETX code may be written to a page to modify Transmit behavior. The codes can optionally be dis-
played with a special glyph.
Enable Visible Delimiters (on)
When checked, field delimiters are shown as graphics symbols, otherwise as they are shown as space charac-
ters.
Enable Visible Data CR marker (off)
The CR code doesn’t normally produce any additional on-screen indication, however a CR marker can be
written.
Enable Visible Return key marker (off)
Return doesn’t normally entail additional on-screen indication, however a CR marker can be written.
Hide Attribute Markers (on)
This option is set to on by default.
General Settings
Custom Environment ID ()
This setting allows the Environment ID, normally displayed in reverse video at the right-hand end of the sepa-
rator line, to be customized.
Insert Mode (Line Mode)
The drop down allows the default insert mode to be specified. Insert mode is not cleared upon arrow-key or
other non-printing keypress. The mode can also be selected with the Insert key and, whilst in Insert Mode,
can be toggled between Line Mode and Page Mode with [ALT_INSERT]. If Overtype mode is selected
Line and Page modes are disabled.
Enable Type Ahead (on)
While the keyboard is locked, keystrokes are stored and released when the keyboard is unlocked.
Update Cursor After ETX Write (off)
If set, the cursor position is advanced after ETX is written.
Block Timeout Duration, ms (350)
It is necessary for the emulation to be aware when a write from the host has concluded. For Telnet communi-
cations where no protocol-based indication is available, the emulation assumes that a write is complete when a
timeout period elapses after the last character is received. The timeout period can be from 1 - 999 milliseconds.
Enable Cursor Wrap (on)
When selected, cursor movement past one extent of the screen area takes the cursor to the opposite extent of
the screen.

187TTerm for Linux User Guide : Chapter 14 - Emulations
Enable Variable TABs (off)
This option is set to off by default.
Suppress LINC Header (off)
This option is set to off by default.
Page Settings
Number of Pages (4)
Use up and down keys to set.
Page Height (32)
Use up and down keys to set.
Form Settings
XMIT Sends Form Data From Home to Cursor (on)
If set, and ignoring other influences, in Forms Mode, a transmit operation sends all data from the mobile
home position to the cursor. Otherwise, the send is to end-of-page.
Auto Field Advance (on)
If set, the cursor jumps to the next field whenever it moves past the right most character in a left-justified
field.
Render Fields to End Delimiter (on)
This option is set to on by default.
FF Exits Forms Mode (off)
This option is set to off by default.
Sync Display to Forms and Blocking (on)
This option is set to on by default.
DC1/DC2 Settings
DC1 Function (Stay in Rcv)
> Stay in Rcv: The T27 terminal can interpret the DC1 code (11H) as an instruction to stay in Rcv mode
at the end of a host write. It also has a Rcv Mode Hold option that provides this behavior continuously.
Otherwise, at end of write, the T27 switches to Local mode. The emulation doesn’t fully implement
separate Rcv, Local and Xmit modes, being always in a combined Rcv / Local mode unless transmitting.
Consequently the Stay in Rcv choice has no effect other than to disable the alternate choice.
> Clear to EOL: DC1 causes a clear-to-end-of-line operation.
DC2 Function (Toggle Forms)
> Toggle Forms: The T27 can interpret the DC2 code (12H) as a command to toggle Forms Mode
> Advance DCP: Or to advance the DCP (host write pointer) by one position.

Carriage Return/Line Feed Settings
Expand Data CR (CR LF)
> CR LF: The T27 can expand a received CR (0DH) to a CR, LF pair
> Normal: No expansion is performed.
Expand Data LF (Normal)
> CR LF: The T27 can expand a received LF (0AH) to a CR, LF pair (ie. carriage-return, linefeed)
> Normal: No expansion is performed.
Keyboard Settings
Enable Uppercase Only (off)
Characters entered at the keyboard are normally displayed in the case in which they are typed. This option
allows them to be forced to uppercase.
Clear-key Action (Clear Unprotected Areas)
> Clear Unprotected Areas: The [CLEAR] key action can be set to clear either unprotected only
> Clear all: Both unprotected and protected areas.
Enable Vertical Tab Page Advance (off)
Allows the VT (0BH - Vertical Tab) command code to be used to execute a vertical tab. Page height must be the
default 32 lines and the tabstops are at rows 1, 9, 17, 25. Otherwise, VT toggles the tabstop at the current cur-
sor column.
SPCFY Key Sends Page Number (off)
The default [SPCFY] key ([CTRL_SHIFT_NUMPAD5]) action is to send cursor column and row parameters
to the host. It can optionally send column, row and page.
SPCFY Key Sends ASCII (off)
The default [SPCFY] sequence uses binary encoding of the cursor parameters. This checkbox allows ASCII
encoding to be selected.
Return-key Form Action (Exit field)
Return can be actioned either as positioning to the Next Line, possibly still within the current field, or as
explicitly positioning beyond the current field (Exit Field).
SO,SI Switch Character-set (off)
When checked, the SO (0EH) and SI (0FH) codes are active as Shift-Out and Shift-In. Characters received
bracketed by SI and SO command codes are translated to the corresponding high-bit-set character.
Clear Page Clears TAB Stops
Allows the FF (0CH - Clear Page) command code to be used to also clear variable tabstop settings.
Backspace Destructive (off)
This option is set to off by default.

189TTerm for Linux User Guide : Chapter 14 - Emulations
Byte Config Allowed (off)
This option is set to off by default.
RS Resets Attributes (on)
Set to on by default.
Mouse Cursor Control (on)
This option is set to on by default.
Character Mapping
For information on how to create or alter custom languages or character sets, please refer to chapter 16.
Character Sets
Available sets for this terminal are as follows:
> Standard map
> To host

UNIX ANSI Console
Personality
ANSI Mode (Interactive Unix)
Support for several different 386 UNIX products is provided within the ANSI Terminal emulation by way of
the ANSI Mode option. The supported 386 UNIX products are:
> Interactive Unix
> Bell Tech. Unix
> AT&T Unix
Display Options
Display Size (80x24)
Available options are:
> 80x24
> 132x24
> Custom: uses the width and height as defined in the Custom Columns and Custom Rows options.
Custom Columns (24)
Enter the number of rows required. This option is only visible is Display Size is set to Custom.
Custom Rows (80)
Enter the number of columns required. This option is only visible is Display Size is set to Custom.
Options
Wrap End of Line (on)
When selected and the cursor is in the last column, incoming text is written to the beginning of the next line.
When not selected, incoming characters will overwrite the last column until an EOL (end-of-line) character is
received.
Auto Scroll (on)
When selected and the cursor reaches the bottom of the screen, the display scrolls up. When not selected, the
cursor jumps back up to the top.
Filter Incoming NULL Characters (on)
When selected, all received NULL characters are removed from the received data stream prior to passing it to
the emulation.

191TTerm for Linux User Guide : Chapter 14 - Emulations
Character Mapping
For information on how to create or alter custom languages or character sets, please refer to chapter 16.
Languages
Available languages for this terminal are as follows:
> English
> English (UK)
> Dutch
> Finnish
> French
> French/Canadian
> German
> Greek
> Italian
> Norwegian/Danish
> Spanish
> Swiss
> Swedish
> Cyrillic
Character Sets
Available sets for this terminal are as follows:
> Low character set
> High character set
> Normal character set
> Graphics set
> To host

Wang 2110
Display Mode
Display Size (24x80)
Available options are:
> 24x80
> 24x132
> 25x80
> 25x132
> Custom: uses the width and height as defined in the Custom Height and Custom Width settings.
Custom Height (24)
Enter the number of rows required. This option is only visible is Display Size is set to Custom.
Custom Width (80)
Enter the number of columns required. This option is only visible is Display Size is set to Custom.
Display Options
Status Line Display (None (hide the status bar))
> None (hide the status bar): The status line is not displayed.
> Indicator: The status display is always visible.
> Host writable: Host applications can write messages in place of the status line.
Enable Local Echo (off)
If selected, as a character is typed on the keyboard it is immediately echoed to your screen. If disabled, the
entered character is sent to the remote host which in turn echoes it back. On its return the character is dis-
played on your screen. In this way, passwords and other sensitive information do not appear on your screen.
Insert Mode (off)
This mode determines how characters are added to the screen. When selected, the character is inserted at the
cursor, moving previously displayed characters to the right. When not selected, new display characters replace
old display characters at the current cursor position.
Wrap End of Line (on)
When selected and the cursor is in the last column, incoming text is written to the beginning of the next line.
When not selected, incoming characters will overwrite the last column until an EOL (end-of-line) character is
received.
Enable Clear Character Retains Attribute (off)
Specifies whether a cleared character retains an attribute.
Clear screen on size change (off)
When selected, this will cause a screen clear whenever a switch between 80 and 132 columns occurs. If history
is enabled, the screen data is moved to the scroll history buffer, otherwise it is lost.

193TTerm for Linux User Guide : Chapter 14 - Emulations
Responses
Answerback Message ()
The string specified here is used as the answerback message which is sent from the terminal to the host when
the host sends the ENQ character.
Operating Mode (WANG2110A)
Select to change between the following modes:
> VT52
> VT100
> WANG2110
> WANG2110A
7 or 8 bit Mode (7 Bit)
Select either 7 or 8 bit modes as required.
Terminal ID (WANG2110A)
Select between the following:
> VT102
> WANG2110
> WANG2110A
Use Custom DA string (off)
Select to enable the Custom DA string function.
Custom DA string (?77;2;1)
Enter your custom DA string.
Keyboard Configuration
Keypad Mode (Numeric)
Select between Application and Numeric keypad state.
> Application: Selects application keypad mode. The keypad generates application control functions.
> Numeric: Selects numeric keypad mode. The keypad generates characters that match the numeric, period,
plus, minus, star and forward-slash keys on the main keypad.
Cursor Keys Mode (Normal)
The characters generated by the cursor keys depend on the state of the Cursor Keys mode.
> Normal: Causes the cursor keys to generate ANSI cursor control sequences.
> Application: Causes the cursor keys to generate application control functions.
Convert LF to CR/LF (off)
When selected, this causes a received [RETURN] to transmit as both a CR and a LF. When not selected and a
[RETURN] is received only a CR is transmitted.

Macros Ignore Keyboard Lock State (off)
When the keyboard is locked, no codes can be transmitted from the keyboard to the host. You can unlock the
keyboard either by deselecting this option or resetting the terminal.
Lock User Defined Keys (off)
The lock parameter determines whether the downloaded key definitions are locked or not, after you load them.
To unlock the keys you must either deselect user defined keys locked option or a reset is required.
Enable Compose (off)
A compose sequence is a series of two or three keystrokes that produce a single character. Pressing the
[COMPOSE CHARACTER] key starts the compose sequence.
Disable Numeric Keypad (on)
Disables application and numeric mode for the numeric keypad.
Reset Clears the Terminal Screen (off)
Reset clears the terminal screen.
Scancode mode (off)
This option is set to off by default.
Wang Private Keys (off)
This option is set to off by default.
Advanced
Character Set Mode (Normal)
Select between the following character set mode:
> Normal
> DBCS
> UTF-8
User Preferred Character Set (DEC Supplemental)
There are two 8-bit character sets and both include the standard ASCII character set and a supplemental set.
> DEC Supplemental: DEC Multinational set
> ISO Latin
Favor Diacritics (off)
When enabled uses European characters rather than line draw characters.
Print Extent (Print Region)
Select from the following options:
> Print Region: to send just the selected region to the printer
> Print Screen: to send entire screen contents to printer.

195TTerm for Linux User Guide : Chapter 14 - Emulations
Print Form Feed (off)
Send a form feed character at the end of the print job.
Character Mapping
For information on how to create or alter custom languages or character sets, please refer to chapter 16.
Character Sets
Available sets for this terminal are as follows:
> HostsNational
> ASCII
> ASCII (8bit)
> DEC Special Graphics
> DEC Supplemental
> To host

Wyse Series
Personality
Personality (Wyse 60)
Select from the following:
> Wyse 50+
> Wyse 60
> Wyse 350
Display Mode
Display Size (24x80)
Available screen mod options are:
> 24x80
> 24x132
> 25x80
> 25x132
> 42x80
> 42x132
> 43x80
> 43x132
> 50x80
> 50x132
> 51x80
> 51x132
Number of Pages (4)
The Wyse terminal offers the ability to store multiple pages of information. The number of pages you require
can be specified here. Each page will use part of your system memory.
Status Line
Status Line Type (None)
Across the bottom of the TTerm for Linux window will be displayed various status details. There are three
choices:
> None: Hides the status line
> Standard
> Extended

197TTerm for Linux User Guide : Chapter 14 - Emulations
Status Line Location (Top)
Set the status line display position. Four options are available:
> To p
> Bottom
> Top Plain
> Bottom Plain
> Use a separator Line
This option is only visible is Status Line Type is set to Standard or Extended.
Use a Separator Line (off)
Check to add a separator to the status display. This option is only visible is Status Line Type is set to
Standard or Extended.
Options
Wrap End of Line (Wrap)
This affects the behavior of the terminal when a character is inserted in the last column of the screen.
> Stop: The cursor remains in the last column position on the same line and all following characters overwrite
into the same position.
> Wrap: The cursor wraps around to the first column of the next line.
Scroll Setting (Scroll)
This affects the behavior of the terminal when a linefeed is issued on the last line.
> Loop: The screen remains unchanged but the cursor loops to the first column of the screen.
> Scroll: The screen scrolls 1 line and the cursor remains on the last line.
Map CR to CR/LF (off)
This option determines the effect of received carriage return (CR) codes. When selected, all received CR codes
move the cursor to the first column position on the next line i.e., it is interpreted as a CR followed by a line
feed (LF). When not selected, all received CR codes simply move the cursor to the first column of the current
line.
Respond to ENQ character with ACK (off)
When selected the terminal will send an ACK character on receipt of an ENQ character from the host. When not
selected the terminal will ignore ENQ characters.
You can configure Respond to ENQ character with ACK for the Wyse 60
personality however the Wyse 50+, like the real terminal, forces SEND ACK to be
selected at all times.

Convert NULL Characters to SPACE (on)
When selected NULLs are converted to spaces.
Attribute Extent (Character at cursor position)
This determines the extent affected by changing the current display attribute.
> Character at cursor position: All characters that are afterwards will have the new attribute.
> From cursor position to line end: The existing line will inherit the new attribute.
> From cursor position to page end: The entire page will inherit the new attribute.
Clear Screen on Display Width Size Change (off)
When selected, this will cause a screen clear whenever a screen change between 80 and 132 columns occurs. If
history is enabled, the screen data will be saved to the scroll history buffer otherwise the data is lost.
Allow Backspace to move to the previous line (on)
Allows backspace to move back to previous line.
Character Set Mode (Normal)
Select from the following Character Set Mode options:
> Normal
> DBCS
> UTF-8
CodePage()
Sets the code page to be used when Character Set Mode is set to DBCS.
Answerback Settings
Enable Answerback (off)
Transmit the string defined within the Answerback Message String field when the ENQ character is
received from the remote host.
Answerback Message ()
The string specified here is used as the answerback message which is sent from the terminal to the host
when the host sends the ENQ character. This option is only visible when Enable Answerback is set to On.
Miscellaneous
Printing CR conversion (None)
Available options are:
> None
> Strip
> CR/LF
> LF/CR

199TTerm for Linux User Guide : Chapter 14 - Emulations
Printing LF conversion (None)
Available options are:
> None
> Strip
> CR/LF
> LF/CR
Enhanced (off)
Set to off by default.
Strip 8th Bit (off)
Strips the 8th bit from the character.
Enable Local Echo (off)
If selected, as a character is typed on the keyboard it is immediately echoed to your screen. If disabled, the
entered character is sent to the remote host which in turn echoes it back. On its return the character is dis-
played on your screen. In this way, passwords and other sensitive information do not appear on your screen.
Colors
To implement the large array of colors associated with a Wyse 350 terminal, this emulation takes advantage of
the Override Color feature in the TTerm for Linux Color configuration tile. This mimics the use of attri-
butes to associate and display colors in a Wyse 350 terminal. To aid in the set-up of the color associations, three
checkboxes are available.
Notify a Color Palette Change (off)
Allows an administrator to know what palette, if any, is been asked for by the host application. The palette can
be set-up as a color scheme in the Color configuration tile. The user can also be notified when to change the
color scheme for an application when colors are important to its usage.
Notify a Color Association Sequence (off)
Applications sometimes add their own flavors to the standard Wyse 350 color palettes. This option allows the
administrator to change the color schemes accordingly.
Lock Write-protect Attribute to Invisible|Blink (off)
TTerm for Linux does not have a Write-Protect as a standard overridable attribute. This option maps this
attribute to a rare attribute, Invisible and Blink, to enable a color to be associated with it. Note that when this
option is selected, any application request for a change of Write-Protect attribute will be ignored.

Character Sets
Primary Character Set (Font Bank 0)
Selection options available 0, 1, 2 or 3.
Secondary Character Set (Font Bank 1)
Selection options available 0, 1, 2 or 3.
Font Banks
Font Bank 0 (G0 Char Map) (Native Mode)
Available options include: Native Mode, Graphics Overlay, MultiNational, PC Equivalent, Standard ASCII,
Graphics 1, Graphics 2, Graphics 3, Standard ANSI, ANSI Graphics or UK ANSI.
Font Bank 1 (G1 Char Map) (Graphics Overlay)
Available options include: Native Mode, Graphics Overlay, MultiNational, PC Equivalent, Standard ASCII,
Graphics 1, Graphics 2, Graphics 3, Standard ANSI, ANSI Graphics or UK ANSI.
Font Bank 2 (G2 Char Map) (Multinational)
Available options include: Native Mode, Graphics Overlay, MultiNational, PC Equivalent, Standard ASCII,
Graphics 1, Graphics 2, Graphics 3, Standard ANSI, ANSI Graphics or UK ANSI.
Font Bank 3 (G3 Char Map) (PC Equivalent)
Available options include: Native Mode, Graphics Overlay, MultiNational, PC Equivalent, Standard ASCII,
Graphics 1, Graphics 2, Graphics 3, Standard ANSI, ANSI Graphics or UK ANSI.

201TTerm for Linux User Guide : Chapter 14 - Emulations
Character Mapping
For information on how to create or alter custom languages or character sets, please refer to chapter 16.
Languages
Available languages for this terminal are as follows:
> English
> Swedish
Character Sets
Available sets for this terminal are as follows:
> Native Mode
> Graphics Overlay
> Multinational
> PC equivalent
> Standard ASCII
> Graphics 1
> Graphics 2
> Graphics 3
> Standard ANSI
> ANSI Graphics
> UK ANSI
> To host

Chapter 15: Keyboard Mapping
Remapping the TTerm for Linux keyboard.

203TTerm for Linux User Guide : Chapter 15 - Keyboard Configuration
Keyboard Mapping
Keyboard mapping in TTerm for Linux is extremely flexible and allows for the creation of as many different
keyboard configurations as is required. For example, it is possible to configure a different keyboard configura-
tion for each application and/or emulation.
To assist in the configuration of a keyboard, a standard keyboard mapping is automatically installed with each
emulation. If desired this standard mapping can be customized, or a new mapping can be created.
With TTerm for Linux you have the ability to program just about any key to match an emulation key, to send a
string or macro sequence.
Keyboard Mapping
In keyboard mapping it is important to distinguish between physical keys and emulation keys. The physical
keys are the keys on the physical keyboard attached to your PC. Emulation keys are the keys found on the ter-
minal being emulated. This may, for example, include the GOLD PF1 key on a VT220 terminal.
Configuring the Keyboard
To configure keyboard mapping select Configure > Edit Current Profile from the program menu or, from
the Profile Directory, selecting More > Edit on the profile of your choice.
Select Keyboard Mapping from the Profile Editor. Options will be displayed as shown in Figure 15.1.
Figure 15.1 Keyboard configuration.

The standard mappings are automatically set for the emulation that you have chosen. If you require an alter-
native keyboard mapping, please contact Turbosoft with your request. (See Appendix B for support contact
details).
Selecting a Keyboard Map
The Default keyboard mapping for each emulation is read only and cannot be edited. To change a keymapping
you will need to either select a mapping from the Select a Keyboard Map list or create a new map set.
To create a new Keyboard Map:
1 Select the New button, this will create a new key template based on the default key set for the selected
emulation.
2 Edit the Name and Description in the Keyboard Mapping Settings section.
To copy an existing Keyboard Map:
1 Select an existing set you would like to copy from the Select a Keyboard Map drop down list.
2 Select the Duplicate button, this will create a new key template based on the selected key set.
3 Edit the Name and Description in the Keyboard Mapping Settings section.
To delete an existing Keyboard Map:
1 Select an existing set you would like to copy from the Select a Keyboard Map drop down list.
2 Select the Delete button, this will display a warning message requesting confirmation.
3 To continue, select the Delete Keyboard Map button. After deletion the profile will revert to the Default
keyboard map.
You cannot retrieve a keyboard map once it has been deleted!
Mapping Physical Keys
You create mappings for physical keys in three ways, with:
> An emulation key from the current emulation, e.g., the VT220 PF1 key.
> An emulation specific escape sequence, string or macro.
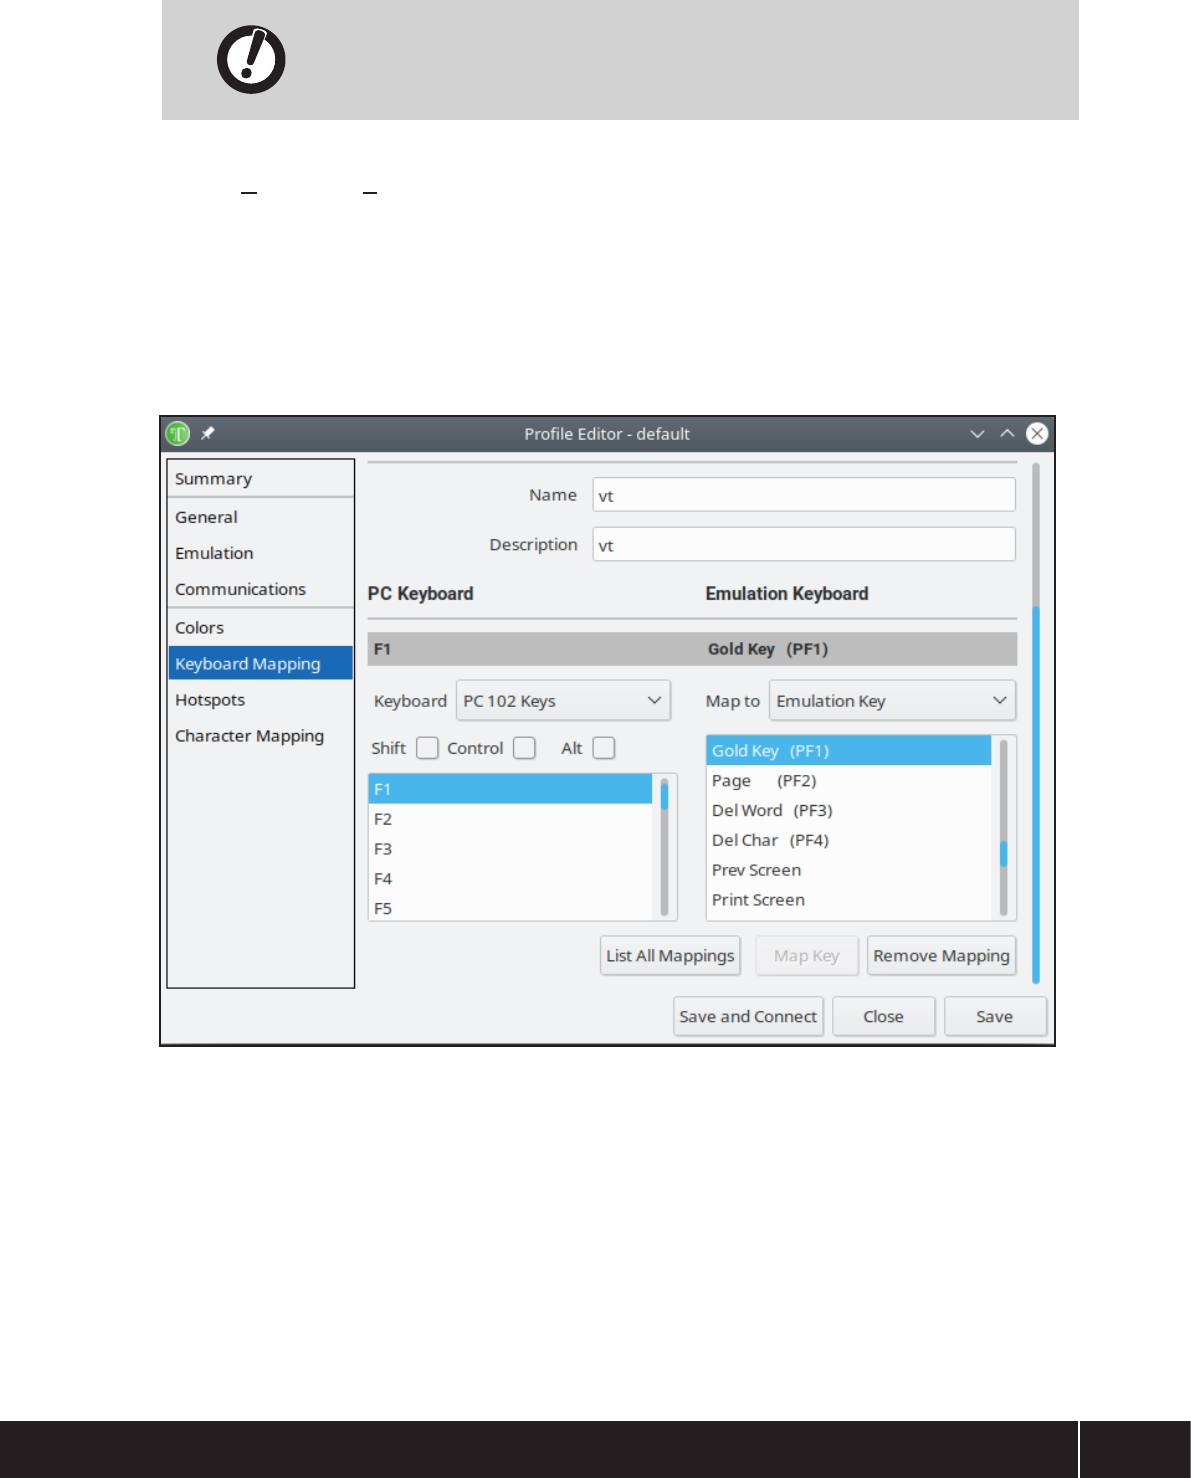
205TTerm for Linux User Guide : Chapter 15 - Keyboard Configuration
To map an emulation key, global or emulation string to a physical key or key sequence, follow these steps:
You can use the [SHIFT], [ALT] and [CTRL] keys together with a physical or
emulation key, if required.
1 Select Configure > Edit Current Profile from the program menu or, from the Profile Directory,
selecting More > Edit on the profile of your choice.
2 Select Keyboard Mapping from the Profile Editor. Configuration options will be displayed as shown in
Figure 15.2.
3 Select the physical key, from the PC Keyboard list, you wish to map. The emulation key, or the string/
macro currently mapped to the selected physical key is highlighted and displayed at the top of the
Emulation Keyboard section.
.
Figure 15.2 Mapping a key.
4 Select one of:
> Emulation key, go to step 4.
> String, go to step 5.

5 Emulation key: Select the emulation key, you want to assign to the selected physical key.
6 String: You can assign an ASCII data string, an escape sequence or a macro to the physical key. Enter the
string or macro in the String text box or click the Assist button to use the Macro Assistant.
7 To save the mapping, click on the Map Key button.
8 Repeat the above steps for all the physical keys you need to map.
9 To save session settings you must also save the profile by selecting Save or Save and Connect.
For example, to map the ANSI BOLD escape sequence (ESC[1M) to [CTRL_F6] for the current emulation,
follow these steps:
1 Click on the [CTRL] tick box and the [F6] key on the PC keyboard list.
2 Select String/Macro.
3 In the String/Macro field enter the string: \x1b[1m where \x1b represents the hex value for ESCAPE
character.
Hex values are prefixed by \x
4 Click on the Map Key button to save the mapping.
5 Select Save or Save and Connect.
Removing a Mapping
Click on the Remove Mapping button to remove a mapping. Alternatively, re-map BOTH the physical key(s)
and the emulation key(s).
Saving a Mapping
To save a mapping, click on the Map Key button.
You MUST also save the profile by selecting the Save or Save and Connect buttons.
Keyboards
Click on the Keyboards list to select from available keyboard layouts.

207TTerm for Linux User Guide : Chapter 15 - Keyboard Configuration
List and Export Mappings
The List All Mappings button displays a tile showing a complete list of defined keyboard mappings as shown
in Figure 15.3.
This listing can be exported to a comma separated value (.csv) file by clicking the Export button. The export
function is designed to facilitate the publishing of keyboard mappings in end user documents and spreadsheets.
The Show Modified Mappings Only checkbox can be toggled to display only those mappings which, in the
current keyboard mapping, deviate from the default keyboard mapping set.
.
Figure 15.3 List all mappings.

Chapter 16: Character Mapping
Editing and creating character mappings and
language sets.

209TTerm for Linux User Guide : Chapter 16 - Character Mapping
Character Mapping
Emulation character mapping allows the user to select the character generated for a given ASCII value by the
relevant country code mapping. This ASCII value may originate from a keyboard sequence, or from a character
sequence from the remote host to the local PC screen or printer. Language mappings and Character Sets may
be edited in-program.
Character mapping and the process for modifying language and character sets is the same for all the emula-
tions.
To edit a character map for the profile of your choice select Configure > Edit Current Profile from the
program menu or, from the Profile Directory, select More > Edit on the desired profile.
Select Character Mapping from the Profile Editor. Configuration options will be displayed as shown in
Figure 16.1
Each emulation contains a series of languages, you may select an existing language or create a new language
mapping and modify the accompanying character sets to suit.
Figure 16.1 Character Mapping configuration.

Selecting a Character Map
The Default character mapping for each emulation is read open and cannot be edited. To change a character
mapping you will need to either select a mapping from the Select a Character Map list or create a new map
set.
To create a new character map:
1 Select the New button, this will create a new key template based on the default character map for the
selected emulation.
2 Edit the Name and Description in the Character Mapping Settings section.
To copy an existing character map:
1 Select the existing set you would like to copy.
2 Select the Duplicate button, this will create a new key template based on the selected key set.
3 Edit the Name and Description in the Character Mapping Settings section.
To delete an existing character map:
1 Select the existing set you would like to delete.
2 Select the Delete button, this will display a warning message.
3 To Continue, select Delete Character Map. The Default character map will be selected.
Adding a New Language Mapping
Not all languages are supplied for all emulations. If you require a language and it
is not present in TTerm for Linux, please contact Turbosoft Support.
Each emulation is supplied with one or more language sets. To create a new language or custom language navi-
gate to the Character Map section shown Figure 16.2 (following page). Click the New button to and enter a
name for the new language based on the (default) settings.
Similarly, clicking the Copy button will create a new language based on the selected existing language item.
Editing a Character Map
The Character Map sections lists the Map, Unicode and Character values for the character set as shown in
Figure 16.2.

211TTerm for Linux User Guide : Chapter 16 - Character Mapping
Figure 16.2 Character Mappings.
To edit an entry click on the desired row or item and click the Edit button. This will bring up the Edit
Character Map Item tile as shown in Figure 16.3 where the values for a particular character may be modified.
.
Figure 16.3 Editing a Character Map Item.
Unicode
A hexadecimal Unicode value. The equivalent display character will be shown in the Character field.
Character
Enter a character in this field and the equivalent Unicode value will appear in the Unicode field.
Saving a Character Set
Character Set changes are saved by saving the associated profile. Click the Save or Save and Connect buttons

Chapter 17: Colors
Creating and editing a color scheme.

213TTerm for Linux User Guide : Chapter 17 - Colors
Color Configuration
The Color Configuration section of the Profile Editor allows you to choose or create your preferred termi-
nal color scheme.
To configure a terminal color scheme select Configure > Edit Current Profile from the program menu or,
from the Profile Directory, selecting More > Edit on the profile of your choice.
Select Colors from the Profile Editor. Color Scheme configuration options will be displayed as shown in
Figure 17.1.
Figure 17.1 Configure colors.
Color Scheme
Predefined and custom created color schemes are available by clicking on the Select a Color Scheme drop
down.
New
A custom color scheme may also be created clicking the New button.
Duplicate
A custom color scheme based on an existing scheme may be created by clicking the Duplicate button.

Delete
Select this button to remove a listed color scheme that is no longer required. When a color scheme is deleted
the profile will revert to a default scheme.
Color schemes are shared between all profiles however TTerm for Linux will not
permit the deletion of a scheme in use with other profiles.
You cannot retrieve a color scheme once it has been deleted!
Color Scheme Options
Name
An arbitrary name for the color scheme. Text entered here is used when selecting from the Select a Color
Scheme drop down item.
Description
An optional description of the color scheme.
Editing Options
Show Configuration For
This item specifies which emulation to show attributes for in the Attribute List item, hiding those attributes
which are not relevant to the desired terminal. For example, a DEC VT220 terminal does not support the Dim
attribute while a Wyse 60 terminal does.
Show Invisible Attributes
This option will show or hide any attribute combinations that have invisible as one of the attributes.
Show Blink in Preview
If set to off, text with the blink attribute will not blink in the Preview item.
Show Invisible in Preview
If selected, text in the Preview that has the invisible attribute will remain visible.

215TTerm for Linux User Guide : Chapter 17 - Colors
Emulation Attributes Configuration
Attribute List
To view or modify a terminal attribute select an item from the Attribute List. This will update the Preview
below and the list of Feature Options assigned to the attribute such as bold, underline, overline and/or strike-
through as well as any color overrides that have been applied.
Figure 17.2 Attribute configuration.
Feature Options
The Feature Options item allows any aspect of the attribute combination to be added or removed.
Clicking a checkbox adjacent to a feature will include or exclude this feature from the current selected attribute
combination. The features are:
> Blink
> Reverse
> Underline
> Bold
> Overline
> Dim
> Strike out
> Invisible
> Box

Color Options
This configuration option determines whether the colors used when mapping the attribute combinations are
those used by the normal attribute or are an independent set of colors. If selected, the colors are independent.
Any change to the color set used by the normal attribute will have no effect on this attribute combination and
vice versa.
Override color must be selected before you select the new color from the Color
palette.
Miscellaneous Color Scheme Options
Color palette
The Color Palette represents those colors that are available for use in the color scheme, in particular for map-
ping attribute combinations. The actual number of colors in the palette display is fixed at 32, shown as two
banks of 16.
Clicking any of the colored squares will select that palette item for editing.
Figure 17.3 Edit Color Palette tile.

217TTerm for Linux User Guide : Chapter 17 - Colors
Edit Color
R(ed), G(reen), B(lue)
The selected palette entry can be edited by directly entering red, green and blue values between 0 and 255.
Alternately the color values can be adjusted via the associated slider or color wheel.
Changing a palette entry will also change attributes within the color scheme
where this palette entry was applied.

Chapter 18: Misc. Configuration
Other TTerm for Linux configuration options.

219TTerm for Linux User Guide : Chapter 18 - Miscellaneous Configuration
Miscellaneous Configuration
To access these configuration options select Configure > Edit Current Profile from the program menu or,
from the Profile Directory, selecting More > Edit on the profile of your choice.
Select General from the Profile Editor and scroll down to the relevant sections described below.
Figure 18.1 General configuration options, Clipboard Settings.

Clipboard Settings
Marking/Copy
Full screen copy by default (off)
When this option is set to on and a copy operation is performed while no text is selected, TTerm for Linux
will copy the entire screen.
Trim trailing spaces on copy (on)
When selected deletes any spaces from the end of the selected text.
Pause when marked (on)
Places the screen into a paused stated until marking/copy is completed.
Paste
Paste configuration items can accept macros.
End-of-line text (\n)
The character that will be appended to the end of the pasted line.
End-of-field text ()
The character that will be appended to the end of the pasted field.
Field separator text ()
The character that will be appended to the end of each pasted field.
Start text ()
Text which will be prepended to the pasted text.
End text ()
Text which is appended to the pasted text.
Process key-macros in pasted text (off)
When selected any macro present in the pasted text will be executed.
Line delay (ms) (50)
The time delay in milliseconds between each pasted lines.
Character delay (ms) (0)
The time delay in milliseconds between each pasted character.
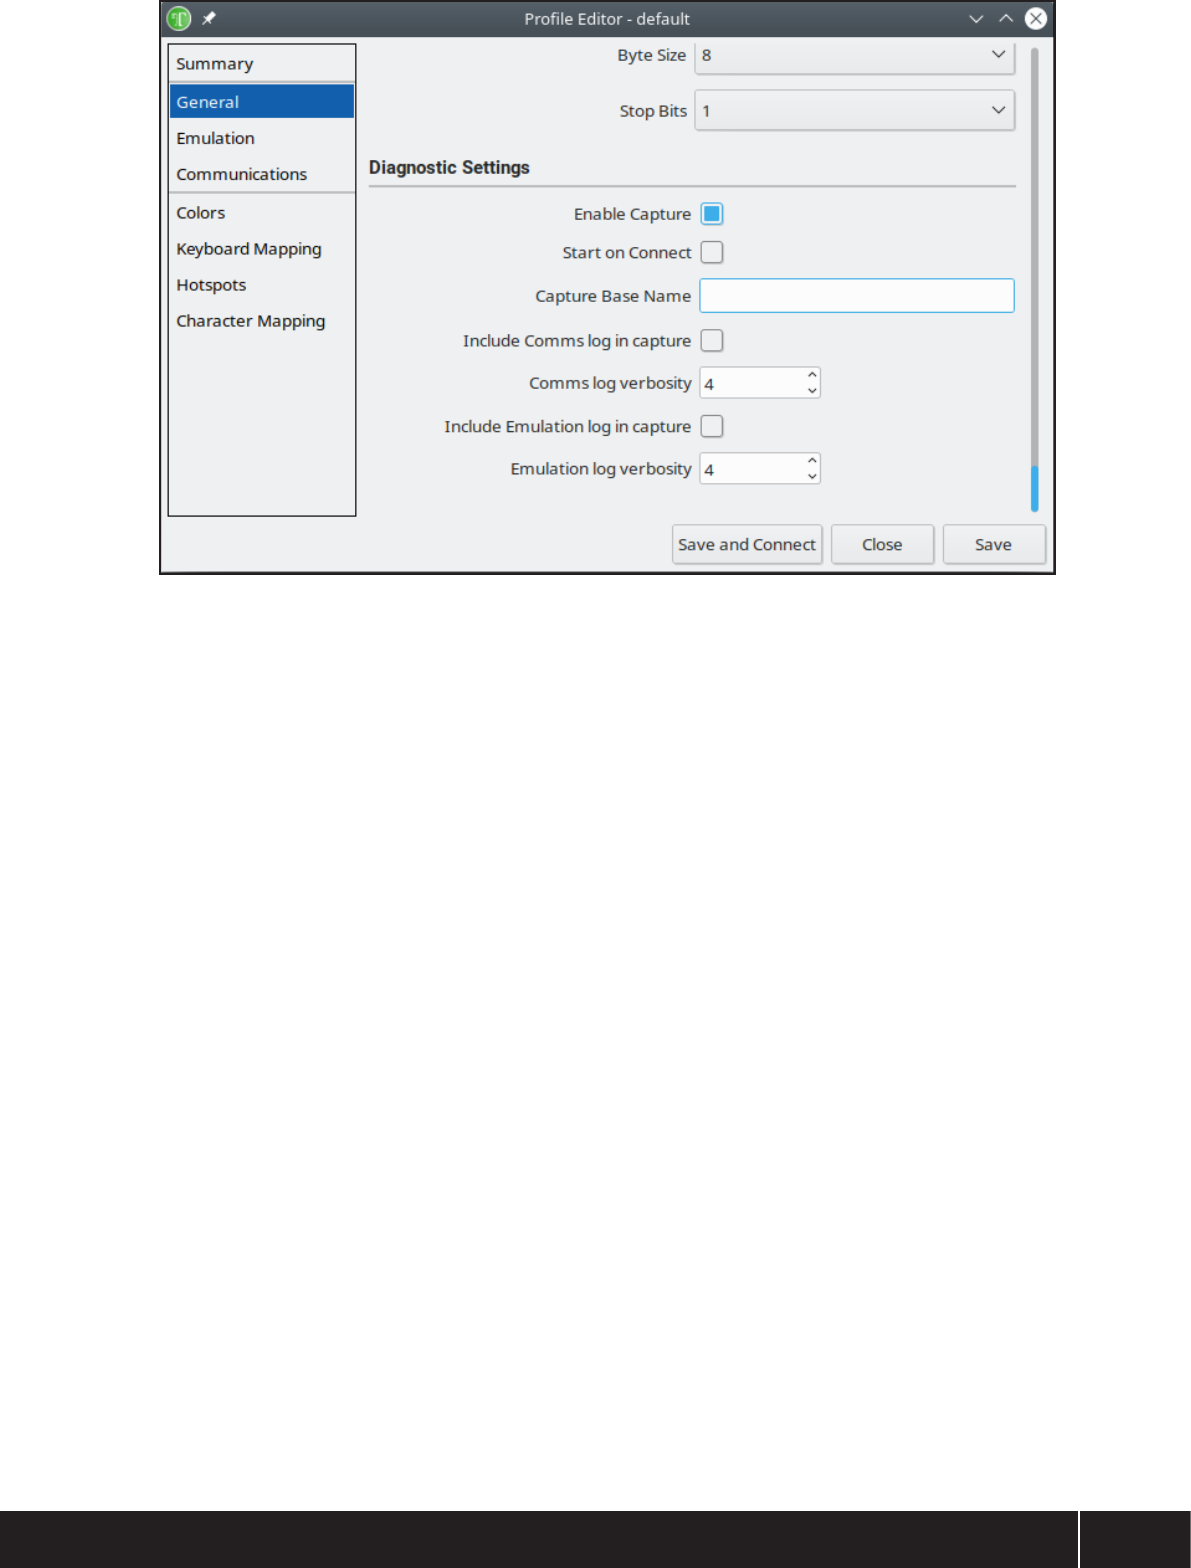
221TTerm for Linux User Guide : Chapter 18 - Miscellaneous Configuration
Figure 18.2 Diagnostic Settings.
Diagnostic Settings
A 'Capture' is a feature of TTerm for Linux where all communications between TTerm for Linux and a host
are logged to a file for use by Turbosoft's Support staff in order to assist in resolving any support issues. It is
designed to assist in diagnosing unexpected host or emulation behavior.
This section of a profile's general configuration contains settings for captures. In general these settings should
only be enabled on request from Turbosoft staff as part of our customer support services.
Enable Capture (On)
When set, the capture function will be available from the Actions menu when this profile is connected. See
Chapter 6 for more details.
Start on Connect (Off)
When set a capture will automatically commence when TTerm for Linux successfully connects with the
defined remote host system. If this option is not set, a capture must be user initiated. This setting is only visible
when Enable Capture is set to on.
Capture Base Name ()
Set a common prefix to be applied to any capture files created for this profile. Time-stamp details will be
appended to the filename for each capture file. This setting is only visible when Enable Capture is set to on.

Include Comms log in capture()
Include extended communications data in the capture file. This setting is only visible when Enable Capture
is set to on.
Comms log verbosity (4)
Determines the level of detail logged. Higher is more verbose. This setting is only visible when Enable
Capture is set to on.
Include Emulation log in capture ()
Include extended emulation data in the capture file. This setting is only visible when Enable Capture is set to
on.
Emulation log verbosity (4)
Determines the level of detail logged. Higher is more verbose. This setting is only visible when Enable
Capture is set to on.

223TTerm for Linux User Guide : Chapter 18 - Miscellaneous Configuration

Chapter 19: Hotspots
Enhanced mouse driven terminal events.

225TTerm for Linux User Guide : Chapter 19 - Hotspots
Hotspots
A Hotspot is an area of the terminal screen which triggers a mouse event, enabling an otherwise keyboard
driven host application to work with mouse interaction.
The appropriateness of hotspots for the TTerm for Linux user will very much depend upon the nature of the
applications that you are running.
In particular, if your applications are menu based then you will find that hotspots allow you to design a more
user-friendly environment.
Screen Regions
The active area for a Hotspot can be either a fixed area of the TTerm for Linux display screen or dynamically
determined based on the screen content.
For example, the Hewlett Packard HP2392 terminals use a fixed area across the bottom of the screen to act as
status labels for the function keys. In this case, you might choose to use a Hotspot with a permanent, fixed
location based on the screen coordinates of the specified status label.
Figure 19.1. An example of a Hotspot in TTerm for Linux, in this instance enhancing the status labels on a
Hewlett Packard HP2392 terminal session.
Dynamically positioned hotspots are positioned based on the appearance of a particular word or character
sequence displayed anywhere on the screen.
For example, the IBM3270 class of terminals are often used with host applications that use the F3 key to EXIT.
The string ‘F3 = Exit’ may be located anywhere on the screen. In this case, you would use a string matched
Hotspot that would look for the string “F3 = Exit”.
Hotspots can be configured to auto execute or to be activated by clicking the mouse button on the defined
screen region.

Configuring Hotspots
To configure the communications transport for the profile of your choice select Configure > Edit Current
Profile from the program menu or, from the Profile Directory, select More > Edit on the desired profile.
Select Hotspots from the Profile Editor. Configuration options will be displayed as shown in Figure 19.2.
Figure 19.2. Hotspots configuration.
Hotspot Set
Different emulations or applications may require different configurations of hotspots. To accommodate this,
hotspots are held as individual sets. Each set can contain as many hotspots as you require for the particular
emulation/application.
Predefined and custom created hotspots sets are available by clicking on the Select a Set drop down.
New
A custom Hotspot set may also be created clicking the New button.
Duplicate
A custom Hotspot set based on an existing set may be created by clicking the Duplicate button.
Delete
Select this button to remove a listed hotspots set that is no longer required.

227TTerm for Linux User Guide : Chapter 19 - Hotspots
Hotspot sets are shared between all profiles however TTerm for Linux will not per-
mit the deletion of a set in use with other profiles.
You cannot retrieve a Hotspot set once it has been deleted!
Hotspot Settings
Name
An arbitrary name for the Hotspot set. Text entered here is used when selecting from the Select a Set drop
down item.
Description
An optional description of the Hotspot set.

Creating, Copying and Editing Hotspots
Using the drop-down menu on the Hotspot Set field, select the required Hotspot set or create a new set as
described on the previous page. A Hotspot set may consist of one or more individual hotspots.
To create a new Hotspot click on the New button in the Hotspots section.
To copy an existing Hotspot, select the Hotspot from the Hotspots list then click the Duplicate button.
To edit a Hotspot, select the Hotspot from the Hotspot list then scroll down to edit its settings.
When you click on either the New button to create a new Hotspot, the Duplicate button to copy a Hotspot
or select an existing Hotspot, the hotspots options are update dynamically to reflect the currently selected item.
Figure 19.3. Configure a Hotspot.
General Parameters
Name
Enter a name for the Hotspot.
Action / Send String
When a Hotspot is triggered the string entered here is sent to the host. This can be either a literal string or a
macro string for more advanced functionality. When specifying a literal string and a carriage return is required,
append a \r to the string.

229TTerm for Linux User Guide : Chapter 19 - Hotspots
For more advanced options Hotspot actions can be used to send emulation keys, trigger program menu com-
mands and much more. The Assist button opens the Macro Assistant, for further detail on macro capabilities
and how to use the Macro Assistant refer to Chapter 12 - Macros.
Positioning
The position of the Hotspot can be either Fixed or Relative to Matched String.
Fixed
Once configured and enabled the section of the screen will always be a Hotspot and a mouse click in this
area will always trigger the Hotspot action.
Match Text
This indicates that TTerm for Linux is to constantly search an area of the screen to see if it contains the text
declared using the Match Text option.
Fixed Position Settings
These fields are used to define the area in which the Hotspot is to be located for fixed position Hotspots.
The screen coordinates are entered in as row and column values, along with height and width values for the
Hotspot.
For example, if you are using an HP2392 emulation with fixed status labels for the function keys, F1 to F8,
then you could define permanent hotspots for each status label. The status labels appear in the bottom two
rows and are seven columns wide, so the coordinates for the F1 status label would be
Location Row: 24
Location Column: 0,
Height (rows): 2
Width (columns): 8
Specifying the Hotspot Match String
If you select the Hotspot position to be Match Text then you MUST specify a Text to Match.
Match Text Settings
Text To Match
The exact string that you wish to match.
Pre Match Characters
Any character that will always proceed the match text. The Text To Match is only to be matched if it fol-
lows the character specified.
Post Match Characters
Any character that will always follow the match text. The Text To Match is only to be matched if it is fol-
lowed by the character specified.

Pre/Post Character Handling
Specify how pre and post characters are handled when drawing a Hotspot. Available options are:
> Exclude Pre/Post Characters From Hotspot Region: characters are used for matching only and are
not included in the Hotspot.
> Included Pre/Post Characters In Hotspot Region: characters are used for matching and also appear
in the Hotspot.
> Included Pre/Post Characters as Blanks: characters are used for matching and also appear in the
hotspot but are replaced with blanks.
Case sensitive
If you require the Text To Match to be case sensitive.
Use Wildcards (* And .)
When checked the text entered at Text To Match will match on wildcards. The following wildcards are
valid:
> An asterisk (*) will match any text for inclusion in a Hotspot. For example a Text To Match entry of
A*F would match the following:
- "123 ASDFGHJK" where the * matched SD
-"123 AFTERNOON" where the * matched no characters and AF was matched on
Placing the (*) wildcard at the end of the Text To Match entry, for example an entry of AF*, will
result in the Hotspot finishing on either the next Post Match Characters or, if no Post Match
Characters exists, the end of the line.
> A period (.) will match on any single character. For example a Text To Match entry of T.E would
match the following:
- "123 TEA CAKE" where the . matched TEA
- "123 TREE FROG" where the . matched TRE
> Combinations of asterisk (*) and period (.) wildcards are valid. For example:
- A Text To Match entry of .a* would match "Easter" in the text "xyz Easter"
- A Text To Match entry of 1.3.5 would match "12345" or "1A3B5"
Autoexecute
The Hotspot action will autoexecute when TTerm for Linux detects the string.
For example, the match text 'Login:' could be used to trigger the sending of a username or to execute a
macro to log the user in.

231TTerm for Linux User Guide : Chapter 19 - Hotspots
Match Region
Determines the area of the terminal display in which TTerm for Linux will search for the Text to Match.
Options are:
> Entire Screen
> Partial Screen
If the Match Region is set to Entire Screen then the Text To Match will search the entire terminal
screen for matching text.
If Partial Screen is set you need to specify the area that TTerm for Linux will search. Note that screen
dimensions are determined by your emulation display setting. When this option is selected, the following
additional options are visible:
Region Row
The terminal screen row, or topmost position where TTerm for Linux will search for the Text to
Match.
Region Column
The terminal screen column or left most position of the region where TTerm for Linux will search for
the Text to Match.
Height
Height in screen rows of the region where TTerm for Linux will search for the Text to Match.
Width
Width in screen columns of the region where TTerm for Linux will search for the Text to Match.
Appearance
Preview
Displays a preview image of the Hotspot based on the currently selection configuration options.
Label
Determines the content of the Hotspot label. Available options are
> Use Terminal Text Underneath: when selected, TTerm for Linux will display the terminal text on the
Hotspot.
> Alternative Text: when selected you can set your own text for the Hotspot overriding the text on the
terminal screen.
Style
Click on the drop-down menu of the Button Style field, then select a button style from the eight pre-
defined styles. The Preview above will update to display a sample of the selected style.
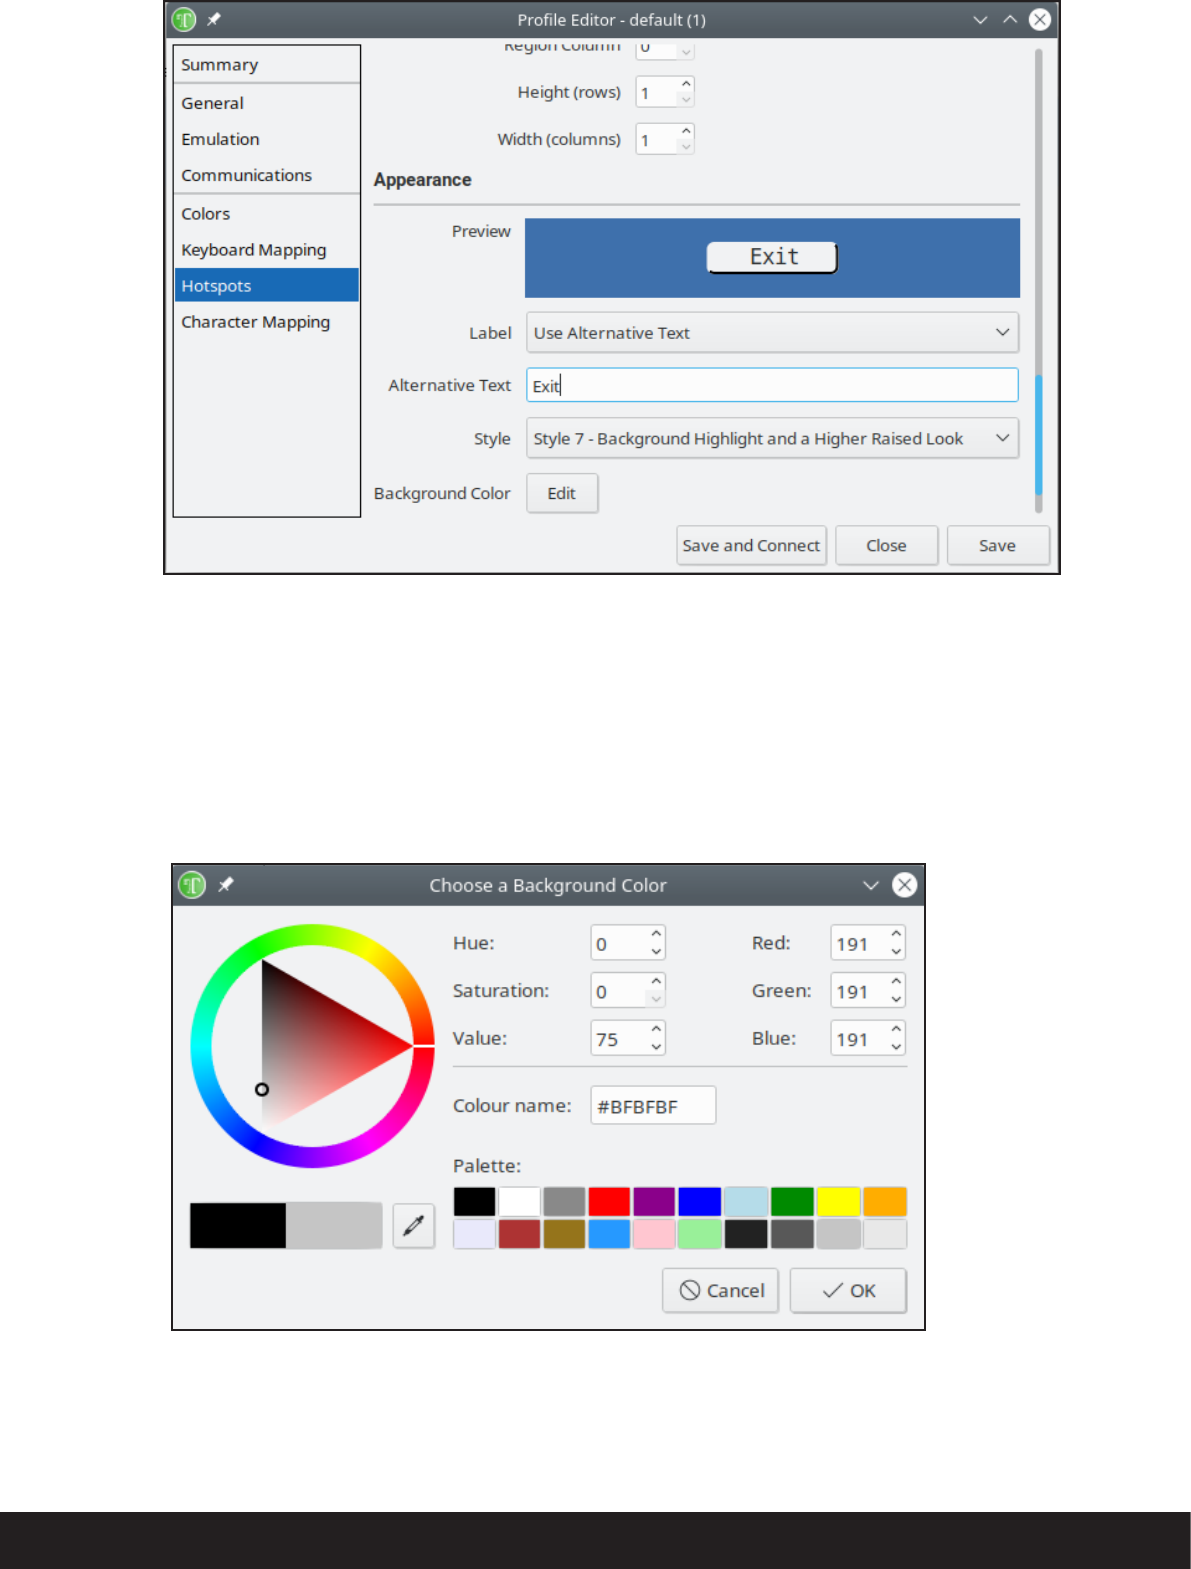
Figure 19.4. Configure Hotspot appearance.
Setting the Hotspot Color
The color of the Hotspot set can be adjusted to suit your preference.
Clicking the Edit button next to the Background Color or Label Color will display the Color selection tile.
Figure 19.5. Configure Hotspot colors tile.

233TTerm for Linux User Guide : Chapter 19 - Hotspots
This tile allows you to select from a predefined color palette for the Background or Label based on the edit
button clicked.
You can also modify the color palette by selecting one of the existing palette entries and replacing the selected
color with a custom color.
Saving the Hotspot Set
Hotspots sets are saved when the profile being edited is saved. Click on the Save or Save and Connect but-
ton to save both the hotspots and profile.
Deleting Hotspots
To delete an individual Hotspot, simply select the Hotspot from the Hotspot list, then click on the Delete
button.


235TTerm for Linux User Guide : Appendix
Appendix A
Glossary
ANSI (American National Standards Institute) The U.S. standardization body. ANSI is a member of the
International Standardization Organization (ISO)
API Application Program Interface.
ASCII (American Standard Code for Information Interchange) This is one of the methods of represent-
ing text characters inside a computer.
Attribute This is a way of enhancing characters on screen by adding features such as underline, bold or a
color.
Break Signal An interrupt signal sent to the host system.
Capture A method used in TTerm for Linux, of copying to disk any incoming and outgoing information from
the remote host.
Certificate Express Logon Also referred to as Express Logon Feature or ELF. Enables secure logon to
hosts via tn3270e and SSL with certificates alone.
Client Any node in a networking environment that initiates a request for a network service.
CR A carriage return (CR) is a control character used to move the cursor position to the start of a line. Often
used in conjunction with a line feed (LF).
DBCS Stands for Double Byte Character Set, using two-byte (16-bit) characters rather one byte (8-bit).
Typically used to handle languages such as Japanese, Korean and Chinese.
Dialog box A window in a graphical user interface which requests information from the user. In this manual
dialog boxes are referred to as tiles.
ELF Express Logon Feature. Enables secure logon to hosts via tn3270e and SSL with certificates alone.
Emulation When used in relation to TTerm for Linux, a program that causes the personal computer to act as
if it were a particular terminal.
Field A defined data area.
FIPS Federal Information Processing Standard. FIPS-140-2 is a United States Government standard of crypto-
graphic accreditation. This standard applies to the TTerm for Linux SSH communications module.
Flow control A technique for ensuring that the transmitting device, such as a modem, does not overload the
receiving device with data. This is also known as pacing.
Function keys A special set of keys which are typically labelled F1, F2 etc. on the keyboard.

GUI (Graphical User Interface) A user environment that uses icons, buttons, windows and pointers etc.
HLLAPI IBM 3270 High Level Language API.
HPNS Hewlett Packard Network Services, see also NS/VT.
Host Machine on which applications are executed. A host may be the local machine or the remote machine
connected to via Serial Communication, TCP/IP, etc.
IRMA board The IRMA board was an early hardware card for PC's designed to provide 3270 host connectiv-
ity and emulation.
IP number A 32-bit (IPv4) or 128-bit (IPv6) address assigned to hosts using TCP/IP. This consists of a net-
work and host code. The host port is signified by an integer and is used to identify destinations within the host,
e.g., the port reserved for electronic mail.
Key File A TTerm for Linux license file with a .key extension, containing unique licensing information.
LAN Local Area Network.
LF A line feed (LF) is a control character used to indicate a new line. Often used in conjunction with a car-
riage return (CR) .
Login The action by which you gain access to and establish your identity to a remote host.
Node Any device including servers and workstations that are connected to a network.
NS/VT Network Services / Virtual Terminal. A proprietary communications protocol developed by Hewlett
Packard.
Profile A session configuration defined within TTerm for Linux. See Session.
Remote host The machine which you are communicating with, via your TTerm for Linux emulation soft-
ware.
RS232 A standard used for many serial interfaces. This standard was devised many years ago and many parts of
it are not used in modern modem equipment. This has led to many different implementations of the standard.
Serial number A unique number allocated to each copy of TTerm for Linux software produced by Turbosoft.
Serial port A communications port, generally referred to as COM number. See also communications port.
Session A combination of one emulation and one communications protocol is called a session.
Shift state A sequence of simultaneous keystrokes, combining the selected PC key with any of the [SHIFT],
[ALT] and [CTRL] keys, to generate a unique combination. For example, [CTRL_ALT_F4].
SBCS (Single Byte Character Set) Character sets which use exactly one byte for each character. See also
DBCS.

237TTerm for Linux User Guide : Appendix
SSH (Secure Shell) A communications protocol that allows secure transmission of data.
SSL (Secure Sockets Layer) A protocol that provides security for communications over networks.
TCF The file-based equivalent of a profile used in Turbosoft Windows based Terminal emulator TTWin. TCF
files may be exported from TTWin in a format that TTerm for Linux can import.
Telnet A protocol for providing terminal facilities using TCP/IP across a network.
Tile TTerm for Linux terminology for what is commonly known as a dialog box.
TTEXP The import/export format for saved profiles used by TTerm for Linux. This file can be used to trans-
fer saved profile configuraiton between copies of TTerm for Linux. The .ttexp format is also utilized by
other Turbosoft terminal emulation software.
X.25 A serial base network communications protocol used for wide area networks.

Appendix B
Command Line Options
-h [ --help ]
Display a help message to console.
-v [ --version ]
Output program version details to console.
-p [ --profile ] profilename
Launch TTerm for Linux and open the nominated profile. This option can be utilized with a profile configured
to autoconnect to start the program and immediately connect to a host system. Multiple profile names may
be added to arguments to open multiple profiles on launch. For example ttermlinux -p "profile 1"
"profile 2" "profile 3"
-e [ --edit ] profilename
Launch TTerm for Linux with the profile editor open and the nominated profile open for editing. If the named
profile does not exist a new profile will be created.
-c [ --create ] profilename
Launch TTerm for Linux with the profile editor open. A newly created profile with the specified profile name
option will be created. If the named profile already exists it will be launched.
-d [ --delete ] profilename
Delete a profile. Supply the profile name surrounded by quotes, for example ttermlinux -d
"profile 1". Multiple profile names may be added to arguments to delete additional profiles. For exam-
ple ttermlinux -d "profile 1" "profile 2" "profile 3"
-x [ --export ] file profilename
Export one or more nominated profiles to a .ttexp format file. The output file argument should be a rela-
tive or absolute path. For example ttermlinux -x output.ttexp "profile 1" "profile 2"
"profile 3"
-i [ --import ] file
Import a set of profiles in the form of a .ttexp . The input file argument should be a relative or absolute
path.
-f [ --fullscreen ]
Launch TTerm for Linux with the program window occupying the entirety of the desktop screen. In this mode
the program menu is hidden by default.
-m [ --maximized ]
Launch TTerm for Linux with the program window maximized.
-M [ --hide-menu ]
Launch TTerm for Linux with the main program menu hidden.

239TTerm for Linux User Guide : Appendix
Appendix C
Support
If you have a support question or issue you need assistance with, we recommend firstly checking the sup-
port section of our website (www.ttwin.com) for up to date downloads and documentation. We suggest these
resources be your first stop as they provide quick answers to many common queries.
If you are still unable to resolve your issue, please feel free to contact Turbosoft's support staff. Full support
is extended to the holders of maintenance contracts and to those users operating TTerm for Linux under an
evaluation license. To raise an issue with Turbosoft support please log in to https://www.ttwin.com/support and
fill out an issue form.
When describing your issue be sure to include information on the exact version of the Turbosoft product
you are using. This information can be obtained by selecting Help > About... > Version from the program
menu. See Chapter 8 for more information.
A
ACT file ..................................................17
ADDS2020 Viewpoint
Character Mapping ................................. 96
Mode ..................................................... 96
ADM11 ................................................... 97
Character Mapping ................................. 98
Mode ..................................................... 97
Status Line .............................................. 97
ANSI ..................................................... 235
ANSI Color Emulation
Character Mapping ............................... 100
Configuration ......................................... 99
ASCII ..................................................... 235
Attribute .............................................. 235
Auto connect on startup ....................... 51
Automating a login.................................52
B
Break ...................................................... 40
Telnet Action ........................................... 88
Bull VIP7800 ......................................... 101
Character Mapping ............................... 103
Printer................................................... 102
C
Capture ...........................................40, 235
Certificate Express Logon ............... 85, 235
Certificate File. See also KEY file
Character Mapping .............................. 209
Adding a Language .............................. 210
Editing .................................................. 210
Clear display ..........................................32
Clipboard ............................................. 220
Color Schemes ..................................... 213
Color palette ......................................... 216
Command Line Options ....................... 238
Communications module
NS/VT .............. 80. See also Hewlett Packard
Selecting ................................................. 79
SSH ....................... 80. See also Secure Shell
Telnet ...................................................... 83
Connecting ............................................24
Auto connect .......................................... 51
Force Clean Disconnection ......................39
Menu option .......................................... 39
Connect string .......................................52
Cursor
Blink ....................................................... 56
Shape ..................................................... 56
Visible/invisible ........................................ 56
Customer support ........................ 238, 239
D
Data General Series ............................. 104
Character Mapping ............................... 106
Personality ............................................ 104
DBCS .................................................... 235
DEC VT Series ....................................... 107
Advanced .............................. 110, 178, 194
Character Mapping ............................... 110
Display Modes ...................................... 107
Display Size ........................................... 107
Keyboard Configuration .................109, 193
Responses ...................................... 108, 193
Disconnecting ........................................ 24
Index
Action on disconnect .............................. 51
Force Clean Disconnection ......................39
Prevent without logout ........................... 52
Display
Clear display ........................................... 32
Configuration ......................................... 55
Full screen ...............................................36
Select display .................................... 31, 32
E
ELF...................................................85, 235
Emulation
ADM11 ................................................... 97
ANSI Color .............................................. 99
Bull VIP7800 ......................................... 101
Character Mapping ..........................96, 209
Data General Series ............................... 104
DEC VT 100 .......................................... 107
DEC VT 220 .......................................... 107
DEC VT 320 .......................................... 107
DEC VT 340 .......................................... 107
DEC VT 420 .......................................... 107
Fujitsu 6681 .......................................... 128
HP Series............................................... 113
IBM 3101 ............................................. 119
IBM 3151 ............................................. 119
IBM 3164 Color .................................... 124
IBM 3270 ............................................. 128
IBM 3287 ............................................. 134
IBM 5250 ............................................. 138
ICL 7561 ............................................... 146
ICL VT220 Plus ...................................... 147
Liberty Freedom One ............................. 151
Linux terminal ....................................... 153
McDonnell Douglas P12 ........................ 154
Prime PT25 ........................................... 156
Prime PT250S ....................................... 157
QNX Console ........................................ 159
SCO ANSI Color .................................... 161
Selecting ................................................. 95
Siemens Nixdorf 97801 ......................... 164
Stratus V102 ......................................... 169
Stratus V103 ......................................... 172
Stratus V105 ......................................... 175
Tandem T653X...................................... 180
Televideo 955........................................ 182
UNIX ANSI Console ............................... 190
Wang 2110 .......................................... 192
Express Logon Feature ...................85, 235
F
FIPS-140 ..........................................82, 235
Flow control ........................................ 235
Unlocking ............................................... 40
Fujitsu 6681 ............. 112. See also IBM 3270
Full screen .............................................. 36
H
Hardware requirements ........................16
Hewlett Packard
HPNS VT ................................................. 80
Message Mode ................................... 80
NS Nodename .................................... 80
Stream Mode ...................................... 80
HP Series Emulation .............................. 113
Character Mapping ........................... 118
Model 2392A ................................... 113
Model 700092.................................. 113
Model 700094.................................. 113
History
Clear history ............................................ 32
Enable/disable ......................................... 56
Select all ................................................. 32
Host Initiated Macros ............................72
Defining .................................................. 72
Trigger .................................................... 72
Hotspots .............................................. 225
Action................................................... 228
Color .................................................... 232
Configuring .......................................... 226
Deleting ................................................ 233
Editing .................................................. 228
Match String ......................................... 229
Saving .................................................. 233
Screen Regions ..................................... 225
HP NS/VT .............................................. 236
I
IBM 3101 ............................................. 119
IBM 3151 ............................................. 119
Character Mapping ............................... 123
Display Size ........................................... 119
IBM 3164 Color .................................... 124
Character Mapping ............................... 127
Display size ........................................... 124
Keyboard .............................................. 125
IBM 3270
Emulation ............................................. 128
Advanced configuration .................... 130
Character Mapping ........................... 133
Code Pages ....................................... 131
Colors ............................................... 129
Paste next ........................................... 32
Printer Setting ...... 132. See also IBM 3287
Express Logon ......................................... 85
LU Name .......................................... 83, 85
Tn3270e ................................................. 85
IBM 3287 ............................................. 134
Printer Definition Table (PDT) ..........136, 144
Telnet settings ......................................... 84
IBM 5250
Emulation ............................................. 138
Character Mapping ........................... 141
Options ............................................ 138
Printer .............................................. 142
LU Name .......................................... 83, 85
ICL 7561 ............................................... 146
Character mapping ............................... 146
ICL VT220 Plus ..................................... 147
Character mapping ............................... 150
Display Modes ...................................... 147
Keyboard Configuration ........................ 149
Responses ............................................. 148
Status Display ....................................... 149
Import
TTerm Connect Configuration .................27
TTWin4 Configuration ............................. 27
Installation .............................................16
IPv6
SSH .................................................. 81, 83
K
Keyboard Mapping .............................. 203
Export to .CSV file ................................. 207
Map an emulation key .......................... 203
Map a physical key ............................... 204
Remove mappings ................................ 206
Save a Mapping .................................... 206
KEY file ............................................17, 236
L
Language Settings .................................44
Liberty Freedom One ........................... 151
Character Mapping ............................... 152
Display width ........................................ 151
Licensing TTerm .....................................17
License Activation ................................... 17
Offline Activation ................................ 17
View license detail .................................. 48
Linux
Supported Distributions .......................... 16
Linux Terminal ...................................... 153
Character mapping ............................... 153
Login
Automating ............................................ 52
M
Macro Assistant .....................................75
Macros
Examples ................................................ 70
Format ....................................................65
Brace Enclosed Tokens ........................ 66
C-Style Replacement Tokens ................65
Version 3 Compatibility Tokens ............ 66
Host Initiated
Defining ............................................. 72
Prefix (Trigger Sequence) ..................... 72
Timeout .............................................. 73
Macro Assistant ...................................... 75
Mapping to key .................................... 204
On Connect ............................................ 52
On Disconnect ........................................ 53
On Shutdown ......................................... 53
On Startup .............................................. 51
Username, password variables ................ 70
Using to automate login ......................... 52
McDonnell Douglas P12 ...................... 154
Character Mapping ............................... 155
Menu
Show/hide .............................................. 35
N
Network Services/Virtual Terminal. See
also Hewlett Packard
O
Online Resources ............................12, 239
P
Predefined Session. See Profile
Prime PT25 ........................................... 156
Character Mapping ............................... 156
Display Mode ........................................ 156
Options ................................................ 156
Prime PT250S ....................................... 157
Character Mapping ............................... 158
Display Mode ........................................ 157
Printing
Close print run ........................................ 28
Configuration ......................................... 59
Margin Settings .................................. 61
Paper Size ........................................... 60
IBM 3287 (3270) .............................84, 134
Printer Definition Table (PDT) ......136, 144
IBM 5250 .................................. 83, 85, 142
Print selected text only ............................ 28
Print setup .............................................. 29
Raw data mode ...................................... 61
SCO ANSI terminal ................................ 162
To file ..................................................... 61
To serial port ........................................... 62
Profile .............................................21, 236
Create New ............................................. 44
Definition .............................................. 236
Importing ............................................... 27
Show/Hide Directory ......................... 35, 43
Profile Directory .....................................35
Q
QNX Console ........................................ 159
Character Mapping ............................... 160
Display Mode ........................................ 159
R
Reset terminal .......................................40
On connect ............................................. 52
On disconnect ........................................ 52
S
Saving Your Settings..............................24
SCO ANSI Color
Character Mapping ............................... 162
Display .................................................. 161
Options ................................................ 161
Printing ................................................. 162
Scrolling
Jump scroll ............................................. 57
Secure Shell ...........................................81
FIPS-140 ................................................. 82
IPv6 .................................................. 81, 83
Key file ....................................................82
Override Terminal Type ............................ 82
Port No ................................................... 81
Terminal Type .......................................... 82
Session ................................................. 236
Session panel .......................................... 36
Session files. See TWC file
Session panel ......................................... 36
Shutdown Macro ................................... 53
Siemens Nixdorf 97801 ....................... 164
Character Mapping ............................... 168
Display .................................................. 164
Keyboard Configuration ........................ 166
SSL
Express Logon for tn3270 ....................... 85
Startup Macro .......................................51
Status Bar
Show/hide .............................................. 35
Stratus V102 ........................................ 169
Character Mapping ........................171, 184
Compatibility Mode .......................169, 182
Responses ............................................. 171
Stratus V103 ........................................ 172
Character Mapping ............................... 174
Responses ............................................. 174
Stratus V105 ........................................ 175
Character Mapping ............................... 179
Responses ............................................. 176
Support contacts .......................... 238, 239
System Requirements ............................ 16
T
Tandem T653X ..................................... 180
Character Mapping ............................... 181
TCF File ................................................. 237
Importing ............................................... 27
Televideo 955 ....................................... 182
Character mapping ............................... 184
Telnet ............................................... 83, 88
Express Logon for tn3270 ....................... 85
Keep Alive ...............................................84
LU Name .......................................... 83, 85
Port ........................................................ 83
Remote Echo .......................................... 88
Toolbar
Show/hide .............................................. 35
TTerm Connect
Importing from ....................................... 27
TTWin
Importing from ....................................... 27
U
Uninstalling TTerm ................................. 16
Unisys T27
Character Mapping ............................... 189
Personality ............................................ 185
Screen Format ....................................... 185
UNIX ANSI Console .............................. 190
Character Mapping ............................... 191
Display Size ........................................... 190
Mode ................................................... 190
Unlock flow control ...............................40
V
Version ................................................... 48
W
Wang 2110 .......................................... 192
Character mapping ............................... 195
Wyse 50/60/350
Answer Back ......................................... 199
Character Mapping ............................... 201
Character Sets ....................................... 200
Colors ................................................... 199
Display .................................................. 196
Options ................................................ 197
